sunnuntai 4. joulukuuta 2022

PictureCorrect.com: Lightroom Photo Editing Exercise to Test Your Progress

Feeling stagnant in your photography and photo editing journey? Mark Denney recommends you try this one exercise to truly test how far you’ve come. You may be surprised by the difference and the number of skills you’ve accumulated along the way! All you need is an old edited photo to compare and an unedited version to use for the test.

Step 1: Beginner Edit Review

Sometimes, all you need to do is look at an old edited image to see how far you’ve progressed. As a pro, it’ll be easier than ever to recognize slight missteps, including over-blown exposure and the overuse of effects. Pull out that exact old shot — ideally from the beginning of your photography or editing journey — then review it.

In Mark’s case, he’s chosen a photograph of a tree taken on his in-law’s farm in Illinois. Supposedly shot at sunrise or sunset, it features a pink, cloudy sky. At first glance, Mark can already pick up the issues and rookie mistakes he made. Mainly:

One of the very first things that really jumps out at me is this really strong magenta color cast… And, of course, it’s definitely too sharp. It looks like I added a ton of clarity, quite a bit of texture, and probably a little bit of sharpening… It also looks extremely contrasty, as well….

Step 2: Pro Edit Test

Now that you’ve isolated the main issues with your beginner-level edits, it’s time to correct them. Use the .RAW file or an unedited version of your image, not your edited image, for the test. Ultimately, being a pro comes down to knowing more of your editing software tools in-depth.

Being able to fix issues more quickly, easily, and effectively is a sure sign that you’ve grown a lot. In this case, Mark’s tree image poses two serious issues. One, the subject — a rather spindly tree — is underexposed. Two, it’s very difficult to mask.

Marks’ fix: to adjust the exposure for a difficult-to-mask image featuring a dark subject and bright background, use the Linear Gradient tool:

  • Draw a solid masked gradient all the way across your entire image, then click the … in the menu.
  • Next, choose Intersect Mask with from the drop-down menu, then Luminance Range.
  • Finally, drag the luminance range slider from the right to the left until only your dark subject is masked accurately.
  • Now, you can adjust its exposure cleanly without overblowing the sky or backlighting!

Step 3: Image Comparison

After you’re done editing your image, you can compare both photographs. Line them up side-by-side in Lightroom (or whichever editing software you’re using). You should be able to preview both next to each other without any background or menus interfering. You’ll probably be amazed by the difference — and impressed with your prowess.

lightroom edit exercise

Photo captured by Andrew Neel

Ultimately, what differentiates a pro-edited photograph from a less-experienced edit is subtlety and accuracy. A light touch is key, as is maintaining as much detail as possible. Try zooming in, as well — ideally to around 300%. Amateurishly-edited photographs will generally include artifacts that make them unsuitable for submission to premium stock sites.

Wrapping Up

Editing is an optional aspect of photography that some photographers rely on while others completely avoid. Though not 100% a necessity, knowing how to edit images can help salvage them or level up your craft.

Everyone has got to start somewhere. If you haven’t done so yet, now may be the time to start. Alternatively, if you have but feel like you’ve plateaued, then do try out Mark’s exercise! Put yourself to the test to see if you’re actually much better than you think.

- - - - - - - - - - - - - - - - - - - - - - - - - - - - - - - - - - - - - - - - - - - - - - - - - - - - - - - - - - - - - - - - - - - - - - - - - -

Did you appreciate this newsletter? Please help us keep it going by Joining Our Patreon Supporters

What are your thoughts on this article? Join the discussion on our Facebook Page

PictureCorrect subscribers can also learn more today with our #1 bestseller: The Photography Tutorial eBook

- - - - - - - - - - - - - - - - - - - - - - - - - - - - - - - - - - - - - - - - - - - - - - - - - - - - - - - - - - - - - - - - - - - - - - - - - -

The post Lightroom Photo Editing Exercise to Test Your Progress appeared first in the Photography Tips category on PictureCorrect.


from PictureCorrect https://ift.tt/gcd2kzM
via IFTTT

PictureCorrect.com: How to Define Yourself as a Photographer

There comes a point in time when you will need to decide what type of photography you like and the specific genres you want to focus on. Most of us start out as generalists, shooting anything and everything that tickles our fancies. But eventually you need to decide on what type of photographer you are or want to be.

macro photography

photo by Thomas Leuthard

Pretty soon after my journey into SLR photography I decided what I liked and what I wanted to focus on. The world of close-up and macro photography was my passion. The worlds within worlds and the finer details of those worlds intrigued me. So I gradually bought the equipment that would help me create better close-ups. I began defining myself as a photographer.

Your photographs are a very personal thing, as they reflect how you see the world and what interests you. So there are a few things you need to do in order to define yourself as a photographer. We are not talking professionals here but ordinary people.

1. Take time for a little introspection

You need to look inside yourself and examine who you are and what you like. What pushes your buttons and what inspires you to create photos. The better you know yourself the better photographer you will become. I am a detail man, so close-ups really make me come alive. Whatever makes you come alive will help define you as a photographer.

introspection

photo by withbeautiful

2. Photograph what you like

All of us have very clear likes and dislikes. So with this in mind, identify all of your likes. Sit down with a piece of paper and jot down everything that you enjoy in life. Then work through this list and see if you would enjoy shooting photos of the likes. Cross out all the ones you don’t want to shoot, and there you have your list.

3. Study the pros

This is as simple as going to a library or bookstore and looking at the type of books that interest you. If it’s wildlife photography then look at photo books by great wildlife photographers. If it’s cars or trucks, then study those books. See the angles, lighting, and compositions they use and get an idea of how they have created their images. You will learn a huge amount from the pros.

4. Allow yourself to dream

Visualizing what you like and what you want to shoot will help motivate and distill in your own mind the specifics you want to shoot. Vision, plan, and goals. This can be what type of images and perhaps what kind of equipment you want to own. Working toward a goal will allow you to become what you want and help define you as a photographer. Which of the pro photographers would you like to become? Knowing this will help clarify what type of photographer you define yourself as.

5. Define your audience

By defining your audience you will also define yourself. If you want your photographs to be appreciated by people, what type of audience should they be? As a car photographer the bulk of your audience will be men of a certain economic class who pride themselves in having a great car. A pet photographer will have a different audience to wildlife photographer, and so it will go on.

defining your audience

photo by Hernán Piñera

You may ask why it’s necessary to define yourself. It may not be essential for you to know this, but most photographers who are successful have an in depth understanding which is reflected in their images. If you don’t know your definition as a photographer it will be hard to concentrate on a genre and make a success of it.

About the Author:
Wayne Turner has been teaching photography for 25 years and has written three books on photography. He has produced 21 Steps to Perfect Photos, a program of learner-based training using outcomes based education.

- - - - - - - - - - - - - - - - - - - - - - - - - - - - - - - - - - - - - - - - - - - - - - - - - - - - - - - - - - - - - - - - - - - - - - - - - -

Did you appreciate this newsletter? Please help us keep it going by Joining Our Patreon Supporters

What are your thoughts on this article? Join the discussion on our Facebook Page

PictureCorrect subscribers can also learn more today with our #1 bestseller: The Photography Tutorial eBook

- - - - - - - - - - - - - - - - - - - - - - - - - - - - - - - - - - - - - - - - - - - - - - - - - - - - - - - - - - - - - - - - - - - - - - - - - -

The post How to Define Yourself as a Photographer appeared first in the Photography Tips category on PictureCorrect.


from PictureCorrect https://ift.tt/hnrsOcf
via IFTTT

PictureCorrect.com: Interesting Photo of the Day: Intricacies of a Lighter Flame

If we only had the power to stop time, so many everyday mundane things would appear completely different. While we may naturally never have such power, our cameras do. Their blazing-fast shutter speeds allow them to capture all those intricacies of the moment that we easily miss even as we just blink. Take the following image taken by photographer Aske Wiil for instance. Many of us have lit lighters before, but when was the last time you noticed something like this?

lighter in action

“A Fiery Jellyfish ” by Aske Wiil (Via Reddit. Click image to see full size.)

Wiil shot the image with a Nikon D7500 and Sigma 50mm f/1.4 Art lens at 1/4000th of a second, f/1.4 and ISO 400. And if you’re thinking that he used some kind of special lighter, think again—it’s just a regular Tokai lighter.

The most interesting aspect here is the shape of the flame. It almost looks like a flaming jellyfish, or a mushroom cloud that’s formed after a nuclear explosion. In any case, the shape is a beauty in itself. And the artist has done justice in emphasizing the flame by placing it in front of a dark background. This rightly draws the attention right to the flame—not that anyone could miss it.

We take using a lighter for granted, but with this high-speed image, we can truly appreciate the details that lie within. From the head of the flame to the little sparks caused by the spitting of fuel, everything is spectacular. And it was definitely not easy for Wiil to capture this shot. He had to take a sequence of 50 shots five times to capture this incredible moment.

- - - - - - - - - - - - - - - - - - - - - - - - - - - - - - - - - - - - - - - - - - - - - - - - - - - - - - - - - - - - - - - - - - - - - - - - - -

Did you appreciate this newsletter? Please help us keep it going by Joining Our Patreon Supporters

What are your thoughts on this article? Join the discussion on our Facebook Page

PictureCorrect subscribers can also learn more today with our #1 bestseller: The Photography Tutorial eBook

- - - - - - - - - - - - - - - - - - - - - - - - - - - - - - - - - - - - - - - - - - - - - - - - - - - - - - - - - - - - - - - - - - - - - - - - - -

The post Interesting Photo of the Day: Intricacies of a Lighter Flame appeared first in the Photography Tips category on PictureCorrect.


from PictureCorrect https://ift.tt/AgNnHOX
via IFTTT

PictureCorrect.com: How to Direct a Viewer’s Eyes in Photography (Video Tutorial)

How do you lead your viewer to your intended subect in an image? Photographers often make the cardinal mistake of using props or asking the model to wear something really bright. Or when shooting landscapes, exposing for the ground rather than the sky. David Bergman from Adorama explains how to make sure your viewer looks where you want them to look:

(for those of you reading this by email, the video tutorial can be viewed here)

As a photographer, it’s your duty to make sure that the viewer is looking at the exact area of your image that you intended.

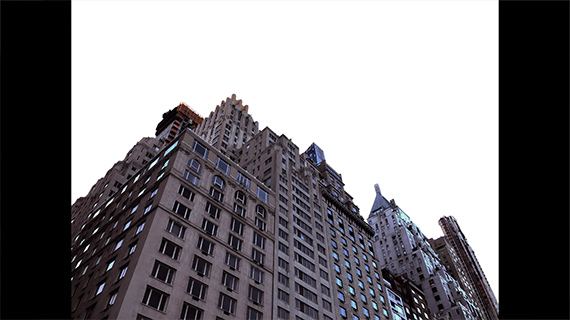
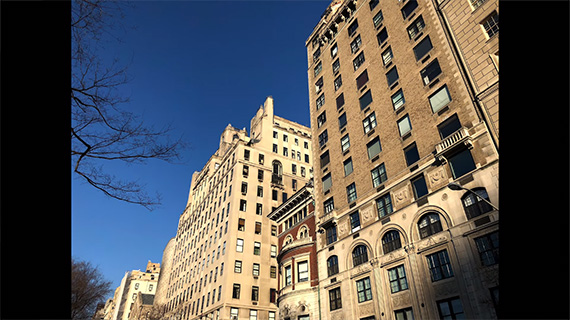
A brighter sky, such as in the image below, naturally draws the attention of the audience toward the sky and not the buildings:

drawing viewers' eyes in photography

In the image below, a darker sky and better exposed building naturally draw the attention of the viewer toward the building:

exposure to draw viewer attention

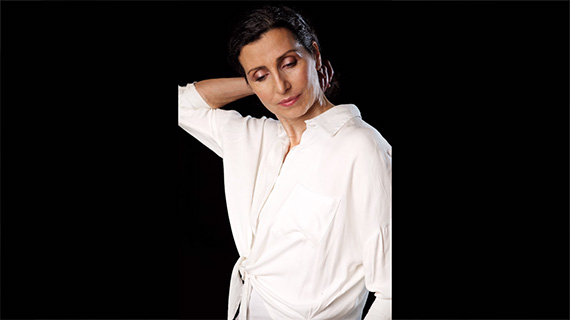
The same thing happens when you’re shooting portraits.

portrait draw the eyes

In the image above, the bright white top of the model completely overshadows her face. Her face, despite properly being exposed, doesn’t draw the same attention.

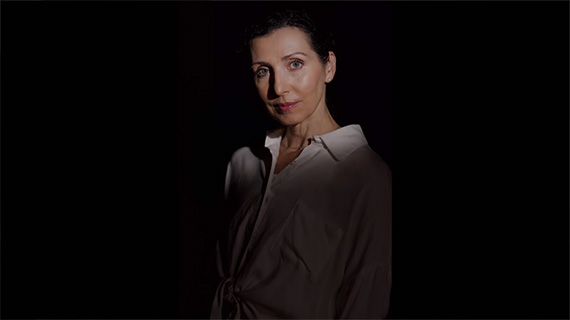
Bergman explains that there are several techniques to make sure this doesn’t happen. To overcome this problem, you can alter the light. Use a snoot or a diffuser or any other light shaping contraption to soften or alter the quality of the light.

But that doesn’t always deliver the kind of results that you want.

altering light in images

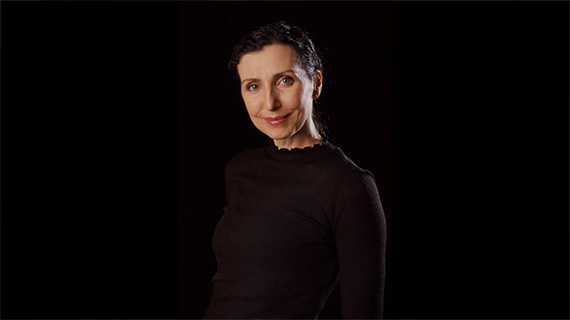
The best solution is to ask the model to change into something darker.

model clothing choice photography

This way the subject is properly exposed while the darker clothing, which absorbs much of the light, remains obscured. Now the viewer’s attention goes straight toward the subject’s face and not her clothing.

What other tricks have you found to draw your viewer’s attention to your subject?

- - - - - - - - - - - - - - - - - - - - - - - - - - - - - - - - - - - - - - - - - - - - - - - - - - - - - - - - - - - - - - - - - - - - - - - - - -

Did you appreciate this newsletter? Please help us keep it going by Joining Our Patreon Supporters

What are your thoughts on this article? Join the discussion on our Facebook Page

PictureCorrect subscribers can also learn more today with our #1 bestseller: The Photography Tutorial eBook

- - - - - - - - - - - - - - - - - - - - - - - - - - - - - - - - - - - - - - - - - - - - - - - - - - - - - - - - - - - - - - - - - - - - - - - - - -

The post How to Direct a Viewer’s Eyes in Photography (Video Tutorial) appeared first in the Photography Tips category on PictureCorrect.


from PictureCorrect https://ift.tt/4WZAF30
via IFTTT

perjantai 2. joulukuuta 2022

PictureCorrect.com: Winter Portrait Studio Photography Tutorial

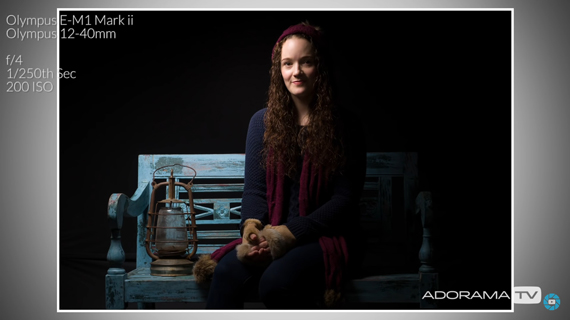
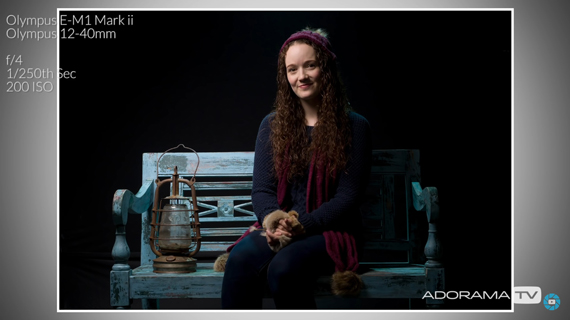
Winter can be a tough time for photographers and models alike. Chilly weather, harsh conditions, and poor lighting all combine to make the job a tough one. Does this mean you should take a photography break when it’s cold outside? Photographer Gavin Hoey from Adorama doesn’t necessarily think so. Check out how he manages to bring winter into the comfort of his home studio for a great portrait session:

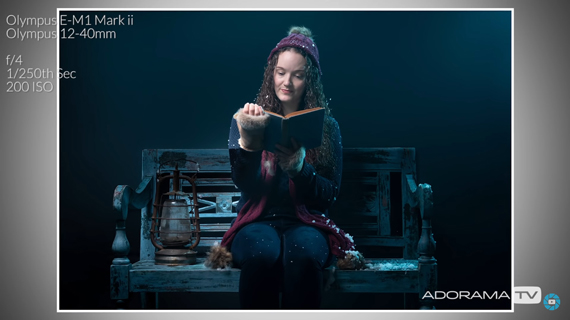
A winter photo feels incomplete without some snow. And replicating real snow inside a home studio can get messy. So, Hoey’s idea is to first take the photo and add the snow later in post.

To set the winter mood, Hoey has the model wear warm clothes and sit on a park bench replica. He uses a black background for the shoot and has a three-light setup.

Lighting Setup

Hoey uses an eVOLV 200 as the key light, placing it off to the side to avoid flat lighting. In order to avoid light spill and to have better control over the light, Hoey uses a grid as well. This is very important for a small home studio. The result is an image that appears to be lit by an elevated lamp post from the side.

winter image with key light

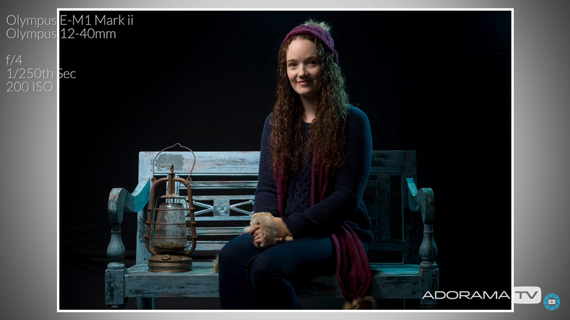
He uses another eVOLV 200 behind the model to act as a separation light. The light is set up to light the model’s shoulders and hat and separate her from the black background. This light also illuminates the smoke to give a hazy winter effect. Also, to emphasize the cold winter look of the image, he uses a blue gel on the back light. By setting the light’s power to 1/64 power, he is able to get a subtle effect.

indoor winter portrait

The key light illuminates one side of the model’s face, leaving the other half in shadow. Hoey uses a fill light powered at 1/128 and covered with a blue gel to add color to the shadows. This further adds to the cold winter feeling.

winter image with fill light

Winter Photo Shoot Technique

Besides creative use of lighting, Hoey makes use of a smoke machine to give a hazy look to the image. He also sprays some fake snow on the model to make the post-processing a bit easier.

snow photoshoot image

Post Processing

In the image above, the model has some “snow” on her when it isn’t even snowing. While you could use some more fake snow during the shoot for a realistic effect, the same can be achieved in post. Hoey demonstrates how you can add snow using Photoshop:

  1. Download and install his free Photoshop action from his blog.
  2. Open the image in Photoshop.
  3. Using Hoey’s action, select the kind of snow you want and click on the play button to run the action. After the action runs successfully, you will notice snow in your image.
  4. To remove the snow from unnecessary areas of the image, select the snow layer and paint over the snow using the brush tool with black selected.
  5. Once you’re happy with the image, go to Layer > Flatten Image.

To take things one step further, Hoey uses the Camera Raw filter in Photoshop to light the old lantern:

  1. Select the Adjustment brush tool.
  2. Set the temperature, tint, exposure, highlights, and clarity all the way to maximum. Leave everything else at zero.
  3. Reduce the brush size and click on the lantern a few times to give it a glowing effect.

Next, Hoey adds a warm glow around the lantern:

  1. Take a new Adjustment brush and leave the temperature and tint at maximum.
  2. Bring the exposure down to about under a stop and set the highlights and clarity to zero.
  3. Then, increasing the size of the brush, click on the lantern to add a warm glow around it.

Finally, to add some finishing touches, Hoey adds a radial filter to darken the area on the model’s left side. And to give viewers a feel that there’s actually a street lamp where the key light was placed, Hoey takes a large soft brush with a light blue color and paints on the corner. To make it realistic, he drops its opacity down for a subtle effect.

final snow photoshoot image

This tutorial is just perfect for those times when you want to take a winter-themed photo while avoiding actual winter photography struggles.

- - - - - - - - - - - - - - - - - - - - - - - - - - - - - - - - - - - - - - - - - - - - - - - - - - - - - - - - - - - - - - - - - - - - - - - - - -

Did you appreciate this newsletter? Please help us keep it going by Joining Our Patreon Supporters

What are your thoughts on this article? Join the discussion on our Facebook Page

PictureCorrect subscribers can also learn more today with our #1 bestseller: The Photography Tutorial eBook

- - - - - - - - - - - - - - - - - - - - - - - - - - - - - - - - - - - - - - - - - - - - - - - - - - - - - - - - - - - - - - - - - - - - - - - - - -

The post Winter Portrait Studio Photography Tutorial appeared first in the Photography Tips category on PictureCorrect.


from PictureCorrect https://ift.tt/ipJszkY
via IFTTT

torstai 1. joulukuuta 2022

PictureCorrect.com: 3 Tips for Wide Angle Portraits

The lens of choice for portraits is usually 50mm and above. But that doesn’t mean wide angle lenses can’t be used for portrait photography. They can absolutely be used for the purpose but there are certain things to watch out for. Photographer David Bergman from Adorama explains:

Shoot Parallel to the Subject

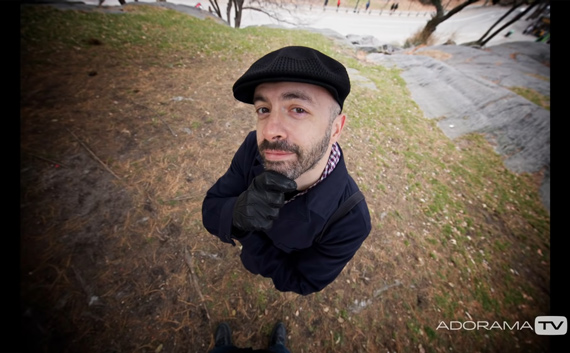
Wide angle lenses have a tendency to exaggerate features. Anything that is close seems larger than usual, and things that are far away seem too small. So, if you shoot from a higher or a lower angle, the image will look unnatural. It’s important that you keep your camera leveled and parallel to your subject.

distorted portrait with wide angle lens

Place Your Subject in the Center

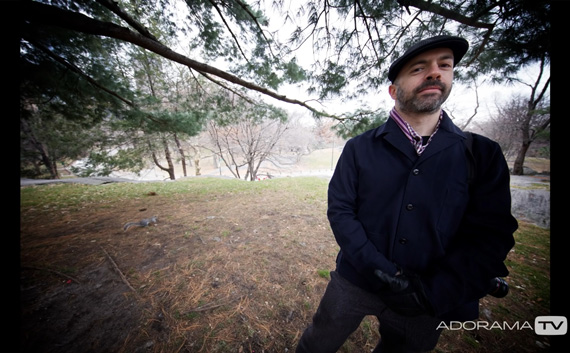
If you’ve worked with wide angle lenses, you know that the images have a more rounded effect at the edges. If you have your subject stand at the edges, they will be stretched and distorted. That definitely isn’t flattering. Place your subject at the center of the frame when shooting portraits with wide angle lenses.

wide angle portrait tips

Pay Attention to the Pose

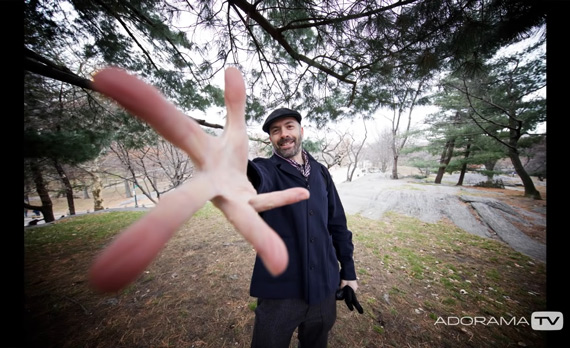
You don’t want your subject’s features to be exaggerated. As wide angle lenses have the tendency to enlarge anything close to them, it’s best to pose your subject with their extremities closer to their bodies.

exaggerated portrait with wide angle lens

“If their hands are sticking out closer to the camera, they’ll look out of proportion to the rest of themselves.”

Keep in mind that these points are to be considered as long as you want to have a flattering image of your subject. If your goal is to get creative with your portraits using distortion and perspective, feel free to experiment and break these so-called rules.

- - - - - - - - - - - - - - - - - - - - - - - - - - - - - - - - - - - - - - - - - - - - - - - - - - - - - - - - - - - - - - - - - - - - - - - - - -

Did you appreciate this newsletter? Please help us keep it going by Joining Our Patreon Supporters

What are your thoughts on this article? Join the discussion on our Facebook Page

PictureCorrect subscribers can also learn more today with our #1 bestseller: The Photography Tutorial eBook

- - - - - - - - - - - - - - - - - - - - - - - - - - - - - - - - - - - - - - - - - - - - - - - - - - - - - - - - - - - - - - - - - - - - - - - - - -

The post 3 Tips for Wide Angle Portraits appeared first in the Photography Tips category on PictureCorrect.


from PictureCorrect https://ift.tt/i67rdRf
via IFTTT

keskiviikko 30. marraskuuta 2022

PictureCorrect.com: Interesting Photo of the Day: Oregon Sea Stacks

Oregon’s rugged coastline is known for its rocky outcrops and islands — particularly sea stacks. In fact, it’s home to many notable formations, such as Haystack Rock and Twin Rocks. In this scenic photograph taken by Erik Lee, you can spot — not one, two, or three — but dozens.

Plus, an arched stack that very much resembles the twins. For this shoot, Erik even managed to crop himself in wearing a fall-inspired pumpkin-toned rain jacket.

“ITAP of myself and the scenic Oregon coast” by Erik Lee (Via Reddit. Click image to see full size.)

For those wondering what a sea stack is, it’s a column of eroded rock that remains standing in the ocean. In each stack, you can clearly study the exposed striated rock layers from top to bottom.

The Oregon coast is full of amazing sea stacks; this scene is one of my favorites. If you look closely the furthest sea stack even has an arch in it. I chose to shoot at sunrise so that the rocks are lit.

Erik packed his Nikon Z7 and 24-200mm lens and shot at 59mm for this shoot. It appears he also used a tripod to keep the camera steady and in position while he was away. To capture himself and the furthest formations in detail, he created a composite image.

The first image was taken with a longer shutter speed to capture the silky movement of the water. Whereas the second image — with Erik in it — was taken with a shorter shutter speed. Naturally! He would have looked a bit of a blur or cramped up trying to stand still for so long!

- - - - - - - - - - - - - - - - - - - - - - - - - - - - - - - - - - - - - - - - - - - - - - - - - - - - - - - - - - - - - - - - - - - - - - - - - -

Did you appreciate this newsletter? Please help us keep it going by Joining Our Patreon Supporters

What are your thoughts on this article? Join the discussion on our Facebook Page

PictureCorrect subscribers can also learn more today with our #1 bestseller: The Photography Tutorial eBook

- - - - - - - - - - - - - - - - - - - - - - - - - - - - - - - - - - - - - - - - - - - - - - - - - - - - - - - - - - - - - - - - - - - - - - - - - -

The post Interesting Photo of the Day: Oregon Sea Stacks appeared first in the Photography Tips category on PictureCorrect.


from PictureCorrect https://ift.tt/wkXIhf0
via IFTTT