torstai 2. kesäkuuta 2022

PictureCorrect.com: Interesting Photo of the Day: Glowing Shelf Cloud

Mother nature is undoubtedly an unrivaled supreme force – a quite temperamental supreme force. While she can be calm and pleasant one second, things can get violent and unpredictable the very next. But, sometimes those violently moody moments are the most mesmerizing, even if they aren’t favorable. Just have a look at the following image that photographer Justin Anderson took during a storm that hit Alberta, Canada:

storm clouds in Alberta

“Stormy Condition in Alberta, Canada” by Justin Anderson (Via Reddit. Click image to see full size.)

Anderson took the image with a Canon 6D Mark II and Canon 24-105mm f/4 lens at 50mm, an exposure of 1/60-seconds, f/8, and ISO 1000.

What immediately catches the eye is the aqua hue on the sky. It almost makes you feel like you’re looking into a pristine sea. Even the bright white fence acts as a powerful leading line to draw us directly into the blue sky. Then, there’s the shelf cloud that acts as a border between the beautiful contrast of colors.

“Whether good or bad, it’s beauty is second only to the cosmos which is truly unparalleled.”

While the photograph truly appears so beautiful and peaceful, being there in person must have been unnerving to say the least. This photo is so majestic, exciting, and scary at the same time. A fantastic capture by Anderson.


Did you appreciate this newsletter? Please help us keep it going by Joining Our Patreon Supporters

What are your thoughts on this article? Join the discussion on our Facebook Page

PictureCorrect subscribers can also learn more today with our #1 bestseller: The Photography Tutorial eBook

The post Interesting Photo of the Day: Glowing Shelf Cloud appeared first on PictureCorrect.


from PictureCorrect https://ift.tt/GcVRQIf
via IFTTT

PictureCorrect.com: Understanding Focal Lengths

Focal length is the distance between the optical center of a lens and the point where it converges a beam of light to form a sharp image. In photography, the focal length of the lens determines the field of view and the magnification of the subject. Understanding focal lengths and their uses can allow you to make more creative choices. Photographer David Flores from B&H takes us through popular focal lengths and how they can be used in the field:

Wide Angle

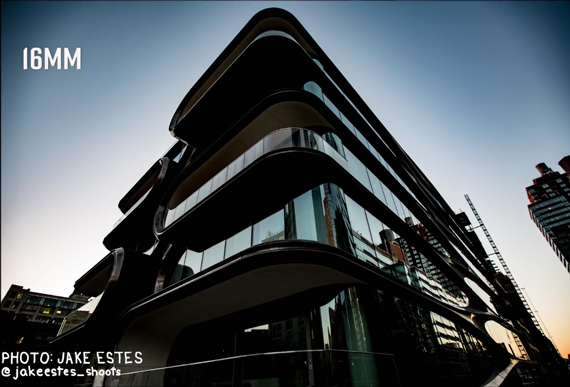
Wide angle lenses (14–35mm range) enable you to have a perspective that is wider than the angle of view of the human eye. Wide angle lenses are popular for photographing landscapes, architecture, group photos, and documentary work that requires lots of context.

architecture photo with wide angle lens

Standard

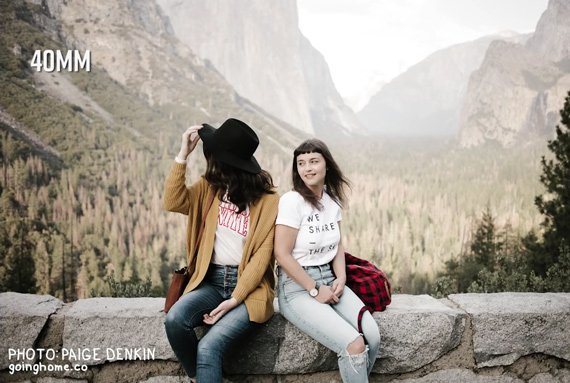
Standard lenses (40–60mm range) have a perspective that is very close to what human eyes see. They’re versatile and are used for photographing a variety of subjects, such as portraits, travel, nature, or just about anything. Many standard lenses have a wide aperture, usually f/1.8, which make them very useful for low light conditions and getting a very shallow depth of field for a smooth background blur.

photo taken with standard lens

Telephoto

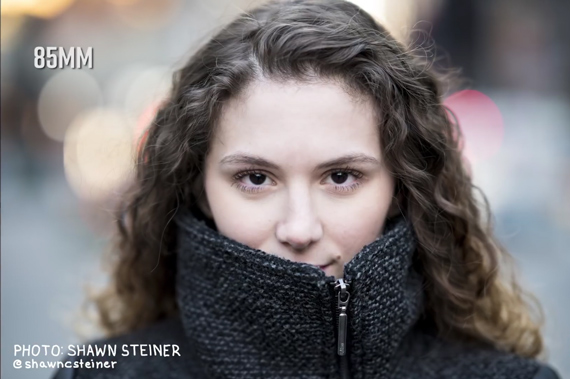
Telephoto lenses (70–800mm range) have the ability to zoom in to subjects that are far away. They’re mostly used for shooting wildlife, sports, nature, and portraiture. With their ability to have a reach on distant subjects, they allow the photographer to have some space between them and the subject. When a lens is used at the telephoto end, it compresses the foreground and background and isolates the subject. This is why many portrait photographers love to work with telephoto lenses.

portrait photo using telephoto lens

Now that you have an understanding of the usage of focal lengths, you may have a dilemma of choosing whether you want to get a lens with a fixed focal length (a prime lens) or something with a variable focal length (a zoom lens).

Prime Lenses

Prime lenses have a fixed focal length, meaning that you cannot zoom in or out using the lens mechanism. It will have to be done by moving the camera closer or farther from the subject. The main  advantage of a prime lens is that it can have a very wide maximum aperture, like f/1.2, f/1.4 and f/1.8.

Zoom Lenses

Zoom lenses have variable focal lengths and are more flexible. They’re more useful in the sense that you don’t need to continuously change lenses to zoom in or out. It is also important to note that some zoom lenses, especially kit lenses, have different maximum aperture sizes at the wide and telephoto ends. For instance, if you see that a zoom lens has 18–105mm 3.5-5.6 written on it, it means that when you are at 18mm, your maximum aperture can go up to f/3.5 while at the 105mm end, the aperture will be at f/5.6 at its widest.

The story of focal length doesn’t end there. The frame that is created by a particular focal length is again affected by the sensor size of your camera. Consider the following scenarios:

  • On a full frame body, a 50mm lens will behave normally (i.e. all of the frame being created by the lens will fall on the sensor).
  • On an APSC body, a 50mm lens will have an image frame that is slightly more zoomed in than the full frame body. Canon APSC sensor has a crop factor of 1.6, while others, like Nikon and Sony, have a crop factor of 1.5. This means that a 50mm lens on the Canon will have an image frame like that of an 80mm lens (50*1.6 = 80), while on a Nikon or Sony, it will have a frame like that of a 75mm lens (50*1.5).
  • Even smaller sensors, like micro four thirds sensors, have a larger crop factor of two. In such bodies, a 50mm lens will form an image frame similar to that of a 100mm lens (50*2).

It is therefore necessary to consider your camera body and its sensor size when deciding on what focal lengths you want to use for your work.

Now that you have a better understanding of focal lengths, we hope that you’ll be able to make more informed creative lens choices.


Did you appreciate this newsletter? Please help us keep it going by Joining Our Patreon Supporters

What are your thoughts on this article? Join the discussion on our Facebook Page

PictureCorrect subscribers can also learn more today with our #1 bestseller: The Photography Tutorial eBook

The post Understanding Focal Lengths appeared first on PictureCorrect.


from PictureCorrect https://ift.tt/wu6JiKq
via IFTTT

PictureCorrect.com: Sports Photography Tips and Techniques

Victory in sports is about practice and performance – the best athletes prepare better than anyone else, training their bodies and minds to perform when winning and losing matter most.

It’s no different with sports photography. Those one-of-a-kind photos you see don’t happen by accident, or just because the photographer was in “the right place, at the right time.”

If you’re serious about sports photography, then you need to do more than show up a sporting event with a camera. You might luck into a nice photo people will compliment you on, but if you take these tips to heart, you can rest assured you’ll take great photo after great photo.

Know Your Sport

I mean that literally. If you are going to photograph a sporting event, you have to understand the strategy well enough that you consider it your sport. That doesn’t mean you have to play it or even know all the rules, but you must know what the point of the game is, as well as what is considered excellent performance.

hockey photography

photo by Mark Mauno

For example, in ice hockey, a player on the offense who is near the goal will sometimes pass the puck away from the goal and into what is seemingly empty space. To someone unfamiliar with the sport, it looks as if that’s a mistake. But in reality the player is passing to empty space knowing that his teammate is going to time his skate to meet the pass and take a shot on goal. It all happens in the blink of an eye, but if you have your camera trained on the momentarily “empty” space, you have a good chance of catching the instant the player strikes the puck with his stick. Or you could focus on the goalie knowing that a shot is coming.

Focus on Players Who Will Give You the Best Photo

A lot goes on during a game. There are a lot of great pictures that you’ll probably miss. Focus on getting the best shot you can in any particular moment, and don’t worry about the ones you missed. During a tennis match, take time to focus on one player’s serve. Then, switch your attention to the other players return. Very quickly, you will find yourself becoming a part of the rhythm of the game. And once you reach that point, you’ll see opportunities as appear.

high school basketball photography

photo by Phil Roeder

While photographing a high school basketball game, I focused on the best player on each team. Now, I knew that other players would make great shots, but I also knew that teammates would look to both of these players. When the ball came to them, I took pictures. When they passed the ball, I took pictures. I avoided getting too distracted by other action. Both of these players went on to be stars in college—one of them played in the NBA—and I got some great shots that night.

Be Prepared

When those opportunities for the “money” shot do appear, don’t get caught unprepared. I’ve known photographers who’ve forgotten to take their lens caps off and missed something great. Or, they may not have changed their ISO setting from the last time they used their camera. If you want to manually control the settings, then be sure to take your camera off automatic so the flash doesn’t pop up when you least want it to.

Remember, you’re not just there to watch the game. You’re there to take a great photograph or two. Keep your camera in your hands, with a clean lens, the right lenses close at hand, and make sure your battery is fully charged.

sports photographer in a group

photo by William Warby

Also, pay attention to weather conditions. Just because it’s raining doesn’t mean you can’t take great photos. In fact, the drama may be increased by the presence of water on the field. If it’s going to be a bright sunny day and your daughter’s soccer game is at 7:30 on a Saturday morning, then you’ll want to make sure you account for both the glare of the sun and the glint of dew that’s sure to be on the fields.

Know Your Equipment

Of course, in order to be prepared, you need to know what your camera can and can’t do. The last place you want to become familiar with your equipment is at the sporting event you paid $100 to get into, or at your daughter’s TaeKwonDo National Championship competition. If you have relatives or friends who play on sports teams, ask if you can take pictures of their events. It will be good practice for you, and they will love to see the pictures you take.

If you don’t already have an SLR camera with a telephoto lens, I recommend you get one. A point and shoot camera is good for portrait shots before and after the game, not fast moving action. And don’t be too intimidated by SLRs or telephoto lenses. They behave much the same way as point and shoots do when you set them on fully automatic. But you gain a lot of flexibility that point and shoot cameras simply don’t have.

Location and Timing

These are the two most important things to keep in mind in sports photography, and they cannot be separated. You have to be in the right place at the right time in order to get a truly great sports photograph. And it doesn’t have anything to do with luck. If your son’s high school football team is marching down the field for a touchdown, then don’t get so caught up in the game that you forget to rush to the back of the end zone. From there, you can get the perfect shot of a receiver catching a touchdown pass or a fullback barreling into the end zone.

Don’t be shy about getting into position, either. I’m not recommending you sneak onto the sidelines during the Super Bowl and risk arrest. But at many events, if you ask politely and explain what you’re doing, officials will let you on the sidelines. Also, you can check ahead to see if you can get a sideline pass. They aren’t reserved solely for the media. It’s good to check well before the event, but if you can’t, try asking at the ticket office when you arrive. After all, the worst they can do is say no!

soccer photography

photo by James Boyes

Sports stir the soul. For millions of fans, watching their favorite teams fight for victory—even if they end up in defeat—inspires them in their day-to-day lives. Your photos can have a similar impact.

Imagine a parent’s delight when you present them with a picture of their child scoring a touchdown or goal. Imagine your lasting memories when you take a picture of your own child’s moments of glory. It will affirm their dedication—and yours—and inspire you both for many years to come.

About the Author:
Matt Smolsky writes articles for a variety of clients, including Hoorray, a photo sharing website that lets new members create an online photo album and is the easiest place to create a digital photo album, calendar, and more.


Did you appreciate this newsletter? Please help us keep it going by Joining Our Patreon Supporters

What are your thoughts on this article? Join the discussion on our Facebook Page

PictureCorrect subscribers can also learn more today with our #1 bestseller: The Photography Tutorial eBook

The post Sports Photography Tips and Techniques appeared first on PictureCorrect.


from PictureCorrect https://ift.tt/LyG8zIj
via IFTTT

PictureCorrect.com: How to Set Up a Simple Photography Studio

Relevant reminder: only 1 day left for the Gigapixel AI Photo Enlarger at $20 Off

Sometimes we just need better light. Not so much a larger amount, but something nicer, portable, adjustable–and something that will just fill in the right places. As we get better at shooting, we start to notice where critical light is missing. But we don’t always need the kind of Hollywood set that Tom Cruise is akin to. You can achieve amazing light using some of the most easily accessible tools that won’t cost you big dollars and, in some cases, won’t cost you anything.

photo studio setup

Photo captured by Randy Fath

First though, we need to understand that handling this equipment is the latter of two evils. The first is learning to identify light: where it’s coming from, how soft it is, and how it interacts to highlight your subject.

Daylight

Let’s start with the most available light there is–daylight. It might seem silly, but using the natural daylight will provide you with the best light there is. Studio lights are built to mimic this light in its various forms. Sitting your subject next to a window provides a complimentary color and softness to the light. The softer the light, the more it wraps around your subject. If using the window method, try both direct sunlight and indirect shaded light for different effects. And the best part– it’s free!
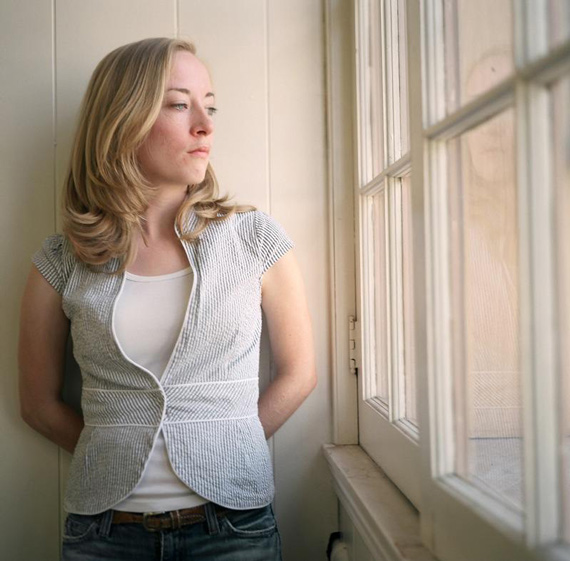
natural light portrait

“Window Portrait” captured by Eric Murray

Strobes

To mimic this kind of light we use studio strobes or “flashes” as they are commonly known. The easiest setup is a single strobe, a large reflector, and a stand. Many places sell these as kits for as little as $600. Sometimes they even include remote wireless triggers, so you don’t even have to be anywhere near the lights when shooting. Compare that to an on-camera flash kit, which can cost $400 and up for a good system, the extra few dollars are going to give you so much more creative freedom to experiment. Look for kits that include the light, stand, remote trigger, and a softbox. You must get a softbox. No softbox, no soft complimenting light. If not included, they start relatively cheap anyway, at around $100–often less.
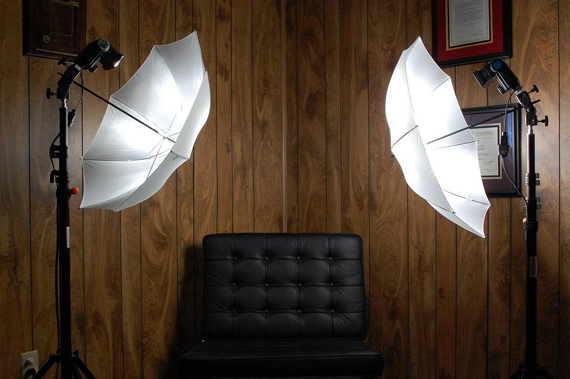
strobe studio lighting

“Strobes” captured by David Yamasaki

A system offering around 400 watts of power is plenty for a small studio, but make sure you can adjust the power up or down by at least 1/4 of a stop with each change. Good systems, such as those from Elinchrom and ProFoto, provide great control in tenths of a stop. Small, but often needed for subtle improvements.

Reflectors

Light with a basic reflector that offers gold, silver, white, black, and translucent, will serve the best. These are known as 5 way reflectors. The gold offers a subtle, warm (orange) tone, whilst the silver cools the light down with a slight blue cast. White adds light to increase the exposure, and black subtracts light, adding a high contrast look. The final element is the translucent disc, acting like a small softbox or cloud. To explain, clouds make for the perfect softener of light, acting as a gigantic diffuser.
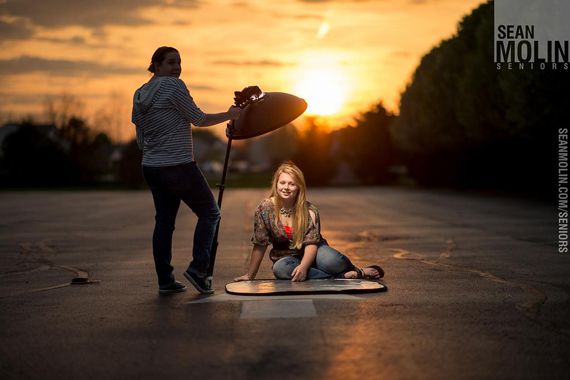
photography reflector

“Fight the Power” captured by Sean Molin

The larger the light source, the softer the light becomes, as the further it has to travel across a surface, before spilling into the subject below. As an example, shining a torch through a bed sheet will spread the light evenly, whilst the torch itself will pinpoint the light. A good start for absolute beginners is to get a continuous light kit, instead of a flash kit. With the continuous kit, simply switch it on, look through the viewfinder, and what you see is what you get. The problem with continuous lighting is that it’s often hot. Tungsten lights are noisy, cast a yellow light, and become very hot to the touch within a very short time of turning them on. New manufacturers are making this easier, with cold LED lights that mimic daylight, but have a big check ready if you want a set. A simple strobe kit is not hard to master.

Many studios use multiple lights, white cards, block boards, reflectors and all sorts of gear, but that kind of gear is reserved for very high end commercial and fashion shoots. To get started, a simple light kit with a 5 disc reflector will give you just as soft or dramatic a look. You’ll wow your friends and family or even your clients. Remember, the more gear you have, the more you need to use it, otherwise it’s a costly resource just sitting in storage.

About the Author:
Steve Rutherford is a photographer with a publication based in Australia.

For further training, below is a helpful video on how to setup a studio in your home:

Once you’ve sorted out your studio lights, it’s time to set up your home photo studio. You could use a spare room so it’s more permanent. Or just push the furniture to one side for a couple of hours.

Part 1:

Part 2:

There are various light modifiers you can use such as soft boxes, umbrellas and beauty lights. I’m going to show you the difference between soft boxes and umbrellas.

To get the exposure you will need a flash meter unless you’re using a speedlight on a stand which has a TTL connection to the camera.

So lets see how the light in your home photo studio looks. sit back and enjoy the movie.

For Help Increasing Photo Resolution:

Topaz Labs just announced a new update to Gigapixel AI (version 6.1). Designed to upscale your photos by up to 600% now also with breakthrough Face Recovery technology. The company is currently offering it at $20 off for a limited time to celebrate the update if you want to check it out.

gigapixel face recovery

Face Recovery in Gigapixel A.I. version 6.1

A neural network analyzes thousands of photo pairs to learn how details usually get lost. The algorithm learns to “fill in” information in new images based on what it has learned… effectively adding new detail to your photo. Plus our readers can save even more using the coupon code picturecorrect at checkout.

Deal ending soon: Gigapixel A.I. Photo Enlarger at $20 Off


Did you appreciate this newsletter? Please help us keep it going by Joining Our Patreon Supporters

What are your thoughts on this article? Join the discussion on our Facebook Page

PictureCorrect subscribers can also learn more today with our #1 bestseller: The Photography Tutorial eBook

The post How to Set Up a Simple Photography Studio appeared first on PictureCorrect.


from PictureCorrect https://ift.tt/MAeOEhv
via IFTTT

PictureCorrect.com: Interesting Photo of the Day: Mount St. Helens at Sunrise

Mount St. Helens, an active volcano in the state of Washington, is infamous for its deadliest and most economically destructive volcanic event in the history of the United States, which happened in 1980. However, looking at this amazing photo by Ross Schram con Haupt, the mountain looks far from dangerous:

mount st. helens

“Mt. St. Helens During Sunrise” by Ross Schram von Haupt (Via Imgur. Click image to see full size.)

Schram von Haupt took this photograph of Mount St. Helens after sleeping through gusty winds exceeding 50 miles per hour. However, in the morning he and his team were treated to this amazing sunrise. If we inspect the photograph closely, we can notice the ashes being blown around in the wind. However, Schram von Haupt was pleased on seeing the sunrise just because it was so colorful.

“I haven’t seen many sunrises that can compete with this one. There was ridiculous color in all directions…360 degrees of EPIC!”

He shot the photograph using his Nikon D610 mounted with Nikon 16-34 f/4 lens. This image is in fact a blend of various exposures.

  • Sky: ISO 100, 16mm, f/18, 106 seconds
  • Mountain: ISO 100, 16mm, f/9, .4 seconds
  • Flowers: ISO 800, 16mm, f/13, 1/10 second (6 shot focus stack for depth of focus)

Also, it’s noteworthy that he shot the flowers a day earlier at the exact spot because of windy conditions. This beautiful photograph is truly a result of skillful photography and post processing. What do you think?


Did you appreciate this newsletter? Please help us keep it going by Joining Our Patreon Supporters

What are your thoughts on this article? Join the discussion on our Facebook Page

PictureCorrect subscribers can also learn more today with our #1 bestseller: The Photography Tutorial eBook

The post Interesting Photo of the Day: Mount St. Helens at Sunrise appeared first on PictureCorrect.


from PictureCorrect https://ift.tt/AZrwqS3
via IFTTT

keskiviikko 1. kesäkuuta 2022

PictureCorrect.com: Focal Length Blending Photoshop Tutorial

Many landscape photographers take a long time to realize this, but foregrounds are an integral part of any successful image. Foregrounds set the context and draw viewers’ eyes into the image.

But don’t worry if you don’t have a powerful foreground in your image; you can always create one by using a technique called “focal length blending” or “perspective blending”. Landscape photographer and media designer Christian Möhrle shows you how it’s done:

Möhrle starts off by showing how you can use different global and local adjustments to retouch your image. It is always a good idea to make those adjustments prior to making any compositional changes.

Next, he shows how easily you can take two separate images of the same scene, taken at different focal lengths, and create a composite with a stronger foreground element. The trick is to clone the foreground from the image where the foreground is more prominent and interesting, and then stamp it over the target image.

He also shows you how you can fine-tune the overlay using pixel grids, the layer-transparency tool and layer masks, so the blend is seamless.

“The benefit of this method is you can nicely fill the foreground.”

As a bonus, toward the end of the video, Möhrle demonstrates how he cleans the image up for a more refined look. Furthermore, you can also see how he makes the flowers in the foreground fill the frame using the perspective-warp tool in Photoshop.

This is a great and a simple trick that you can use to take your images to the net level. If you have an image that you love so much but it’s weak on the foreground, give this trick a shot.


Did you appreciate this newsletter? Please help us keep it going by Joining Our Patreon Supporters

What are your thoughts on this article? Join the discussion on our Facebook Page

PictureCorrect subscribers can also learn more today with our #1 bestseller: The Photography Tutorial eBook

The post Focal Length Blending Photoshop Tutorial appeared first on PictureCorrect.


from PictureCorrect https://ift.tt/XjYiD2y
via IFTTT

tiistai 31. toukokuuta 2022

PictureCorrect.com: Street Photographer Shares Tips to Present a Relaxed Demeanor

Street photography isn’t everyone’s cup of tea. Many new and even experienced street photographers worry about being confronted by passersby on the street. This fear can eventually act as a barrier between the photographer and their art. So how do you overcome this fear surrounding street photography? In today’s video, photographer Sean Tucker and his friend Joshua K. Jackson bring you some great advice on overcoming your fears when heading out for a street photography shoot.

In the video, Jackson emphasizes two aspects that can help you overcome your fears: body language and intention.

A brilliant insight he shares is how body language can tell you a lot about the people around you. How you, as a photographer, present and “behave” matters a lot. This is what dictates whether people take you as a threat or act like you don’t exist.

For instance, it’s best to keep moving, constantly studying your surroundings and anticipating interesting moments that could unfold. However, spending too much time around a particular spot will trigger a sense of consciousness to the people nearby.

“When you plant yourself in one particular location, you draw attention to yourself.”

Another interesting idea that Jackson shares is to think of yourself of as a tourist. Just think—do you ever get intimated by tourists taking photos? Rarely. You can use this idea to your advantage and act like you’re a tourist in a new place taking photos. This will give you a mental excuse to act freely.

There are various other psychological hacks that Jackson shares in the video. If you don’t have malicious intent, you have no reason to worry about being confronted.

If you love street photography but cannot gather the courage to get out there taking photos, we strongly urge you watch the complete video.  You’ll definitely find more than one tip to help you improve.

If you have other ideas to get rid of the fear that surrounds street photography, be sure to share them. We’d love to hear from you.


Did you appreciate this newsletter? Please help us keep it going by Joining Our Patreon Supporters

What are your thoughts on this article? Join the discussion on our Facebook Page

PictureCorrect subscribers can also learn more today with our #1 bestseller: The Photography Tutorial eBook

The post Street Photographer Shares Tips to Present a Relaxed Demeanor appeared first on PictureCorrect.


from PictureCorrect https://ift.tt/x1lUwe5
via IFTTT