perjantai 4. maaliskuuta 2022

PictureCorrect.com: Secrets of Professional Photography

Every trade has its own set of secrets. And those who are actually able to crack those secrets are the ones who become successful. Believe it or not, the field of professional photography also has its own secrets that photographers use to beat the competition and leap forward. Photographer Miguel Quiles shares 5 of such secrets that professional photographers don’t want you to know:

1. Image Quality Doesn’t Matter

You must’ve come across photographers around you who produce amazing quality images but aren’t much successful with their business. On the other hand, there are photographers whose work may not the so great, but their businesses sustain for quite a bit. Why does this happen?

“The secret is that they’re producing consistency in whatever level of images that they’re producing.”

consistency in photography

Always aim to produce consistent results. When you are consistent with your work, your potential clients already know what can be expected from you. And this is what is essential to drive business. If your portfolio has images with varying degree of quality, it can confuse potential costumers which becomes a hindrance to your business.

2. Importance of Post-Production

There are photographers out there who feel that post-production is cheating. They totally downplay the role of post-production in photography. But, if you want to be successful as a photographer, make sure that you embrace post-production as a tool to catapult your business to success.

retouching photos

A good start is to start shooting in raw format. Raw format allows you to capture the image with the greatest dynamic range, and provides you with great flexibility for post-processing. And be sure to spend some good amount of time learning post-production software like Lightroom, Photoshop, or others.

3. The Role of Lighting

“You need great lighting if you’re going to capture truly great images.”

Lighting is undeniably the most important factor that determines the quality of the image. The key is thus to look for, and shoot during favorable lighting conditions. This is why many photographers prefer to shoot during golden hour. If you want to take things into your own hands, you can create light as required using flash, and light modifiers.
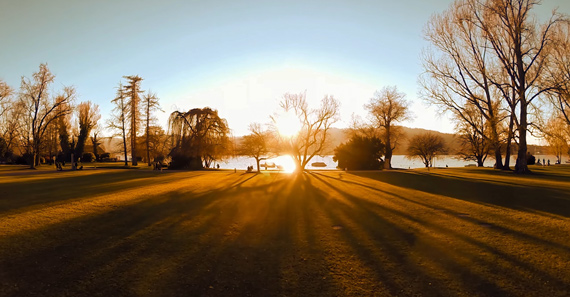
golden hour lighting

4. The Truth About Pricing

The question of how much to charge for photography is quite a common one. However, there is no concrete answer to this.

“Standard pricing in the art of photography doesn’t really exist.”

It thus boils down to how good you are in your field, and how much the market is willing to pay. Professional photographers do not believe in having a standard price list. They simply create images and sell them for as much as they think the image is worth, regardless of what others are charging.

5. The Importance of Social Media

Everyone is making good use of social media these days. You can see photographers posting images regularly in Facebook and Instagram. But, the secret lies in having a strategy while posting in social media as well. Collecting likes will not matter if you are not able to land some business.

Most photographers photograph to their own taste, post the images in social media, and hope that their work gets noticed by their potential customers. But, the secret to success is totally different. Many professional photographers invest their money to shoot campaign quality images to gain the attention of brands and clients they would like to work with.

“I’ve known many pros who have paid tens of thousands of dollars to book models, wardrobe, hairstylist, and a location to add images to their portfolio so they can use those images to approach companies to get hired.”

Posting the images in social media is not alone sufficient. Sending those images to the brands via direct messaging, or even tagging them is another way of gaining their attention.

These are some really awesome tips from Quiles to help you grow your photography business. Give them a shot and see if they’ll help you give a boost to your photography business.


Did you appreciate this newsletter? Please help us keep it going by Joining Our Patreon Supporters

What are your thoughts on this article? Join the discussion on our Facebook Page

PictureCorrect subscribers can also learn more today with our #1 bestseller: The Photography Tutorial eBook

The post Secrets of Professional Photography appeared first on PictureCorrect.


from PictureCorrect https://ift.tt/lO6afPK
via IFTTT

torstai 3. maaliskuuta 2022

PictureCorrect.com: 🍰 How Photography is Like Baking a Cake

Picture this…

You’ve spent all morning baking a delicious cake, waiting for it to cool… you’re about to start covering it in silky-sweet frosting…

photography baking

Photo captured by Szabo Viktor; ISO 100, f/2.2, 1/60s, 35mm.

(Your friends will be over soon and you can’t wait to let them try your latest creation)

Glancing across the kitchen, you take note of the mess you’ve made.

There’s flour all over the counter…

The lid is off the salt…

Or is that the sugar?

Nope… Salt…

Then you realize… You mixed up your containers and put half a pound of salt into your cake instead of sugar!

There’s no time to bake another cake… Maybe you can drench your salt-cake in syrup or honey to try and sweeten it, or start troweling on extra frosting until you can’t even taste the sponge…

But you’re out of luck…

Cover it up all you like, but no matter what you do you can’t go and un-bake the cake and put in sugar instead of salt, then re-bake it…

But what’s this got to do with taking photos?

Well this is what you’re doing when you put a JPEG into Photoshop to edit it. You are editing the pixels that have already been baked using your cameras own recipe.

But if you start with a RAW file instead of JPEG, then you have the ability to go back and undo the whole “baking” process so that you can tinker with your original cake-mix, adding or adjusting the original recipe from scratch until you hit a winner.

raw editing

Photo captured by engin akyurt; ISO 400, f/4.0, 1/125s.

The moral of the story?

Shoot RAW, don’t trust your camera to do your baking for you :-)

And what do you do once you’ve captured a great RAW file?

You run it through a Photoshop workflow that makes your photos POP.

If you want to learn more about RAW photo editing, then you may want to check out this 12-module Photo Editing Masterclass. Each module features the complete end to end process of editing a brand new image in Photoshop.

night photo editing

The Landscape Editing Masterclass (see what’s covered)

There is a Beginner and Advanced track for each stage of the processing workflow, where appropriate. So no matter what level you’re currently at, you can still follow along and work through every module. We were able to arrange an exclusive 80% discount for our readers for a limited time.

Deal ending soon: The Landscape Editing Masterclass at 80% Off


Did you appreciate this newsletter? Please help us keep it going by Joining Our Patreon Supporters

What are your thoughts on this article? Join the discussion on our Facebook Page

PictureCorrect subscribers can also learn more today with our #1 bestseller: The Photography Tutorial eBook

The post 🍰 How Photography is Like Baking a Cake appeared first on PictureCorrect.


from PictureCorrect https://ift.tt/QswC2YT
via IFTTT

PictureCorrect.com: Interesting Photo of the Day: Tornado in Colorado

Storm chaser and photographer James Smart captured some powerful images of a tornado ripping its way across open farm land in Simla, Colorado. The extremely rare anti-cyclonic tornado appears to narrowly miss a lonesome farmhouse, but it’s not actually as close as it seems. Still, no doubt a terrifying and intense experience for the home owners:

tornado near farmhouse photo

Tornado in Colorado by James Smart (Via Imgur. Click image to see full size.)

While the way the photo was shot makes the tornado appear closer to the house than it is, the sheer size and power of the storm and its capacity for complete destruction is incredible. As you can see, the tornado collected quite a bit of dirt, adding an even more destructive feel to the image. Along with being an avid storm chaser, James Smart is a landscape photographer capturing moments of Mother Nature’s power across Australia and the United States.


Did you appreciate this newsletter? Please help us keep it going by Joining Our Patreon Supporters

What are your thoughts on this article? Join the discussion on our Facebook Page

PictureCorrect subscribers can also learn more today with our #1 bestseller: The Photography Tutorial eBook

The post Interesting Photo of the Day: Tornado in Colorado appeared first on PictureCorrect.


from PictureCorrect https://ift.tt/pbj1sB3
via IFTTT

PictureCorrect.com: Landscape Photography: Essential Lens Filters Tutorial

The key to being a good landscape photographer is to understand how the look of a subject changes according to light, and photograph it during the best lighting conditions. Unlike in other genres of photography, a landscape photographer has no control over the light source. In the following video, landscape photographer Ross Hoddinott discusses how you can use filters to manipulate exposure and take better landscape photographs:

Filters are the bread and butter of landscape photography. They allow photographers to produce results that are impossible to see with the naked eye. Before we jump into the video, it’s necessary to understand the concept of “stops.” A stop is the doubling or halving of the amount of light entering through the lens. For instance, let’s say that you meter a scene to be well exposed at 1/30 second. If the ambient light now decreases by one stop, the exposure needs to be doubled to get the correct exposure, which is now 1/15 second (aperture and ISO value remaining constant). Keep this concept in mind if you aren’t well acquainted with stops.

Using ND Filters for Landscape Photography

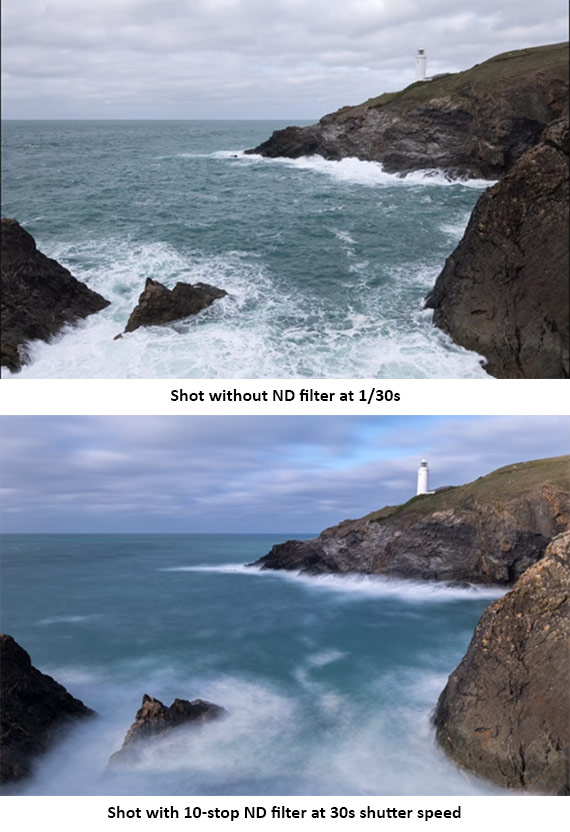
Neutral Density (ND) filters are like sunglasses for the lens. Just as we use sunglasses when it’s too bright outside, we can use ND filters on our lens to block some ambient light. By doing so, we can artificially manipulate the exposure settings in our camera. As Hoddinott demonstrates in the video, without using any kind of filters, he was getting a correct exposure at 1/30 second. By using a 3-stop ND filter, he was able to halve the light three times (i.e., 1/8 of original, hence the 1/4 second exposure).

But why is long exposure necessary? The answer is simple. It just makes  the photograph look beautiful when used correctly. Since our eyes are naturally incapable seeing long exposures, photographs that are created by using long exposure technique seem surreal to us. By exposing a shot for a longer period, we can record the trails left by moving subjects, such as clouds, water, and light. This adds a dreamy and hazy effect. The stronger the ND filter, the slower the shutter speed, thereby making the long exposure effect more prominent.

landscape photography using ND filter

There are certain things to keep in mind while using ND filters:

  • Since ND filters block light entering your camera, some cameras may have difficulty in focusing with the filter on. If this is the case, focus prior to placing the ND filter.
  • ND filters tend to have a color cast (i.e., the color of your subject in the photograph can have some kind of tint). To fix it, either manually input the white balance, or if you’re shooting RAW (which you should be), you can easily fix it in post.

Using Graduated ND Filters for Landscape Photography

There’s a very basic difference between an ND filter and a graduated ND filter. While ND filters are uniformly dark, graduated ND filters are half coated and half clear. Graduated ND filters are useful when shooting scenes with high contrast lighting. If you have ever shot a scene with the sky in the frame, you must have faced this situation; exposing for the sky underexposes the land area and exposing for the land area overexposes the sky. Graduated ND filters are designed to solve just this kind of issue. By darkening the sky, a graduated ND filter allows us to get a less contrasting exposure of the sky as well as the land.

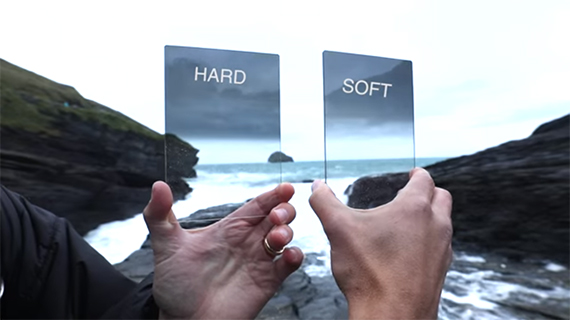
Like solid ND filters, graduated ND filters are also available in a variety of strengths: 1, 2, or 3 stop. They also have varieties of feathered edge transitions. You can get hard transitions if you shoot landscapes where the horizon is straight and even (like in case of coastal images). If the horizon is not even, you’re better off getting a soft transition graduated ND filter.

hard and soft graduated ND filters

To choose the strength of a graduated ND filter, you will need to understand the difference in exposure between the sky and the foreground. If you get an exposure reading of 1/500 second for the sky and 1/30 second for the foreground, there is an exposure difference of 4 stops. Since skies naturally tend to be brighter than land, exposing with a 2 stop difference between the land and the sky would be a good idea. Hence, a good choice in this example would be to shoot with a 2 stop graduated ND filter.

While others may argue that filters are unnecessary and you can get away from using them by just bracketing your shots, remember that you will need to spend a lot of time in post working with the bracketed shots. As professionals value time, they choose to get most things correct in-camera.

Hopefully, you now have an understanding of how you can take better landscape images using ND and graduated ND filters. If you have any other ideas of using these filters creatively, let us know in the comments below.


Did you appreciate this newsletter? Please help us keep it going by Joining Our Patreon Supporters

What are your thoughts on this article? Join the discussion on our Facebook Page

PictureCorrect subscribers can also learn more today with our #1 bestseller: The Photography Tutorial eBook

The post Landscape Photography: Essential Lens Filters Tutorial appeared first on PictureCorrect.


from PictureCorrect https://ift.tt/KJ81eB5
via IFTTT

keskiviikko 2. maaliskuuta 2022

PictureCorrect.com: Photographer Shares Some Key Video Tips

There is more video content being produced than ever before in human history. As a result, clients will specifically ask for videos as well as photos from creative professionals. How do you deal with this if you identify as a photographer? Do you pivot to video, or can you learn to juggle the two?

If you’re interested in learning more about videography from the perspective of a photographer, you’ll surely benefit from today’s video, hosted by Justus McCranie. He shares some of the basics of videography that speaks the language of photography:

“Video is a totally different beast than photography.”

It would be a mistake for photographers to assume they understand videography off the bat. As McCranie notes, things aren’t so simple.

In the video, he describes eight different aspects that will help photographers get on board with videography. Surprisingly, most of the terms that he talks about are nothing new to a photographer. But when it comes to using them to produce a video, the difference is huge.

For instance, it’s common for a photographer to change the shutter speed to control exposure. Well, you can’t do that when shooting a video, as the shutter speed has to be pegged to the frame rate. So using an ND filter becomes a must, which is of course not the case in photography.

Any photographer who’s interested in learning about videography will find this video very useful. Be sure to watch the full thing.

If you’re a video expert, what tips would you share with a photographer looking to get started with videos?


Did you appreciate this newsletter? Please help us keep it going by Joining Our Patreon Supporters

What are your thoughts on this article? Join the discussion on our Facebook Page

PictureCorrect subscribers can also learn more today with our #1 bestseller: The Photography Tutorial eBook

The post Photographer Shares Some Key Video Tips appeared first on PictureCorrect.


from PictureCorrect https://ift.tt/ZX2dBou
via IFTTT

tiistai 1. maaliskuuta 2022

PictureCorrect.com: Pre-dawn Landscape Photography Tips

Today’s article comes to us from the Landscape Editing Masterclass instructor who has it marked down 80% today if you want to dig deeper for further training.

There was a time when I’d come home from most sunrise shoots disappointed.

Why?

Because I didn’t like cloudless skies.

And by the time I’d realise the sunrise was going to be a “boring” one, I’d already be out of bed and on the way, so I might as well go through with the shoot. (Breakfast at a nearby cafe afterwards would be the highlight on these mornings.)

That was until I learned to appreciate shooting pre-dawn.

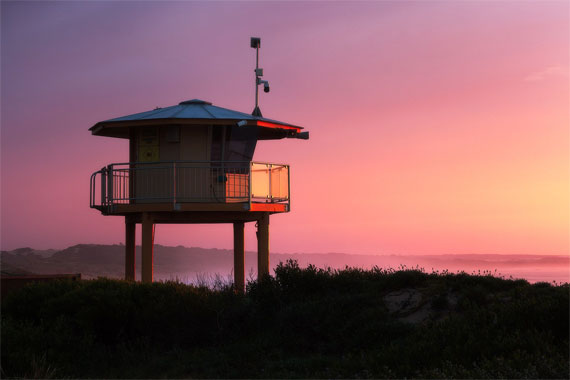
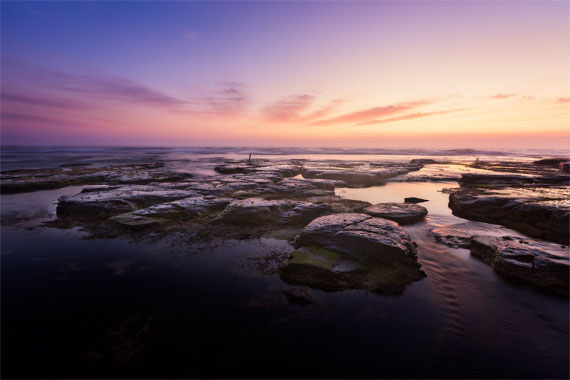
There’s a certain glow that even a cloudless landscape takes on in the half an hour before the sun comes up, that I really like.

Like in the photo at the top of this message.

Here are some tips you can follow to get great pre-dawn shots of any landscape:

1: Start shooting 30 minutes before sunrise

Once the sun rises in a cloudless sky, it will be so bright and harshly lit that it loses most of the colour. Your best shots of a cloudless sky will happen between 30 and 10 minutes before sunrise.

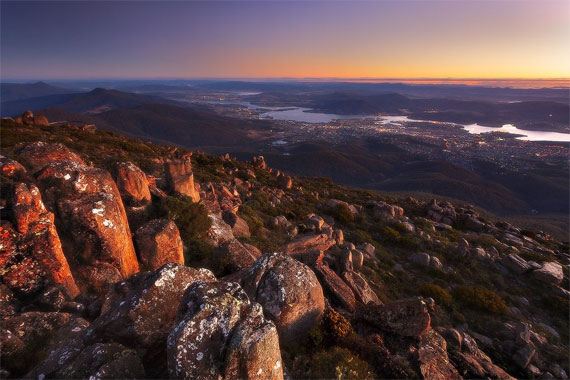
predawn landscape

2: Shoot slightly away from where the sun is coming up

To capture the nice deep yellows and blues in the sky, keep the brightest part of the sky just out of frame. (Also for the reason mentioned in tip 4)

3: Shoot multiple exposures

Even before sunrise, it will still be a high-contrast scene that will probably require bracketed exposures to capture detail in the darkest shadows and the brightest highlights.

multiple exposures

This photo required two bracketed exposures to capture the entire dynamic range of the scene, which were then blended using luminosity masking techniques in Photoshop to produce the finished image.

When you capture the entire dynamic range, it gives you full creative license to edit it how you like whereas if you capture only one exposure, you’ll likely lose detail in either the shadow or highlight (which may not be recoverable!)

4: Create a three-dimensional foreground

foregound dimensions

Even with the sun below the horizon, the light will still reflect off of objects in the scene. If you’re shooting away from where the sun will rise, then see a great three-dimensionality to the objects in your foreground by creating interesting light and shadows. (Note the bottom-left corner of my shot above as a great example of this)

5: Process to the darker end of the histogram

Let shadows be shadows. The deep colorful pre-dawn glow will get lost if you process the image to appear bright and vibrant.

It might be tempting to process the foreground brighter (for the detail), whilst keeping the sky darker (for the colour). But try to resist, else it will create an imbalance between foreground and sky and make things look a bit weird.

That said, you can still show lots of detail in the shadows (especially if you’ve bracketed exposures), just keep them in proportion.

In other words, keep what should be dark, dark and what should be bright, bright.

If you want to learn more about editing your landscapes in Photoshop, then check out the author’s 12-module Landscape Editing Masterclass:

landscape editing masterclass

The Landscape Editing Masterclass (see inside)

We were able to arrange an exclusive 80% discount for our readers for a limited time.

Deal ending soon: The Landscape Editing Masterclass at 80% Off


Did you appreciate this newsletter? Please help us keep it going by Joining Our Patreon Supporters

What are your thoughts on this article? Join the discussion on our Facebook Page

PictureCorrect subscribers can also learn more today with our #1 bestseller: The Photography Tutorial eBook

The post Pre-dawn Landscape Photography Tips appeared first on PictureCorrect.


from PictureCorrect https://ift.tt/RKPafL5
via IFTTT

PictureCorrect.com: Behind-the-Scenes Tips and Tricks for Bird Photography

Bird photography requires true dedication and an in-depth understanding of not just photography, but also bird habits. The subjects may be small, but they’re pretty darn fast. To give you a hint of what goes into bird photography, photographer Morten Hilmer has put together this amazing behind-the-scenes video:

Hilmer shares what he did completely wrong during his first day out photographing birds with a floating hide, then goes on to elaborate about how he rectified those mistakes and started shooting smarter.

You really need to pay attention to a few key things. These include keeping yourself dry, remaining camouflaged, staying very still, not disturbing the birds and remaining patient.

“When the birds start to be a little nervous, you stop and wait. Then, when the birds relax, you move forward.”

Toward the end of the video, he also shares an adventure he enjoyed while out shooting on a cold and rainy day—and how the trouble was absolutely worth it. If you are into bird photography, be sure to watch the complete video to hear the fun story.


Did you appreciate this newsletter? Please help us keep it going by Joining Our Patreon Supporters

What are your thoughts on this article? Join the discussion on our Facebook Page

PictureCorrect subscribers can also learn more today with our #1 bestseller: The Photography Tutorial eBook

The post Behind-the-Scenes Tips and Tricks for Bird Photography appeared first on PictureCorrect.


from PictureCorrect https://ift.tt/HJCSYsz
via IFTTT