torstai 3. joulukuuta 2020

PictureCorrect.com: 3 Flower Photography Setups & Styles

Who doesn’t love photographing flowers? With a little extra planning and effort, you can create even more attractive images of flowers inside a studio. Photographer Ed Verosky teaches you three flower photography looks that you can create with simple lighting and post-processing:

Look #1: Complementary Background

Get yourself some sheets of arts and craft paper with interesting patterns and colors. They can be used as beautiful backgrounds for the purpose of photographing the flowers. Verosky purchased a few sheets at a local Hobby Lobby for around 25 cents each.

studio backgrounds for flower photography

Setup

For the actual setup, Verosky taped the background paper to a foam board. With the flower placed in front of the background, he then illuminated the flower with a softbox. He placed the light with the closest part of the softbox about 15 inches from the flower. He then set his Sony A7III with a 24–70mm lens at 70mm in front of the flower on a tripod.
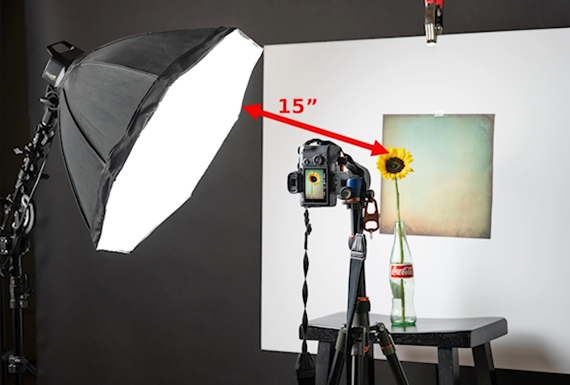
setup for flower photography with colorful background

Post-processing

Once done with the shoot, Verosky made the following adjustments to the image to get to his final result:

  • decreased the contrast
  • desaturated the yellows on the flower petals
  • added some sharpening in Lightroom, and then some more sharpening in Photoshop using Smart Sharpening
  • introduced some vignette to emphasize the flower
  • removed dust spots using the clone tool

Look #2: White Background

“You don’t always have to have a background. You don’t always need context outside of the subject itself. These beautiful flowers are fascinating to look at in their natural design, aren’t they?”

In order to achieve look with a clean background, Verosky lit the flowers from the front in the same way he did in the first case. However, for the background, he uses a big Apollo Orb softbox. If you don’t have an extra softbox around, you can use a clean white cloth or white translucent material and light it from the back.
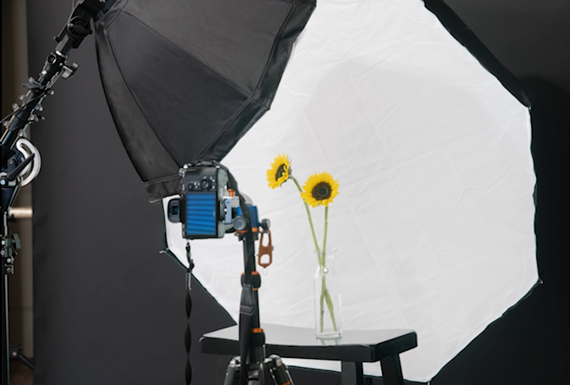
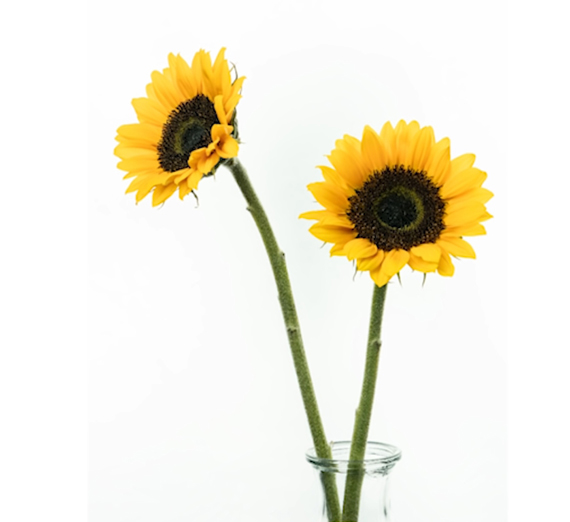
flower photography with white background

flower with white background

55mm, ISO 400, f/14. 1/125 second

With a little tweak in the lighting setup, Verosky demonstrates how you can give the flowers an ethereal look while maintaining the white background. With white cardboard or foam board for the background, place your flower in front of the camera. Then, using a light stand, point a speedlight directly at the background.

The background looks okay, but as you can tell, the flower looks underexposed. To overcome the issue, simply boost the exposure in post. This is where shooting in raw comes handy. This brings up the darker areas of the image while making the background even brighter. This is what gives an ethereal look to the image.

Again, Verosky shares how you can get a translucent dreamy look using a rather simple setup. Place your flower in front of a softbox and use a really shallow depth of field.

Look #3: Dark Background

After working with a colorful background and a white background, Verosky demonstrates how you can work with a dark background. The motive of having a dark background is to draw the viewers’ attention solely toward the subject.

Place the flower in front of a dark background and light it from above using a speedlight. When setting up the speedlight, make sure that more of the beam is thrown on the front and top of the flower. You may need to adjust the flash positioning and power setting following some trials and errors. Then, using a white foam core, bounce some light onto the flowers to fill in some harsh shadows. Just like you’d do when taking a portrait.
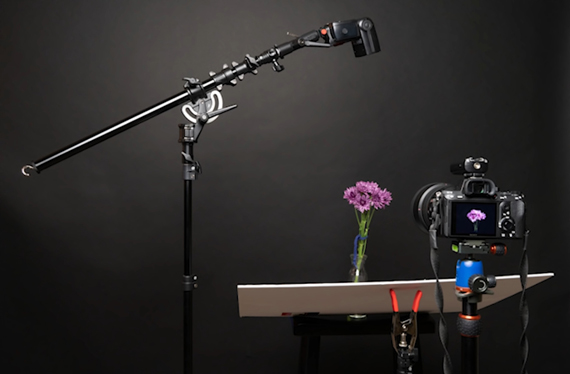
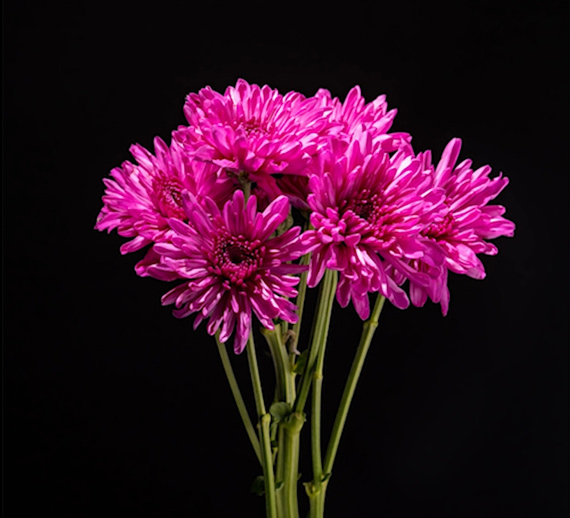
light setup for photographing flower with dark background

image of flower with dark background

85mm, ISO 100, f/9, 1/200 second

Dark Background Without Flash: Another way Verosky demonstrates how you can photograph a flower with a black background is by removing the speedlight from the top, and placing the Apollo Orb to the side of the flower. The Orb is placed in such a way that most of the light is well above the flower.
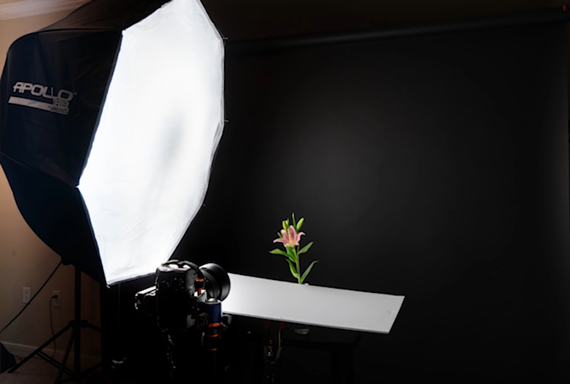
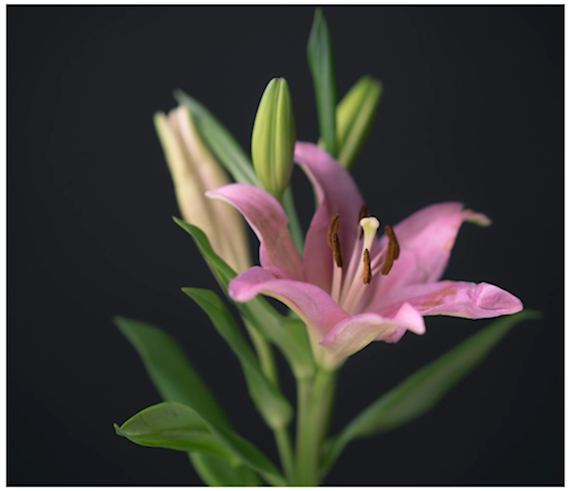
flower photo with side lighting and dark background

flower shot at shallow depthh of field and dark background

ISO 100, f/1.8, 1/160 second

It’s fun to experiment with various photo setups.


Go to full article: 3 Flower Photography Setups & Styles

What are your thoughts on this article? Join the discussion on Facebook

PictureCorrect subscribers can also learn more today with our #1 bestseller: The Photography Tutorial eBook

The post 3 Flower Photography Setups & Styles appeared first on PictureCorrect.


from PictureCorrect https://ift.tt/2IdnDFA
via IFTTT
keskiviikko 2. joulukuuta 2020

PictureCorrect.com: Masking: The Secret to Perfect Photos

This article is based on lessons from Understanding Masking for Photographers which is still over 68% off for Cyber Week if you use the discount coupon CM20 at checkout.

I think we can all agree that our goal is to make our photos as perfect as possible.

Some of that process occurs within the camera. However, in the era of digital photography, we are given far greater tools to work with than our previous brethren had with just film.

The key to perfection is post-processing.

And the key to perfection in post-processing comes with masking.

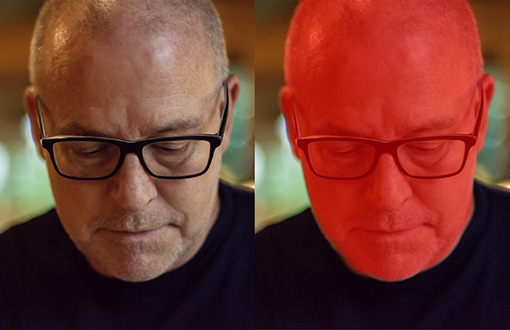
example of masking in adobe photoshop

Photo by Kent DuFault

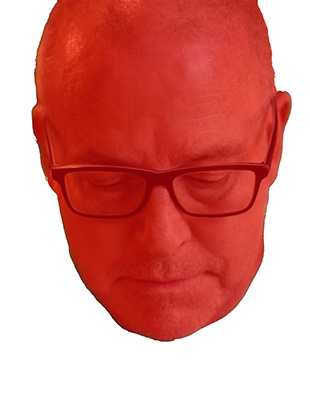
In this example photo above, the version on the left has no mask. The version on the right has the head masked from the rest of the picture.

All the possibilities for masking are too great to cover in a simple quick tip.

masking photoshop tutorial

Photo by Kent DuFault

Today, I want to give you a firm foundation on what masking is and how you can learn to make it work for you in your photography.

With masking, you can take different parts of different photos and combine them into a new picture. This would be an advanced masking technique.

example of mask transparency photoshop

Photo by Free-Photos, editing by Kent DuFault

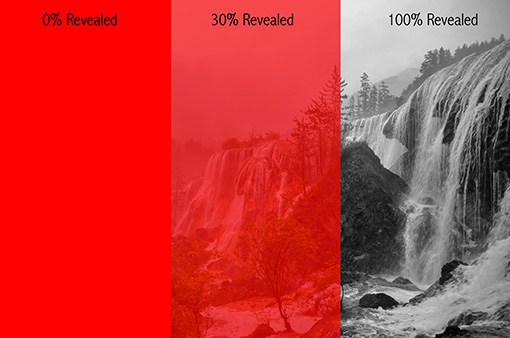
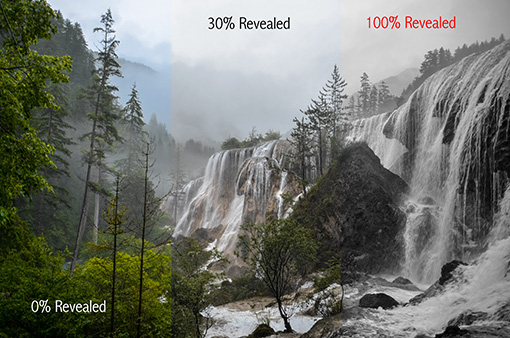
Most post-processing editing programs will allow a varying degree of transparency for a mask. This means that a mask can be applied at 100%, 0%, or anything in-between.

photoshop lightroom mask explained

Above is the example with a black-and-white preset applied:

  • A 100% revealed mask is a black and white photo
  • A 30% revealed mask has a subdued color effect
  • A 0% revealed remains a full-color photograph

Quick Tip: You can vary the transparency of a mask from zero-to-100% in certain programs and with certain tools.

Masks are an essential tool to change a part of your photo while leaving the rest of the image alone.

Remember These Terms:

A global edit is one that affects the entire picture. A localized edit is one that affects only a portion of a photograph. The part of a photograph that a localized edit changes is determined by a mask.

example photo for masking in photoshop

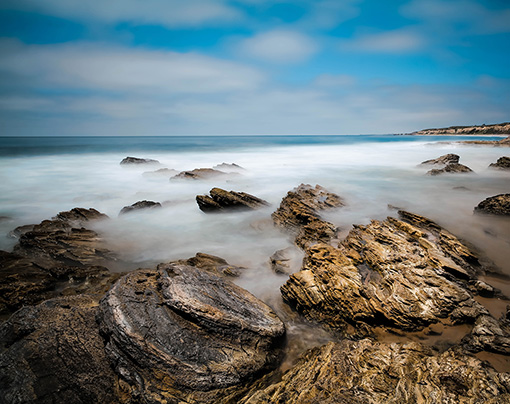
Photo by Jung Ho Park

For example, in the above photo, I want to slightly darken the lighter rocks in the foreground on the right, so that the circular stones in the center-left are more prominent within the composition.

masking lightroom walkthrough

Masking a seascape

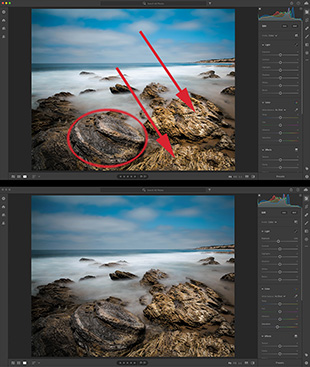
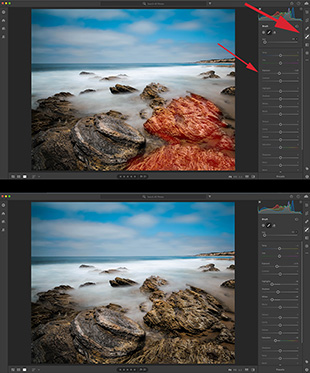
I want to darken the rocks at the red arrows while preserving the rest of the picture so that the stones in the red oval become more dominant.

On the bottom of the example photo above, I did a global adjustment using the Exposure slider in Lightroom CC.

It didn’t work out very well, as the entire picture became darker (global edit), and the round rocks don’t stand out at all.

masking lightroom tutorial

Masking tools

In the top half of the example photo above, I am using Lightroom CC to complete a localized edit.

I chose the Adjustment Brush, and I painted a mask over the rocks that I wish to change.

The larger red arrow points to the Adjustment Brush tool in Lightroom CC. The smaller red arrow points out my Exposure adjustment to the mask.

Quick Tip: In Lightroom, you can cycle the view of a mask on and off using the O key.

At the bottom half of the example photo above, you can see how my mask has darkened the rocks to the right, making the circular stones more visually prominent in the foreground.

Quick Tip: A mask can be created and applied in a distinct manner, such as by using the Adjustment Brush. However, at other times, masks are operating in the background, and you may not even realize they are there.

masking lightroom walkthrough

Masking brushes

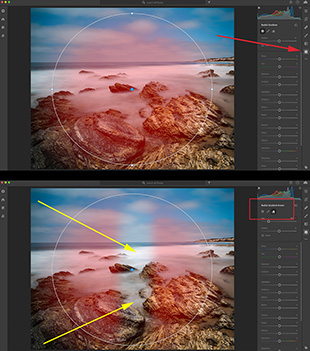
Some tools, like the Linear Gradient Tool and the Radial Tool, automatically create a mask in the background.

You may not realize that it’s there unless you press the O key to turn it on. Any mask, even an auto-generated one, can be edited—and this is the real power behind masking!

Quick Tip: Cycle the mask view on while you create the mask. Then cycle the mask view off while you make your adjustments with the sliders. If the modification you’re making isn’t affecting a part of the picture, you can add to the mask with the Brush tool. If the mask is changing a part of the image you don’t want it to, erase part of the mask with the Eraser tool. You can see these tools in the red box in my image above. The yellow arrows indicate how I’ve changed the mask using the tools mentioned earlier.

Masking opens up your photography to limitless possibilities!

For Further Training:

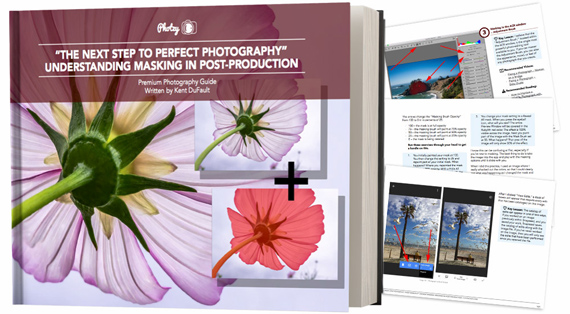
Achieving perfect photography requires more than just in-camera skills in today’s environment. Yes, even the professionals now rely on post-production skills to PERFECT their images. One of the most important photo editing skills to learn is called “Masking” and an in-depth guide is now available to help photographers master it. It is still 68% off for Cyber Week if you want to check it out. Also try the discount code CM20 at checkout for extra savings.

understanding masking

Masking: A Critical Skill for Photo Editing

After you read this new masking guide you’ll realize that you are no longer tied to what you find. You can clean up the bugs in your shots. Fix those less than perfect rose petals. Take out that pesky truck that parked right in the middle of your landscape shot.

Deal ending soon: Understanding Masking for Photographers at 68% Off


Go to full article: Masking: The Secret to Perfect Photos

What are your thoughts on this article? Join the discussion on Facebook

PictureCorrect subscribers can also learn more today with our #1 bestseller: The Photography Tutorial eBook

The post Masking: The Secret to Perfect Photos appeared first on PictureCorrect.


from PictureCorrect https://ift.tt/3g0EgAR
via IFTTT
PictureCorrect.com: Interesting Photo of the Day: Filtered Skyline

When we use filters by attaching them to the front of the lens, it can be hard to gauge its full effect. To get an idea, you could just hold a filter in your hand and shoot right through it. This way, you can get a better understanding of the filter’s impact. Photographer Luca Nicoletti did something similar, shooting London’s Canary Wharf skyline during sunrise. The result is just spectacular:

city through a filter

“Cityscape Through a Filter” by Luca Nicoletti (Via Reddit. Click image to see full size.)

While the image appears to be taken with a single shot, it is in fact a composite of two images. Nicoletti took the images with a Sony A7III with the 24-105mm f/4 lens at 105mm. The first image was shot at 1/250 seconds, f/5 and ISO 500 with the filter in focus. The second was shot at 1/250s, f/4, and ISO 200 with the buildings in focus. He then quickly edited the two images in Lightroom and merged them later in Photoshop.

The crisp and detailed image of the skyline right in front of the blurry background makes the image so satisfying to look at. Anyone who wears glasses will know what we’re talking about. Also, since Nicoletti took the image during sunrise, we can witness the golden-hour magic taking place in the background sky. The glow of the horizon adds a wonderful touch to the image and draws the eyes right in.

Although this concept has been used by many photographers, we must appreciate how successfully Nicoletti has executed it. The details in the image, down to the exhaust shooting off a building roof, are truly mesmerizing.

Have you tried taking a similar photo?


Go to full article: Interesting Photo of the Day: Filtered Skyline

What are your thoughts on this article? Join the discussion on Facebook

PictureCorrect subscribers can also learn more today with our #1 bestseller: The Photography Tutorial eBook

The post Interesting Photo of the Day: Filtered Skyline appeared first on PictureCorrect.


from PictureCorrect https://ift.tt/39xT0G5
via IFTTT

PictureCorrect.com: Wedding Photo Tips on a Bad Weather Day

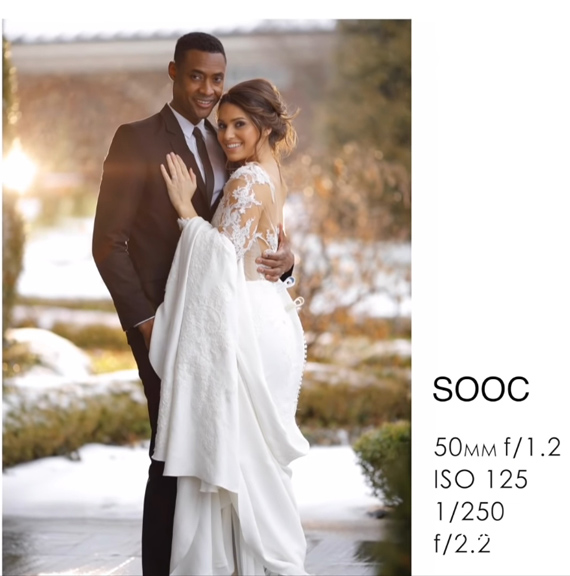
Imagine that you have a big day for a shoot. You need to shoot a wedding but the weather is against you – it’s raining outside. Do you postpone the wedding? Of course not. As a working professional, you need to be prepared for such situations and make it work for you. Adorama has put together this video with wedding photographer Vanessa Joy who’ll show you how you can make a cloudy day look sunny:

Find an Overhang

It is important that the couple do not get during the shoot. This is even more important if you are photographing them before the ceremony. So, in order to shoot outside, do everyone a favor and find an overhang.

“Position your couple so that they’re as close to the edge of that overhang, but not getting wet.”

What this does is that, the overhang blocks the light coming in from above thereby preventing shadows from forming under the eyes, nose, and the neck region. No to mention that it keeps your couple from getting wet as well.

Have Control Over Lighting

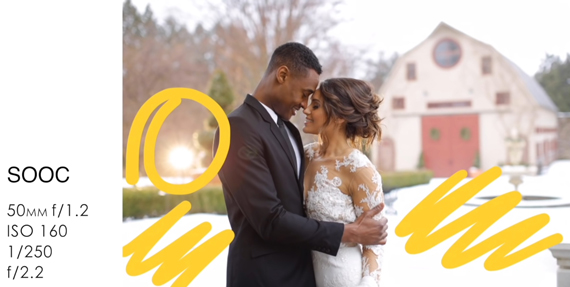
Now that you have some control over the lighting from above, the next step is to have better control over the light from the sides. For her purpose, Joy uses the Profoto B10 with a CTO gel attached to the front. The gel helps in providing warmth to the flash in order to emulate the sun. However, when placing the light, it is extremely important that everything appears natural in the process.

wedding photo on a rainy day

“If you just have some random light coming from behind them, it might look cool, but it’s not believable that it’s actually the Sun. The further back you can go, the better.”

Also, have an assistant hold a reflector facing the couple to soften the light. Once you’re done taking some images, be sure to review them just to make sure that the image looks believable. If it does not, you may need to change the lighting position or the location.

wedding photo shot on a rainy day

“It’s about playing, it’s about maneuvering, and seeing where the light is, and making adjustments.”

With a little bit of thinking, there’s absolutely no need to panic if it rains on a wedding day. Be sure to try out these simple tips from Joy and assure any couple a sunny day picture every time.


Go to full article: Wedding Photo Tips on a Bad Weather Day

What are your thoughts on this article? Join the discussion on Facebook

PictureCorrect subscribers can also learn more today with our #1 bestseller: The Photography Tutorial eBook

The post Wedding Photo Tips on a Bad Weather Day appeared first on PictureCorrect.


from PictureCorrect https://ift.tt/2VvEO8c
via IFTTT

tiistai 1. joulukuuta 2020

PictureCorrect.com: Anticipation in Photography

This article is based on concepts from Effective Storytelling with Photography if you want to dig deeper for further training. It is still over 76% off for Cyber Monday if you use the discount coupon CM20 at checkout.

Remember the lyrics from the famous Carly Simon song: “Anticipation. It’s making me wait.”

Remember: Anticipation is a skill common among experienced photographers and generally lacking in newer photographers. Let’s discuss the photographic expertise of anticipation and what it can mean to your photography.

anticipation in sports photography

Photo by Nik Shuliahin

Sports photographers use the tool of anticipation all the time. They do so because they need to capture the peak moment of action.

They use their knowledge of the game to anticipate where the peak action will occur and then place themselves in a position to creatively capture it.

For the rest of us photographers, anticipation can be a bit more challenging to sort out.

For this quick tip, let’s discuss some techniques to help you hone your anticipation skills.

waiting for the right photo moment

Photo by Kent DuFault

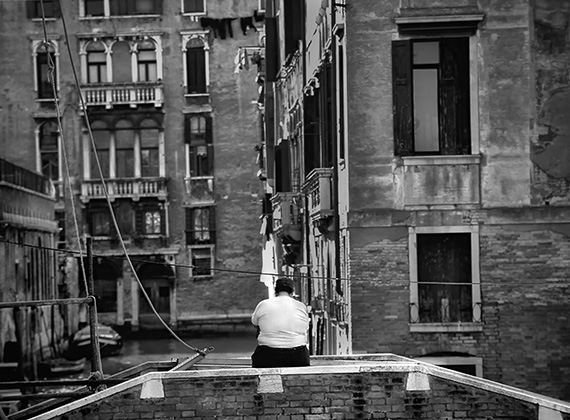
In the above image, I was visiting Venice, Italy. I was standing on one canal bridge while looking at the one next to me. I was attracted to the scene, but it was missing something. So, I practiced anticipation and waited.

A few minutes later, a man walked up onto the bridge and sat down. I was ready, because I had anticipated this moment!

First Tip: Find a scene that attracts you visually, and then wait for something to happen. This is a common technique with experienced street photographers.

anticipating the scene

Photo by Kent DuFault

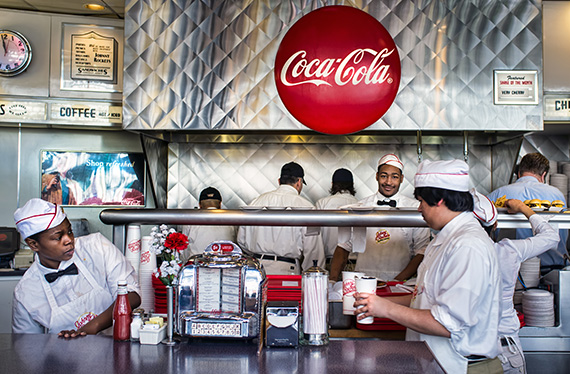
At this moment, I saw the scene and walked toward the order counter with my camera ready. I waited in anticipation for something special to happen—and it finally did, when one of the employees looked up at me and smiled.

Second Tip: When a scene catches your eye, get your camera ready. This is where automation will really help you—no manual mode is necessary. I tend to use shutter priority mode with auto ISO. I like to set my shutter speed because I don’t want my picture ruined by camera shake. Preset the focus or use all your focal points in autofocus. Hold the camera just below your eyes. You are not actually looking through the viewfinder but over the top of the camera. This technique allows you to anticipate what might happen by opening up your peripheral vision. It works best with a wide-angle lens.

anticipating wedding photo

Photo by Max Poschau

Be ready when the subject doesn’t think you’re ready. This will allow you to capture candid moments.

Third Tip: When you are actively setting up a picture, get yourself ready before you announce that you’re ready. In this way, you can anticipate a true moment of expression that you may not get once the subject realizes you’re shooting.

anticipating street photos

Photo by Kent DuFault

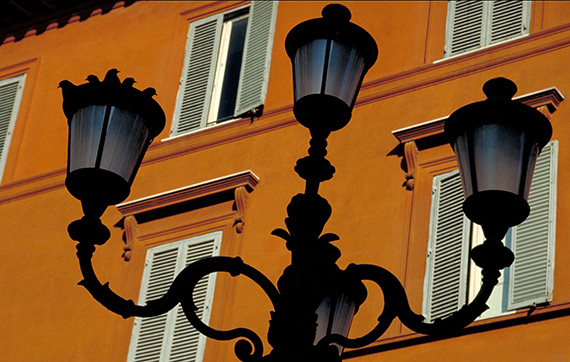
In the photo above, I was walking the streets of Paris. I noticed a couple of birds on top of a light post. They were in silhouette against a brightly colored wall.

I took a picture, and then in anticipation that the situation might improve, I waited and watched.

Within a minute or so, several more birds swooped down onto the light and began looking at me. I think they thought I was going to throw down some food.

My anticipation created a photo with more impact—by having more birds in silhouette.

Fourth Tip: When you take a live-action picture, don’t be satisfied with your first shot. Anticipate that the scene might improve. It often will—with a little bit of anticipation and patience.

About the Author:
Kent DuFault is an author and photographer with over 35 years of experience. He’s currently the director of content at the online photography school, Photzy.

For Further Training:

Storytelling is the single biggest photographic skill, that you can learn, that will make your work stand out from everyone else. This in-depth guide by Kent DuFault is 133-pages of deep training, giving you a simple and practical understanding of using storytelling to make your photographs stand out. It is still 76% off for Cyber Monday if you want to check it out. Also try the discount code CM20 at checkout for extra holiday savings.

storytelling photo

Effective Storytelling with Photography Guide

You’ll get 7 complete chapters of training, illustrations, case-studies and self-check quizzes. It will teach you every aspect of the storytelling process, and also, (even more importantly), how you can implement that knowledge into your photographic efforts.

Deal ending soon: Effective Storytelling with Photography at 76% Off


Go to full article: Anticipation in Photography

What are your thoughts on this article? Join the discussion on Facebook

PictureCorrect subscribers can also learn more today with our #1 bestseller: The Photography Tutorial eBook

The post Anticipation in Photography appeared first on PictureCorrect.


from PictureCorrect https://ift.tt/3mvP0JJ
via IFTTT

PictureCorrect.com: Interesting Photo of the Day: A Lit Self-Portrait


We all know not to play with fire. But if you’re careful, willing to take a risk and running with a clear idea in your head, you can easily capture some amazing shots. Take, for instance, the following self-portrait that was taken by photographer Kritagya Nayyar. As you can tell, the image is really lit:

burning news self portrait

“Burning News Self Portrait” by Kritagya Nayyar (Via Reddit. Click image to see full size.)

Nayyar, an amateur photography, didn’t let a lack of technology hold him back. He used a Sony A7RIV with a Tamron 28-75mm f/2.8 lens—and the help of his father.

“I set up my camera on a tripod and asked my dad to press the shutter button continuously as I burned the newspaper. The fire looks this intense as the wind was strong and thus the fire was burning vigorously.”

The fire definitely is the hero in this case. And by the looks of it, you can tell that the newspaper was burning with quite some intensity. However, the calmness on Nayyar’s face speaks otherwise. The contrast in emotions makes you think about what’s happening in the image.

It’s also worth noting how Nayar used the fire as a light source as well as a focal point, to illuminate his own face.


Go to full article: Interesting Photo of the Day: A Lit Self-Portrait

What are your thoughts on this article? Join the discussion on Facebook

PictureCorrect subscribers can also learn more today with our #1 bestseller: The Photography Tutorial eBook

The post Interesting Photo of the Day: A Lit Self-Portrait appeared first on PictureCorrect.


from PictureCorrect https://ift.tt/36qJHFQ
via IFTTT

PictureCorrect.com: How Light Modifiers Affect Your Images

Light modifiers are equipment that change how light interacts with your subjects. Light modifiers can range from a simple reflector and an umbrella to a sophisticated soft box. But do light modifiers matter? Have you ever paid attention to how the different light modifiers change the look and feel of your images? How do you decide which light modifier to use for a particular image? Photographer Mark Wallace from Adorama explores these questions by comparing five common light modifiers:

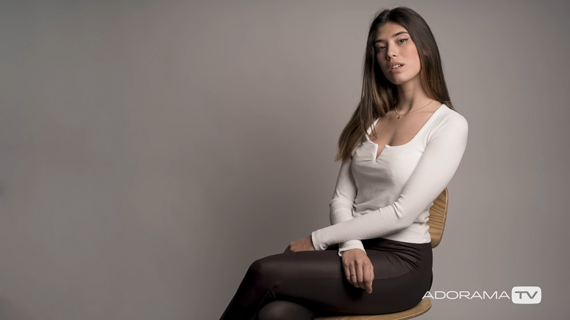
To compare how each light modifier affects an image, Wallace makes sure that everything is consistent. He has the model sit on a chair, and all photos are metered to f/8. He also keeps the distance between the subject and the light source same for all the photos.

Using a Medium Sized White Umbrella

When used with an umbrella, the light source acts as a large source. As a result, the shadows are soft.

portrait with umbrella modifier

With Built-In Diffusion Disc

Next, Wallace uses a Profoto D1 head that comes with a small built-in diffusion disc without any light modifier. This acts as a hard light source that creates harsh shadows. You can notice that the light does not wrap around the model and creates a hard shadow on the background.

off axis hard light portrait

To avoid the shadows from creeping into the image, Wallace suggests that you avoid shooting with the harsh light and the camera being off-axis. Have them on-axis instead. So, by moving towards the same direction as the light source, Wallace takes another photo and you can see that the shadow on the background is less pronounced:

on axis hard light portrait

Using a Parabolic Reflector

A parabolic reflector diffuses the light in a special way and keeps it from spilling everywhere. As the result, the background turns out little bit darker when using it. The shadows are still  harsh but you can notice a soft transition in the shadows in this case.

portrait using parabolic reflector

A parabolic reflector also affects the output of the light source. This is because it channels all the scattered light forward and hence more light reaches the subject. As Wallace demonstrates in the video, the light head which was previously metered at f/8 got metered to f/16 just by adding a parabolic reflector.

Using a Small Square Soft Box

The light coming out of a small square soft box with a diffusion panel wraps beautifully around the subject. This results in soft shadows under the chin and in the background. Also, the catch light in the eyes of the model appear as square specular highlights due to the shape of the soft box.

portrait using small square softbox

Using an Octabox

Fiinally, Wallace uses a 3 foot octabox with a diffusion panel to have softer light on the model. Because of the larger size of the octabox, the light is softer compared to that from the small square soft box. The softer light wraps better around the subject and even the shadow behind the subject is softer. Another advantage of using an octabox is that the catchlight in the eyes appear round which is more natural and flattering than square ones.

portrait using large octabox

I’m sure this helped you understand how different modifiers affect your images. Which one is the best one? Try it out in a studio and see for yourself. Different modifiers come in handy for different requirements.


Go to full article: How Light Modifiers Affect Your Images

What are your thoughts on this article? Join the discussion on Facebook

PictureCorrect subscribers can also learn more today with our #1 bestseller: The Photography Tutorial eBook

The post How Light Modifiers Affect Your Images appeared first on PictureCorrect.


from PictureCorrect https://ift.tt/2JtXdQv
via IFTTT