perjantai 3. huhtikuuta 2020

PictureCorrect.com: Bad Weather Black & White Photography Tips

One of the greatest variables dedicated landscape photographers have to accept is the weather. You can spend hours scouting locations and thousands of dollars on the best possible equipment. But even the mightiest photographer is powerless when pitted against Mother Nature.

Obviously, the weather has a dramatic impact on the light, and in turn, our photographs. When it’s not ideal outdoors, many photographers will give up without even trying. UK artist Nigel Danson isn’t so easily deterred.

Great photographers have the ability to adapt to whatever their environment throws at them, and Danson shows exactly what that means in this means. In this case, a gray day at the beach turns into an opportunity for some moody, reflective shots.

And, while the colors in the file may not blow us out of the water, a black and white conversion and some tonal adjustments really bring the photographs alive. Want to learn exactly what measures he took to make this photoshoot shine? You’ll have to watch to find out!


Go to full article: Bad Weather Black & White Photography Tips

What are your thoughts on this article? Join the discussion on Facebook

PictureCorrect subscribers can also learn more today with our #1 bestseller: The Photography Tutorial eBook

The post Bad Weather Black & White Photography Tips appeared first on PictureCorrect.


from PictureCorrect https://ift.tt/2Rp8mTB
via IFTTT

torstai 2. huhtikuuta 2020

PictureCorrect.com: Capturing Birds in Flight

A shot of a bird in flight has always been a challenge to photographers. Seeing a perfect print image only serves to make them eager to create the same result. Photographing a bird in flight presents one problem, but capturing that one special bird-in-flight shot that’s in focus and has good composition plus good light can represent a whole set of problems. Everyone has their share of good flight shots where the bird may be just a tiny bit soft. Those are easy. But, how do you get a great flight shot?

bird in action

Photo by Deven Dadbhawala; ISO 100, f/5.6, 1/1600-second exposure.

The camera technology of the last several years has made flight photography easier than it was before, but there are still lots of variables that need to be added to the equation to make good bird-in-flight photography a common part of your repertoire. Here are some fundamentals to help you increase your supply of flight shots:

Camera Body Features

The camera body equipment out today has made action photography much easier than it was when manual focus was the rule rather than the exception. The first handy feature to set is the continuous focus mode called AI Servo on Canon and Continuous Servo on Nikon. This setting allows the lens to keep changing the focus as long as the shutter button is depressed halfway and the subject is in the set auto focus point.

Second, Canon has a custom function that expands the auto focus point activation area to either 7 or 13 points. This is a great function, as it allows for the subject movement to remain in focus even if you don’t keep up with the movement of the bird in your primary AF point.

Drive mode is the third camera function to set. Here, the best setting is “high-speed continuous” where you get the most frames per second that your camera body will allow. While you’ll burn quite a few shots with this setting, it will allow more shots to choose from for the wing position and lighting you like best.

birding

Photo by Susanne Nilsson; ISO 100, f/5.6, 1/800-second exposure.

Lens Selection

Lens selection is a very subjective topic with plenty of correct answers. Being a Canon shooter, I’ll refer to Canon lenses, but many other brands have comparable lenses. If you want to do flight photography hand-holding your camera and lens, the best choices are the 400mm f/5.6 and the 100–400mm IS. These are, by far, the best lenses on the market for flight photography. (Canon shooters have the advantage here, as the comparable Nikon lens, the 80–400 VR, is very slow to focus. People in my workshops have wanted to throw their Nikon lenses as far as they could when they couldn’t force them to focus fast enough.)

When hand-holding, try to keep your hand as far out on the barrel of the lens as possible to provide better balance while you’re panning and moving around with the subject. Also, tuck your elbows into your body as far as you can and keep your legs about shoulder-width apart. This position helps you turn your body into a tripod.

Your skill level also plays a part in proper lens selection. When you’re starting out in bird photography, it’s best to use the above lenses as opposed to “big guns” such as the 400mm f/2.8, 500mm and 600mm lenses. The reason is that shorter focal length lenses provide easier tracking of the birds in the viewfinder. With the larger lenses, you have a very limited viewing range when the birds are close. You have to get them in view when they’re farther away and stay with them until they move close enough for you to take your shot. After time and practice, you’ll find it easier to focus on them when they’re close, but even then you’ll miss some shots. Longer focal lengths also allow you to work at greater distances with less change in subject position. Birds going across the frame are easier to track, particularly with a long focal length, than those coming directly into the camera, since they stay at roughly the same distance.

If you plan to shoot from a tripod instead of wanting to hand hold the camera/lens combination, a big lens will definitely do the trick. If you’re setting up a big lens on a tripod, by far the best option for a tripod head is the Wimberley head. The gimbal action is designed for action photography and makes panning with the birds easier than you could imagine if you’ve never used one of these heads. You can use a sturdy ball head, but you have to be careful with how loose you keep it. I primarily use my 400mm f/2.8, sometimes with an extender, with the Wimberley head and then keep a second body close at hand with a 70-200 f/2.8 lens and either a 1.4 or 2X extender attached.

bird watching

Photo by Peter Miller; ISO 100, f/8, 1/1000-second exposure.

The faster the f-stop of the lens, the better, as quick shutter speeds are imperative in getting sharp flight shots. It’s best to be able to stick with a f/2.8 lens but this isn’t always an option, depending on how much money you can spend. F/4 and f/5.6 are about as slow as you want for getting quick action shots, whether the subject is birds-in-flight or any other fast-moving subject.

Advancing lens technology has made flight photography much easier, but not foolproof. Auto focus is the major development that has helped to capture action. Be aware that owning an AF lens is not a guarantee of sharp results. There is no substitute for good technique. However, auto focus does yield a higher percentage of acceptable images when you’re shooting birds in flight, especially if you have a camera body that can shoot upwards of eight frames a second or more.

ISO

Because digital cameras keep improving the quality of images you get at higher ISO settings, it’s now alright to push the setting to 200 or even 400 to get good flight shots, depending on the available light. The caution to keep in mind is that a shutter speed of at least 1/500 is needed–preferably even 1/1000 or more, if possible. Doing a little bit of testing with shutter speed and f-stop will help you determine what the ISO needs to be for you to obtain the desired shutter speed.

Lighting

As with any other subject, lighting is critical with flight photography. The best light condition for flight photography is front lighting, with the sun at your back and the birds coming towards you or across in front. The best light is still those two golden times of day when the sun is low on the horizon, but because the subject is high in the sky, you can extend your shooting time as the higher sun can still bounce nice light off the bird.

birds flock

Photo by Thomas Hawk; ISO 100, f/6.7, 1/180-second exposure.

Composition

A key detail to keep in mind when you’re composing flight shots is which auto focus point is set. You need to become adept at changing the auto focus point on the fly for you to get good flight shots. As multiple birds are flying around your location, you have to be aware of which point you’ve selected for the best composition.

The best compositions have space in front of the bird in the direction the bird is flying. Having its beak/ bill crowded against the leading edge of the shot makes for a potential throwaway image, even if everything else is right with the shot. Your subject needs room to breathe, and continually changing the AF point for better composition will provide the space you need to maintain in front of the bird.

Starting out, keep the AF point on the center point and try to get the bird’s eye focused there. This will ensure there is room in front of the bird for it to fly into the frame. While the eye will be in the middle of the frame, the majority of the bird will be behind it, so you’ll be keeping the full bird from being centered in the frame.

Technique

The farther away you can get the subject into your viewfinder, the better. If you try to focus only on a bird that’s close to your position, you’ll never get a good flight shot. As you see a bird coming in your direction, get it in the viewfinder, and track with it as it moves closer. Once it’s in the position you like (the preferred frame size and in good light), you can fire away.

When you’re panning a bird in flight, continue the panning motion even after you’ve taken the final shot. Following through will keep that last shot in focus better than if you abruptly stopped the movement. It’s the same idea as a golfer doing a follow-through on her shot or a baseball player continuing with his swing. A good way to do this is to continue shooting after the bird has passed you by. The last couple shots will be throwaways, but you’ll have included the shot you really want.

birdwatching photos

Photo by Susanne Nilsson; ISO 100, f/8, 1/500-second exposure.

The eyes have it. As with any wildlife photo, you need to have the eye in sharp focus. If the eye is out-of-focus, then the shot is not of a technical quality suitable for publication. If possible, try to set your AF point on the eye. If you can’t do this, at least get the focus on the neck, as the neck of a bird is on the same plane as the eye.

Location

The biggest factor to keep in mind when you’re shooting flight photography is the relationship of the wind and the sun. Birds will always (well, almost always) take off and land into whatever wind or breeze there is. Getting the wind under their wings help them with lift and drag. Putting yourself in the right position to get the best flight shots means having both the wind and the sun at your back, allowing the birds to come towards you.

As you see, there are plenty of factors to keep in mind when you’re taking flight shots of birds. You have to think about how much you want the bird to fill the frame, what the background is like, and the direction of the subject in relation to the sun. Since these variables change from picture to picture, you begin to understand that creating great flight shots requires more than just getting the subject sharp. You’ll need to give yourself time and practice. In the meantime, you always have the delete button on both the camera and the computer.

My 600 f/4 sitting on a Wimberley head with my camera set to high-speed continuous and the sun and wind at my back will keep me happy for a good long time. I try to get caught up with what’s in front of me, fly with it, and become part of the action. The next stop for me will be in front of my computer, looking at lots of shots of birds in flight and, hopefully, lots of keepers.

About the Author:
Andy Long is an award-winning photographer/writer who devotes his photography work to the beauty of the world around us. As a leader of workshops (http://www.firstlighttours.com) since 1994, Andy likes to help people explore new areas and to go home with a memorable experience as well as great images.

With more than 100,000 stock images, his work has appeared in more than 30 publications and books as well as appearing in National Geographic and Animal Planet television shows. Besides these, Andy’s work has also appeared in Birder’s World, Outdoor Life, Audubon Regional Field Guides, regional AAA magazines, Montana Magazine, Outdoor and Nature Photography, Photo Media, National Cowboy Museum’s Persimmon Hill, Ancient Images note cards, travel brochures, Sierra Photographers Focus and in ads for Rollei cameras. He is a previous winner of the national RoseWater Network Photographer of the Year award.


Go to full article: Capturing Birds in Flight

What are your thoughts on this article? Join the discussion on Facebook

PictureCorrect subscribers can also learn more today with our #1 bestseller: The Photography Tutorial eBook

The post Capturing Birds in Flight appeared first on PictureCorrect.


from PictureCorrect https://ift.tt/2FMZyzv
via IFTTT

PictureCorrect.com: Interesting Photo of the Day: Tower Through the Sun

Planning is one of the greatest key elements of successful photography. When you want to get a particular shot, you must plan for it well ahead of time and have the perseverance as well. An image that lacks planning after all is a mere snapshot. Photographer Tyler McKay for instance, had to go back to the same place for twenty-five times within one and a half months to capture the sun perfectly aligned with the CN tower in Toronto, Canada:

tower through sun

“Sun Aligned with the CN Tower” by Tyler McKay (Via Reddit. Click image to see full size.)

McKay took the image with his Sony A7RIII and 100-400mm lens at 340mm, f/9, 1/250s, and ISO 100.

It’s a good thing McKay didn’t give up, and instead kept on trying until the 29th attempt. Although he used different applications and online resources to determine the perfect alignment between the sun and the CN tower, they’d be off by some bit every time. He finally got lucky on the 29th attempt. The fact that the alignment lasts only about 1-2 seconds makes this shoot even more challenging. Just imagine how prepared you’ve got to be in order to take such an image.

Besides the perfect alignment, there are other factors that make the image praiseworthy. The silhouette of the cityscape that surround the tower is equally fascinating. The unique cloud pattern in the background adds another point of interest to the image. And how can anyone miss the flock of birds near the water body. The birds flying so close to the water surface perfectly complete the image. They make the image so much more aesthetically pleasing.

“1000’s of birds starting flying across the water making the weirdest/coolest sounds I’ve ever heard. It was such an incredible thing to witness. It was a beautiful warm summers morning when I finally captured this image how I imagined and planned it. Practice patience and enjoy the moment.”

This is a great proof that photography isn’t just luck, it’s discipline as well.


Go to full article: Interesting Photo of the Day: Tower Through the Sun

What are your thoughts on this article? Join the discussion on Facebook

PictureCorrect subscribers can also learn more today with our #1 bestseller: The Photography Tutorial eBook

The post Interesting Photo of the Day: Tower Through the Sun appeared first on PictureCorrect.


from PictureCorrect https://ift.tt/2R3JSyH
via IFTTT

PictureCorrect.com: Using a Mountain Bike to Get to Photography Spots

If you’re a landscape photographer, you understand the amount of effort it takes just to reach a particular location for a shoot. You may end up hiking for hours just to get to your preferred destination before taking any photos. The challenge with this is time. Because it can be a slow process, you may not be able to reach all the places where you want to go and take all the photos that you want to take. Landscape photographer James Popsys came up with a way to tackle this issue by getting himself a mountain bike. He shares his experience in this video:

As some may suggest, a car could be an easier and a quicker way. But that doesn’t give the feeling of being outdoors, and many locations are not accessible by cars. If you do decide to go by bike, it’s probably going to be inconvenient to take your phone out frequently while riding, so getting yourself a GPS navigation kit would be a good idea too.

If you feel that you’re really up for it, you can even go camping for multiple days with your bike. This way, you can have a great experience out in nature with many opportunities to shoot landscapes in different lighting conditions without having to worry about getting back home.

Are you a fan of the idea to go around on a bike taking photos? Let us know what you think.


Go to full article: Using a Mountain Bike to Get to Photography Spots

What are your thoughts on this article? Join the discussion on Facebook

PictureCorrect subscribers can also learn more today with our #1 bestseller: The Photography Tutorial eBook

The post Using a Mountain Bike to Get to Photography Spots appeared first on PictureCorrect.


from PictureCorrect https://ift.tt/2xLCbGE
via IFTTT

keskiviikko 1. huhtikuuta 2020

PictureCorrect.com: Photography Perspective

After spending the last four years getting more and more into photography, it has only been recently that I’ve felt I have really become confident in my abilities to make use of perspective to get shots that I’m truly proud of. That may seem like a long time. But I guess you could say I’m somewhat of a perfectionist when it comes to critiquing my own work. I have recently been able to capture some images that really emphasize the sense of depth in the scene. This led me to write this article to share some of those techniques with you.

perspective photo

Photo captured by Antonio Idini

If you look at a photograph, whether it be in print or on a screen, it goes without saying that what you are looking at is a two-dimensional representation of a three-dimensional scene. The two-dimensional image is an illusion, and your mind deciphers the information to determine the ‘depth’. As photographers, we can use the concept of perspective to create a sense of depth and scale in photos.

As a photographer, you must be aware of perspective, as it can be a little tricky at times. We must avoid taking pictures that include unintended distortions or that are flat and uninteresting.

We can define perspective as the sense of distance between things and their dimensions in relation to the position of the viewer, producing a sense of depth. Here are my most useful tips on how to use perspective:

Blocking Parts of Subjects

It’s an obvious statement, but when you see one object partially obstructing your view of another object, your brain tells you that the obstructed object is further away than the object obstructing it. By relating their sizes we can get a sense of the depth. We call this overlap perspective.

Relative Size

As an object gets smaller, our brains process the information to let us know that the object is farther away from the spot where the photo was taken. We already know rough sizes of natural objects, like cars, trees, humans, and houses, so upon seeing a person who is five times taller than a house, our brain lets us know that the person is much closer to us than the other object. Our brain works this out based on familiar objects in relation to other objects in the picture to get an idea of the distance and depth of relative objects. This is what we refer to as scaling.

We can use some effective photography techniques by placing several objects at different distances from the viewpoint and create an illusion that they are the same distance from the camera as each other. This can produce some peculiar pictures.

Having a single familiar object in a photo allows us to work out the sizes of everything else in the scene in relation to that one familiar object. Think back to all the pictures you’ve seen of fishermen holding their catch smiling at the camera. You’re able to see how large the fish is compared to the sizes of the fisherman’s body. Think about an image of a person standing among huge leaves in the jungle, which are taller than him. Seeing this stimulates our minds because we’re used to seeing leaves that are smaller than our hands.
leading lines

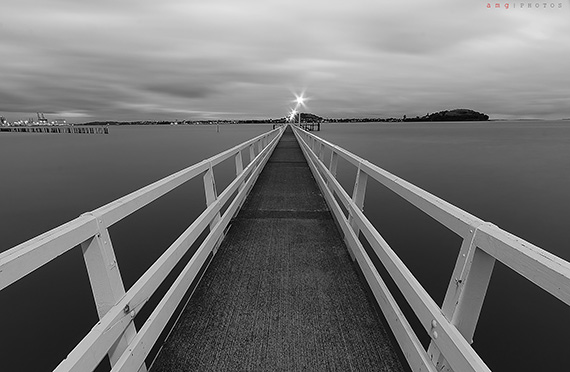
“Mission Bay, Auckland” captured by PictureSocial member Al Michael Genabe

Vanishing Point

The human eye judges distance by looking at how lines and planes converge at a point inside or outside of the picture. This is what we call linear perspective.

Fisheye lenses produce photographs of objects which appear smaller along the edges of the shot than they would look in reality. Conversely, things in the middle of these shots appear a lot bigger than they would in reality.

Parallel lines which move away from the viewpoint in a photo appear to be converging or meeting with each other at a certain point, which is what we call vanishing point. This is very common in photography. A typical example is a photo of railway tracks converging in the distance.

The Lens Axis Level

Horizontal lines moving across the lens axis level appear to be straight, while all other horizontal lines above and below this level appear as curved lines. With rectilinear perspective, the straight lines in the frame are reproduced as straight lines in the picture in the same way that we perceive objects in reality. Regular lenses are rectilinear lenses.

Perspective Projection Distortion

All pictures could be subject to perspective projection distortion. The fisheye and panoramic lenses produce perspectives that are false. They’re used to produce interesting effects deliberately.
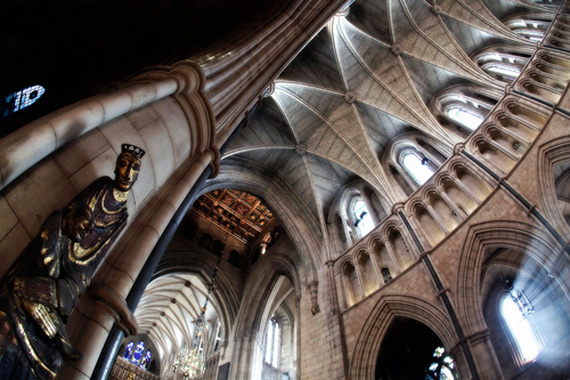
Wide angle and fisheye lenses can warp lines to create or enhance an artistic flair. "Southwark Cathedral" captured by Luigi Clemente. (Click image to see more from Luigi Clemente.)

Wide angle and fisheye lenses can warp lines to create or enhance an artistic flair. “Southwark Cathedral” captured by Luigi Clemente

Reduced Color Quality, Definition, and Sharpness

Due to reduced contrast, scattering of light, and other factors, our eyes cannot define objects in the distance as easily. Objects farther away are harder to define because of light scattering and reduced contrast, as well as other factors. Knowing this allows our brains to make more sense of distance. In photography, we can take this knowledge and use it to our advantage to create pictures where objects far away have less definition and contrast. We do this by controlling the depth of field. An easy way to do this is by focusing the camera lens slightly shorter than infinity so that the objects furthest away look blurred. This is what gives the viewer a sense of depth and distances of various objects in the picture.

Objects with reduced brightness and contrast make our brains perceive that we are looking at something further away than the brighter, more vivid objects closer to the foreground.

Before you take a photo, you should decide whether you want to emphasize the depth of the scene or not.

Depth of Field And Focus

The aperture, focus distance, and focal length can be used to control depth of field. Depth of field (DoF) is used to define an area where objects are sharp in the picture. Objects outside of this zone appear blurred. Many beginners try to make everything in the picture look sharp. They often try to maximize the DoF with smaller apertures. Sometimes this can work well, but it is generally not seen as something more seasoned photographers like to do.

Isolating an Object

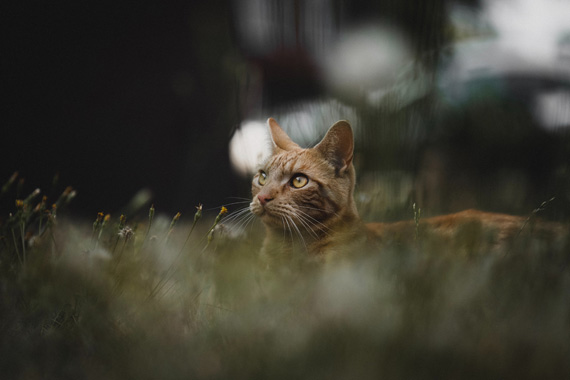
One way to get nice effects in photography is to isolate an object from its environment. An example is to use a wide lens, enabling you to divide the scene into different layers. Sometimes you will find that the background is unappealing. You can often resolve this by using a tiny DoF so that everything behind the main subject is out of focus. Background elements are now less significant in the picture.
isolating subject

Photo captured by Gijs Coolen

Layers

If you’re interested in landscape photography and enjoy shooting scenes of mountains, a great approach is to use the notion of layers. Mountains are usually the dominating feature of a photo. By including more layers in the foreground and the middle area of depth you can bring your photos to life.

A lack of familiar objects (trees, people, etc.) in a shot makes it hard for the viewer to get a sense of scale. In this instance, you might wait until someone comes walking past to get a shot or ask your buddy to stand in the frame.

Now that we’ve reviewed these tips on working with perspective, let’s look at how we can use it to create some interesting effects. That brings us to the second half of this article.

Forced Perspective Photography Tips

Forced perspective photography is a style that uses optical illusions to make a subject seem to be different sizes and distances from the viewer than it actually is. It can be used to create some rather unusual (and often funny) effects.

Let’s examine a few simple techniques for doing forced perspective photography.

As mentioned, it’s possible to deceive the viewer by manipulating perspective. Think about a diamond. Usually, with diamonds, size is the most important factor to determine how much they are worth. The cut and clarity are less important to some extent. When we see a photo of a diamond, we need a reference point to get an idea of its size. We can manipulate photos so that the viewer sees the diamond and the other object as being entirely different sizes or virtually the same size.

You will no doubt have seen the usual ‘holding a building’, ‘leaning on a skyscraper’, ‘holding the sun’ types of pictures, but how can we get some more interesting photos using this technique?
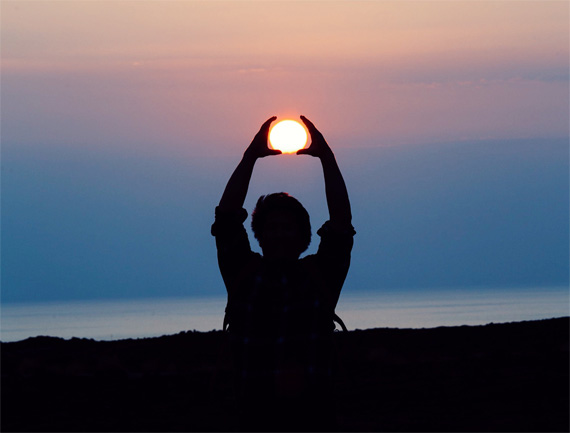
forced perspective

Photo captured by Jason Leung

Below I have outlined three ways for getting forced perspective shots. Everything else is completely your choice. Use your creativity and ride that sucker like a wave for as long as you can until you have no more ideas left!

Size Altering Forced Perspective Photography

A size altering forced perspective picture is manipulating three things: distance, the line of sight, and the depth of field. First, choose the subject that you want to appear smaller. Position this object further away from the camera than the subject you want to make seem larger. How close or how far away the two subjects are will determine their difference in size. More space is needed for larger size differences between the two objects. It’s, therefore, a good idea to do this kind of photography outdoors.

Try using a wide angle lens, around 35mm or 24mm. Set your aperture to a large F-stop value. The F-stop will vary depending on the distance between the two objects. It is necessary to find a setting that allows you to get both of your subjects in focus.

After finding the most suitable focus, the next step is to spend some time lining up the two subjects and working out your camera position–the overall alignment of the photo. Let’s pretend you’re taking a shot where the first subject is a person and he or she has a hand on the other subject. For such a photo you would need to take some time to get the alignment as perfect as you can. You may need to take many shots to get the perfect picture. I would recommend you use a tripod to minimize movement and stabilize the camera position. Consider gaps and overlaps between the two subjects. You need to spend time getting everything aligned perfectly. Think about all of the failed attempts you’ve seen by people trying this technique–more than you care to remember, no doubt.

Zero Gravity Forced Perspective Photos

This technique can be achieved fairly easily by placing the camera on its side or upside down. Ask your model to lie on the ground and put his or her feet against a wall to look as though the ground is actually a wall that the model is leaning against. The model could also lean out from doorways and windows to make it seem like he or she is hanging out from them. One thing to be aware of is the direction in which clothes and hair hang. You could have the subject wear a hat or tuck in his or her T-shirt. It also helps if models wear clothing that fits a little tighter than normal.

Another point to remember with this approach is that when you turn the camera on one side, you need to make sure it is perfectly aligned at 90 degrees or 180 degrees with the horizon or the edges of the building and ground to make the illusion works properly.

Merged Subject Forced Perspective Photos

There has been a growing trend recently to show old photos of a scene in front of a recent photo of that same place. This is an example of merged subjects. What you have to do is get the old picture to line up with the size of the current scene. You’ll be holding the old picture relatively close to the camera, so you’ll need a large F-stop with a wide angle lens so that you can put the two pictures in focus.

I hope that reading this has given you a wide range of actionable approaches and provided you with the basics to step outside and start getting some excellent shots by using perspective. Step outside when you can and enjoy yourself! Thanks for reading and please remember some of the tips I made next time you’re taking photos.

About the Author:
Luke Walkers is a photography enthusiast originally from the UK and lives with his wife in Canada.


Go to full article: Photography Perspective

What are your thoughts on this article? Join the discussion on Facebook

PictureCorrect subscribers can also learn more today with our #1 bestseller: The Photography Tutorial eBook

The post Photography Perspective appeared first on PictureCorrect.


from PictureCorrect https://ift.tt/3dPEKIj
via IFTTT

PictureCorrect.com: Interesting Photo of the Day: The Milky Way Over Dubai

You can associate a lot of things with Dubai: shopping, great food, breathtaking skyscrapers, and desert safaris. But one thing you’ll rarely hear tourists (more specifically photographers) say is, “Dubai is a great place to shoot Milky Way photos.” I mean, no way, not with all that light pollution! If you’ve seen NASA’s images of Dubai at night you, know how difficult it is to make a Milky Way shot. The city shines like a beacon in the dark. So when photographer Siddharth Prem decided to shoot an image of the night sky from Dubai he had to travel to the outskirts of the city:

india long exposure of the sky

Milky Way over Dubai (Via SmugMug. Click image to see full size.)

As you can see even then the image reflects how the night sky is dominated by light pollution from the city. This was a very good result given the difficult conditions.

Prem catpured the image with a Canon EOS 6D at ISO 6400, 16mm, f/4, and 30 seconds. He says he used Lightroom to “make the light pollution easy on the eyes.”


Go to full article: Interesting Photo of the Day: The Milky Way Over Dubai

What are your thoughts on this article? Join the discussion on Facebook

PictureCorrect subscribers can also learn more today with our #1 bestseller: The Photography Tutorial eBook

The post Interesting Photo of the Day: The Milky Way Over Dubai appeared first on PictureCorrect.


from PictureCorrect https://ift.tt/2yij1Ie
via IFTTT

PictureCorrect.com: Creative Studio Photography Using a Projector

Inspiration can sometimes have unexpected sources. While sometimes it can be really difficult to come by creative ideas, other times it can come around from something like….a projector. Well that’s exactly what photographer Henbu took inspiration from this time around. Let’s join him in this video as he shares some cool results he was able to get using a projector for his photoshoot:

The idea is quite simple. Use a projector to project some colors and patterns from your computer on to your subject. You’ll thus need to plan for what all images you’ll be using in your photoshoot beforehand. Sort out a varied array of designs, patterns, and colors that go well with the theme of your shoot.

Another important factor that you’ll need to keep in mind is the projector’s brightness. Make sure that the lighting you use doesn’t overpower the projector. Otherwise, the projections won’t be so prominent in the images.

You can even set the mood to the image by using creative background lighting. This is quite important as you’ll be quite restricted as to how much flash you can use to illuminate your subject.

“What’s really cool about a projector is that you can basically shape your light however you want, any color you want. The creativity is almost limitless. This is why I think it’s such a fun process to do.”


Go to full article: Creative Studio Photography Using a Projector

What are your thoughts on this article? Join the discussion on Facebook

PictureCorrect subscribers can also learn more today with our #1 bestseller: The Photography Tutorial eBook

The post Creative Studio Photography Using a Projector appeared first on PictureCorrect.


from PictureCorrect https://ift.tt/2UB4Vev
via IFTTT