maanantai 30. maaliskuuta 2020

PictureCorrect.com: Daily Interesting Photo: Sunset at Superstition Mountains

When the conditions are just right, an event like a sunset can get crazy. The explosion of colors in the sky mixed with dramatic cloud patterns and a majestic landscape; these are the ingredients that a landscape photographer’s dreams are made of. Luckily, when landscape photographer Ross Schram von Haupt was out in the Superstition Mountains in Arizona, he got to witness such a sunset in real life. Just have a look at the image below and you’ll see why it was so special:

sunset in Three Sisters Peak

“Crazy Sunset in the Superstition Mountains” by Ross Schram von Haupt (Via Reddit. Click image to see full size.)

The image is a 3 shot focus stack that Haupt took with his Nikon D610 and Nikon 16-35mm f.4 lens at ISO 100, 16mm, f/14, and 1s exposure time.

What’s striking about this image is how well composed and brilliantly vibrant it is. The interesting cacti in the foreground, the Three Sisters Peak in the mid-ground, and the crazy beautiful sky in the background altogether make this image an insane package.

“This particular scene was facing roughly 60° to the right of the actual sunset. And I can’t even begin to explain the color and light that was going off. It was hard to keep my focus on the scene in front of me and not turn to watch the main sunset to my left.”

It’s also interesting how the colors in the sunset match the colors of the cacti in the foreground. How Haupt has composed this brilliant image has definitely done justice to the beautiful sunsets that Arizona is known for. Wouldn’t you love to witness such a sunset for yourself?


Go to full article: Daily Interesting Photo: Sunset at Superstition Mountains

What are your thoughts on this article? Join the discussion on Facebook

PictureCorrect subscribers can also learn more today with our #1 bestseller: The Photography Tutorial eBook

The post Daily Interesting Photo: Sunset at Superstition Mountains appeared first on PictureCorrect.


from PictureCorrect https://ift.tt/3aBzYMQ
via IFTTT

PictureCorrect.com: Wedding Photography: 10 Hacks for both Photo & Video

Being a wedding photographer does not necessarily mean that you can’t try your hand at some videography. Being a hybrid shooter has certain perks of its own. While it gives you an edge over the competition, it also gives you an opportunity to charge more. But to be able to do both, you need to be able to work efficiently as well. To help you out, wedding photographer Taylor Jackson shares 10 hacks to taking wedding photos and videos:

Stabilization matters a lot when it comes to taking videos. If you have a camera with a stabilization system built-in, that’ll help you out to some extent. Otherwise, using your camera strap or viewfinder as points of support will let you take smoother videos. A good alternative can also be to use a GoPro. Its amazing stabilization almost matches the output of a gimbal. If any shake still manages to creep in, you can use software to sort it out. For instance, the warp stabilizer feature in Premiere Pro is a great tool to use to stabilize videos in post.

Another very important aspect that Jackson talks about is slow motion. Slow motion footage adds that cinematic feel to the video. It captures the movement in a way we can’t see in real life. It also has the advantage of letting you create more content by shooting less video. Be sure to go through your camera menu and set it to shoot at 60fps, or even 120fps if absolutely necessary. Further, using a handle to add motion when doing a slow motion shot will add to the cinematic feel of the video.

If you are primarily a photographer, always give greater importance to the images first. Photograph the important moments first, and then shoot video. This method also puts less of a load on the camera’s buffer system. And if it gets really difficult for one person to handle, let the second photographer take the video.

What do you think? Are you confident enough to work as a hybrid shooter in weddings?


Go to full article: Wedding Photography: 10 Hacks for both Photo & Video

What are your thoughts on this article? Join the discussion on Facebook

PictureCorrect subscribers can also learn more today with our #1 bestseller: The Photography Tutorial eBook

The post Wedding Photography: 10 Hacks for both Photo & Video appeared first on PictureCorrect.


from PictureCorrect https://ift.tt/2w4uXxc
via IFTTT

PictureCorrect.com: How to Photograph a Car to Sell It

When buying products online, what is the first thing that you look at? Obviously “the photo” right? Yes, photographs play a very important role in making an impression when it comes to online selling. A well-taken photo helps in attracting a lot of attention and will help in selling your product. Photographer Mike shares his experience on how photography helped him sell cars:

Like when photographing any product, have the car cleaned before the photoshoot. It will save you a lot of time from fiddling around in post removing the dirty spots. A shiny car also makes the photography process a breeze and results in an attractive looking image.

When taking the image, opt for a longer focal length. This will result in a more natural looking image. However, for the interiors, shorter focal lengths work best. And since you’d want all of the car in focus, shoot at greater f-values like f/4.

Also, be sure to experiment with various angles and perspectives.  For instance, lower angles give a strong look the car.  And don’t forget to take photos from multiple angles. Seeing multiple photos helps in making the prospective customers feel more confident about the car and you – the seller.

Do you have any experience selling products online? If you’ve been struggling, try posting better photos. You’ll definitely see an improvement in sales.


Go to full article: How to Photograph a Car to Sell It

What are your thoughts on this article? Join the discussion on Facebook

PictureCorrect subscribers can also learn more today with our #1 bestseller: The Photography Tutorial eBook

The post How to Photograph a Car to Sell It appeared first on PictureCorrect.


from PictureCorrect https://ift.tt/2wEQjSc
via IFTTT

sunnuntai 29. maaliskuuta 2020

PictureCorrect.com: Infographic: The Hidden Costs of Photographing a Wedding

When you’re a photographer, it’s only a matter of time before friends and acquaintances start asking you to do them favors—favors like photographing their weddings. And it’s tempting. You’re a good friend. You like taking pictures. And it’s just a few hours of work, right? Wrong.

Before you think about working for next to nothing, make sure you’ve considered the hidden costs of photographing weddings. Italian wedding photographer Francesco Spighi created this telling infographic to illustrate what it really costs to provide your services:

cost-of-photographing-a-wedding-infographic

The Cost of Photographing a Wedding (Via Francesco Spighi. Click to see full size.)

There’s a reason professionals charge so much for their photography services; there’s a lot going on behind the scenes. Remember to factor in the cost of your gear, software, editing time, planning time, transportation, and other hidden expenses before you agree to work for pennies or good karma.

We want to hear from you. Have you been asked to photograph a wedding for cheap or free?


Go to full article: Infographic: The Hidden Costs of Photographing a Wedding

What are your thoughts on this article? Join the discussion on Facebook

PictureCorrect subscribers can also learn more today with our #1 bestseller: The Photography Tutorial eBook

The post Infographic: The Hidden Costs of Photographing a Wedding appeared first on PictureCorrect.


from PictureCorrect https://ift.tt/2fV0cPx
via IFTTT

PictureCorrect.com: Using Natural Light For Great Wildlife Photography

Wildlife photography combines a range of skills, both creative and technical. Many people struggle with one aspect in particular; knowing the best light for capturing their wildlife photos.

To take a top-class wildlife photograph, you need to know your animal: where to find it, how to approach it without scaring it away, and how to know the precise moment to press the button to capture the character of the subject. Often a wildlife photographer will spend hours trying to get a good shot. What a shame, then, if all that effort is wasted by taking your photo in bad light.
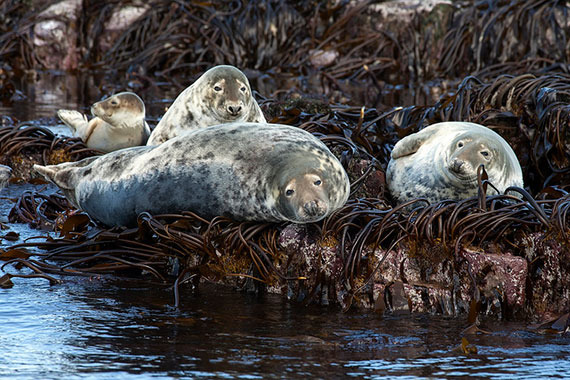
wildlife photography lighting techniques

Photo by kennysarmy; ISO 200, f/8.0, 1/100-second exposure.

As a nature photographer, I have learned that the ideal light for a photo varies depending on the subject. Landscape photos are usually best photographed in sunny weather, early in the morning or late in the afternoon when the contrast is low and the light is soft and colorful. On the other hand, rainforest photography is usually best in the middle of the day in cloudy weather to eliminate extremes of light and shade. To understand the best lighting for wildlife photography, take a lesson from both landscape and rainforest photography.

To get the best light for a wildlife photo, you are really looking to minimize contrast, and to eliminate shadows from important areas–most importantly across the face of the animal.

If you take your photos in the middle of a sunny day, you are bound to encounter shadows in all the wrong places. Bright light is likely to overexpose parts of the subject, while the face and the underside of the animal could be lost in heavy shadow. The result will be unattractive and lacking in much of the detail that should give character to your photo.

There is nothing wrong with taking your wildlife photos on a sunny day. Just remember the lesson from landscape photography and seek to take your photos early in the morning and late in the afternoon. At these times, the subject is illuminated from a more horizontal angle, so the full face of the animal is well-lit; you are less likely to have shadows over the eyes and other important features. If there are shadows, they will be much softer because the contrast is much lower when the sun is low in the sky.
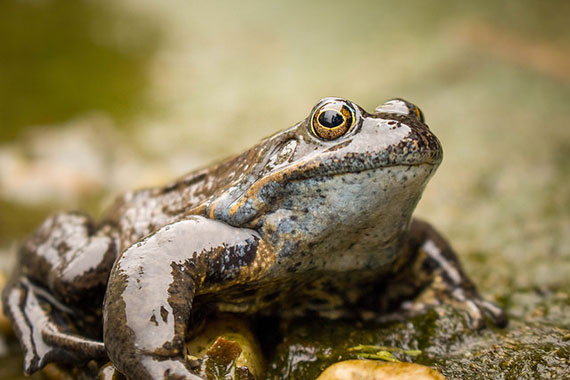
best wildlife photo tips for good lighting

Photo by Matacz; ISO 400, f/5.6, 1/400-second exposure.

The light at these times is also much more colorful, with the golden hues you associate with sunrise and sunset. This is a classic technique for improving landscapes, but it can be just as effective for wildlife. The warmth of the light can create an intimacy in your pictures that is completely lost in the harsh light of midday.

The second approach is to follow the rule of rainforest photography, and take your photos in overcast weather. This allows you to catch your subject in very even, low-contrast light.

I find cloudy days particularly useful for animals with glossy surfaces. Frogs, for example, have damp, shiny skin that reflects a lot of light. In glaring conditions, a green frog may appear mostly grey or silver in a photo. On a cloudy day the same frog will be shown in its true colours.

Birds often appear more colorful on a cloudy day for the very same reason. The sun shining on glossy feathers can create a lot of reflection, robbing the photo of its natural color. It may seem the opposite of what you would expect, but the dull light of a cloudy day can actually produce the truest colors in a bright wildlife subject.

One final question you may ask: should you use a flash to illuminate a wildlife photo? My answer to that is a definite “NO.” Flash photography bathes the subject in white light, coming from directly in front of the subject. It may illuminate the subject, but at the same time rob it of the natural play of light and shade that makes a good photo so appealing.

Some wildlife photography experts use multiple flashes to brightly illuminate a subject from every possible angle. This approach can work very well, but remember: these are experts in flash photography. If you are at the beginner stage, I recommend learning to work with natural light. When you get the hang of it, I guarantee you will be happy with the results.

About the Author:
Andrew Goodall writes for http://www.naturesimage.com.au and is a nature photographer based in Australia. He manages a gallery in Montville full of landscape photography from throughout Australia.


Go to full article: Using Natural Light For Great Wildlife Photography

What are your thoughts on this article? Join the discussion on Facebook

PictureCorrect subscribers can also learn more today with our #1 bestseller: The Photography Tutorial eBook

The post Using Natural Light For Great Wildlife Photography appeared first on PictureCorrect.


from PictureCorrect https://ift.tt/2vX65qY
via IFTTT

PictureCorrect.com: Photographer Braves Blizzard for Stunning Street Views

Three hours in powdery snow and subzero wind chills isn’t for everyone. On the contrary, most of us would prefer to stick around inside and shield our gear from the inclement weather and harsh elements. But, for photographer Pierre T Lambert, a quiet cold evening proved to be a source of excitement and inspiration.

Using an action cam to record, Lambert captured his trek through a bonafide Chicago blizzard. What’s more, the POV footage gives viewers the opportunity to see the small details that drove Lambert’s photography that particular night.

Each click of the camera is paired with the accompanying image file, showing just how much a talented hand can make a banal scene seem incredible. The next time winter weather has you feeling down, watch how this image maker deals with it. Chances are, you won’t look at a snow day the same way ever again!


Go to full article: Photographer Braves Blizzard for Stunning Street Views

What are your thoughts on this article? Join the discussion on Facebook

PictureCorrect subscribers can also learn more today with our #1 bestseller: The Photography Tutorial eBook

The post Photographer Braves Blizzard for Stunning Street Views appeared first on PictureCorrect.


from PictureCorrect https://ift.tt/2UYNvaH
via IFTTT

lauantai 28. maaliskuuta 2020

PictureCorrect.com: 10 Mind-Blowing Photography Tips for Beginners

If you want to take better photos but aren’t sure where to start, this list of 10 beginner tips is for you.

1. Pick a subject that speaks to you.

Pay attention to the reccurring themes in your work. Think of what draws you to these things so you can find new ways to capture and express what you like!

2. Practice!

Don’t be afraid to make mistakes! Sometimes those mistakes turn out to be something unique and innovative that you can build on.

3. Work the subject.

Try shooting the same thing in as many ways you can that capture different aspects about it.

shoot the same subject in many different ways

photo by Yu Morita

After your shoot, look through your shots and critique your work. Be mindful of what worked and what didn’t and why. Editing your shoot is an important part of the learning process.

4. Study the work of other photographers.

Find something that inspires you and pay attention to what you like and try to mimic it. Then try to make it your own by bringing in something new and different.

5. Composition.

If you pay attention, you’ll see that most great photographs contain at least one of these guidelines:

  • Rule of Thirds. Imagine the image is divided into thirds both horizontally and vertically. The interesting aspects of the image are placed on those lines. This rule is often used in landscapes, with the horizon being placed in the top, or bottom third of the composition. Some cameras even have a grid option that will display through your viewfinder, to help you make your composition precise.
  • Balancing Elements. If you’re framing your main subject off center, try having a less important object in the background of the image to balance the weight of the dominant object. The secondary object will add depth to the subject and make it more interesting by filling the void of space in the image.
  • Leading Lines Use the subject’s lines or contours to your advantage. These lines lead the viewer’s eyes across the image, so become aware of them and how to use them to your advantage. The more they lead the eye around, the longer the viewer looks at your image. Examples of leading lines could be a winding road on a hilly landscape or the contours of your model’s body. Notice how models pose in ways that create leading lines by using their limbs in interesting ways.
leading lines

photo by Nicolas Raymond

  • Symmetry and Patterns. These are often used in architecture and nature, even in artistic portraits. The subject is center balanced, unlike in the rule of thirds.
  • Viewpoint. The angle from which the photographer shoots in relation to the subject. Showing us a subject from an angle that we don’t usually see it is a great way to make it more interesting. In working the subject, pay attention to the message the shot conveys. Try eye-level, from above, below, side, behind, from a distance, in close, etc.
  • Background. Pay attention to your background! If your background doesn’t add to the subject, use a plain backdrop or use a shallow depth of field to blur the background out. Think about how it affects the tone of the subject.
  • Depth. Mostly in landscapes, depth helps convey a three-dimensional subject in a photograph, which is two-dimensional.
  • Framing. Objects in your environment can be used to add to your shot! Some useful examples are archways from a building, branches from a tree, or holes in cliffs. These frames can help show off the setting.
  • Cropping. Cropping in tight on a subject is a great way to remove distracting elements around it. Everything in the photograph should hold value to your image. If it doesn’t, try cropping it out.

The more you practice these composition guides, the more they will become instinctual. Even in your editing & selection process, pay attention to which images pop out at you, and see if they hold one of these elements.

6. Familiarize yourself with your tools.

Photography is so versatile! You can even take amazing photos with a coffee can, but you must understand the limitations of your gear.

7. Learn to use photography software.

Digital software is today’s darkroom, and developing an image is just as important as how you shoot it. My favorite way to digitally polish my images is through Lightroom. It’s amazing what it allows you to do to an image without exposing yourself to chemicals or wasting photo paper and developer. The preset filters are a great way to intensify the tone of the image, but you must know how to fine-tune them to make the image just so. Photoshop is also an important tool.

8. Learn lighting.

I suggest photographing a subject at different times of day and compare them. If you have access to professional lighting equipment, try shooting your subject lit from different angles, diffusion versus hard lighting, etc. There are jobs just dedicated to lighting on high-end shoots, so there are no limits there if you have the budget. Really think about how the light conveys your message to the viewer.

studio lighting setup

photo by Matt Biddulph

9. Go with your instincts.

Make sure what you are shooting is fulfilling something for you. There is no point in shooting something you aren’t enjoying. It will show in your work! The more you are passionate about it, the more creatively you can capture it! I’ve worked with so many photographers that have talent, but take on shoots they don’t enjoy and it showed in the quality of the images. For example, I could never understand why somebody would hire a nature photographer to shoot their portraits. Somebody that isn’t a people person doesn’t take flattering photos of people no matter how much technical knowledge they have. On the other hand, if you see all people as beautiful and you have a natural talent for making a person feel good about him/herself, then portrait photography is a great niche!

communicate with your subject

photo by Oscar Rethwill

10. Communicate with your subject.

If you’re shooting any type of portrait, make sure it is prepared beforehand. There’s nothing worse than having your model show up with chipped blue nail polish! Learn to guide your subject with clear direction in a way that makes them feel comfortable! Even models feel vulnerable with a lens in their face, so learn to give suggestions in a flattering way. Nobody feels confident after hearing “suck in your gut,” but if that’s what you want, try something like “intensify your rib cage.” Compliments go a long way! When you ask for a smile, it will look forced. If you compliment the person they will naturally smile.

About the Author:
Article written by Lara Solomon.


Go to full article: 10 Mind-Blowing Photography Tips for Beginners

What are your thoughts on this article? Join the discussion on Facebook

PictureCorrect subscribers can also learn more today with our #1 bestseller: The Photography Tutorial eBook

The post 10 Mind-Blowing Photography Tips for Beginners appeared first on PictureCorrect.


from PictureCorrect https://ift.tt/39lPkDy
via IFTTT