maanantai 3. helmikuuta 2020

PictureCorrect.com: 3 Tips To Nail Exposure In-Camera

Being able to nail the exposure in-camera is something every photographer should be able to do. It’s quite essential as you’ll be able to deliver results with optimal quality and details. It also cuts down a pretty good chunk of time you’d otherwise spend in correcting exposure in post. Photographer Pye Jirsa from SLR Lounge talks about 3 tips that will teach you how to expose for your photos while maximizing your camera’s details and dynamic range:

 LCD Brightness

Straight out of the box, the displays on the back of the cameras are designed to get bright outdoors, and dim down when indoors. This makes it inconsistent for judging exposure.

“I don’t want you to rely on your screen to judge exposure.”

To make the LCD more consistent, change its brightness from Auto to Manual. Then pick any brightness level that you’re comfortable with. And that’s it. No matter whether you’re indoors or outdoors, the LCD will now give a consistent output.

Turn On Highlight Alert

Highlight alert notifies you if you’re clipping the highlight details. Be sure to go through your camera menu and look for this option, and enable it. If the image that you’ve taken has lost details on the highlights, it will let you know by blinking in those clipped areas. You can then adjust your camera settings accordingly to fix the issue.

Use Flat Picture Profile

The preview that the camera shows is based on the picture style/profile that you’re shooting in. This therefore affects the histogram as well. To make sure that your images retain as much detail as possible, set a custom picture style with minimal sharpness, contrast, saturation. Using such flat/neutral picture style in conjunction with the histogram will allow you to set your camera to make the utmost use of the camera’s dynamic range.

If getting correct exposure in-camera has been your weak point, try these simple tips out. You’ll be surprised with the boost in efficiency in your workflow.


Go to full article: 3 Tips To Nail Exposure In-Camera

What are your thoughts on this article? Join the discussion on Facebook

PictureCorrect subscribers can also learn more today with our #1 bestseller: The Photography Tutorial eBook

The post 3 Tips To Nail Exposure In-Camera appeared first on PictureCorrect.


from PictureCorrect https://ift.tt/396nQCg
via IFTTT

sunnuntai 2. helmikuuta 2020

PictureCorrect.com: 5 Tips for Photographing the Northern Lights

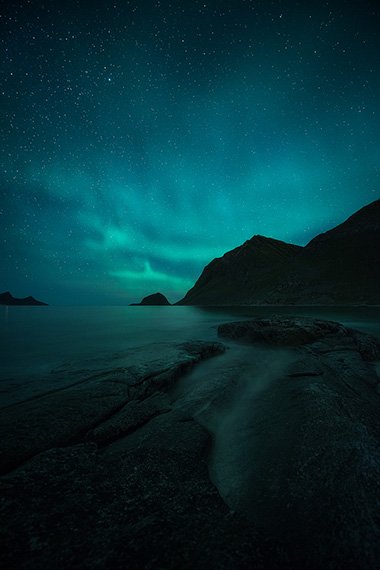
There are few natural phenomena more popular than the picturesque Aurora Borealis. During the last years there’s been a huge influx in tourism to countries such as Norway and Iceland, where many hope to get a glimpse of “the lady in green.”

In this article, I’ll give you five tips to locate and photograph the Northern Lights.

1. Choose Your Location Wisely

The first thing you need to consider when photographing the Northern Lights is the location and time of year. Unfortunately, it’s not visible all year nor all over the world.

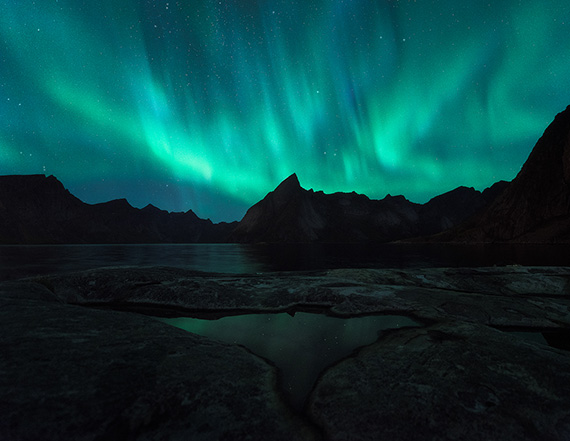
aurora

Choose your location wisely.

Northern Norway, Iceland, Finland, Greenland, and Alaska are the most popular places to witness the Northern Lights, but it is also visible in other countries in the Northern Hemisphere. To see exactly where the Aurora can be visible, I suggest looking at an aurora map.

Once you have found the destination within the Northern hemisphere that you want to visit and photograph, you need to plan when to visit. The Aurora Borealis is a phenomenon that’s only visible in the dark, which means that summertime is off the table in most of these regions. Keep in mind that the midnight sun occurs during summer in the Arctic. It’s only between September and April that the nights are dark enough to view the Northern Lights.

2. Avoid Light Pollution

To increase the possibility of seeing the Northern Lights you need to get away from the city lights. Sure, you might be able to witness it from the hotel balcony in Northern Norway but, trust me, the experience is much more mind-blowing when you get to a dark area. The pictures will also be more impressive.

This is a tip for night photography in general. Even when there are no Northern Lights and you just want to view the stars, they become more visible the farther away from light pollution you are.

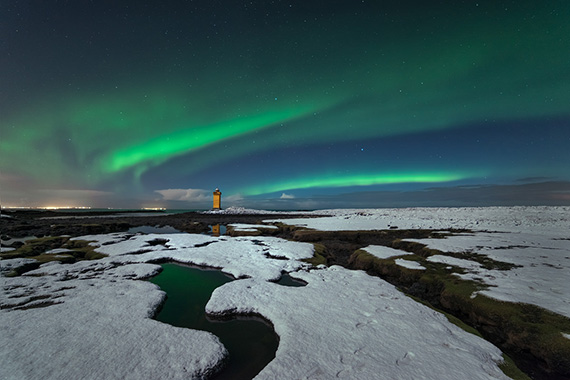
northern lights photo tips

Avoid light pollution.

3. The Forecast is Key!

The benefit of ‘regular’ landscape photography is that even when the weather is bad, you can work with the conditions and create beautiful images. This isn’t the case with Northern Lights photography. There are two things crucial for succeeding:

  1. There have to be no—or very few—clouds. If it’s overcast and you can’t see the stars, you can’t see the Aurora.
  2. The Aurora forecast needs to be active.

The first one might be logical but what is an aurora forecast? Simply put, it’s a forecast that predicts how much northern lights there are. The Aurora activity is typically displayed as a number on the KP Index. The KP Index goes from 1–9 where the higher the number, the more active it is and the farther south it’s visible.

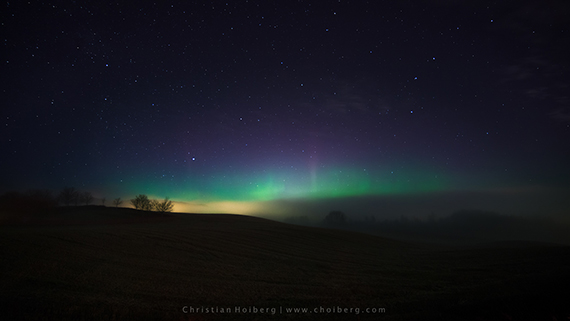
norway northern lights

Check the forecast.

In the Arctic you’re able to see it already at the lowest KP’s, so just because the index is low doesn’t mean you shouldn’t go out looking; it’s just less likely that it will be an ‘explosive’ show.

4. Use a Quick Shutter Speed

Many nighttime photographers follow the 500 rule, while others tend to strictly use a shutter speed of approximately 20 seconds. When photographing the Northern Lights, you’ll need to adjust the settings slightly.

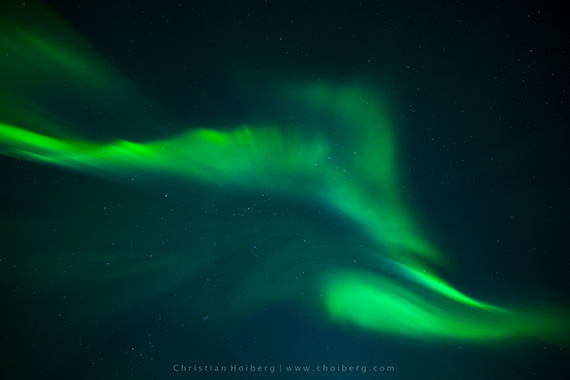
shutter speed northern lights

Use a fast shutter speed.

You might have heard someone say “the lady in green is dancing tonight.” While it might just be a saying, I find it perfectly describes this phenomenon. When active, the Northern Lights move quickly across the sky and can even burst into different colors. If you use a shutter speed of 20 seconds when this happens, the sky will be too bright and the Aurora will be blurry.

There’s no exact blueprint for what settings to use, but try aiming for a shutter speed of around 5 seconds. Sometimes even that will be too much, while other times you can get away with a slower one.

5. Choose a Cold White Balance

The White Balance is a setting that many beginning photographers find slightly confusing, and it’s quite often that my workshop participants set it to Automatic. I always recommend using a manual or semi-automatic setting, especially when photographing Northern Lights.

Automatic White Balance rarely does a good job at night and tends to give some weird results with the Northern Lights. A better choice is to manually set the White Balance at somewhere around 3200K. This gives a more natural and slightly colder look to the image, and makes it easier to process later on.

white balance for northern lights

Choose a cool white balance.

Lastly, I want to mention the importance of staying warm. This should be obvious for most of you who are used to the outdoors, but the Arctic nights, especially during winter, can be quite harsh and unforgiving. Always dress up with warm clothes and leave an extra layer in your backpack!

About the Author
Christian Hoiberg is a Norwegian landscape photographer who has had his work published in several online and print magazines. To help inspire and educate aspiring photographers, Christian shares his knowledge through his website, CaptureLandscapes—a place to improve your landscape photography.


Go to full article: 5 Tips for Photographing the Northern Lights

What are your thoughts on this article? Join the discussion on Facebook

PictureCorrect subscribers can also learn more today with our #1 bestseller: The Photography Tutorial eBook

The post 5 Tips for Photographing the Northern Lights appeared first on PictureCorrect.


from PictureCorrect https://ift.tt/2Ac9b6x
via IFTTT

PictureCorrect.com: Interesting Photo of the Day: The Clouds Parted Right Before Sunrise

It’s amazing how much photography can inspire us. Every image created can provide a different perspective for others, leading them to create their own special masterpieces. Unfortunately, not every photo shoot begins successfully. But Portland based landscape photographer Steve Schwindt learned the valuable lesson that what starts off as disappointment can eventually lead to breathtaking results:

steve, schwindt, landscape, photography, mount, st. helens, daisies

photo by Steve Schwindt (Via Imgur. Click image to see full size.)

After carefully watching the weather forecasts and wanting to capture the wildflowers near Mount St. Helens, Schwindt and his wife took a trip for a nice relaxing photo shoot. Regrettably, it didn’t quite work out the way he had planned. Once they arrived, between the fog and rain, they could barely see 10 feet in front of themselves.

Due to the weather (and a little bit of indecision), the couple decided to wait it out to see if things got better in time for a sunrise shoot. At first glance, it didn’t seem promising. When the duo woke up at 4:30 AM, there were still clouds across the sky. However, after spotting a couple other photographers, Schwindt decided to head up the trail to Loowit Lookout. Fortunately for everyone, about five minutes before sunrise, the clouds parted creating the perfect Mount St. Helens backdrop for his daisy shoot, proving yet again that patience and perseverance are often the key to success.

Camera Settings

  • Camera: Canon 5D Mark II
  • Background: ISO 100, 1/60 of a second, f/11, 17 mm
  • Flowers (8 Exposures for clarity and focus): ISO 500, 1/10 of a second, f/9, 17 mm

Go to full article: Interesting Photo of the Day: The Clouds Parted Right Before Sunrise

What are your thoughts on this article? Join the discussion on Facebook

PictureCorrect subscribers can also learn more today with our #1 bestseller: The Photography Tutorial eBook

The post Interesting Photo of the Day: The Clouds Parted Right Before Sunrise appeared first on PictureCorrect.


from PictureCorrect https://ift.tt/2EnKj2J
via IFTTT

PictureCorrect.com: How to Capture Starbursts in Your Photos

Starbursts render a magical effect in landscape compositions, especially when the technique is done correctly. A lot of photographers capture starbursts accidentally, but if you know the exact process, you can recreate the magic at will. In this video, John Greengo describes the trick behind the effect and how to control and enhance it for stunning images:

What Causes the Starburst Effect?

A starburst is lens flare from the sun’s rays shaped into a starburst pattern. The best and easiest way to capture starbursts in your photos is to stop down to an aperture between f/11 and f/22. You can stop down even further—the more you stop down the easier it is to capture this effect—but keep an eye out for lens diffraction.

Tips for Perfecting the Starburst Effect

It helps if you can partially obscure the sun (or the light source) behind a solid object. For example, if you are shooting a sunset try to use a tree branch or a mountain or even a house to partially obscure the sun. The effect will be enhanced as a result.

starburst-lens-flare

The darker the surrounding area, the livelier the starburst effect, as can be seen in the image above.

Another tip that’s useful to know is that wide-angle lenses tend to be better in terms of composition compared to telephoto lenses.

aperture bladed affect starburst

The number of aperture blades affects the starburst’s shape.

One thing that you may notice when looking at different starburst images is the number of star points; they tend to be different in different images. This is relative to the lens that you are using. More specifically, it depends on the number aperture blades there are in the lens. If it has even number of blades it will produce the same number of star points as blades. If it has an odd number of blades, it will produce double the number of star points as blades.

starburst comparison

Comparison of the starburst effect captured with different lenses

Let’s say a lens has five aperture blades; it will produce 10 star points. If it has six, it will produce six star points, and if it has seven blades, it will produce 14 star points. However, the optical formula of the lens as well as how well it controls lens flares also contributes to the actual effect. Greengo prefers the Canon 16-35mm f/2.8L II lens for a beautiful, clean starburst.


Go to full article: How to Capture Starbursts in Your Photos

What are your thoughts on this article? Join the discussion on Facebook

PictureCorrect subscribers can also learn more today with our #1 bestseller: The Photography Tutorial eBook

The post How to Capture Starbursts in Your Photos appeared first on PictureCorrect.


from PictureCorrect https://ift.tt/2igAPvJ
via IFTTT

lauantai 1. helmikuuta 2020

PictureCorrect.com: Interesting Photo of the Day: Camel Caravan in the Desert

Drone photography has become more popular in recent years because of advances made in technology and accessibility to the equipment. Some photographers have embraced this new wave of image capturing that allows them to photograph immense portions of land from above. It used to be a view that was left to helicopters and planes. The exciting part about drones is that there is an essentially untapped perspective of photography that was less available just ten years ago:

drone photography aerial perspective

“Camel Caravan in the Desert” by Hanbing Wang (Via Imgur. Click image to see full size.)

Photographer Hanbing Wang captured this photo of a camel caravan trekking across the desert and entered it into SkyPixel’s photo contest. He ended up winning first prize in the Professional Beauty category. The competition was open to professional or amateur photographers and split into three categories: Beauty, 360, and Drones in Use.

Subtle waves on the dunes hint at the journey this caravan must take across the ocean of sand. The drone’s bird’s eye view works well here with the sun beating down on the travelers. His photograph displays the stunning detail of each hoof print and the ripples that surround them. Excellent shot, Hanbing!


Go to full article: Interesting Photo of the Day: Camel Caravan in the Desert

What are your thoughts on this article? Join the discussion on Facebook

PictureCorrect subscribers can also learn more today with our #1 bestseller: The Photography Tutorial eBook

The post Interesting Photo of the Day: Camel Caravan in the Desert appeared first on PictureCorrect.


from PictureCorrect https://ift.tt/2uir0mG
via IFTTT

PictureCorrect.com: How to Photograph the Milky Way in Places with Light Pollution

In this short yet detailed video tutorial, Ian Norman dissects an incredibly useful process of photographing the Milky Way in really difficult conditions. The technique, known as “expose to the right” (ETTR), overcomes conditions of extreme light pollution which are normally unsuitable for photographing the Milky Way:

Photographers striving to capture the Milky Way crave for a really dark location, absolutely devoid of any light pollution. Light pollution is the worst possible condition, and some photographers are known to go great distances just to be beyond the reach of city lights.

But what if you are stuck in a location where there is unavoidable light pollution? What if you have no means to travel out of the city? The ETTR method is the answer.

ettr comparison

Comparison of noise between an ETTR exposure and a normal exposure

When using this method, the trick is in over-exposing the scene so that enough light is captured. The benefit in doing this is that the final images have a better signal to noise ratio as is visible in the comparison above. The histogram for images shot with this technique appear stacked to the right (thus the name). However, one thing that you need to keep an eye on is too much over-exposure; there is a risk of losing details, which cannot be corrected in post-processing. Start with one stop of over-exposure and then gradually increase if necessary.

Exposure Settings

milky way

Milky Way captured at Death Valley by Ian Norman

Norman used the following exposure settings in most of his Milky Way photos:

  • Manual
  • RAW
  • 30 seconds
  • f/2.8
  • ISO 6400

He uses these settings regardless of whether he is shooting in very dark conditions or at a highly light polluted area.

Post-processing

  1. Reduce the exposure slider and adjust the histogram so that it now stacks more toward the center of the graph.
  2. Push the saturation and vibrance all the way to the right (if you are using Adobe Photoshop Lightroom).
  3. Adjust the white balance so that you can see a larger chunk of color tones in the images.
  4. Slide back the vibrance and saturation sliders so that they are now back to neutral.
  5. Adjust the contrast. Feel free to push it to the edge. Use the tone curve to add some more spicy contrast.
  6. If your image starts to show some vignetting, correct this by pushing the vignetting slider to the right. Balance the vignetting and exposure settings so that the final look appears natural.
ettr raw

Before: unedited RAW image using the ETTR method

ettr post-processing

After: the same image after post-processing


Go to full article: How to Photograph the Milky Way in Places with Light Pollution

What are your thoughts on this article? Join the discussion on Facebook

PictureCorrect subscribers can also learn more today with our #1 bestseller: The Photography Tutorial eBook

The post How to Photograph the Milky Way in Places with Light Pollution appeared first on PictureCorrect.


from PictureCorrect https://ift.tt/2v49Wgk
via IFTTT

PictureCorrect.com: 10 Easy Tricks to Improve Your Indoor Photography

Taking the perfect photograph is much like painting a masterpiece, composing a symphony, or writing an epic novel. It’s one of the hardest things you’ll ever try to do, and it’s even harder when you’re no savant.

corporate portrate of eye doctor

Indoor Portrait

The good news is that there’s plenty of tips I’ve learned concerning how to make average indoor photographs into excellent ones. I’ll share as many of them with you as I can remember for the simple sake of hoping that what I’ve learned can help you make your photographs even better.

1. Start With Your White Balance

Your white balance acts much like an artist’s canvas; it determines the overall effect that your picture will have.

While most modern cameras do have the ability to automatically employ white balancing, learning how to manually balance your white levels can allow you to make an otherwise mundane picture vivid and outstanding.

business woman portrait in office chair

Set white balance for your portraits.

Below are some basic white balance presets that most DSLR cameras have with some details on how to use them.

  • Auto – The camera does its best to guess at the white levels in the room. This does a job that can be described as “okay.”
  • Cloudy – Designed to counterbalance pictures that seem too “cool” or blue. Use this when you want to warm up the colors in your scene.
  • Daylight/Sunny – The counter to the cloudy white balance setting. Use this when your colors are too warm or you want cooler colors.
  • Flash – Designed to work with flash photography. This balance counters the light blue that most flashes have.
  • Shade – Photographs in the shade tend to have a deeper blue added to them. Shade corrects this by making photographs appear warmer than if the “Cloudy” setting was used.
  • Fluorescent – Indoor fluorescent lighting tends to make things appear much bluer. It can even drain the color from things. This setting should be used to counteract an overabundance of blue tones.
  • Tungsten – This setting helps when you’re taking photographs with incandescent bulbs lighting the scene. It will counteract the yellow or orange colors for a cooler color palette.

2. Refrain from Using Flash

The biggest mistake you can make as a beginner is to always use your camera’s flash. It can do silly things to the color of your photograph that may not be correctable with your camera’s white balance.

If you need more light to take a picture, then consider adding more lights to the scene. This will give you a greater degree over how the final outcome of your photos appear.

If you don’t want to add more light, then refraining from using flash can teach you how to use the natural lighting in an environment to your artistic advantage.

3. Shoot With Both Eyes Open

Most people use just one eye for taking pictures. This gives them tunnel vision and can hurt in the long run.

Learn to keep both eyes open when you take photos. You’ll learn how to gauge the entire scene rather than just what you’re focusing on, which in turn will help you improve your photos dramatically.

4. Pick Some Spots

By finding spots that reliably make for great photos, you can learn what traits make these spots fantastic to replicate them elsewhere indoors.

portrait inside office

Environmental Portrait

Your kitchen, your living room, and your garage are all places to start looking for great spots. Backgrounds that use neutral colors with only one or two sources of light tend to make for the best beginning spots.

5. Use a Faster Setting

There’s a few more tricks to using your camera without flash that I haven’t discussed yet. The most important concerns your camera’s settings and your shutter speed.

You can set your ISO as high with as high of a resolution as your camera will allow. Your camera’s aperture should then be set to the lowest f-stop value that utilizes the fastest lens you have for your camera.

If your camera’s shutter is too slow after doing this, then set the f-stop one notch up until it feels comfortable in your hands.

6. Utilize Windows and Doors

Mastering lighting is one of those things that can potentially drive you crazy. I know it nearly drove me there when I was a beginner trying to set up multiple light sources to make my living room “perfect” for shooting.

executive portrait

Doorways also work for framing your subject.

You can simplify the problem by utilizing ready solutions like windows and doors. They can act as a light source on their own, which makes lighting your photographs significantly easier.

7. Play With Your Camera

It sounds incredibly simple, but playing with your camera is often the best way to learn how it works. You’ll want to meticulously change settings, experiment with different ISO speeds, and utilize different lens settings to learn what each setting does to affect the outcome of photographs.

8. Pretend to Be an Artist

Though there’s no pretending when it comes to taking photographs, you can imagine yourself as a sort of artist. Experiment with your photographs. Use black and white, sepia tone, strobe lights, and anything else you can muster.

It will help you find your unique style, and it may help you discover new ways to take even better photographs.

9. Use HDR

HDR images combine shorter and longer exposures to create a picture that seems to have a more even distribution of highlights and shadows. This can make situations with a large amount of contrast more appealing to the eye.

corporate group portrait indoors

Group Portrait

To take advantage of HDR, you’ll need a camera that has an auto-bracketing mode and access to software like Adobe Photoshop.

When you use HDR, you may find that simple photos become highly defined and stunning.

10. Get Creative

The biggest tip that I can give you concerning photography is to get creative. Use anything everything that you can find to make your photographs unique.

Different levels of light, seemingly mundane environments like bookstores, a particular arrangement of “boring” household items, and the beat of music as you snap pictures are all important tools that most beginner photographers dismiss immediately. The problem is that they can all help to create breathtaking photographs.

About the Author:
Andy Templeton is an award-winning corporate photographer currently living in the Orange County. After graduating from CSUF, he worked as a photojournalist at various publications in Southern California. Andy was a staff photographer for the Los Angeles Times and the Orange County Register newspapers. Feel free to check out his website.


Go to full article: 10 Easy Tricks to Improve Your Indoor Photography

What are your thoughts on this article? Join the discussion on Facebook

PictureCorrect subscribers can also learn more today with our #1 bestseller: The Photography Tutorial eBook

The post 10 Easy Tricks to Improve Your Indoor Photography appeared first on PictureCorrect.


from PictureCorrect https://ift.tt/31jUAoF
via IFTTT