torstai 4. huhtikuuta 2019

PictureCorrect.com: Landscape Photography Tips Checklist

This article is a review of landscape photography tips and techniques I’ve covered before. Have you wondered why I’m going over previously covered ground? There are several reasons.

how to take stand-out landscape photos

Photo by Kris Williams; ISO 100, f/13.0, 0.7-second exposure.

First, I wanted to have all these landscape photography tips and techniques listed together so you can more easily make a checklist. I hope you’ve done that. In the excitement of the moment, it’s easy to forget important and rather obvious techniques.

Second, it’s good to review from time to time, because statistically, only about 15 percent (or fewer) of you will read any particular article I write. So actually, this is new material for 85% of you.

Third, I keep repeating the important points, because there is a story about a preacher. He wasn’t a dynamic speaker, but he did OK. One Sunday, he did a fire and brimstone sermon that got a lot of favorable comments from the parishioners as they left the church.

The next Sunday, he used exactly the same sermon. Word for word! This drew some quizzical looks, but no one mentioned it to him.

The next Sunday he did the same sermon–word for word–again! And the next, and the next!

Finally, thinking he was losing his mind, someone asked him if he was aware that he was doing the same sermon over and over. He said that he was well aware of what he was doing, and he intended to keep doing the same sermon until his parishioners started following the advice.

How can I dispute that? Enough said. Here are today’s landscape photography tips:

Time of Day

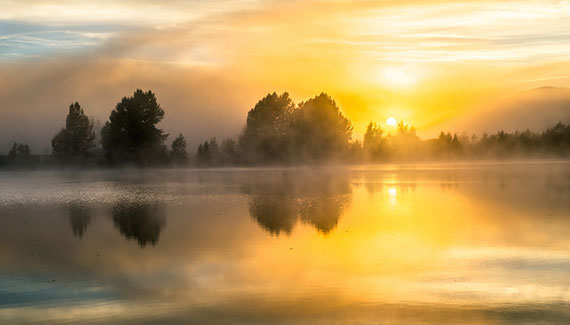
how to take the best nature pictures

Photo by JD Hascup; ISO 100, f/11, 0.5-second exposure.

Light–with a portrait, we have total control. We can adjust the light levels, we can place our light where we want it, we can use modifiers, like umbrellas, scrims, diffusion materials, gobos and so on. We can do pretty much anything we want to get the image our mind has conjured up.

With landscape and cityscape photography, we are pretty much stuck with what nature provides us. There’s not much we can do. Or is there? With some planning, we can almost guarantee a stunning shot.

In an outdoor, landscape setting, there isn’t much we can do to modify or adjust the light, but we can become hyper aware of what light does at various times of day and in various weather conditions.

First and foremost, to be successful as a landscape or cityscape photographer, you have to have a desire to lose sleep. If you want to start capturing those dramatic landscape photos with all the stunning colors, there’s really only two times of day to shoot: dawn and dusk.

But for a photographer, dawn and dusk are a bit more expanded than you may think. About twenty minutes before the sun first peeks over the horizon in the morning there is a “false” dawn. This time of day will give you those intense cobalt blue colors you see in contest winners but haven’t been able to see in nature. As the sun gets closer and closer to the horizon, the colors start to get pinker. The colors you see at dawn are not the same as the colors you see at sunset. (They are more red and orange.)

Drag yourself out of bed a couple hours before dawn so that you will have enough time to grab a cup of coffee and make your way to your predetermined spot, get set up, and start shooting during the false dawn.

See what I mean about needing a desire to lose sleep? Most of your friends and camera club competition will be snoring away while you “get the shot”.

Angle of Light

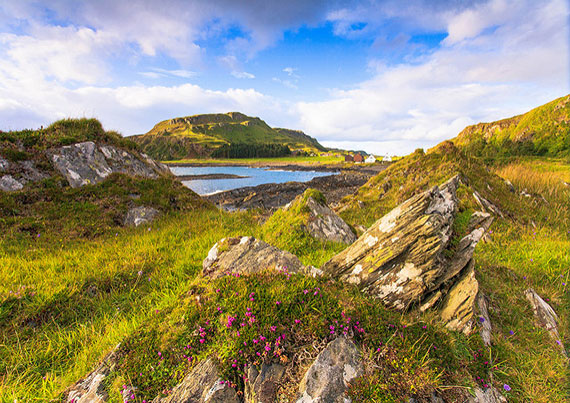
best landscape photography tips

Photo by Giuseppe Milo; ISO 100, 67-second exposure.

In addition to the terrific colors, you also get great light angles. Think of the last photo you saw of a body builder. Where was the light? I’d venture to guess that it was to the side. Actually, about 90 degrees to the camera-model axis.

This glancing side light causes heavy shadowing around the muscles, making them look more defined and actually larger. The light causes some specular highlights too, which makes the difference between highlight and shadow even more striking.

Now think of your landscape or your cityscape as a muscle bound model. The shadows caused by the glancing sunlight will help define and emphasize the shapes.

Composition

Next look for an interesting scene. Use foreground elements to draw the eye into the photo. Use the rule of thirds, leading lines, diagonals and other compositional techniques to draw the viewer’s eye.

gorgeous nature photographs

Photo by Giuseppe Milo; ISO 50, f/22.0, 3.2-second exposure.

Throw in a few clouds to reflect the sun’s colors and add some visual interest to the sky, and you will be well on your way to winning photo contests.

Another compositional element to consider is the horizon, make it level! What is the most important element in your landscape or cityscape photo? Is it the sky? If so, put the horizon on the lower third of the shot. Is it the ground? Put the horizon in the upper third.

While there are times that placing the horizon in the middle is the right call, they are rare. Make sure you have a specific reason to do so.

Last but not least, make sure your photo has a “star”. What attracted you to the scene? Make sure you accent that feature and drive the viewer’s attention to it. Don’t make the mistake of trying to make the entire scene equally important. You need a star.

Sharpness

beautiful sunset

Photo by ™ Pacheco.

Use a tripod! When shooting landscapes–particularly in the predawn and post sunset times–you will need a long exposure! (Creating an acceptable depth of field requires shooting at minimal apertures, which means long shutter speeds.) Don’t even think of trying to get a contest winner by shooting handheld. It won’t happen.

Use the mirror lockup feature if your camera has one. Most of the better DSLR cameras do.

For the ultimate in photo sharpness, in addition to locking up the mirror, use a timed shutter release. It may seem like a bit of overkill, but these sharpness techniques can and do make a big difference.

Filters

Photoshop has the ability to do remarkable things, but there are limitations. Stop trying to “fix” photos in Photoshop. Get it right in the camera and use PS for some minor tweaks.

First, make sure you have a circular polarizing filter for each of your lenses. This eliminates glare and polarizes light. What this means is that you will get far more intense and saturated colors, and the clouds in the sky will “pop”.

Next, have a selection of neutral density filters. At least have filters that will give you 1, 2, and 3 extra stops–more if you can afford them. There are tons of uses for ND filters, but getting that silky, cotton candy effect in flowing rivers and waterfalls is the most common. You WILL want to do this–be ready.

Finally, add a couple graduated neutral density filters. This will help with your sunrise and sunset photos where the ground and the sky have dramatically different light levels.

stunning landscapes

Photo by Kemal ATLI; ISO 100, f/6.3, 1/200-second exposure.

Consider getting some colored graduated filters, too! I recommend at least having a tobacco colored filter. It is the most popular to add or intensify sunset colors.

In the excitement of the moment, it is easy to forget some of these admittedly basic but essential landscape photography tips and techniques.

Here is your assignment: make up a checklist (of these and any other landscape photography tips and techniques you can think of), have it laminated, and stick it in the side pocket of your camera bag.

Every time you are shooting, you can pull out your landscape photography tips and techniques checklist and won’t forget anything. Finally you will have the landscape photography techniques needed to let your artistic side shine through.

I challenge you to try USING these landscape photography tips and techniques this weekend, and prove me wrong!

About the Author:
Dan Eitreim writes for ontargetphototraining.com. He has been a professional photographer in Southern California for over 20 years. His philosophy is that learning photography is easy if you know a few tried and true strategies.


Go to full article: Landscape Photography Tips Checklist

What are your thoughts on this article? Join the discussion on Facebook

PictureCorrect subscribers can also learn more today with our #1 bestseller: The Photography Tutorial eBook

The post Landscape Photography Tips Checklist appeared first on PictureCorrect.


from PictureCorrect https://ift.tt/2Vmgbt7
via IFTTT

keskiviikko 3. huhtikuuta 2019

PictureCorrect.com: Spring Photography Tips

Spring and autumn are my favorite seasons for taking photographs. In spring I feel more invigorated after the winter and more inclined to get out and take new photos.

Here are a few of my tips for taking photographs in spring.

Landscapes

  • Spring landscapes are colorful and the new spring growth looks great against a blue sky. To make the colors more saturated—particularly the blue sky—use a polarizing filter.
  • Look out for symmetrical shapes and unusual views, such as rows of strong green vegetation or views through tree blossom. Try to frame your landscapes with tree branches, doorways, arches, window frames, etc.
  • If you have a wide angle lens, take it out of hibernation and use it to incorporate a foreground view as well as the landscape in the distance.
  • Don’t forget about your depth of field. To get everything in focus, use a higher f number, such as 11 or 22.
best spring photography tips

Photo by Stephen Lee; ISO 100, f/11.0, 1/50-second exposure.

Sunrises and Sunsets

  • Take advantage of the sunrise now that the days are getting longer. The air is cleaner at sunrise, and at this time of year when day and night temperatures vary a lot, the colors will photograph very differently early in the morning than they will late in the afternoon.
  • Fog and mist can also be an extra bonus. Try getting up high—the tops of hills or mountains are perfect, as they give you great views over valleys which may hold early morning mist and fog like a bowl.
  • A polarizer can also help here, and also remember that fog acts like a soft box and can lower the contrast of your surroundings which can leave you with rather long exposure times, so take a tripod if you have one.
  • Your camera may also have a few exposure problems and as a result, you’ll have to use exposure compensation to rectify this.
  • If your skies end up looking a little washed out, try fitting a neutral density grey graduated filter on your lens.
tips for spring photography

Photo by 姐夫 吳; ISO 200, f/8.0, 1400-second exposure.

People

  • Although the days are getting longer, the sun is still low in the sky, and this can create problems with heavily backlit scenes. Rather than photographing your subject with their back to the sun, try photographing them with the sun to one side but still slightly behind them, or photograph them in the shade under a tree and use your flash to fill in.
  • Try using a low f number on your lens to throw the background out of focus; this will also help to bring the shutter speed up to prevent camera shake if the light is too low.
what to know for spring photography

Photo by barbasboth; ISO 640, f/2.2, 1/1000-second exposure.

Flowers and Blossoms

  • Look for patterns and for the abstract when photographing flowers and blossoms.
  • Get down low and zoom right into the subject or use a wider angle lens and very little depth of field—around f/5.6.
  • Break the rules, too. Flowers look great with the sun behind them. Be very wary of underexposing. If you’re looking into the sun, you may have to use your exposure compensation at +1 or +2.
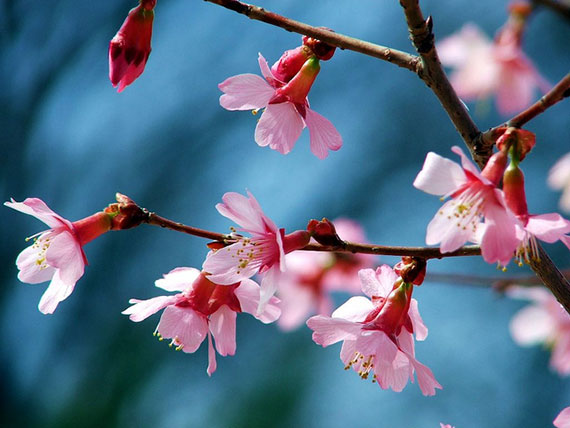
tips for taking spring photos

Photo by Timothy K Hamilton; ISO 64, f/5.0, 1/340-second exposure.

About the Author:
Mark Anderson specializes in London weddings (weddingphotographerslondon) and brings a subtle taste of London architecture and city photography to couples who get married in and around London.


Go to full article: Spring Photography Tips

What are your thoughts on this article? Join the discussion on Facebook

PictureCorrect subscribers can also learn more today with our #1 bestseller: The Photography Tutorial eBook

The post Spring Photography Tips appeared first on PictureCorrect.


from PictureCorrect https://ift.tt/2OIzmKW
via IFTTT

tiistai 2. huhtikuuta 2019

PictureCorrect.com: How to be Creative with a Wide Angle Lens

Wide angle lenses have tremendous creative potential. The way they affect perspective and line helps you make dynamic and exciting images. Yet, care is required to get the best out of them. It takes a little thought to avoid the messy compositions characteristic of photos taken with wide angle lenses by careless photographers.

boat in foreground

Fog and Mist

These tips will help you get creative with your wide-angle lenses.

1. Use your wide angle lens when it’s foggy or misty

Wide-angle lenses are useful for shooting in adverse weather conditions like mist and fog. You can move in close to your subject (in this case a fishing boat in Galicia, photographed with an 18mm lens on an APS-C camera – see above) and because you are fairly close, it is more or less unaffected by the fog.

The result is a nice contrast between the sharp foreground and the soft background. The fog also simplifies a potentially messy composition by obscuring whatever is in the distance.

If you shot a scene like this with a longer focal length, the boats would be much harder to see through the fog.

Both are valid techniques for photographing a foggy scene. It’s just a question of deciding which approach you’d like to take, then selecting the most appropriate lens.

2. Add foreground interest to landscape photos

As wide-angle lenses make objects that are not close to the camera look smaller there is a risk that the most interesting part of the landscape is pushed away into the distance, leaving the uninteresting parts of the scene to dominate the foreground.

To counter this you need foreground interest— something in the front third of the image that captures the eye.

It may help to mentally divide the frame into thirds. Each third requires something interesting to look at to pull the eye through the frame. Filling each region effectively also helps create a sense of depth.

You need some foreground interest in the first third, an interesting part of the landscape (such as trees or mountains) in the middle third and finally some interesting texture or color in the sky. Treat this as a guide, not a rule, and bear in mind the thirds don’t need to be of equal size.

The photo below (taken with an 18mm lens, APS-C) has an interesting foreground (jagged rocks), more rocks in the middle ground and an island with a distinct shape on the horizon. The eye naturally follows the rocks through the photo to the island and the distant cliffs.

water and rocks wide angle

Foreground

3. Take the “simplify your composition” challenge

With wide angle lenses it’s easy to include too much in the photo and end up with a cluttered composition. A good exercise, and a great way to improve your images, is to keep the composition as simple as possible.

That usually means getting in close to the subject and framing it in a way that keeps the background as uncluttered as you can. It won’t always work – depending on the scene there are times when it’s impossible to avoid a busy composition. But keep the principle in mind and apply it when you can.

For the photo below (taken with an 18mm lens, APS-C) I simplified the composition by using a slow shutter speed (240 seconds) to blur the movement of the sea. The sky is nearly empty of clouds, further simplifying the design.

This principle applies to all types of subject, not just landscape photography.

sky and water wide angle

Simple Composition

4. Photograph the night sky

Wide-angle lenses are really useful for taking landscape photos at night. Their wide angle-of-view is essential to capture the glory and scope of the stars and milky way. The shorter the focal length, the more sky you can capture. Ultra-wides can be really useful for this.

There are two ways to take photos of stars at night.

The first is to use a relatively fast shutter speed (usually around 20 seconds) to freeze the motion of the stars, so the camera records them as pinpricks of light.

A prime lens or wide-angle zoom with a maximum aperture of f2.8 or greater is useful as it gives you the option of opening the aperture to let more light in, allowing you to keep the ISO down.

The second way is to use longer exposures to capture the curved star trails created by the Earth’s rotation. Wide aperture lenses may also come in useful here, as keeping the ISO low both maximizes image quality and reduces long exposure noise.

This photo was taken with an 18mm lens at Lake Tekapo in New Zealand.

landscape at night

Night Sky

5. Photograph people in the landscape

Another effective technique is to include people in the photo. Getting close to a person with a wide-angle lens creates a strong focal point, and lets the landscape sweep away into the distance. The human figure creates a sense of scale. A small figure amongst a dramatic landscape, even more so.

There are two approaches to including human figures in the landscape.

One is to create a portrait of the person, using the landscape as a backdrop. A wide angle lens lets you get close to the person, yet include lots of background. This is different to a telephoto lens, which would also let you get close to the person (or make them large in the frame), but would exclude most of the background, throwing it out of focus if you use a wide aperture.

The other is to use the person (or people) as human figures. Anonymous, but there to provide interest, a point of reference, a focal point or scale. In this case the figures may well be small in the frame, an effective way of showing the scale and drama of a particular landscape.

This portrait of a friend of mine uses the first approach. It was taken with a wide-angle zoom set to 25mm on a full-frame camera.

wide angle portrait

Portrait in a Landscape

6. Use your wide angle lens to take photos of buildings

You can use wide-angle lenses to take photos of buildings, both from the outside and the inside.

Inside, a wide-angle lens might be a necessity and the only way to include a significant part of a room or the inside of a large structure like a church or cathedral.

This holds true outside as well, especially if you are close to the building. Depending on its size, you will probably only be able to include the building in its entirety from a distance.

In the photo below (taken with an 18mm lens, APS-C) the tower, positioned at one of the corners of the wall surrounding Beijing’s Forbidden City, is shown in its environment. The use of a wide-angle lens includes enough of the scene to create a sense of space and serenity.

wide angle photography buildings

Building

7. Use your wide angle lens to emphasize line and shape

Exploit the exaggerated perspective of wide angle lenses whenever you can. Look for lines that lead towards the subject or the horizon. They add depth by taking the eye through the image from the foreground to the horizon, and create a sense of motion or flow through the photo.

Wide-angle lenses emphasize and exaggerate line. You can use this to your advantage by placing them in a way that leads the eye into and through the image rather than out of it. This is where the fun element of wide-angles comes in – a simple change in position can alter the composition, and the way that lines run into and through it, dramatically. Experiment with point-of-view and line and see what happens.

Wide-angle lenses can also emphasize shape, especially with photos of man-made objects like buildings. Two things drew me to the scene in the photo below (taken with a 14mm lens, APS-C). The first was the dramatic shape of the house. The second was the corresponding shapes made by the road markings. Both are emphasized by the black and white conversion and high contrast treatment.

black and white wide angle photography

Line and Shape

8. Create an environmental portrait

Wide angle lenses are idea for environmental portraiture and this is an approach often adopted by documentary photographers and photojournalists.

A good approach for this type of photography is use a moderate wide angle lens. If your lens is too wide you may get too close and make your sitter uncomfortable. Try and keep your focal lengths between 24 and 35mm (full-frame), 15 and 22mm (APS-C) or 12 and 17mm (Micro four-thirds). Avoid placing your model’s head too close to the edge of the frame, especially the corners, where it may be distorted.

I made the portrait below (taken with an 18mm lens, APS-C) by moving in close to my friend while she played her guitar.

woman playing guitar

Environmental Portrait

With wide angle lenses you need to get physically close to take photos where your model fills a large part of the frame. This requires a good relationship with your model. Once she trust you she will let you get close enough to use a wide angle lens. Getting close creates a sense of intimacy and involvement in the scene that isn’t present with longer focal lengths and is usually worth the effort.

About the Author:
Andrew S Gibson is a professional photographer based in New Zealand. He has taken photographs in 60 countries now as a Technical Editor for EOS magazine. He produced a Mastering Lenses guide for photographers.


Go to full article: How to be Creative with a Wide Angle Lens

What are your thoughts on this article? Join the discussion on Facebook

PictureCorrect subscribers can also learn more today with our #1 bestseller: The Photography Tutorial eBook

The post How to be Creative with a Wide Angle Lens appeared first on PictureCorrect.


from PictureCorrect https://ift.tt/2I7QicM
via IFTTT

maanantai 1. huhtikuuta 2019

PictureCorrect.com: 13 Bad Habits That Can Ruin Your Photography

Do this simple test below. For each bad habit, give yourself a test score.

photography bad habit quiz

photo by MIKI Yoshihito

1. Leave the Camera at Home

The best camera is the one you have with you—even if it’s on your smart phone. Not every photo you take is photography competition material nor is it of commercial value. Regardless, a huge megapixel count and optimum lens quality on a DSLR is useless if left at home.

2. Rely on a Single Memory Card

Those little storage cards are expensive, but the temptation to be frugal will bite you on the bum. Murphy’s Law states that your memory card will fill up precisely when you’re shooting that money shot, when the light is right, or when the entire group is all smiling at you. The remedy? Buy more memory cards.

3. Don’t Back Up Your Photos

I know a friend who fills up a memory card with images then buys another, fills that up, then buys another—a dangerous habit! He recently confessed he’s lost some of his precious photos. Personally, I have experienced the pain of having a hard drive fail, losing more than a year’s commercial photography work. To be super-secure, you really should store your photographs in three different locations.

4. Chimp

Constantly checking your images on the LCD display is called chimping. Nothing wrong with it, unless you’re into street photography or at a wedding or party. You may miss that decisive moment, as you’re too engrossed in the perfectionistic tendency of chimping.

chimping

photo by Jim Pennucci

5. Shoot from Eye Level

Amateur shutterbugs tend to hold the camera at head-height. However, this will produce predictable results. When shooting in a location, learn to ‘work the scene’. Drop to your knees, or even lie on the ground, searching for fresh angles. An aerial perspective can be stunning. Remember that the best tool of composition is your feet.

changing perspective

photo by in transition

6. Fail to Consider the Background

Look for a simple background behind your subject. For example, avoid having a telephone pole in the distance that appears to protrude from a person’s head. If you have a long lens, you can employ a narrow depth-of-field to blur the background. This will isolate your subject from the clutter beyond, achieving a degree of separation.

7. Center the Subject

Ignore the rules of composition at your peril. If you want your photos to stand out, learn and use the Rule of Thirds rather than place your focal point bang in the middle, like most folks do, (in blissful ignorance). Or, add dynamic by tilting your camera at an angle. Don’t forget to try different types of framing: portrait orientation versus landscape orientation. Or even a really wide panoramic crop.

8. Shoot Only in Bright Daylight

Confession time… I am guilty of this. Because I trained back in the bad old days of film, when strong light was necessary to capture good images, I became a fair-weather photographer. Also, I used compact digital cameras for a decade, which were hopeless in low light situations. So I was infatuated with clear, blue skies, as cloudy skies often washed out into a white haze.

However, under a harsh, midday sun, shadows are short and therefore objects do not look three-dimensional, lacking form. Human subjects may squint into the sun, or blink. Worse, they may have an ugly ‘sun-dial’ effect under their noses! Better to pose people in the shade.

photography at sunrise

photo by Jeff P

Landscapers should learn to work with softer, diffused light, This is mandatory for waterfall scenes. Thunderclouds overhead will introduce a sense of foreboding that blue skies cannot. Golden hour lighting will exude warmer tones and longer shadows.

9. Don’t Read the Camera Manual

Same old story: you buy a new camera, put the box away and the camera’s manual stays inside the plastic bag. Perhaps you were too eager to use your new gadget. Well, now it’s time to dig out the manual, and attack it with a highlighter pen.

Be methodical, and diligently work through each function of your camera. You may find features you didn’t know existed!

10. Shoot on Auto

If you haven’t read the camera manual, your photos may suffer from the restrictions of shooting in Automatic mode. Modern cameras are amazing and can produce great results on Auto, but not consistently. Better to take control yourself. Learn the semi-automatic shooting modes, such as Shutter Priority or Aperture Priority. Then, if you are brave, try shooting on Manual.

11. Think That Post-Processing Can Fix Anything

This is a lazy habit to fall into. It’s much better to get a shot right in-camera, including the correct exposure, as blown-out highlights cannot be retrieved later. Another consideration is ensuring that the horizon is straight, or you will lose the edges of your image when rotating then cropping it on a computer. Use the 3×3 grid on your LCD display or a spirit level fitted on the hot shoe.

If you shoot landscapes, buy some ND and ND grad filters. The most useful filter is the polarizer, the effects of which cannot be replicated using software.

Finally, it’s better to do a bit of gardening, removing distractions from a scene, than be forced to clone them out in Photoshop—tedious work!

12. Shoot Only JPEGs

JPEG files are compressed. Unfortunately, this narrows the dynamic range of your photographs and changes the color according to the camera’s presets. This can’t be undone. Shoot using the RAW file format, as this is more forgiving. RAW allows you the latitude to correct exposure and color, as well as sharpen the image, on computer software. Think of RAW files as digital negatives, that need processing and fine tuning.

13. Post Too Many Photos

We all take poor pictures, badly exposed or blurry, but there’s no need to inflict these on the unsuspecting public! Carefully select only your best images, then process these on the computer.

posting too many photos

photo by Kevin Jarrett

Also, display a variety of images on social media or online galleries, but limit these to 3-5. Essentially, don’t submit minor variations of the same shot.

So, what’s your score? How many bad habits can you identify with?

Tick these habits and tally up your total.

Scoring

1-3 habits. Wow! You are disciplined and must have done a few photography courses.

4-6 habits. Not bad. But there is room for improvement.

7-9 habits. Don’t despair; there’s still hope for you.

10-13 habits. You need professional help!

About the Author:
Ray Salisbury is a seasoned landscape photographer and art teacher based in Nelson. He sells his photos to magazines, calendars, and image libraries. This article is part of a 28-page eBook Jumpstart Your Photography, designed to educate & inspire beginning photographers.


Go to full article: 13 Bad Habits That Can Ruin Your Photography

What are your thoughts on this article? Join the discussion on Facebook

PictureCorrect subscribers can also learn more today with our #1 bestseller: The Photography Tutorial eBook

The post 13 Bad Habits That Can Ruin Your Photography appeared first on PictureCorrect.


from PictureCorrect https://ift.tt/2FPtJYK
via IFTTT

PictureCorrect.com: Interesting Photo of the Day: Island at the Edge of the World

Sometimes the best images materialize when you’re willing to take a risk. For German landscape photographer Daniel Skeye, that certainly proved to be the case:

iceland waterfall

photo by Daniel Skeye (Via Reddit. Click image to see full size.)

Believe it or not, Skeye captured this incredible shot of Mardalsfossen blindly. Initially, he flew his drone over 700 meters high to the edge of the waterfall, but once the drone made it to the clouds he found that he had lost the image transmission signal. Nestled in the beautiful Norwegian countryside, the photographer decided to snap a few shots into the unknown, completely relying on the drone’s internal GPS feedback. He returned to the lift-off point to see what his leap of faith yielded.

While it’s hard to take a bad photograph in such an amazing setting, Skeye wasn’t expecting the outstanding results of his flight: a stream free-falling from a ledge that seems to disappear into a thick mist. But the lovely content and composition weren’t the only things that attracted us to this particular image. We found that this photographer’s willingness to take a chance was what put this shot over the edge.


Go to full article: Interesting Photo of the Day: Island at the Edge of the World

What are your thoughts on this article? Join the discussion on Facebook

PictureCorrect subscribers can also learn more today with our #1 bestseller: The Photography Tutorial eBook

The post Interesting Photo of the Day: Island at the Edge of the World appeared first on PictureCorrect.


from PictureCorrect https://ift.tt/2HYd7jV
via IFTTT

PictureCorrect.com: Camera Metering Modes Tutorial

It’s frustrating when an image turns out bright or darker than you would have liked. To better understand how to get correct exposures, you need to understand the different ways a camera meters light. Photographer Saurav Sinha shares his insight on three basic metering modes:

To form an image, cameras need to focus the light being reflected from the subject. The camera’s light meter evaluates this reflected light to estimate a proper exposure. Basically, there are three metering modes that you can use to expose the subjects properly.

Evaluative/Matrix Metering

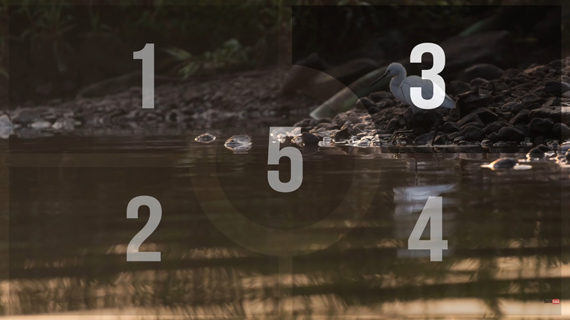
This is the most commonly used metering mode and is also set as the default option in many cameras. In this mode, the camera divides the entire scene into various zones and calculates an average exposure for the entire frame. However, a slightly greater weight is given to the zone with your focus point.

matrix or evaluative metering mode

Greater priority is given to zone 3 as the subject is in that zone

This mode works great when the lighting is uniform. For most photographers, this is the “set it and forget it” metering mode. So unless the lighting is very challenging, you can get away with using this mode.

Center-Weighted Metering

The name says it all. In this mode, the center of the frame is given the highest priority. When metering in this mode, the portion of the frame that lies at the center will be properly exposed.

You can still use this metering mode if the subject isn’t in the middle of the frame. Simply set the subject to the center of the frame once to take the exposure reading, lock the exposure, recompose with the subject placed where you want them, and take the shot.

center weighted metering mode

You can use this metering mode when the subject is backlit or in other challenging lighting situations where evaluative/matrix metering cannot function properly.

Spot Metering

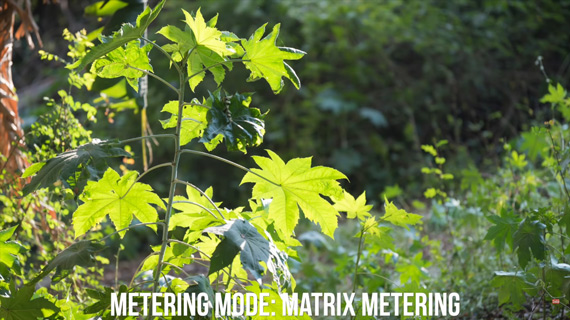
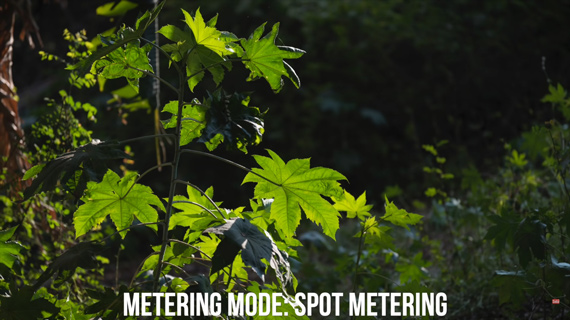
If you need to meter precisely for a very small area of the frame, spot metering is the mode to go for. This mode is more accurate than the center-weighted metering mode. Also, while center-weighted metering mode is restricted to the center of the frame, spot metering is linked with the focus point. The camera will thus ignore the rest of the scene except for the focus point.

matrix metering

The leaves are overexposed when shot in matrix/evaluative metering mode.

spot metering mode

The leaves are exposed properly when shot in spot metering mode.

As with center-weighted metering mode, use the spot metering mode when the lighting is complex, and when the subject occupies a tiny area of the frame.

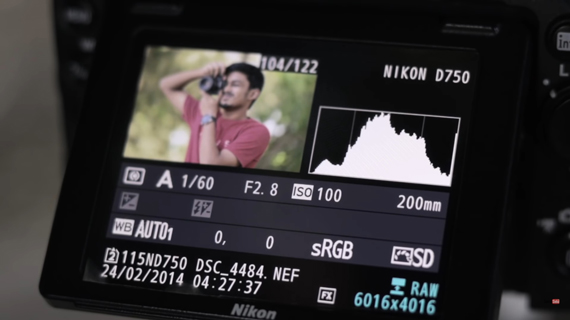
No matter what metering mode you prefer to use, always refer to the histogram. The histogram tells you exactly if the shot is properly exposed or not.

check histogram of exposure

Which metering mode do you prefer?


Go to full article: Camera Metering Modes Tutorial

What are your thoughts on this article? Join the discussion on Facebook

PictureCorrect subscribers can also learn more today with our #1 bestseller: The Photography Tutorial eBook

The post Camera Metering Modes Tutorial appeared first on PictureCorrect.


from PictureCorrect https://ift.tt/2WFJBTg
via IFTTT

sunnuntai 31. maaliskuuta 2019

PictureCorrect.com: Camera Sensor Dust: Good Photographs Ruined

As I excitedly sat down to process hundreds of images taken during an extended landscape photo shoot I was shocked to find spots and specks on almost all of my images! And the later the shot was taken the more there were. It soon became apparent it was caused by the camera’s dirty sensor. Fortunately, after many hours spent cleaning the images up in post-processing, while beating myself up mentally for letting this happen, I was able to salvage most of the images to a degree that I was satisfied. A hard lesson learned.

How did I allow this to happen? Well, due to my inexperience and laziness I was changing lenses on my DSLR in the field without taking a few basic precautions, which allowed all kinds of dust, dirt, pollen, moisture, etc. into the body of the camera. All this was building up on the camera’s sensor.

This is commonly referred to as “sensor dust.” It can cause spots, specks, smudges, color distortion, reduced clarity, etc. on an image. And by the time you realize it has happened, it’s too late as it has already affected the quality of the image.

Every time a lens is removed from the camera body it becomes an open window for all manner of particles to get in. Also, as the mirror and shutter are mechanisms with moving parts they can throw off oil and other debris. When the shutter is activated all this is stirred up and redistributed inside the camera. When the camera is on, the sensor becomes statically charged so it attracts all these unwanted particles like a magnet.

The term “sensor dust” is a bit of a misnomer as there is at least one filter that sits in front of the actual sensor. Dust accumulates on the filter, not on the sensor. And “dust” refers to any type of unwanted foreign matter such as dirt, lint, dust, pollen, oil, grease, etc. Whatever it is called, “dust” can build up to a degree where it can degrade the quality of an image.

Checking for Sensor Dust

Sensor dust is almost impossible to see with the naked eye. Even with a loupe, you may only see the large pieces of dust. The best way to see if and how much sensor dust is present is to view an image that would clearly show any dust on the sensor.

There are a few methods to utilize from simple (will do in a pinch) to a bit more extensive (recommended).

The technique is pretty basic and it only takes a few minutes. To start you will need to take a shot of a brightly lit, clean, solid-white piece of paper taped to the wall. (You can also take a shot of a cloudless sky but I prefer the paper-on-wall method.)

Set the aperture at f/11. This setting is a good place to start. Smaller and larger aperture settings show different results. The smaller aperture will provide a better view of the dust that is on the sensor while a larger aperture will show fewer dust spots. You may wish to take three images: smallest, mid-range and largest aperture to see the difference. I usually take the image at f/11 as that is right around the “sweet spot” of my lenses. This provides a good view of how any sensor dust will affect my final images.

Next, adjust the manual focus to infinity, and position the camera a few feet away from the paper. You want the image to be out of focus so only the details of the dust on the sensor will show up on the image, not any spots that may be on the paper. Shoot an image making sure that only the paper is in view, not past the edges of the paper.

From this point, there are two different paths to take to review the image for sensor dust. The first is to look at the image on the monitor on the camera. Zoom in a few clicks to enlarge the image and then scroll back and forth and up and down and look for specks throughout the image. This will provide a quick check (though not thorough) to detect sensor dust as only large pieces sensor dust will be able to be seen.

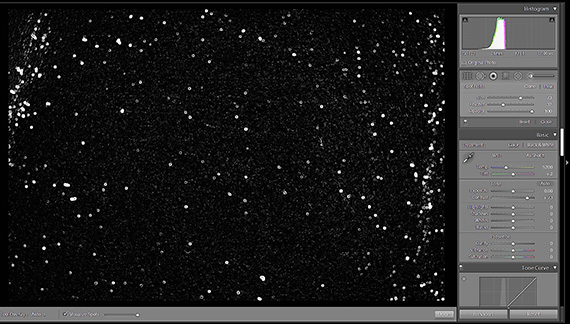
Another technique, which I believe is the far better way to check for sensor dust, is the “visual spots” method. To use this method, you will need to import the test image to Lightroom. This method can also be utilized in Photoshop and Camera Raw, but I prefer using Lightroom as it’s a quicker and simpler method.

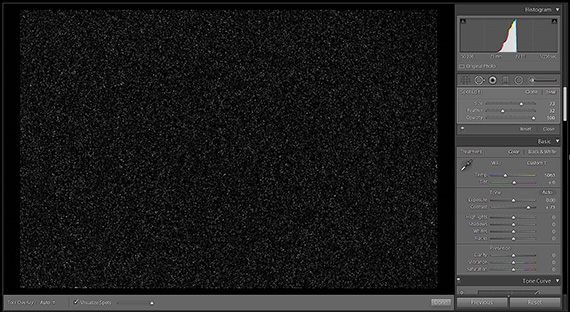
Open the image in the Develop mode, set the size of the image to Fit or Fill, and activate the Spot Removal tool. Check the Visualize Spots box. Then move the slider located to the right of the Visualize Spots box back and forth to adjust the amount of background noise. You can also fine tune the image by adjusting the Contrast and Dehaze sliders. You may also want to zoom in on areas for a closer look. This will provide a detailed view of any debris on the sensor.

Here is an example of what a dirty sensor looks like in Lightroom with the above viewing adjustments applied:
how to identify sensor dust

A clean sensor should look something like this using the Visualize Spots tool:
visualize spots

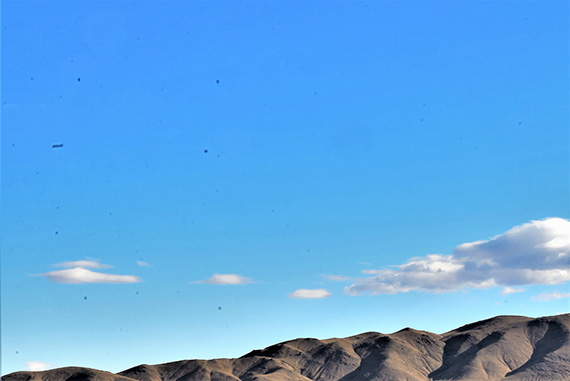
Another way to detect sensor dust is by simply viewing the image in any photo viewing application. Open the image, zoom in, and scroll around checking for spots:
detect sensor dust

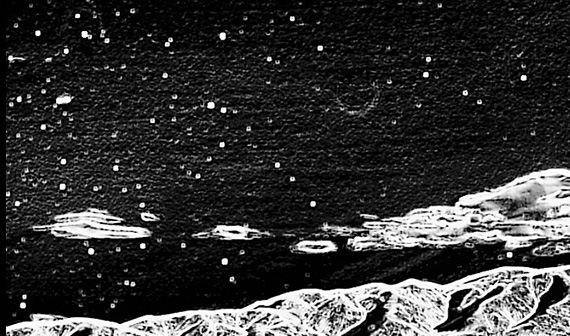
The same view utilizing the Visualize Spots tool in Lightroom:
lightroom visualize spots

You can plainly see the true degree of sensor dust using the Visual Spots tool in Lightroom.

Cleaning a Camera Sensor

If you do find that sensor dust is affecting the quality of your images, it’s decision time. Can you get by with a few specks on the sensor and just clean them up in post-processing using the Spot Removal tool? Or does the sensor need to be cleaned?

If you believe the sensor is in need of cleaning you can either do it yourself or take it to a camera repair source. I recommend spending a short amount of time learning how to clean your camera sensor. It’s a quick process. If you have a steady hand and are able to follow a few simple instructions and precautions you should do fine. Cleaning your sensor only takes a few minutes. You not only can do it anytime and anywhere but it also keeps the cost of camera maintenance down. Also, it will cut down the time spent removing spots in post-processing and provide an overall better image.

If you’re not comfortable with working on the inside of your camera then, by all means, take it to a camera repair source for cleaning. Sensor cleaning runs from about $35 to $75.

Sensor dust is inevitable so even if you feel more comfortable taking it to someone for cleaning there are still some things you can do to help to keep your sensor clean. These are discussed in the Prevention section toward the end of this article.

Keeping the sensor clean is an ongoing consideration and if you can learn the basics of how to help keep sensor dust to a minimum and learn how to clean the sensor when needed you will be a much happier photographer.

Sensor Cleaning Tools and Products

Here is a list of the basic tools and products you will need in order to maintain a clean sensor. Some kits include the main items and you can supplement them with other items as needed.

  • Hand blower. Purchase a high-quality hand blower. Cheap blowers can release chunks of rubber onto the sensor. Consider the ones with filters.
  • Photo lens brush. Used to dust off the sensor. Again, purchase a high-quality brush made specifically for lens cleaning that can be kept covered or sealed when not in use.
  • Sensor cleaning swabs. Used in the most common method of sensor cleaning. These come in different sizes. It’s important to use the correct size for the dimension of the sensor in the camera you will be cleaning. Here is a link to find the correct size swab by camera brand and model: https://photosol.com/swab-sizes.
  • Sensor cleaning fluid. For wet-cleaning the sensor. You want a product that is specifically made for cleaning camera sensors, dries quickly, and will not leave streaks or residue.
  • Sensor loupe with lighting. Useful during the cleaning process.
  • Lint-free wipes. Helpful in cleaning the outside and inside of the camera. Not recommended for cleaning the sensor directly.
  • Lint-free gloves. Recommended in helping keep dust and lint to a minimum when cleaning the sensor. Why add to the problem.
  • Canned air. Optional but useful.

More about canned air. Many photographers suggest never using canned air for cleaning inside the camera chamber because the propellants may have oil, moisture, or contaminants that can end up on the sensor. On the other hand, my camera repairman uses compressed canned air when cleaning cameras and their sensors. If you do use canned air, keep it pointed at a 45-degree angle when spraying to reduce the risk of releasing contaminants. Never shake the can. Use a gentle pressure spray (as a strong blast of air may damage camera parts inside the chamber).

I do not believe there is any canned air product that is 100 percent contaminant free. Use it accordingly and be prepared to use the wet-swab method described below if you use a canned air product. A hand blower is much preferred for removing loose particles from the mirror chamber and sensor area.

Optional tools include lens pens, gel sticks, and spinning brushes. These are discussed at the end of the Cleaning Methods section.

Prior to Sensor Cleaning

Before starting the cleaning process make sure the camera’s battery is at least 50 percent charged. The camera shutter mechanism will be activated in order to access the sensor. You could risk damage to the mechanism if the shutter closes due to a low battery while you’re cleaning. Some cameras won’t allow you to access the sensor area if the battery is weak. Do not set the camera to Bulb or long exposure timer settings when cleaning the sensor as the shutter may close unexpectedly and cause damage as stated above.

To minimize further dust getting on the sensor, do your cleaning in a dust-free environment, turn off any ceiling fans or heating or air conditioning units, and wear lint-free gloves. Wipe off the lens and camera prior to removing the lens. Always keep the camera body pointing downward when removing the lens to help prevent dust and debris from settling into the camera.

The first step is to use a hand blower (or canned air) to remove any dust or debris in the mirror area. With the camera off and pointed downward, remove the lens and blow any dust off and out of the chamber. You want to get rid of any dust or debris so it doesn’t fall on the sensor once the sensor area is accessed. Sensors may be scratched by dragging debris across them with a brush or cleaning swab so it is important to try to remove as much debris as possible before any cleaning tools come in direct contact with the sensor.

Sensor Cleaning Methods

Below is an overview of sensor cleaning products and methods. You should fully follow the instructions provided with each product prior to attempting cleaning your camera’s sensor.

There are two kinds of sensor dust. There’s dust that simply sits on the sensor’s surface and can be removed by blowing or brushing it off or using a dry swab. And there’s dust that may have become “welded” on due to moisture, grease, oil, etc. This usually requires sensor cleaning using the wet swab method.

Depending on how dirty the sensor is you may wish to do each step individually and then check the cleanliness of the sensor. Or you may just wish to make some or all these steps part of your routine with each sensor cleaning.

Blowing

Turn the camera on and set it to “Cleaning Mode” or “Lockup Mirror for Sensor Cleaning.” These options are accessed through the camera’s menu. With the camera pointed downward, position the tip of the hand blower close to but not inside the camera body and blow on the sensor a few times. If you will be using canned air use the same positioning and spray gently, keeping the can at a 45-degree angle. Do not place the blower or canned air nozzle tip into the camera body; the sensor is a delicate piece of equipment and can easily be scratched or damaged. Never allow anything to touch the sensor except appropriate cleaning tools such as a brush or sensor cleaning swabs.

Brush Method

With the camera in Cleaning Mode and the sensor exposed, simply move the brush across the sensor a few times to remove any debris. Some brushes are statically charged to help pick up any debris from the sensor.

Don’t let the cleaning brush come in contact with any other part of the inside of the camera or with your skin. It may pick up oil, dust, etc. and spread it onto the sensor.

After using the brush method you may wish to blow off the sensor to help remove any residual dust.

Swab Methods

The swab method uses a specialized cleaning tool that is wiped across the sensor. This can be done with a dry or wet swab.

Only use the appropriate size swab for the size sensor that you are cleaning and only purchase swabs that come in individually sealed packaging.

If you touch the cleaning end of the swab with your bare skin throw it away; debris or oil from your skin may be transferred to the swab and then onto the sensor.

Dry Swab Method

As mentioned earlier it is important to remove any loose particles off the sensor using a hand blower or canned air as dragging debris across the surface of your sensor with your cleaning swab may cause scratches.

Using a new clean swab, swipe the sensor from one side then, without lifting the swab, swipe it back to the other side. Do this only once and discard the swab. Reusing a swab may cause undesired results such as scratching the sensor. For best results, you may need to do this more than once using a new swab each time.

Wet Swab Method

Some sensor dust may have become “welded” onto the sensor which may require the wet swab method. This is done in the same manner as the dry swab method except that a cleaning fluid that is specifically made for sensor cleaning is applied to the sensor swab.

Apply only one or two drops of the sensor cleaning fluid on the tip of the swab as too much fluid may create unfavorable results. Again, swipe the sensor from one side then without lifting the swab swipe it back to the other side. Do this only once and discard the swab. As with the dry swab method, it may require using multiple swabs to get a clean sensor.

Re-check the results of your completed cleaning using the methods described above.

Optional Cleaning Methods Using Other Tools

  • Lens Pen. A generic term for a tool that has a brush on one end and a small chamois cleaning tip on the other end.
  • Sensor Gel Stick. A stick with a gel cube on one end that has a sticky substance that picks up dust and other particles from the sensor or lenses. Never drag or wipe the gel stick across the sensor or lens as it may leave a sticky substance behind.
  • Spinning Brushes. The thought of anything spinning placed on the sensor makes me a bit nervous. When using any brush inside the camera chamber you run the risk of it picking up any oil or grease on the walls inside the camera chamber and then spreading it onto the sensor. Then you may have made a bigger mess to clean up. The best way to remove grease or oil from the sensor is by cleaning it using the wet swab method described above.

I haven’t been impressed with the results of the optional products mentioned. You may wish to read reviews on the internet and decide if these methods and products would work for you.

Of course, there are quite a few articles and video tutorials on the internet on how to clean sensors. You may want to review some of those prior to cleaning the sensor on your camera.

How Often Should My Sensor Be Cleaned?

The simple answer is, whenever it needs it. And you won’t know that unless you do a sensor dust check. Here are some factors that determine how often the sensor needs cleaning:

  • how often the camera is used
  • the number of shutter actuations
  • how many lens changes are done
  • environmental conditions (wind, dust, high pollen count, humidity, etc) of lens changes
  • the prevention measures you take when changing lenses

Some photographers check before every shoot assignment while others not so often.

Prevention

The best way to remove sensor dust is to prevent it.

Here are some tips for helping keep your sensor as dust-free as possible.

  • When removing the lens always point the camera body downward.
  • Have the next lens ready to install prior to removing the existing lens.
  • Only change lenses in an area that is not windy or dusty. If you do need to change lenses in that environment consider using a “lens changing bag”.
  • Keep the lens body, base and CPU contacts clean using a lint-free wipe.
  • Periodically blow out the camera’s mirror chamber to keep dust in that area to a minimum.
  • If your camera offers “Sensor Shake” or some of sensor cleaning method you may consider using that to help remove any dust that has gotten on the sensor.
  • In post-processing utilize the Visual Spots tool to keep tabs in the cleanliness of the sensor.
  • If you know there is sensor dust and you are not able to clean it right away consider shooting at a lower f-stop to minimize the number of dust spots that will show up on an image.

As a side note, if the sensor gets to a point where it needs to be replaced because of scratches or can no longer be completely cleaned, it may be possible to have just the filter replaced, not the complete sensor unit. This is a much less expensive alternative. Some camera repair shops will tell you that the whole sensor unit needs to be replaced. But an internet search of “sensor filter replacement” will yield results of reputable camera repair companies that offer that service.

A clean sensor will greatly reduce the amount of time spent in post-processing and improve the quality of your images.

A clean sensor helps make for a happy photographer.

About the Author:
Adrian Skiles is a freelance photographer based in Atlanta, GA. He has been a photographer for most his life, specializes in real estate and landscape photography, and has written numerous photography articles.


Go to full article: Camera Sensor Dust: Good Photographs Ruined

What are your thoughts on this article? Join the discussion on Facebook

PictureCorrect subscribers can also learn more today with our #1 bestseller: The Photography Tutorial eBook

The post Camera Sensor Dust: Good Photographs Ruined appeared first on PictureCorrect.


from PictureCorrect https://ift.tt/2UlCdyH
via IFTTT