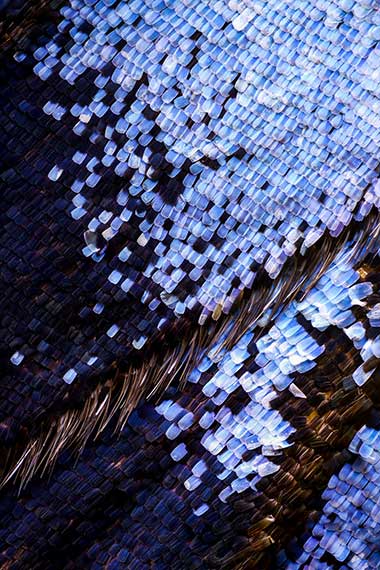
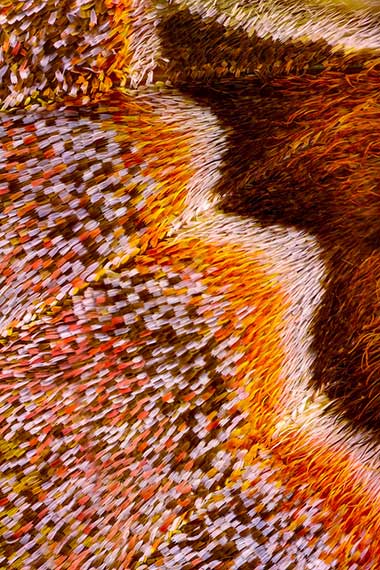
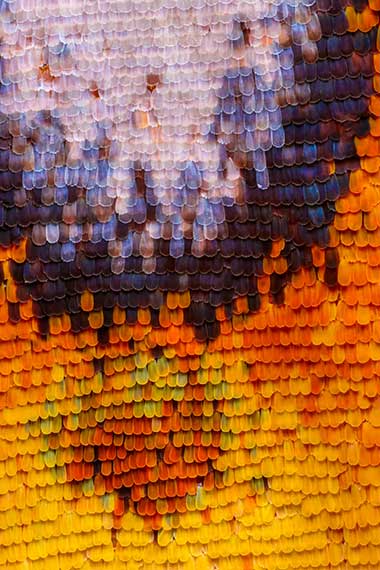
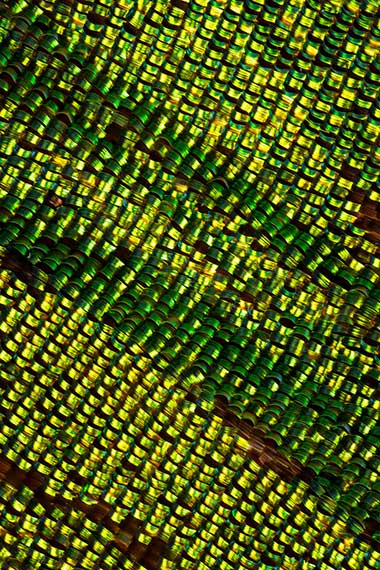
I never thought I would be running around with a net desperately trying to capture butterflies and dragonflies. But that was exactly what I was doing two summers ago at the local golf course.
Baeotus Japetus
Living north of San Francisco I am surrounded by natural beauty with flowing waterfalls, giant redwoods, and luscious green hillsides. However, when summer comes, the waterfalls dry up and the mountains turn brown—not the most appealing subjects to photograph. To challenge myself and find natural beauty to shoot one summer, I bought a macro lens. Little did I know that this purchase would jumpstart my passion for extreme macro.
When I first began macro photography, I was stunned by all the beautiful micro worlds that we walk right by. Whenever I would go out in nature, after spending time shooting macro, I would notice the various textures on a leaf or the water drops on a spider’s web. I began to see so much more of the beauty around me and I wanted to see it even more clearly. Hence the butterfly net. I realized I needed insects that were not moving and could be lit in a studio setting. Soon my freezer was filling up with various flying insects I had captured.
Saturn Moth Rothschildia
Now the trouble with capturing insects is that by autumn there are not too many left out there. By October any new ones I could capture were bedraggled from a long hard summer. One day discouraged with my dwindling supply of insects to photograph I went to the San Francisco Academy of Science to shoot the butterflies in their rainforest exhibit. After photographing their stunning butterflies I noticed a table full of microscopes and butterfly wings. Here I could see every detail in their wings. I knew instantly this was going to be my next project, shooting extreme macro of insects.
Researching how to take pictures with minute detail, I came across Levon Biss’s Microsculpture videos for shooting insects with microscope objectives. Acquiring a similar setup, I began to shoot insects in this new way. This was the most frustrating experience of all. The slightest mistake (a shaky table, hot lights, specks of dust, walking in the studio) and all that work would result in a blurry photo.
Agraulis Vanillae
The Process
The final results, though, were worth all the hard work and frustration. Each final image of a butterfly wing consists of 2,100 separate exposures merged into a single photo. So many exposures are necessary because I am using either a 10x or 5x microscope objective attached to a 200mm lens. Since the depth of field on an objective is almost nonexistent, I must go through a several step process to achieve a truly in focus shot.
Sunset Madagascar Moth
To accomplish this I use a focus rail that moves my lens no more than 3 microns (the width of a human hair is 75 microns) per photo. I then can achieve focus across the height of the subject, which can be up to 8 millimeters. This yields 350 exposures, each with a sliver in focus, that must be composited together into a single file. This file is one piece of a six piece puzzle. The process is repeated six times for different sections of the wing. The photos are then brought into Photoshop and pieced together to make a final image.
“Butterfly Wing” is my latest extreme macro project showcasing the beauty and complexity of butterflies.
About the Author Chris Perani is an extreme macro photographer who specializes in shooting butterflies at a microscopic level.
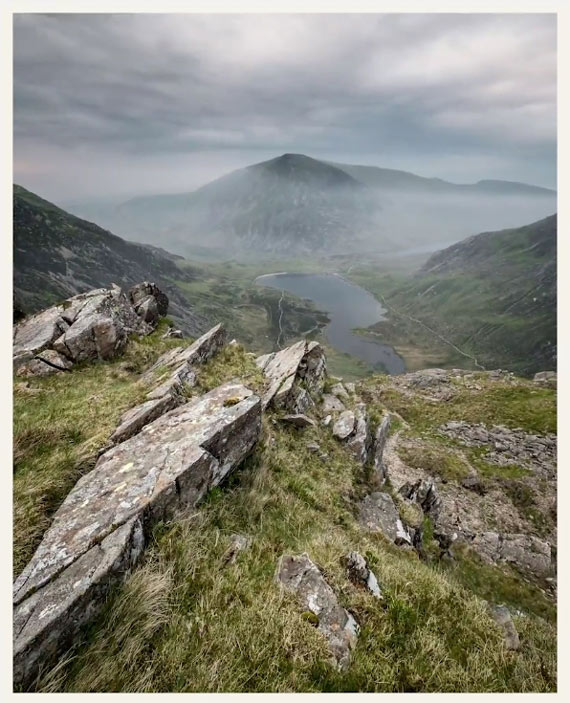
The Olympic Peninsula in the state of Washington has 73 undeveloped and wild beaches in total, and each beach seems more amazing the farther north you go. Photographer Tamon Yanagimoto took this photo at Second Beach:
“Misty morning at Second Beach on the Olympic Peninsula, WA” by Tamon Yanagimoto (Via Reddit. Click image to see full size.)
Yanagimoto has captured a magical moment on a cold misty morning at the beach. The patches of rock in the foreground work excellently to form a compelling leading line. And as your eyes wander to the ocean, the mist makes it look as if the sky is seamlessly blending into the ocean.
Hats off to Yanagimoto for an excellent composition.
As a beginner photographer, you’ve probably been inundated with articles, videos, and tutorials covering a whole slew of photography tips and tricks. So much information all at once can be overwhelming. Where do you start? To make learning easier, photographer Nigel Danson shares seven photography tips he wishes he’d known when he was a beginner:
1. Use Aperture Priority Mode
It’s not surprising to see many photographers sticking to full manual mode. Learning to use manual mode is without a doubt an excellent skill, but it’s not necessary that you stick with it every time. There are certain moments and lighting conditions that don’t last long; sometimes you need to act quickly. Aperture priority mode is extremely useful for shooting under these circumstances.
Modern cameras are quite good at metering. There’s no harm in relying on them to improve your efficiency.
You still have plenty of creative control with aperture priority mode. You can conveniently control depth of field, and if you’re not satisfied with the exposure that the camera deterimines for you, use exposure compensation to correct it.
2. Understand Your Histogram
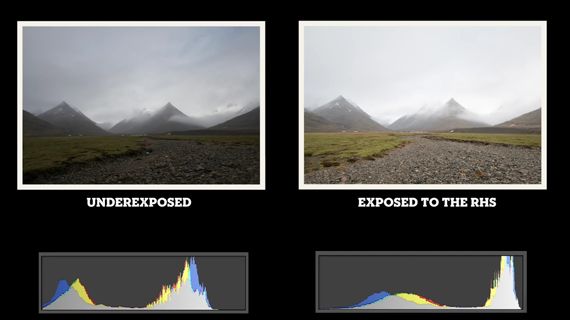
In simple terms, a histogram denotes the distribution tonal values. The left side of a histogram represents shadow details, while the right side represents highlights. Mid-tones are in the middle.
Expose as far as you can to the right-hand side of the histogram.
Exposing to the right without clipping is a common practice that most photographers follow. This method captures most of the shadow and highlight details in your image. Lifting up shadows in an underexposed shot can introduce noise, which can be minimized by exposing to the right.
3. Focus Efficiently
The amount of scene that you have in focus can differ from camera to camera. A crop sensor camera, for instance, will have a greater depth of field than a full frame camera at the same aperture setting. It’s essential that you understand your camera.
Danson suggests that when using a wide angle, instead of focusing on the hyperfocal distance to have your entire scene in acceptable focus, just focus on the distant landscape. If you miss out on exact hyperfocal distance even by a bit, your depth of field can reduce significantly. This will lead to the distant landscape being out of focus. So stop stressing out and focus directly on the distant landscape at “infinity.”
4. Simplify Your Image
“It’s what you cut out of the photos that is more important than what you put into the photos.”
By simplifying your composition and including only things that actually make sense, your images turn out to be much more comprehensible. Identify and exclude the distracting elements in the composition and just focus on the core, interesting subject. If you can, zoom in and try filling the frame.
5. Use Different Lenses
It’s not the camera body that determines the quality of your photos; your lens plays a major role here. Repeatedly changing cameras causes you to spend more time learning to use new gear and less time perfecting your shots. Almost all cameras today are very capable, so try sticking with one. Invest in lenses rather than a new camera.
Using a wide angle lens allows you to capture most of the scene. A telephoto lens, on the other hand, lets you isolate your main subject. Prime lenses will test out your ceativity, while zoom lenses will provide you with versatility.
6. Change Your Position
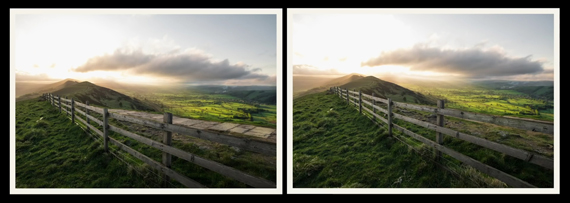
When composing your shots, pay attention to whether you can improve them by moving around a bit.
The path that was visible and distracting in the left photo has been eradicated in the photo at the right just by getting low.
To further improve your mobility, why not ditch the tripod entirely? By just moving around with one camera and one lens, you’re free to explore a scene more thoroughly.
7. Find the Right Light
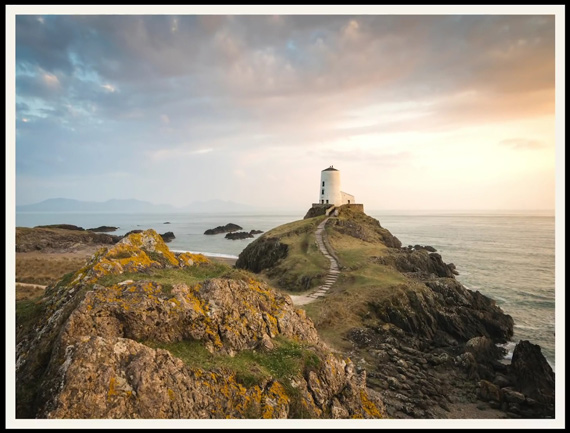
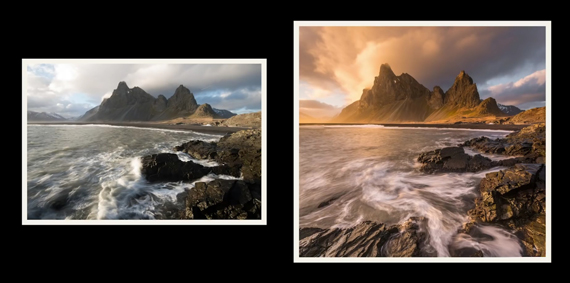
The very essence of photography is capturing light. The quality of light determines how pleasing or unflattering your images come out. Going out to shoot at your convenience doesn’t cut it. You need to be out there shooting when the light is right.
Natural light isn’t all that flattering during mid-day. It creates harsh shadows, and images come out looking flat and washed out. If you take the same image when the sun is low on the horizon, you’ll notice how vibrant and beautiful your photos appear. This is the reason photographers prefer to shoot outdoors during the golden hour. Shoot in the early morning or just before sunset to make the best use of the soft, golden light.
We’re really thankful to Danson for sharing these tips that are the result of his years of experience as a photographer! What do you wish you’d known when you first started taking photos?
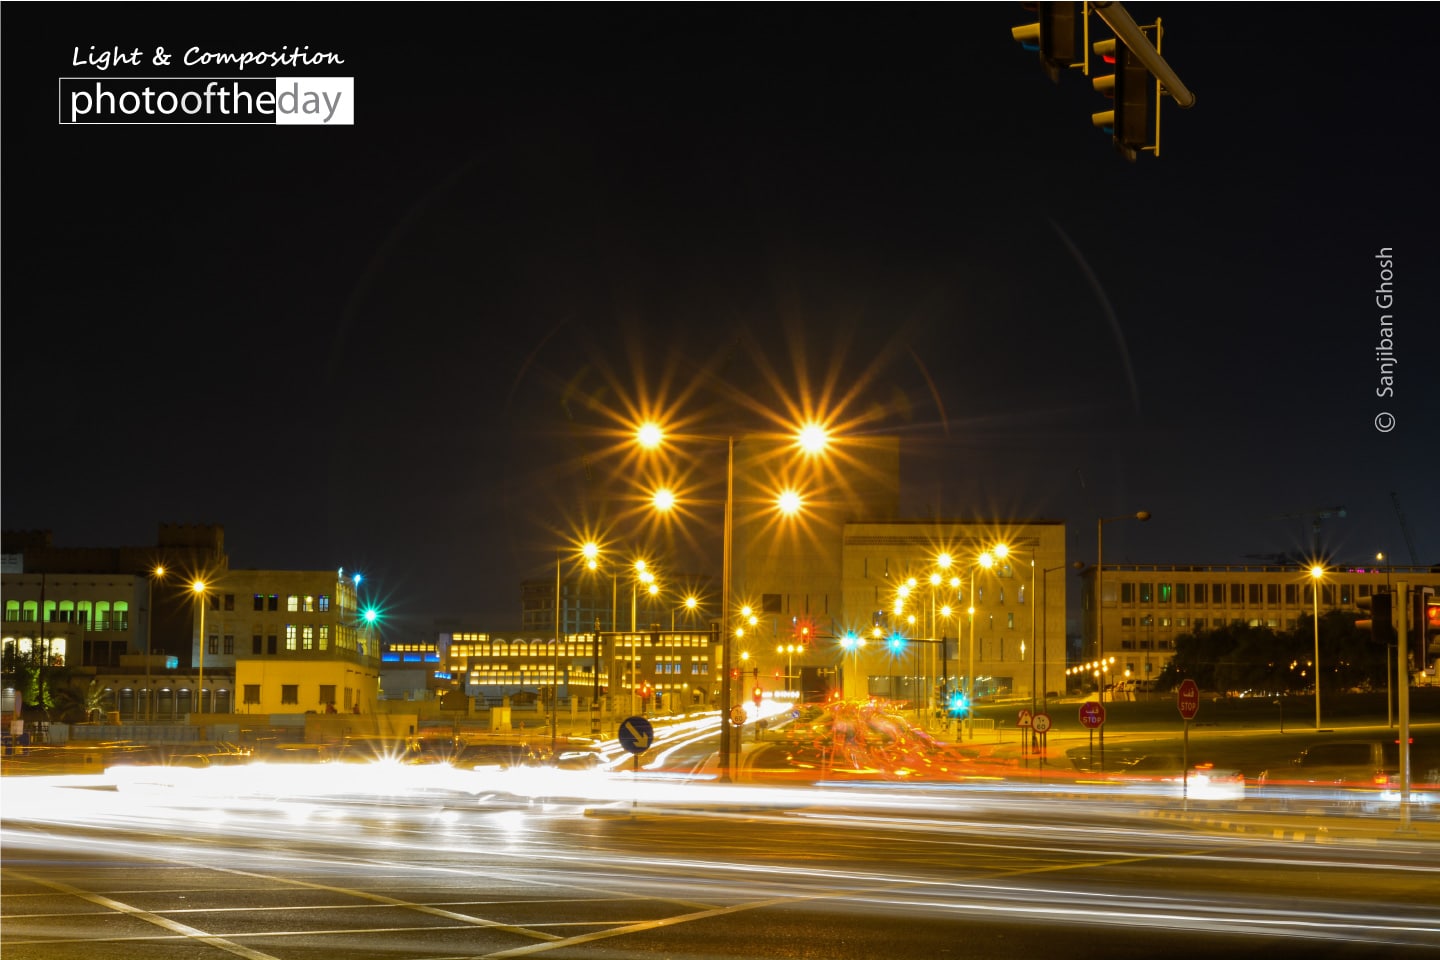
Taken on a Friday evening on the seaside road, I wanted to capture the evening holiday rush hour when everybody wants to enjoy the weekend on the seaside corniche. The row of the street lamps adds the starry festive mood to the frame.
Nikon D7100 with Tamron 17-50 f/2.8 | Exposure 25Sec @ f/20 | ISO 100 | Focal Length 42mm
Traffic Rush, by Sanjiban Ghosh
Photographer: Sanjiban Ghosh (Doha, Qatar)Registered
An engineer by profession, Sanjiban Ghosh pursuing photography as a hobby to share the wonderful events around us with friends. He is currently living in Doha, Qatar for professional reasons. His main photography interest is on architecture, night, travel, and landscape photography. He loves travelling, mainly to capture the culture and beauty of places in digital and share them with the world. He is a self learner and started with a point and shoot camera then slowly moved to DSLR in pursue of his photography addiction seriously.
The professional photography industry can be a scary place for the new photographer trying to earn a living doing what he or she loves by establishing a photography business. The competition is fierce, the bookkeeping seems mountainous, and for those introverts among us, the thought of interacting so closely with people for a living—um… promote myself?—is daunting to say the least.
But if deep passion for the craft is the driving force, one would be remiss not to try.
In this lecture, photographer Jeff Cable provides 15 tips for starting and maintaining a successful photography business, advice born in the crucible of experience as a professional photographer:
1. Have passion and LOVE what you do.
There’s nothing worse than hating one’s job. Professional photography requires hard work and long hours on the clock (and on one’s feet), so only the passionate photographers actually succeed at maintaining successful photography businesses without burning out—and sometimes even they fail.
Passion for the craft is what will sustain you when the going gets tough, but passion will also pay off in the everyday mundane routine, in relationships with clients, and in your photographs because it will push you to give your all.
“If you have passion and you’re having a good time, guess what you get back? You get photos of people who are also having a good time,” Cable said. “[Clients] tend to feed off of you having fun… I get hired a lot because of my photography, but I also get hired a lot because of who I am as a person.”
Cable walked a good distance to 5Pointz in Queens, NY just because he heard that the graffiti was cool. Then, he climbed onto a dumpster to photograph the rap battle taking place there. “Why did I do all of this? Is it because I’m getting paid? Am I going to send it to the newspaper? No, I’m doing this because I love photography,” he said.
2. Know how to shoot and practice if you don’t.
A successful professional photographer knows his or her equipment in and out and knows how to shoot in every lighting situation he or she might encounter on the job—but it’s not just about gear and lighting. The ideal pro can seamlessly select good foregrounds and backgrounds for stellar composition and can even predict situations and key moments before they happen so as to catch them with the shutter.
“If you’re going to call yourself a professional photographer and start commanding good money for it, you want to know how to do these things,” Cable said. “A good photographer can walk into any room or environment and within 15 seconds or less have it figured out, and that comes with experience… It’s not hard. It’s just practice.”
3. Focus on what you know.
As you build reputation and expertise as a professional photographer, make note of your strengths and weaknesses so that you can shoot according to your strengths for paying clients and practice on your own time or during free test shoots to improve your weaknesses.
Cable practiced shooting water polo for 1.5 years to prepare to shoot the US Water Polo team at the 2012 Olympics. He learned water polo in and out so that he could predict plays and know how to best tell the story.
4. Invest in good starter equipment.
Since price really does determine quality in photography, starting a successful photography business usually involves investing a good-sized wad of cash right from the get-go to purchase some high quality gear and backupgear—although renting backup gear is a viable option as well. Don’t forget that photography is all about the brain and eye and heart behind the camera, but do remember that, while you don’t need to buy the best quality glass or DSLR to take good photographs, it certainly helps if you can.
“The camera is just a tool, but it is an important one,” Cable said. “Having a good camera helps, but it doesn’t make you a good photographer… it won’t get you there all the way.”
Using his equipment spread as a reference point, Cable created this list of ideal Canon starter gear for beginner pros.
5. Get insurance and backup religiously.
Insuring your gear and property is obvious here, but purchasing general liability insurance, which protects you from liability if you bump into an expensive vase while shooting a wedding, or if a kid trips over your camera bag and breaks his arm, is just as important. Many venues even require proof of insurance before they will let you shoot there.
Along that same vein is a different kind of insurance: backups.
“If you don’t care about your photos, then don’t worry about it, but if you care about what you’re shooting or you’re charging a client for it, backup. And don’t just backup on your home machine. Backup somewhere else,” said Cable. “I’m really kind of very detail-oriented when it comes to that and you need to be if you’re charging people money.”
6. Differentiate yourself.
How do you stand out in a highly-competitive field like photography? You find ways to differentiate yourself from the rest by owning your unique style and by developing a Unique Selling Proposition (e.g. I work my butt off; I tell stories in ways that no one else can tell them, etc).
“There’s a lot of people out there that want to become photographers,” Cable said. “I’ll shoot stuff that most people wouldn’t shoot in ways that most people wouldn’t shoot it. I’ll lay on the ground, I’ll go up high, I’ll even dance sometimes with the kids while I’m shooting them.”
7. Have the right attitude.
People skills are a huge part of professional photography, so learn to treat clients with respect, of course—but more than that, learn to have fun, keep in touch, and put your clients at ease during photoshoots.
“Turn the camera around and show [your clients] what you’re getting,” Cable said. “If they’re hesitant, as soon as you turn the camera around and show them what you’re getting and it’s good, they’ll relax and then you’ll have that trust, and then you’re good.”
“Be a part of the event when you can,” said Cable, pictured here. “There’s nothing better than getting them to trust you than just by turning around and going, ‘Check this one out.'”
8. Have a compelling website.
Maintaining a fast, HTML-based website with a handful of solid images will work wonders for your business. In your portfolio and/or homepage slider, make sure to feature only your best 5-10 images; including one or two sub-par images just for the sake of having more can drive potential clients away.
“What are you judged by—your best images or your worst images? Your worst,” Cable said. “People will judge you on your website.”
9. Learn to tell the story.
No matter what the gig is, capture the key moments that you’re expected to capture while also keeping alert with your head on the swivel, looking for “unscripted” moments to fill in the holes in the story between those stereotypical key moments.
“Don’t wear blinders. Shoot a lot of things and look around for those unscripted moments that you didn’t expect,” said Cable. “You gotta be ready for anything that might happen.”
Cable captured this shot at the 2010 Winter Olympics because he was ready for it, having planned it out beforehand and thoroughly studied the key moments of the event.
10. Continue to learn.
Learning goes hand in hand with practice and differentiating yourself from your competition. Push yourself to try different techniques and equipment. Shoot in unfamiliar environments to figure them out. Go on photo walks for inspiration and do everything you can to stay interested and passionate.
“I dread the day when I can say, ‘I’ve done it all. I’ve learned every bit of the camera, I’ve shot everything I want to shoot,'” Cable said. “I push myself always to deliver better for the client, but also to kind of inspire me more.”
11. Understand people.
It may be easier said than done, but learning to understand people goes a long way in photography. Try to understand your clients, each one, and know who they are and what they like—your clients will appreciate the attention and your photographs will show your compassion.
“We forget as photographers that we can give this gift,” Cable said.
12. Design your pricing and stick to it.
If you’re just starting out as a professional photographer, it might be a good idea to do a few shoots for free while you build a decent portfolio, but as soon as you have that, Cable says, stop giving your art away. Develop a reasonable pricing and deliverables list according to your financial needs and don’t waver or undercut yourself, even when potential clients request lower rates.
“Your photos are your art,” Cable said. “Giving them away is leaving money on the table and is devaluing what you do. It makes you the guy with the camera just hitting a button.”
13. Know business as much as you know photography.
The sad fact is that many good and passionate photographers fail as professional photographers. Probably the number one reason for that is that having good photography sense isn’t enough; pro photographers also need to have just as much business sense—and this is where many go wrong, in Cable’s opinion. In fact, he even suggests going to school for business and learning photography on the side, instead of the other way around.
“The problem is, a lot of it is marketing and selling yourself and understanding the business side,” Cable said. “It’s great that you can take a good picture, but if you don’t know how to sell it and price it and you give it away, you won’t be able to do this for very long.”
In addition to embracing social media, working with local vendors is important. “They can be great referrals for you,” Cable said. “Those guys, they get asked.” Photographing vendors is a great way to earn their loyalty.
14. Always think about referrals.
Treat everyone—yes, Cable really means everyone, even the kids—as potential clients. Make friends, maintain a fun-loving and positive attitude, and work diligently at all times, even when your current paying client isn’t around. Always over-deliver.
“Whether it’s a referral from the family [or] the friends of the family, people spend a lot of money on advertising and word of mouth has always been and will be the best ever,” Cable said. “I go above and beyond to make an impression.”
15. Be smart about your time.
That old saying, “Time is money,” really is true. Unfortunately, the other saying that “things always take more time than you think they will” is also true. Effectively budget your time, always work towards streamlining your workflow, and make sure to factor time into your pricing.
Cable firmly believes that these 15 tips, which he attributes to his own success, will help your new or soon-to-be photography business not only to succeed, but also to thrive in the photography industry. After all, Cable began is career humbly by shooting occasional Bar and Bat Mitzvahs and making amateur mistakes like bringing only one 4GB memory card for the whole event.
Now, Cable is widely-respected as an Olympic photographer and he conducts photography lectures all over the world. If he can do it, you can too.
I like to think of myself as an avid photographer, but there are times when the creativity wanes and the inspiration dries up. The trigger finger stiffens from lack of use and generally I start to suffer from photographer’s malaise. This is when auto-pilot needs to kick in and get me up and running again. How do I switch on the auto pilot? With the 365 Photo Challenge–a photo a day for a whole year.
Photo by Amy; ISO 102, f/2.6, 1/60-second exposure.
A photo a day keeps the staleness away. Staleness and boredom with a hobby like photography is a killer. Before you know it, you’re advertising your gear on eBay. I have found a simple way to keep the pot boiling on the stove. All my students know this one. It is simple, and it’s most certainly not time consuming.
There are two ways to approach this:
The simple photo a day challenge. By this I mean that you allocate yourself a few minutes a day to shoot one image that you like or even dislike for that matter. Just shoot an image at some point during your day. Carrying your camera with you every day would help. Whatever you do, make sure that you take one photo every day. Even if it is the clock on the wall before you go to bed. Of course, it would help if you make your subjects different each day.
The best photo of the day challenge. This is a variation of the challenge and gives you more leeway, meaning that you shoot as many images as you want but that at the end of the day you will select the best one, the one with most meaning or just a random choice if they are all good.
Photo by thematthewknot; ISO 4000, f/4.0, 1/100-second exposure.
In order to make this interesting you can add a touch of variety to it by choosing a theme or using a common thread. I know of a photographer who took a small beach ball with him wherever he went and this ball featured somewhere in every photograph. Choose something and add it as a common thread to all 365 days.
With the advent of Facebook, blogs, and Flickr you can really make this interesting and even generate regular interest in your images. Change your Facebook profile every day replacing it with your daily 365 Challenge shot. People will eagerly log in every day to see what photo you have loaded. Not only will this make you more enthusiastic but will generate an interest in your images. The same goes for your blog. Upload a daily image and makes some comments on it. This way you can keep a record of the how, when, why and who of each image. This could actually turn into a form of photo journal in which you document your life over 365 days.
Photo by Evan Sanders; ISO 3200, f/2.8, 1/50-second exposure.
This could be the beginnings of a really fun experience. The bottom line is that you will keep your creativity, inspiration, and enthusiasm alive and at the same time learning and entertaining others. If you can find a way to make your photography fun and inspiring, it will never die. You will continually shoot photos throughout the year.
One more tip before we go. It is great to sit down and write down ideas and thoughts about what you will do, what themes to shoot, and how you will display the images, BUT, unless you get out there and just do it you will get nowhere. If you will run with the idea I can guarantee you that in 365 days time, you won’t believe the improvement and progress you’ve made as you learn digital photography.
Photo by Jehane; ISO 64, f/3.7, 1/85-second exposure.
What the 365 photos show you is just how you have improved; they become your timeline of growth in creativity and skill.
About the Author: Wayne Turner has been teaching photography for 25 years. Passionate about photography, radio and video. He is a Radio CCFm producer and presenter in Cape Town.
Is this photo double exposure? Technically, the term is reserved for when an analogue camera opens its shutter twice over the same slide of film, superimposing one image atop another. Some debate the issue feverishly, with critics complaining that when the images is a Photoshopped composite, it isn’t true double exposure. Others shrug that this is what double exposure has become in the 21st century. Judge for yourself:
A double exposure-style effect can be created easily in Photoshop. (Via Imgur. Click for larger size.)
The photographer snapped two photos, cropped out the hand and pasted one atop the other in Photoshop. He set the opacity of both at 50 percent and fiddled with the brightness and contrast until he found a happy medium. That’s it. No masks, no in-camera editing.
For reference, here are the two images used to create the composite. As you can see, they’re simple shots on their own:
Is the Photoshopped version of double-exposure too simple? Does it devalue the authenticity of double exposure photography, back when you had to open the shutter twice to impose two images over the same layer of film? Most importantly: does it even matter? Ultimately, it’s a lovely image of the interconnection between man and nature. The process is less relevant.