lauantai 7. huhtikuuta 2018

PictureCorrect.com: How to Photograph Boiling Water with a Macro Lens

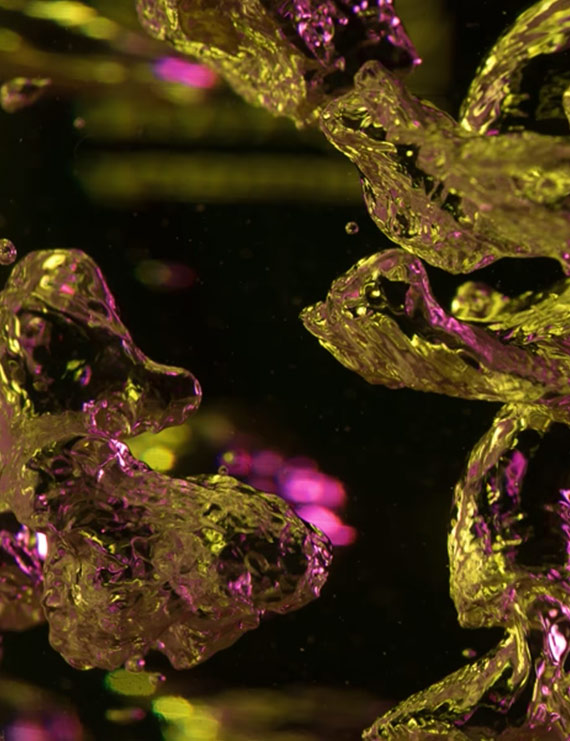
For photographers, even the most mundane moments can yield spectacular beauty. On one particular morning, Swedish photographer Micael Widell was flooded with inspiration during the utterly banal task of fixing himself a cup of tea. So, naturally, he grabbed his camera and got straight to shooting the contents of the glass kettle resting on his kitchen counter:

Evidently, Widell wasn’t the only one to see something beautiful in the water; an Imgur gallery containing the spur-of-the-moment shots went viral straight away, garnering over 70,000 views. However, the artist felt confident enough in his ability to improve upon his original viral photographs that he took it upon himself to record a second take, complete with full explanations behind his process.

Using a Sigma 150mm macro lens, a rainbow’s worth of colored gels, and several combinations of natural and artificial lights, Widell achieved a variety of results. As it turned out, getting the perfect shots took equal parts skill and luck. After all, the air bubbles violently making a bee-line to the water’s surface couldn’t exactly be directed into place. Nevertheless, the end results of all that experimentation proved to be well worth the effort.

boiling water macro photography

Try photographing a boring detail in your daily life, and see what you can get!


Go to full article: How to Photograph Boiling Water with a Macro Lens

What are your thoughts on this article? Join the discussion on Facebook

PictureCorrect subscribers can also learn more today with our #1 bestseller: The Photography Tutorial eBook

The post How to Photograph Boiling Water with a Macro Lens appeared first on PictureCorrect.


from PictureCorrect https://ift.tt/2H66ISL
via IFTTT

perjantai 6. huhtikuuta 2018

PictureCorrect.com: Interesting Photo of the Day: Rush Hour in Bangladesh

Anyone who utilizes public transportation has, at some point, felt a little crowded, but the image below may offer a little a perspective. The photo, which shows throngs of Bangladeshi crowding a train and platform, was taken during Eid al-Adha, a Muslim holiday sometimes referred to as the The Festival (or Feast) of The Sacrifice:

An overcrowded train approaches a railway station in Dhaka, Bangladesh. (Via Imgur. Click for larger size.)

Over the course of the three day holiday, Muslims gather to pray and celebrate with friends and family. As photographer Andrew Biraj has done a great job documenting here, Eid al-Adha is one of the busiest travel days in Bangledesh, a city which is already ranked among one of the highest in regards to population density.


Go to full article: Interesting Photo of the Day: Rush Hour in Bangladesh

What are your thoughts on this article? Join the discussion on Facebook

PictureCorrect subscribers can also learn more today with our #1 bestseller: The Photography Tutorial eBook

The post Interesting Photo of the Day: Rush Hour in Bangladesh appeared first on PictureCorrect.


from PictureCorrect https://ift.tt/2Hh1Nw3
via IFTTT

PictureCorrect.com: How to Construct Your Own Custom LED Triangle “Ring” Light

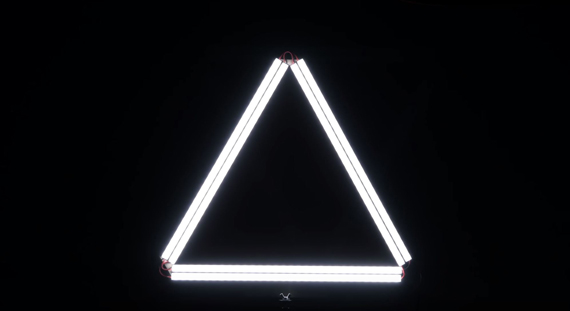
Ring lights are used for even lighting on the subject’s face and solid eye lighting. Caleb from DSLR Video Shooter created this video demonstrating how he saved money and created a unique look by constructing a homemade triangle “ring” light with LEDs:

All in all, he spent under $100 on the materials, so this could be a relatively inexpensive, fun project for you!

How to Make a Triangle Light

  1. Start by building the frame with six aluminum U-channels.
  2. Line the edges with super glue to pair up three sets.
  3. Place a strip of electrical tape on each end so that the wiring won’t solder the LED strips to the U-channel.
  4. After that, apply the LED strips. Caleb suggests choosing between two options: 90 CRI LED or 80 CRI LED strips. The higher CRI has less light and costs a bit more than the 80 CRI LEDs but causes less strain on your eyes and creates a daylight temperature. If you want the brighter option, choose the 80 CRI!
  5. You can use small blocks of wood as shown in the video and super glue to attach the U-channels in a triangle shape. For one of the corners, Caleb used an aluminum diecast box to contain the wiring, dimmer unit, and the power input.

gear setup triangle LED ring light tutorial

  1. When you are wiring everything together, be sure that the negatives are attached to the negatives and the positives are attached to the positives on each strip.
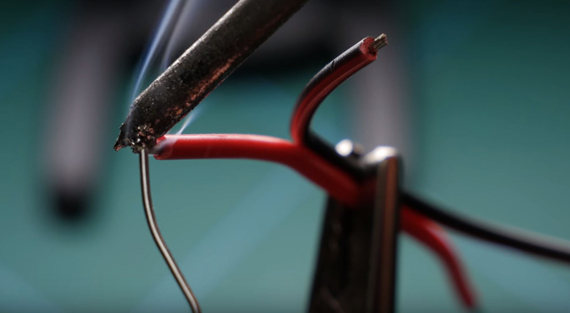
  2. Solder the wires to your LED strips.
  3. Wire up the light dimmer using the positive/negative DC inputs and the positive/negative motor input.
  4. Drill three holes in the aluminum wiring box: DC (power in), LED wires, dimmer knob.
  5. Attach the lid of the wiring box and finish up with the mounting point for your triangle ring light. Caleb used a scrap piece of wood, ball head, and wing nut to attach the light to an L-bracket. The power is controlled with a power cable and 12V battery.

diy triangle ring light

This may sound like a lot of instructions and prep work, but once you have the supplies it will be easy to set up! Does a triangle LED ring light interest you?


Go to full article: How to Construct Your Own Custom LED Triangle “Ring” Light

What are your thoughts on this article? Join the discussion on Facebook

PictureCorrect subscribers can also learn more today with our #1 bestseller: The Photography Tutorial eBook

The post How to Construct Your Own Custom LED Triangle “Ring” Light appeared first on PictureCorrect.


from PictureCorrect https://ift.tt/2GHNkMg
via IFTTT

torstai 5. huhtikuuta 2018

PictureCorrect.com: Interesting Photo of the Day: Moeraki Boulders

Sunsets are always magnificent if captured properly. But when you capture one with something that you don’t see every day, like these Moeraki Boulders in New Zealand, it takes it to another level:

sunset with unique rock formations

“Alien Forms” by Chris Smith (Via 500px. Click image to see full size.)

Besides the unique rock formations and the magnificent sunset, good post processing and a camera with decent dynamic range were required to pull off this image. Using a Canon 5D, photographer Chris Smith managed to combine technique with natural phenomena perfectly.


Go to full article: Interesting Photo of the Day: Moeraki Boulders

What are your thoughts on this article? Join the discussion on Facebook

PictureCorrect subscribers can also learn more today with our #1 bestseller: The Photography Tutorial eBook

The post Interesting Photo of the Day: Moeraki Boulders appeared first on PictureCorrect.


from PictureCorrect https://ift.tt/2GFjF6o
via IFTTT

PictureCorrect.com: How to Imitate Window Light Inside a Studio

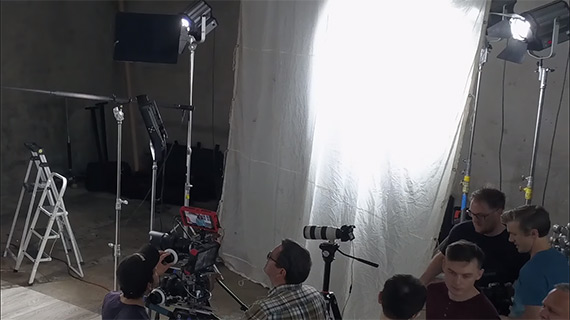
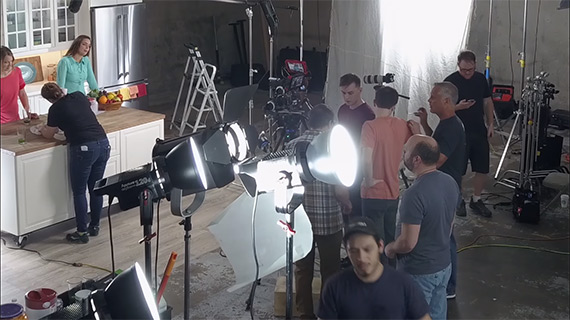
How do you create soft window light for a shoot in an artificially lit indoor room without an actual widow? Jay P Morgan takes us through the paces, explaining how he did it:

Before we begin let’s talk about window light. Window light is a large natural light source, so it’s soft and produces very little shadow.

Morgan’s shoot is for a kitchen product on a white set for a high key effect. When you throw in the concept of window light, it creates an upbeat, positive mood, which is perfect for a product of this nature.

Key Light

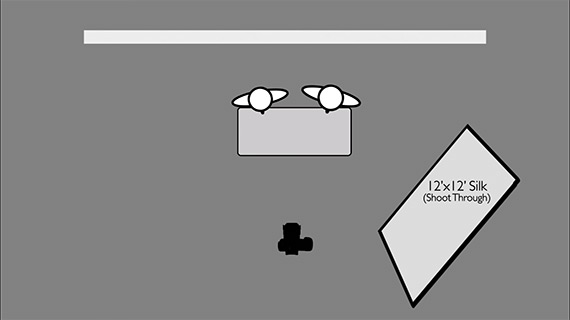
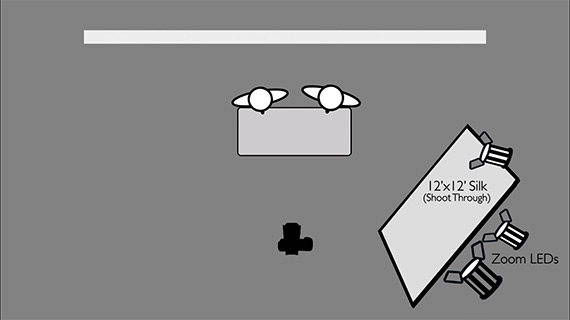
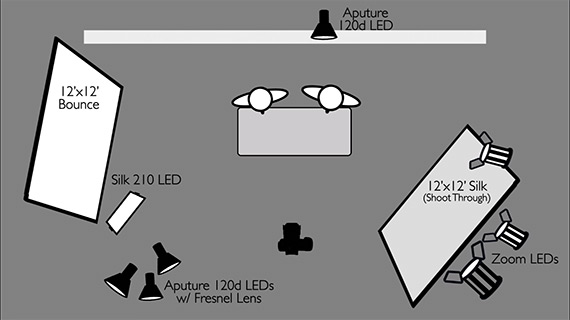
First, Morgan set up a large 12 x 12 shoot-through silk screen.

lighting for a commercial kitchen shoot

This screen is translucent property, which means any light fired through it becomes large and wraps around the corners and fills in shadows.

window light photography

The zoom lights threw an incredible amount of light to fill the 12 foot screen.

Directional Light

Morgan used a third light positioned just next to the silk screen and pointing toward the models.

artificial window light setup

This hard directional light added a bit of highlight to shadow ratio and opened up the models’ faces.

Fill Light

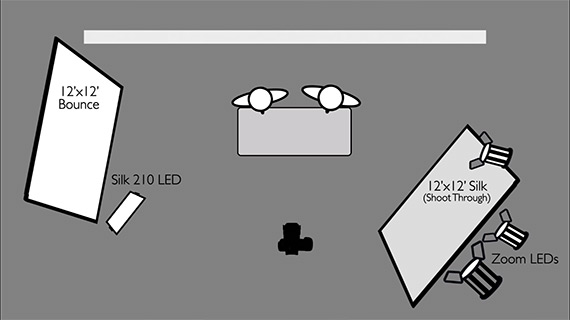
Even with the hard light in place, the lighting wasn’t perfect. So, Morgan brought in an Ultra bounce, which is another 12′ x 12′ screen.

studio lights to mimic window light

But unlike the shoot-through translucent surface of the silk screen, this one is a harder surface designed for bouncing light. It bounced light from the key light.

Light Floor

Light floor signifies the amount of light in the room. In other words, the amount of exposure that exists in the room. It’s easy to create a good exposure when you’re by a window, because there is already a lot of light to go around. But when you’re shooting inside a room with no windows, you will have to create all that light yourself.

window light for photo and video

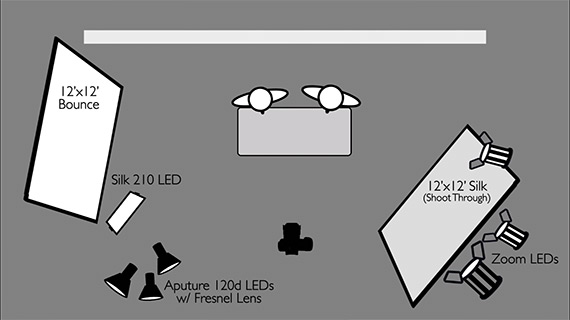
To bring up the light inside the room, Morgan used a set of Aputure 120d LED lights. Several of these lights were aimed at the walls to bring up the exposure.

how to mimic window light

Rim Light

A rim light (Aputure 120d LED) behind the talent isolated them from the background.

How to Create Window Light

Finally, Morgan used a Silk 210 light as a roving key light. It produces a very soft light, which was moved around to provide that extra bit of punch.

Exposure

Morgan set his exposure to f/4. He wanted an all-white setup. His meter kept telling him that he was overexposing, because it’s programmed to make everything middle-grey. To keep things all white, Morgan needed to expose at least a stop over what the meter told him to—probably a stop and a half to be safe.

light setup for soft high key shoot

Though Morgan used this setup for a video shoot, the same principles apply to still photography. Give it a try!

For further training: Fantastic Fundamental Light Skills at 70% Off


Go to full article: How to Imitate Window Light Inside a Studio

What are your thoughts on this article? Join the discussion on Facebook

PictureCorrect subscribers can also learn more today with our #1 bestseller: The Photography Tutorial eBook

The post How to Imitate Window Light Inside a Studio appeared first on PictureCorrect.


from PictureCorrect https://ift.tt/2qb1ZVd
via IFTTT

PictureCorrect.com: How to Get Stunning Colors in Your Sunset Photography

Nothing makes a sky pop in a photograph the way that a sunset can. Beautiful purples and yellows in a sky are often the result of the setting sun, but in order to capture the richness of those colors in a photograph, there are a few tricks you should know about. In today’s landscape photography photo tip, we will continue our discussion on shooting better sunset photos.

sunset coast

“Sunset 2” captured by PictureSocial member Edmond Santirs

Metering

In a past photo tips article we discussed how to meter the sunset so that we don’t get a dark, muddy (or even completely black) sky.

The meter in our camera will see all the light from the sun and expose for that value while letting everything else in the scene go dark. To fix it, we meter for the sky with the sun out of the frame, then recompose to include it. In effect, this increases the exposure value and more properly exposes the sky.

For today’s first sunset photo tip, we are going to take a step backward. Now that we have increased the exposure to get a “correct” reading in the sky, we have to step back and change our settings to slightly underexpose the sky. That’s when we are going to get all of those colors to “pop.” Slight underexposure will deepen and intensify the colors.

The problem is that if we overexpose the sky–or even if we have a “correct” exposure (I put “correct” in quote marks because artistically there really is no such thing) —we wash out all the stunning colors that drew us to the scene in the first place. On the other hand, if we underexpose by too much, everything starts to go black.
colorful sunset

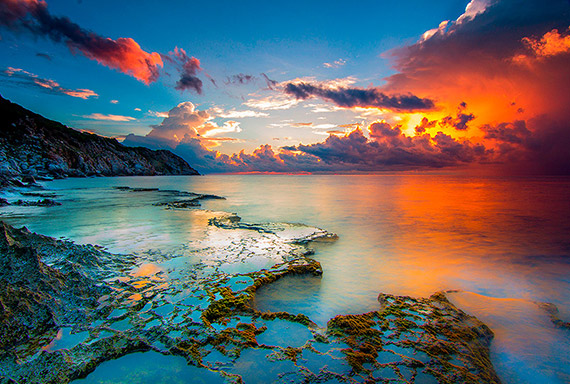
“Untitled” captured by PictureSocial member Trandinhkhiem

This is another area where shooting digital images is sometimes better than film. We can see what we’re getting and make adjustments on the fly. When shooting film, we had to guess at the best exposure–and frequently we were wrong. Even worse, we didn’t find out until the film was processed, which could take several days. And we had to pay $15 or $20 for the privilege of seeing bad or inadequate sunset photos.

With digital cameras, we can immediately see the results and tweak our settings until we get exactly what we want. With this ability, there is absolutely no reason why we can’t get sunset photos that will absolutely take our breath away.

The flip side to underexposing the sky in sunset photography is that the ground area is going to go dark. At sunset it is probably dark to begin with, and underexposing the image is going to further darken it, possibly making the foreground go completely black with no detail. Unless we are going for a silhouette, we rarely, if ever, want areas of our photographs to be without detail.

Add Filters

If we want to lighten the foreground without lightening the sky, we use a split neutral density filter. This way we underexpose the sky with the filter, not the exposure setting.

Actually, the filter can be neutral or colored. When using a colored filter, you can add color to a sunset.
sunset with rocks

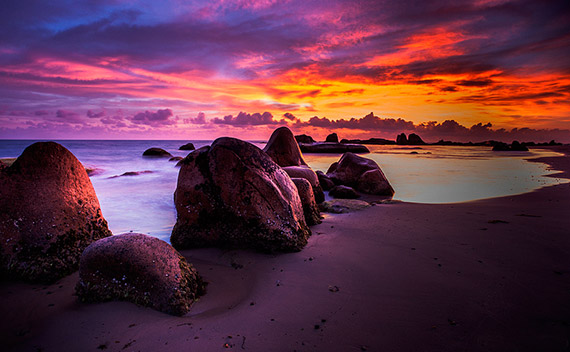
“Biển Cổ Thạch” captured by PictureSocial member Trandinhkhiem

Here’s a pro secret: many of the beautiful colors we see in professional quality sunset photographs have been added with a filter. Particularly in movies and on television. (Photo techniques don’t change just because it’s a movie set.)

We can stack filters and use a colored filter to add colors to the sky and then darken it with a split neutral density filter to rescue the foreground.

For sunsets, tobacco colored filters tend to be very popular. For sunrises, filters trend more toward pink.

So, to create that jaw-dropping, contest-winning sunset you’ve been dreaming about, meter with the sun out of the frame to increase the exposure value. Then slightly underexpose the sky to intensify the colors. Finally, bring back the details in the ground and add color to the sky, if necessary, with filters. Today’s landscape photography photo tip is going to quickly separate you from the crowd. Try it!

About the Author
Dan Eitreim writes for ontargetphototraining.com. He has been a professional photographer in Southern California for over 20 years. His philosophy is that learning photography is easy if you know a few tried and true strategies.


Go to full article: How to Get Stunning Colors in Your Sunset Photography

What are your thoughts on this article? Join the discussion on Facebook

PictureCorrect subscribers can also learn more today with our #1 bestseller: The Photography Tutorial eBook

The post How to Get Stunning Colors in Your Sunset Photography appeared first on PictureCorrect.


from PictureCorrect https://ift.tt/2JmZfgj
via IFTTT

PictureCorrect.com: Interesting Photo of the Day: Icelandic Ice Cave

The best part about adding to a beautiful landscape is placing a figure in it to show scale or draw the viewer’s attention to a spot in the photograph. In this case, the cave explorer wears a crimson red jacket in stark contrast to the cool blue and dark navy colors filling the space around him. The placement adds emphasis to the cave entrance and draws the viewer’s eyes from the vignette corners to the focal point:

ice cave Iceland photo tour

“Ice Cave” by William Yu (Via Imgur. Click image to see full size.)

Photographer William Yu captured this image in Vatnajökull National Park in Iceland. The stunning detail of the walls and ground shows the incredible change that this cave has been through over the years. It all seems to spiral in a vortex toward the vanishing point, which has been reduced to a glare from the beaming sun just outside. The ocean blue colors add to the effect that a giant wave froze while it was breaking above the person shown in this photograph.

To capture this photo, he used a Sony A7RII camera with a Leica WATE 16-21mm lens at 16mm length, an aperture of f/11, 1/10 of a second shutter speed, and ISO 1600.


Go to full article: Interesting Photo of the Day: Icelandic Ice Cave

What are your thoughts on this article? Join the discussion on Facebook

PictureCorrect subscribers can also learn more today with our #1 bestseller: The Photography Tutorial eBook

The post Interesting Photo of the Day: Icelandic Ice Cave appeared first on PictureCorrect.


from PictureCorrect https://ift.tt/2GBrZ3j
via IFTTT