keskiviikko 4. huhtikuuta 2018

PictureCorrect.com: Photoshop Trick to Reduce Noise in Low Light Photos

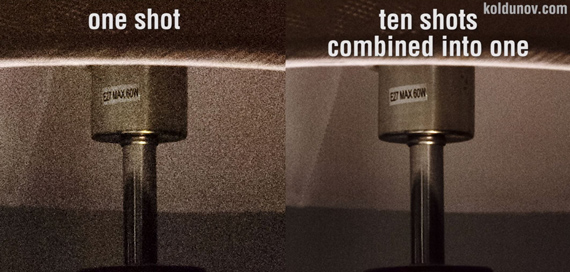
Are you looking to clean up your noisy images and prevent the grain from ruining your future pictures? The Koldunov brothers have shared a method to reduce noise created while shooting dark photography. The listed steps are easy to follow. Here’s how to get started:

  1. Take 10 similar shots of your scene.
  2. Open the images in Photoshop.
  3. Go to File > Scripts > Load Files into Stack.
  4. Select all 10 files.
  5. Select Attempt to Automatically Align Source Images.
  6. Select Create Smart Object after Loading Layers.
  7. Go to Layer and click Smart Objects, then scroll down to Stack Mode and click Median.

noise reduction trick
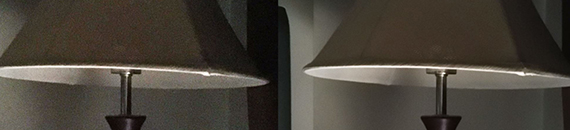
reduce noise dark photography tutorial

There you have it! You can see the side-by-side comparison above. Look at the difference it makes in noise reduction and detail in the photo. Do you think you’ll try this out?


Go to full article: Photoshop Trick to Reduce Noise in Low Light Photos

What are your thoughts on this article? Join the discussion on Facebook

PictureCorrect subscribers can also learn more today with our #1 bestseller: The Photography Tutorial eBook

The post Photoshop Trick to Reduce Noise in Low Light Photos appeared first on PictureCorrect.


from PictureCorrect https://ift.tt/2GBe9lC
via IFTTT

tiistai 3. huhtikuuta 2018

PictureCorrect.com: Interesting Photo of the Day: Water Droplet Umbrella Effect

An endless fascination among many photographers is the pursuit of that elusive perfect water droplet shot. With liquids being so fickle and a drop being so small, it’s a difficult image to capture, but one that, when done right, can be packed so full of simple, natural elegance. Today’s interesting photo of the day is actually the product of TWO water droplets – one, which was dropped first, hit the pool’s surface and jumped upwards where it collided with a second, perfectly timed drop. This interception broke the surface tension and created a billowing umbrella shape:

water drop photography

Two drops of water collide to create this mushroom-like shape. (Click to view full size, imgur)

The photographer behind this image shared widely through imgur is believed to be Corrie White. The image appears to be completely natural, unmanipulated by any photo editing program. When making a picture such as this, the timing of the droplets is definitely the trickiest part. The colouring, reflections, and background are actually quite straightforward. If you’d like to try it yourself, all you’ll need is a wide bowl full of water, a pipette (or a thick, watertight plastic bag), a strong light, and some coloured gels.

  1. Set up the bowl on a sturdy table, with a blank wall behind it. If the bowl is coloured, the hue will reflect throughout the water.
  2. Place your light to one side of the bowl and cover it with a coloured gel. The water will refract the tones of the objects which surround it. You can use more than one light, as well as objects such as plants and fabric. This image appears to use two lights – one on the right covered with a cyan gel, and one on the left, covered in magenta.
  3. Fill the pipette with water, and drip it into the bowl, taking an exposure with every drop. It will take some practice to get the timing right. Alternatively, you could fill that thick plastic bag with water and suspend it over the bowl, poking it with a needle to let it drip slowly while you focus on making your exposures.

Experiment with moving the lights and objects, to see how the effect changes. Remember that this method is not new, so kick your imagination into gear in order to make that final shot stand out, and make it yours.


Go to full article: Interesting Photo of the Day: Water Droplet Umbrella Effect

What are your thoughts on this article? Join the discussion on Facebook

PictureCorrect subscribers can also learn more today with our #1 bestseller: The Photography Tutorial eBook

The post Interesting Photo of the Day: Water Droplet Umbrella Effect appeared first on PictureCorrect.


from PictureCorrect https://ift.tt/2uJaaxz
via IFTTT

PictureCorrect.com: 6 Effective Setups for Portraits Using Reflectors

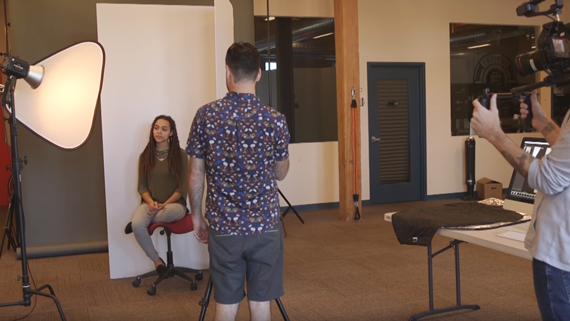
Do you think that reflectors are useful, but just for reflecting light in one way? Reflectors are actually versatile pieces of kit and can be used in several ways to create different looks. Aaron Nace from Phlearn shows us how to use reflectors in six different ways. He’s also thrown in a bonus use for a diffuser at the end of the video:

A 5-in-1 reflector generally has a diffuser disc in the middle, which is covered with a gauzy white fabric. The reflector has gold, silver, black, and often white covers that slip on over the disc and zip up. This type of reflector is inexpensive to buy and usually folds down to a small, light circle which fits in a bag for easy portability.

Reflectors are used to fill dark shadows, and the diffuser part to, well, diffuse harsh light! But it’s the way they are used that makes a lot of difference.

Reflectors don’t just come in the 5-in-1 variety; you can reflect light with a piece of white poster board, a bed sheet, or white foam core, to name a few. If you can shine light through it or bounce light off it, it will do the job.

When using reflectors/diffusers, these rules hold true: the closer the reflector is to your subject, the more light it will bounce back into the shadows. The closer the diffuser is to the model with a light shining through it, the softer the light will be. This is also a great trick to use when shooting portraits outdoors in bright sunlight.

Ask your subject if s/he can see the light reflected in the reflector. With sunlight it’s easy to tell, but if you’re using a studio strobe, turn on the modeling light and ask the model if they can see it in the reflector. If they can see the light reflected, it means that it will hit them in the right place to fill the shadows.

6 Uses for Reflectors/Diffusers

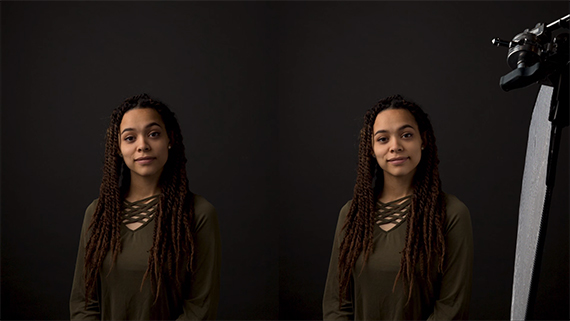
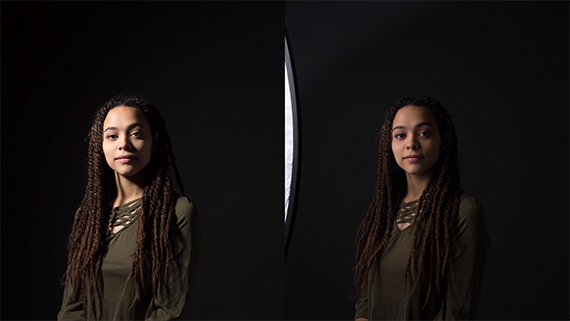
  1. Use a  softbox on camera left. The model’s right side is in shadows. Add a reflector to the right-hand side to fill in the shadows.
fill in shadows with a reflector

Fill in Shadows

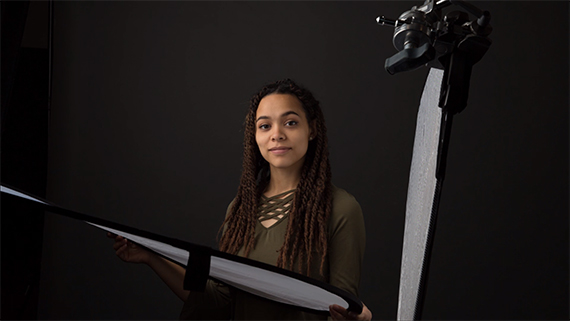
  1. Bring in a second reflector to the setup above, and have the model hold it under their chin to fill in the shadows from below.
two reflectors

Second Reflector Held By Model

  1. Use a strobe with no softbox. This is normally a very harsh light, but with the diffusion panel put between the light and the subject, it produces a much softer light.
diffusion between light and subject

Diffusion Disc Between Light and Model

  1. Create a V-flat by taping two giant pieces of white foam core together to form a large V. Have your model sit or stand within the V. Both sides of the foam core will reflect light back.
v-flat

V-Flat Behind Model

  1. Point your strobe into the V-flat. Firing the strobe into it will bounce the light onto the subject. This technique can make it look like you used a much larger light source than just a bare strobe, and it will soften the light.
  1. Light your model from three different directions using a strobe, diffuser, reflector, and V-flat. This surprisingly simple setup makes it look like your model was lit from front and behind, but you’re only using one studio light.

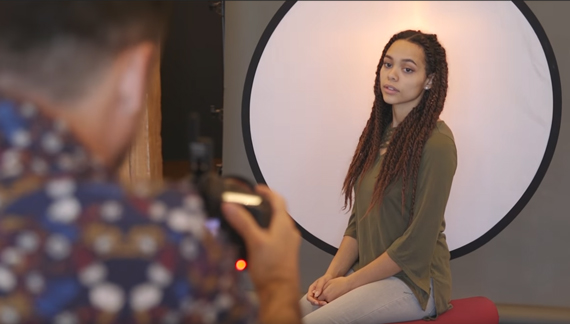
The bonus setup Nace shows us is a creative setup with what he calls ‘angel’ or ‘halo’ lighting. He puts a diffusion panel directly behind the model, then he shines a strobe through it from behind. This backlighting will give a soft glow around your model if you overexpose a bit.

photoshoot model backlight diffuser

Halo Lighting

You don’t need to spend a fortune on studio lights if you have a few reflectors handy. Try it out for yourself and see the difference one humble reflector/diffuser combo can make!


Go to full article: 6 Effective Setups for Portraits Using Reflectors

What are your thoughts on this article? Join the discussion on Facebook

PictureCorrect subscribers can also learn more today with our #1 bestseller: The Photography Tutorial eBook

The post 6 Effective Setups for Portraits Using Reflectors appeared first on PictureCorrect.


from PictureCorrect https://ift.tt/2H5uFXP
via IFTTT

maanantai 2. huhtikuuta 2018

PictureCorrect.com: New Deal: Fantastic Fundamental Light Skills at 70% Off

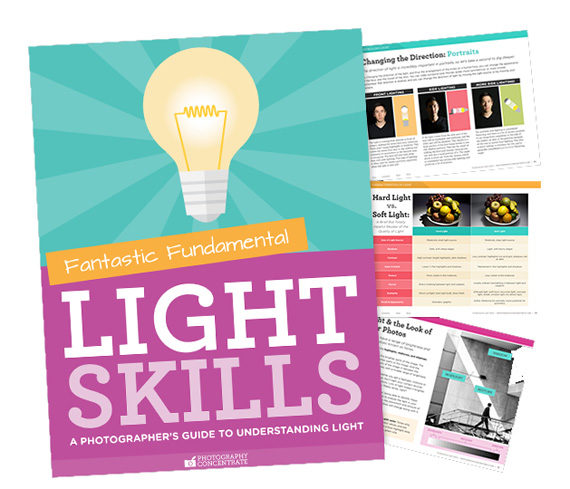
As a photographer understanding light is absolutely critical. It doesn’t matter whether you’re a beginner or a professional – light is the most important element in photography. This popular 125 page in-depth tutorial eBook educates photographers on the most critical and important aspects of harnessing light in photos. We were able to arrange an exclusive 70% discount today which ends soon. Deal found here: The Photographer’s Guide to Understanding Light at 70% Off

Fantastic Fundamental Light Skills (Learn More)

It’s no secret that light is essential to photography, and so it’s no big surprise that learning about it will help you improve.

But what is there to really understand about light?

light skills photography

Photographer light skills

Well, the more you understand how light works, the better your photos will be. The more you start to see how light affects everything around you, the better your photos will be. The more you know about the different qualities of light, and how they change the look and feel of your scene, the better your photos will be. And the more you practice controlling light, the better your photos will be.

But despite being so fundamental, light has actually been a pretty tricky thing to learn…until now!

understanding light

Understanding Light = Better Photos

This guide aims to help you understand the essentials of light so you can look at a scene, describe the light, and actually understand why it looks the way it does. And then you’ll know the options you have for controlling and changing that light to suit your tastes.

What’s Covered (125 Pages):

  • What Light Is (skip the long physics lesson and get right to what you need to know)
  • Why We See Anything at All
  • How We See Different Colors
  • Why Your Camera Sees Light Differently Than You See Light
  • Your Camera’s Light Meter
  • The 3 Ways That Light Behaves: Reflection, Absorption, and Transmission
  • Specular Reflection
  • Diffuse Reflection
  • The Law of Reflection
  • How to Identify Shadows, Midtones, and Highlights
phtoography lighting guide

Pages from Light Skills (Click to See More)

  • Dynamic Range
  • HDR Photography
  • Contrast
  • White Balance
  • The 4 Different Characteristics of Light: Direction, Quality, Intensity, and Color
  • Soft Light vs. Hard Light
  • Flattering Light for Portraits
  • The Inverse Square Law De-Mystified
  • The 3 Main Ways of Controlling Light in Your Photos
  • Window Light
  • Backlighting
lighting from a sunset

Lighting: the critical element of photography

Plus, this deal also contains a few bonuses including the Light Skills Field Guide. This printable pocket guide contains the most essential light information, laid out in an easy-to-follow format so you can keep you favorite tips and tricks close by, wherever you go.

How to Get a Discounted Copy Today:

We were able to arrange an exclusive 70% discount today for PictureCorrect readers which ends soon (normally $97, today just $29) plus the offer also includes two bonuses!

Deal found here: Fantastic Fundamental Light Skills at 70% Off


Go to full article: New Deal: Fantastic Fundamental Light Skills at 70% Off

What are your thoughts on this article? Join the discussion on Facebook

PictureCorrect subscribers can also learn more today with our #1 bestseller: The Photography Tutorial eBook

The post New Deal: Fantastic Fundamental Light Skills at 70% Off appeared first on PictureCorrect.


from PictureCorrect https://ift.tt/2q3xKzo
via IFTTT

PictureCorrect.com: Interesting Photo of the Day: Amazing Nighttime Snowboarding Portrait

Dave Lehl is known for his action and adventure photography—and many consider him to be the best snowboarding photographer in the world. Once you see this image, we’re sure you’ll agree:

LED snowboarder snowboarding jump colorado mountain snow ice

“LED Snowboarder.” (Via Imgur. Click image to see full size.)

Lehl created this image with professional snowboarder Steve Fisher in the mountains of Breckenridge, Colorado.

Some speculate that Lehl infused the snowboard with LED lighting and used a traditional long exposure technique, utilizing a flash to freeze the motion of the snowboarder at the peak of his jump. Others tout the “it was all done in Photoshop” theory, believing that Lehl combined multiple images in Photoshop to create his final masterpiece.


Go to full article: Interesting Photo of the Day: Amazing Nighttime Snowboarding Portrait

What are your thoughts on this article? Join the discussion on Facebook

PictureCorrect subscribers can also learn more today with our #1 bestseller: The Photography Tutorial eBook

The post Interesting Photo of the Day: Amazing Nighttime Snowboarding Portrait appeared first on PictureCorrect.


from PictureCorrect https://ift.tt/2H64MqY
via IFTTT

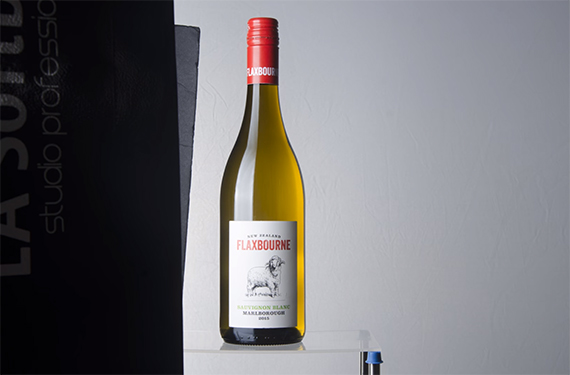
PictureCorrect.com: How to Photograph a Bottle of White Wine

Photographing any kind of glass bottle with liquid in can be a challenge, but Dustin Dolby explains the technique he uses in this video:

He talks us through his setup and explains that you don’t need expensive kit to make great wine bottle shots. He’s using a Yongnuo 560 IV speed light and a Bowens mount adapter for a strip softbox, with an 85mm f/1.8 lens.

Dolby gives out plenty of lighting tips while he shoots and shows what happens with each setup. He takes a series of shots with lighting from different angles or added flags or reflectors so he can create a composite image in Photoshop later with all the best parts of each photo.

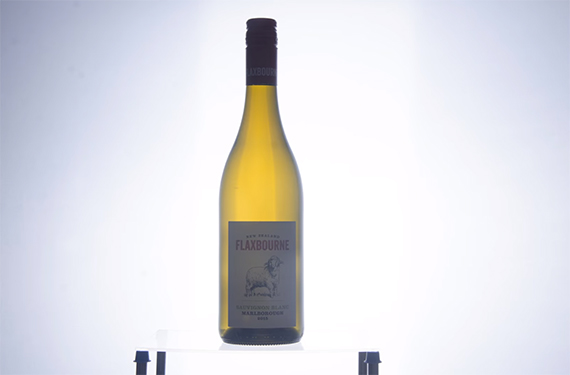
He starts by using his speed light at the back of the bottle, and adds a large, white diffusion panel. This creates a high contrast backlight, but the front of the bottle is shadowed.

backlit wine bottle

Backlight Only

Next, he goes for a more side directional look. Still with his light at half power, he moves the strip box very close to the side of the bottle, which gives directional highlights on the side. With the softbox this close to the bottle, small adjustments to the light make big differences.

side lit wine bottle

He then adds a white reflector to the opposite side of the bottle to add fill light to any shadows.

To deal with the problem of the bottle reflecting the diffusion material, Dolby uses black flags held to the side for a couple of shots to help define the edges of the bottle.

black card for wine bottle photo

A black card defines the left side of the bottle.

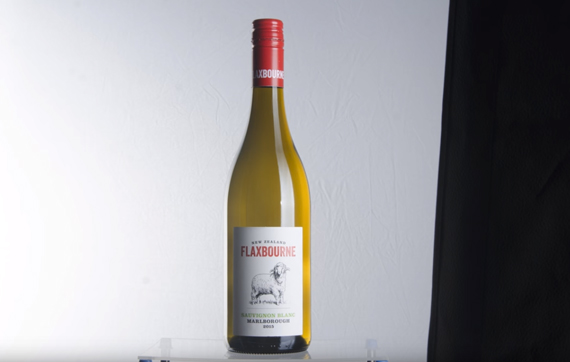
He then adds all the images to Photoshop and creates a composite final image using layer masks.

white wine bottle final image

Final Image

Dolby shows us all the tricks he uses to get professional standard white wine bottle images. If you want to practice your glass bottle shooting skills, this video is a great place to start!


Go to full article: How to Photograph a Bottle of White Wine

What are your thoughts on this article? Join the discussion on Facebook

PictureCorrect subscribers can also learn more today with our #1 bestseller: The Photography Tutorial eBook

The post How to Photograph a Bottle of White Wine appeared first on PictureCorrect.


from PictureCorrect https://ift.tt/2ImWB8V
via IFTTT

lauantai 31. maaliskuuta 2018

PictureCorrect.com: 3 Secret Techniques from Real Estate Photographers

Since real estate photography has some pretty unique attributes, there are some secrets that most might not know about when starting with it.

And since we are dealing with inanimate pieces of property, we have a huge flexibility to our advantage that allows us to use different techniques that a photographer might not be able to use in another style of photography.

Let’s take a look at these three secrets and why they can easily help us.

1. Shooting Under Exposed

To the average individual, shooting under exposed might not seem like the right thing to do. They would think that we need to shoot at properly exposed so the shot can be well lit.

But we can afford to shoot images under exposed. Not only that but it would help us in the long term by retaining the details and highlights of a shot.

This would be used for one exposure shot images only. But don’t worry, we’ll get into another secret that discusses multiple shots soon.

There are several editing techniques that allow us to brighten up an image and still retain those details and highlights, such as using a brush in Lightroom or Photoshop to increase exposure in only certain areas of the image that are dark. This gives us much more control over the final image.

2. Shooting at a Smaller Aperture

This could also be another case of a typical individual thinking that we should shoot at a larger aperture (e.g. f/1.2 – f/2.8) than a smaller one (e.g. f/8 – f/22).

Of course, we would be trained to let more light in and probably adjust the aperture until we feel like the image is properly bright or lit.

But there’s something with aperture that also changes when we go larger, and that is the depth of field or the amount of bokeh that is produced at larger apertures.

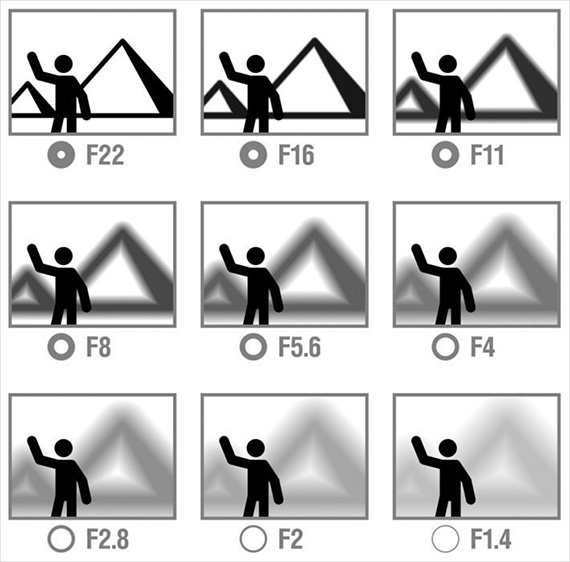
Take a look at this chart to really understand how depth of field or bokeh (blurriness from your subject and background) works from the range of available apertures.
aperture chart

So, notice how when the aperture gets larger (and the number gets smaller. I know, very confusing), the background from the subject gets blurrier.

For real estate, we would technically want the whole image in focus and no blurriness at all, so we’ll want to keep our aperture relatively smaller.

Now we don’t have to take the aperture all the way to f/22 but we could stick around f/8 – f/11 and focus the camera on an object toward the second half of the image. Meaning, don’t focus on the farthest object but an object that is around three quarters of the way from your camera and the farthest point in the image.

Let’s just look at this example below to easily understand the complicating thing I said above about focusing.
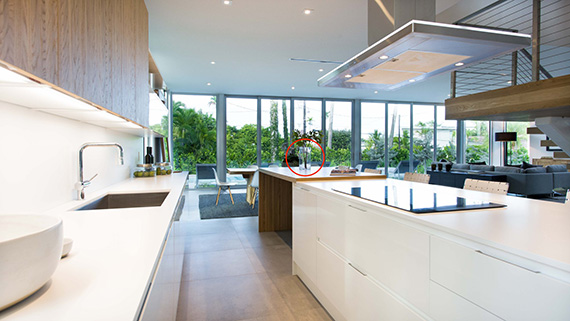
interior real estate photography

Shot at f/8

Notice how everything is in focus with my aperture at f/8 and the focus point set on the flower vase in the red circle. We can see that the focus point isn’t the farthest object from the image and it’s not too close to the camera. It’s within that second half of the image range.

3. Shooting Multiple Exposures and Blending

When shooting real estate, our subject is never moving so we are able to plop our camera onto of a tripod to get the most stable shot for us.

That’s the beauty of working with real estate. So, we take that into account and develop a technique to use based on that advantage.

Voila!

We can take multiple exposures of one shot that we can then easily blend in post to get the perfect shot.

The way that this technique is accomplished is by taking a minimum of three different exposures (you could probably do two exposures but I think three is the best minimum).

One shot under exposed, one shot properly exposed, and one shot over exposed. Here’s a look at what that should look like…
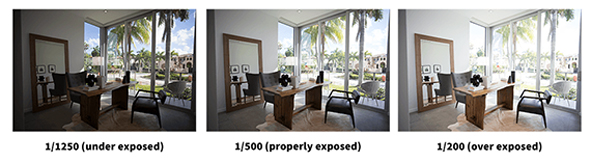
bracketing exposures

And then here is the final image but blended together from the three exposures above.
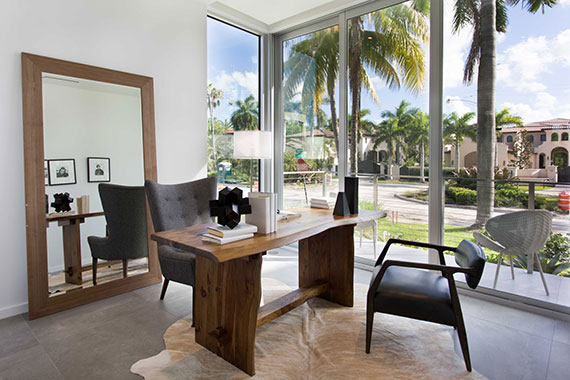
hdr real estate

By the way, the term for capturing multiple exposures is called bracketing. Simply put, we are bracketing the shots from under exposed to over exposed.

Nick, what do you mean specifically by under exposed, properly exposed, and over exposed?

Glad you asked!

As referring to the auto exposure bracketing indicator highlighted by the orange rectangle on your DSLR below…
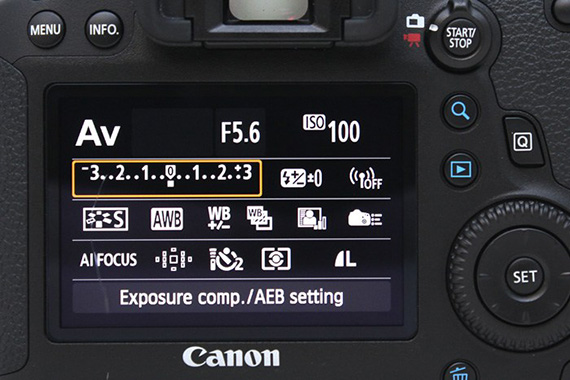
canon camera exposure bracketing

Under exposed is when the bottom marker (which is currently under 0) is anywhere to the left of the 0—negative numbers.

Properly exposed is when the marker (where it’s currently at) is on the 0.

And over exposed is when the marker is anywhere to the right of the 0—positive numbers.

When ever you adjust the shutter speed, aperture or ISO, that meter will change and let you know where the exposure currently stands at.

And each number represents an amount of shutter stop. For example, the number 1 that is to the left, is -1 shutter stop, which is considered under exposed. And vice versa for the right side.

Now for the sake of the above example, I labeled the darker image as under exposed, balanced image as properly exposed and the brighter image as over exposed.

There may be some instances where the exposure marker is on the 0 (representing properly exposed) but the shot is still pretty dark.

This can happen when you have a lot of light coming in from a large window and it’s trying to compensate that large amount of light coming in.

So for situations like that, you would just want to bracket the exposures from dark to bright based on your own eye.

(I hope I’m explaining this well and sorry if I’m saying too much. Just want to make sure everyone understands this well.)

You could even get fancy with it and do even more bracketing than just three exposures. For example, five brackets or seven brackets.

If you are shooting a shot that has a window in it and you want to capture both the outside and the inside, you’ll definitely be in the 5–9 bracket range.

Let’s quickly recap the three secrets of real estate photography that we just talked about:

  1. Shoot under exposed if only shooting one shot images so you can retain detail and just boost in post.
  2. Shoot with a mid-range aperture of about f/8 to f/12 to widen the depth of field, and focus the camera at an object within the second half of the image.
  3. Shoot with multiple exposures to capture the highs and lows more independently, and then blend them in post to create a better resulting image.

Now take these new ideas and start using them today!

About the Author:
This articles was kindly provided by ApertureUniversity and Nicholas Cuervo.


Go to full article: 3 Secret Techniques from Real Estate Photographers

What are your thoughts on this article? Join the discussion on Facebook

PictureCorrect subscribers can also learn more today with our #1 bestseller: The Photography Tutorial eBook

The post 3 Secret Techniques from Real Estate Photographers appeared first on PictureCorrect.


from PictureCorrect https://ift.tt/2GlmwBo
via IFTTT