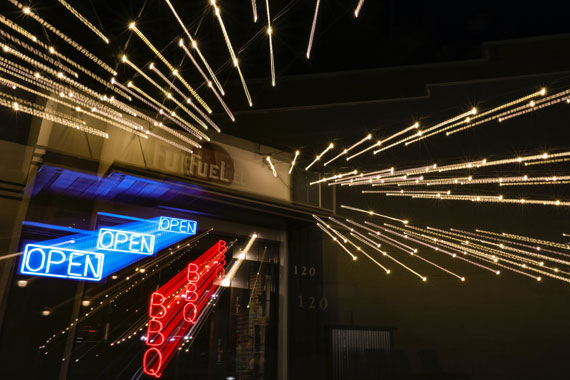
A zoom effect, in photography terms, is an effect in an image that looks like the subject is moving either toward you or away from you with lines of motion. It’s also known as racking the lens. The information in this article pertains to creating this look in-camera and not the post production technique (in Photoshop terms, it’s called “radial blur”).
3 Basic Steps to Achieve the Zoom Effect
- Set your shutter speed to a longer exposure.
- Compose and focus.
- While taking the shot, between when the shutter opens and actually closes, zoom in or zoom out.
As usual, you need a lot of practice in order to capture a nice zoom effect, and that’s what fun about photography.
Tips for Better Results
Shutter Speed. Choose a shutter speed long enough to zoom your lens from one end to another. There is no one standard setting on your shutter speed in order to achieve the effect, but there are a few factors to consider:
- Level of available light
- Type of lens you are using
- Amount of movement from your camera or the subject
Again, always experiment with different shutter speeds. Different settings may result in different levels of effect.
Aperture. While your aperture setting is not the most critical to obtain a nice zoom effect, when using a slower shutter speed you might have a problem with overexposure (depending on the overall lighting) as it lets more light into your camera. You can cope with the potential overexposed shot by selecting a smaller aperture (larger f number).
Zooming. To get nice smooth motion lines in your image, you need to zoom smoothly and constantly. Do not speed up at one point and later slow down at another point while zooming.
It does matter if you zoom in or zoom out to get the effect, as zooming in on a subject will give you a different result than zooming out. Try both ways, and you will see the different effects.
Lights. Lights can produce really spectacular effects. On one occasion I captured a photo during a stage performance where the stage was well lit with colorful lighting, while the foreground was dark. In this situation, I fired my flash gun just enough to freeze the subjects in the foreground. During the long exposure, I managed to freeze part of the image—in this case the video crew and the audience—while getting movement behind and around them.
Photo by Bill Gracey; f/22.0, 1/4-second exposure.
Hope this is a useful tip. Keep a look out for more photography tips and tutorials. Remember to practice and keep practicing.
About the Author:
This article was written by Affendy Ahmad, photographer for all occasions.
Did you appreciate this newsletter? Please help us keep it going by Joining Our Patreon Supporters
What are your thoughts on this article? Join the discussion on our Facebook Page
PictureCorrect subscribers can also learn more today with our #1 bestseller: The Photography Tutorial eBook
The post Photography Zoom Effect: Racking the Lens appeared first on PictureCorrect.
from PictureCorrect https://ift.tt/syVPi59
via IFTTT


0 kommenttia:
Lähetä kommentti