


Photography in its simplest sense is about balance among three basic factors: aperture, shutter speed, and ISO. These factors respectively control how much of the frame is in focus, the timing, and the sensitivity of the camera to light. Understanding these basic pillars of photography (also known as the exposure trinity, or exposure triangle) is the first step toward improving as a photographer. David Flores from B&H explores the fundamentals of photography in the following video:
Shutter Speed
Shutter refers to the curtain which is placed just in front of the camera sensor. It’s controlled by a mechanism in the camera. When a photograph is taken, the shutter opens up and exposes the sensor to the light coming in through the lens.
By using the camera in Manual mode (“M” in the camera dial) or in the Shutter Priority mode (“S” or “Tv” in the camera dial), you can control the shutter speed. Shutter speed is the duration for which the shutter opens and exposes the sensor to the light. It is measured in fractions of a second. For example, in order to freeze action, you’d want to dial in a fast shutter speed, say 1/1000 second. On the contrary, if you want to capture motion blur, a slower shutter speed, say 1/4 second or slower, can be used.
Another thing to keep in mind while choosing shutter speed is the availability of light. When you choose a faster shutter speed, the sensor is exposed to light for a very tiny fraction of a second, meaning that only a small amount of light will strike the sensor. So, if your photos are turning out dark, try lowering the shutter speed. And if you’re shooting in very dark conditions, a slower shutter speed will come in handy but any type of camera or subject movement will lead to a blurry photograph.
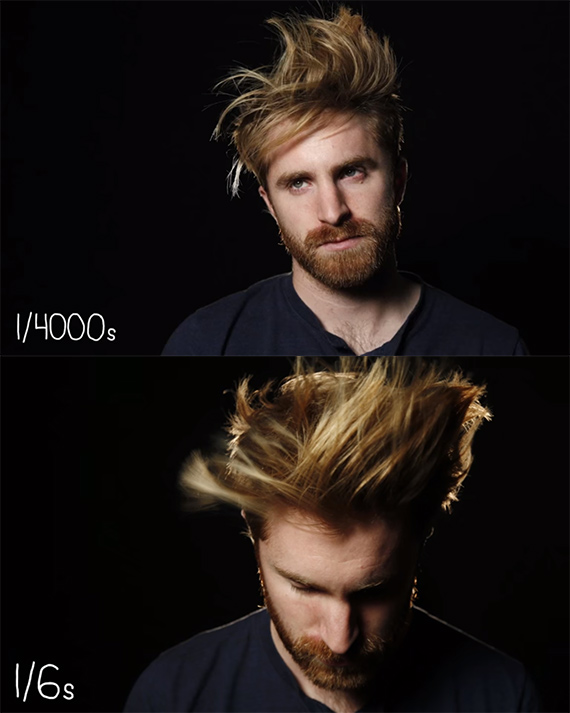
A faster shutter speed freezes the subject’s hair while a slower shutter speed captures the motion of his hair
Aperture
Aperture is the opening of the lens through which the light enters the camera. Aperture controls two things: the amount of light entering the camera and how much of the subject is in focus. Aperture is measured in reciprocals. So when we refer to a value such as f/1.8 or f/2.8, it means that the aperture is wide open (big opening). And values such as f/13 or f/22 means that the aperture is narrowed down (small opening). The larger the number, the smaller the opening and the smaller the number, the larger the opening. You can control the value of the aperture (referred as “f-value”) in Manual mode or Aperture Priority mode (“A” in the camera dial).
Wide open aperture has two effects:
- It allows a huge amount of light into the camera—good for low light conditions.
- It has a small depth of field. Only a small area is in focus and the rest is blurred out.
Small aperture also has two effects:
- It allows a small amount of light into the camera—appropriate for bright situations.
- It has a greater depth of field (a greater area of the photograph is in focus).
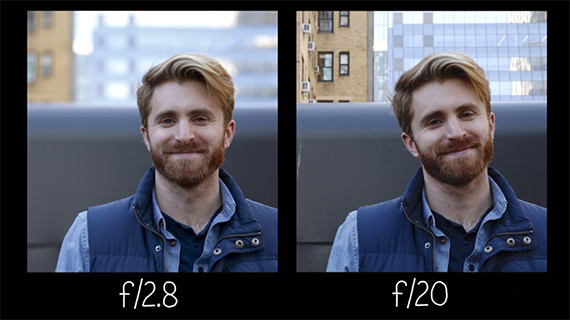
Wider aperture causes a photograph with a blurry background while a narrower aperture has most of the things in acceptable focus.
ISO
ISO is the sensitivity of the film or the sensor toward light. In the past, film had a fixed ISO. But with digital photography, cameras have the ability to amplify the light signal and change their sensitivity toward light and so they have variable ISO.
You can choose to shoot at a lower ISO value of 100 or 200 when the shooting conditions have sufficient light. Shooting at the lower ISO values also renders cleaner and noise free photographs. However, when lighting conditions aren’t favorable, you can increase the ISO value (1600, for example) to get a brighter image. Using higher ISO values comes at a cost of “noisy” images. But don’t let noise stop you from stepping up the ISO when getting the shot is absolutely necessary.

A photograph shot at lower ISO is much cleaner while a photograph shot at higher ISO has lots of noise in shadows and mid tones.
Getting a Balance
Now that you have a basic understanding of the exposure triangle, it’s up to you to practice and balance the three variables. Don’t let the terms overwhelm you. Focus on what kind of shot you want to get and start with the variables accordingly. Consider the following scenarios:
- When shooting something fast, choose a fast shutter speed and set the aperture and ISO accordingly.
- When prioritizing depth of field, choose your aperture first and set the shutter speed and ISO accordingly.
- When shooting in dark conditions, set your ISO and then set the aperture and shutter speed accordingly.
Understanding these three basics will allow you to improve your photography and gain more creative control over your shot. So keep on practicing and let us know if you have any comments of questions.
Go to full article: Exposure Triangle: The Basics of Aperture, Shutter Speed, and ISO
What are your thoughts on this article? Join the discussion on Facebook
PictureCorrect subscribers can also learn more today with our #1 bestseller: The Photography Tutorial eBook
The post Exposure Triangle: The Basics of Aperture, Shutter Speed, and ISO appeared first on PictureCorrect.


from PictureCorrect https://ift.tt/2m9CcLC
via IFTTT


0 kommenttia:
Lähetä kommentti