


Children’s portraits often seem better when they have a dreamy, vibrant, fairy tale touch to them. Umesh Dinda from PiXimperfect shows us how to achieve the effect by softening the skin, adding vibrant color, and dodging and burning:
The first and the obvious step is to open the photo using Photoshop. If the photo is RAW, Photoshop will automatically pop up the Camera Raw plugin. If it is a JPEG, then you can click on Filter > Camera Raw Filter to pop it up yourself. Here, you can make the basic adjustments on the image like white balance, exposure, contrast, highlights, shadows, and others. Go ahead and make the necessary basic adjustments and then click on Open Image at the bottom. This will take the edited image to Photoshop where you can make other edits.
Step 1: Getting the Structure Right
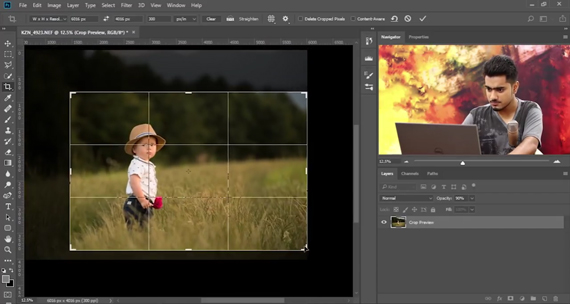
This is the first step of the actual editing process in which you need to make basic edits, like softening the skin and removing spots, blemishes, and wrinkles. But before making any adjustments to the photo, it is recommended that you crop the image to remove unnecessary elements in the photograph or reorganize the composition.
Make sure that you always work on the original duplicated layer and not on the background layer. To create a duplicate layer, press Ctrl + J (Command + J on a Mac).
- To modify any body part, it is suggested that you get permission from your client and use the liquify tool. Go to Filter > Liquify and choose the forward warp tool (shortcut: W). By using this tool, Dinda has added a smile to the child’s face. Remember, it’s up to you whether you use this tool or not.
- To remove blemishes, select the Healing Brush Tool. Make sure that in the toolbar All Layers is selected in the Sample drop-down menu and that Mode is Normal. Zoom in and look for blemishes. Sample from a part of the skin that doesn’t have a blemish by pressing Alt (Option in Mac) and clicking on that area, and then click on the blemish to cover it up. Repeat this sampling and covering process in all the blemishes that you want to remove. You can also use the same process to remove any wrinkles but do it in a separate layer in case the opacity needs to be adjusted later.
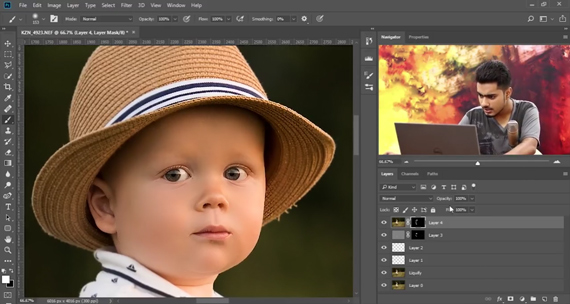
- To soften the skin, first create a merged layer of every changes that you have made by pressing Ctrl + Alt + Shift + E (Command + Option + Shift + E on Mac) and change its blend mode from Normal to Vivid Light. Next, invert the image by pressing Ctrl + I (Command + I in Mac). Then, go to Filter > Other > High Pass. Here, you need to find the radius where the skin seems softened (i.e. free from any kind of irregularities). In the process, be sure not to overdo it. Once you have the radius that is good for your image, hit OK. Again go to Filter > Blur > Gaussian Blur, and starting from radius 0.1, slowly start increasing the radius value. Once you start to see the skin texture, stop and hit OK. By doing these steps, everything gets softened and not just the skin. Now, to target just the skin, use layer masks.
- To use layer mask, press Alt (Option in Mac) and press the Mask button. Take the Brush tool with a white foreground color and start painting over the skin. Dinda suggests not to go near the edges. Once you’re done with this, you get a result with softened skin. If you feel that you have gone a bit overboard, you can decrease the opacity and set the value that satisfies you.
- To sharpen selective areas, press Ctrl + Alt + Shift + E (Commnad + Option + Shift + E on Mac) first to create a merged layer and then go to Filter > Sharpen > Smart Sharpen. Dinda’s trick is to increase the Amount all the way up to 500 and then control using opacity. Increase the Radius in small increments until the edges are clearly determined without any halo effect. When you hit OK, you will notice that the entire image has been sharpened. But, the motive is to sharpen selective things like the eyes, lips, and the nose.
To sharpen selectively, follow the exact steps that that did in selectively softening the skin and use a layer mask. But this time, you need to paint with the brush with a white foreground color on the areas that you want sharpened. Finally, decrease the opacity of the layer and adjust if you feel that the sharpening is just too much.
Now that you have the structure right, pause for a second and have a good look at the photo before moving on. If you feel that some changes are to be made, do so.
Also, to organize the workflow, you can select all the layers (except for the background layer) and then press Ctrl + G (Command + G in Mac) to group all the layer together. Give the group a name for clarity.
Step 2: Retouching the Skin
Removing the blemishes and softening the skin was just the starting point. Retouching the skin is more about taking care of the skin color and the skin tones.
To make babies look even cuter in photos, Dinda likes to increase the red color in the shadow area. To do so, you can follow these steps:
- Create a curves adjustment layer by clicking on the Adjustments Layer and choose Curves.
- In the channels drop down menu, choose Red instead of RGB, and increase it in the dark areas.
- To avoid this redness being applied to all the parts of the photo press Ctrl + I (Command + I on Mac) by selecting the mask for the Curves layer and then paint over the skin by selecting a brush with a white foreground color. In case you paint over any unwanted areas like the eyes, repaint those areas with a black foreground color to undo it. This is how masks work.
To add more vibrancy to the photo, you can next add a color to the photo by creating a Solid Color Adjustment layer.
- Click on the Adjustments Layer and choose Solid Color and choose a peachy skin color. Then hit OK.
- Change the blend mode of the layer to Multiply.
- To avoid color being applied to all the parts of the photo press Ctrl + I (Command + I on Mac) by selecting the mask for the solid color and then paint over the skin by selecting a brush with a white foreground color. In case you paint over any unwanted areas like the eyes, repaint those areas with a black foreground color to undo it.
- Now, decease the opacity of the solid color layer until the skin looks a lot more natural. In case you want to change the color, double click on the color icon and choose the color of your liking.
You can increase the rosiness of the cheeks by using the Color Balance adjustment layer.
- Click on the Adjustments Layer and choose Color Balance.
- Increase the reds and a bit of magenta tone.
- Press Ctrl + I (Command + I in Mac) by selecting the mask for color balance and then using a big soft brush with white foreground color selected, just dab on the cheeks to add some redness and a lot of cuteness.
Now before moving on to the next step, group all the layers together again and name it so you don’t get lost later.
Step 3: Retouching Eyes, Hair, and Lips
Dinda has a big disclaimer before moving on to this step: “Only do it if required and only if it improves the image.” To show an example of things that can be improved, he gives the following examples:
- Brighten up the eyes creating a Solid Color Adjustment Layer and fill it with 50 percent grey (hex code #808080) and then choose Color Dodge as the blend mode. Then, as we have done in the steps above, just mask in the eyes making sure that you avoid the edge of the iris. Again, if you think that you have overdone it, adjust it by changing the opacity of the layer.
- By choosing a pinkish tone and by masking in the lips only, you can go ahead and touch up the lips as well.
Once you’re done with this step, make sure to group all the layers and name to keep everything organized.
Step 4: Taking Care of the Light
This step has less to do with the children in the photograph and more with the environment they are in. This step is about making the image pop, and Dinda makes use of the curves adjustment layer to achieve the result.
- Darken the background a little to make the subject stand out. To do so, select the Curves Adjustment Layer and pull the curve a down. This will darken the overall image.
- Next, by either using the masking tool or the quick selection tool, exclude the subject from the curves adjustment layer. Make little adjustments in the surroundings of the subject so as not to make the image look unnatural.
- If you want to change the overall darkness or brightness of the image, you can add a curves adjustment layer and adjust. To make sure that the curves adjustment layer does not affect the skin tone, be sure to change the blend mode to Luminosity so that only the brightness is affected.
After you are satisfied adjusting the lighting in the photograph, arrange all the layers in a group and move on to the next step.
Step 5: Adding Colors
This is one of the most important steps in this tutorial, as it has to do with adding vibrancy to the overall environment.
- Start by adding a Solid Color Adjustment Layer and choose a color based on the environment. In Dinda’s example, since the child is in a field, he chooses green for his fill color. Next, change the blend mode to Soft Light or Overlay and exclude the subject by using the method of your convenience to avoid tampering with the skin tones.
- If you’re not satisfied with the fill color, you can always double click on the Solid Color Adjustment Layer icon and change it.
- To increase the contrast, add Curves Adjustment Layer and create a subtle S-curve by pulling the highlights of a little bit in the upwards direction and the shadows in the downwards direction. Again, mask the children out of this mask to avoid any changes on them.
Since you have grouped the layers based on the adjustments that have been made, if in any point of time you feel that any of the adjustments is not satisfactory, then you can go back to it and make the adjustments again.
Step 6: Adding More Punch to the Colors
Now that we have made the overall scene more colorful, you can add a punch to it by adding some Vibrance and the Exposure Adjustment Layer.
- Vibrance increases the colors in the midtones only. To add vibrance, select the Vibrance Adjustment Layer and increase the overall vibrance. To exclude the subject, you can mask them out.
- You can also add an Exposure Adjustment Layer, increase the exposure and adjust the Gamma Correction. Again, exclude the subject by masking them out.
For convenience, group the layers again.
Step 7: Dodging and Burning
Dodging is brightening and burning is darkening particular areas of an image. Think of it like light and shadows, which add more depth and dimension to an image. Before you go ahead with dodging and burning, try to understand where the light source is. Anything that is nearer to the light source needs to be brighter and anything that is farther away needs to be darker.
Use this concept to use the dodge and burn. However, it may not always be necessary to dodge and burn, and also if you use the dodge tool it does not necessarily mean that you need to use the burn tool. You can just do one of them.
Instead of using the readily available burn tool, Dinda uses the following interesting way of burning.
- Add a Curves Adjustment Layer and pull the shadows all the way down.
- Select the mask and press Ctrl + I (Command + I in Mac) to invert the mask.
- Take a brush with a white foreground color and paint on the areas that are protruding away from the light.
- Once done, double click on the Curves Adjustment Layer icon and readjust the curve that makes the subject look more natural. If done correctly, this will add some dimension to the subject.
Again, before moving on to the next step, organize your layers.
Step 8: Adding External Effects
This step is all about adding drama and a surreal effect to the final photograph. Dinda demonstrates how to add a light ball to create a dramatic feeling:
- Create a Gradient Layer and double click on the gradient.
- Choose a preset having a color on the left hand side and transparent on the right hand side. Choose white for the left hand side and something like a yellowish red for the right hand side to mimic warm light.
- For the middle too, choose a warmer color like yellow.
- Finally, change the style from Linear to Radial and scale the light ball to your preference. You can move it around and change the opacity to make it look as natural as possible. If you want to change the colors in the gradient, you can do so by double clicking the gradient icon.
To further add drama to the effect created by the light ball, Dinda adds a Vignette effect:
- Create a Levels Adjustment Layer and make the image darker by taking the slider from the right to the left.
- Select the mask and with a big and hard brush selected with flow set to 100 percent and the foreground color as black, click once. To shape the circle, press Ctrl + T (Command + T in Mac) and then transform it in a way it creates a sort of a spot light from the light ball towards the subject.
- Once satisfied with the way the shape is looking, hit enter and then increase the feather of the mask to make it as natural as possible and then decrease the opacity a bit.
- Finally, to add to the dreamy effect, you can even fade the image a little bit by adding an Exposure Adjustment Layer and then increase the Offset a little to give the image a dreamy faded look.
Lastly, group all these effects together as well. It makes your work a whole lot easier if you ever need to come back to it.

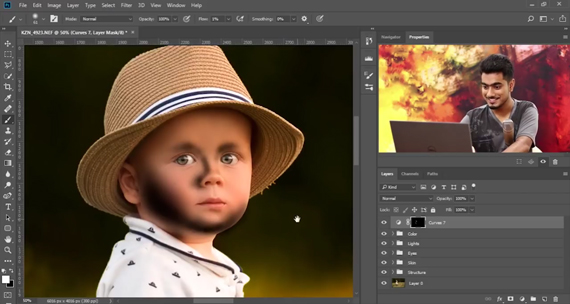
There you have it folks. The way Dinda has transformed an already good looking photo of a child to an amazing dreamy photo is really praiseworthy. There are a lot of steps involved,but try to be patient and learn the process. Also, be sure not to overdo anything!
Go to full article: Dreamy Effect on Child Portraits Photoshop Tutorial
What are your thoughts on this article? Join the discussion on Facebook
PictureCorrect subscribers can also learn more today with our #1 bestseller: The Photography Tutorial eBook
The post Dreamy Effect on Child Portraits Photoshop Tutorial appeared first on PictureCorrect.


from PictureCorrect https://ift.tt/2NO1MSU
via IFTTT


0 kommenttia:
Lähetä kommentti