This article is based on concepts from the Fundamental Photo Editing Guide which is on sale today if you want to dig deeper for further training.
There’s been a lot of debate online regarding the Contrast adjustment versus the Clarity adjustment that appears within most digital photo-editing software products.
Both seem to affect the contrast within a photo.
So, what’s the difference when post-processing your images?
That’s the topic of today’s quick tip.

Photograph #1 By Kent DuFault
Photo #1, at first glance, looks to have average contrast and brightness, although it appears a bit flat to me.

Photograph #2 By Kent DuFault
How do you most effectively judge the contrast of a photo?
The best way is to take a look at the histogram.
Anytime the histogram is ‘bunched up’ onto one section of the scale, the image is lower in contrast, and it doesn’t matter where on the scale that occurs. A full tonal range photograph, with typically appropriate contrast, will be more evenly distributed across the entire scale.
A Key Point: That rarely happens. Most digital photos require at least some adjustment in contrast, especially if they were originated in the camera raw file format.
Photograph #3 By Kent DuFault
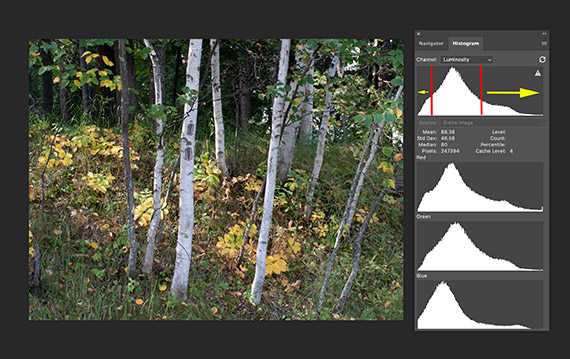
Photo #3 illustrates how the majority of pixels are ‘bunched up’ in the darker mid-tone range of the histogram scale. There are a few pixels in the dark shadow area, and there are even fewer pixels in the white highlight area. This is indicated by the yellow arrows in Photo #3.
Key Note: The vertical elevation of the scale indicates the number of pixels at that tonal range.
The contrast shown in Photo #3 could be adequate for some images. However, for this picture, I would like a fuller range of tones.
I want to improve the photo by brightening the whites and highlights (more pixels), while at the same time darkening the shadows a bit (a few more pixels), and at the same time maintaining the mid-tones (keeping the number of pixels that are already there).
So would that be a Contrast adjustment, or perhaps a Clarity adjustment?
Photograph #4 By Kent DuFault
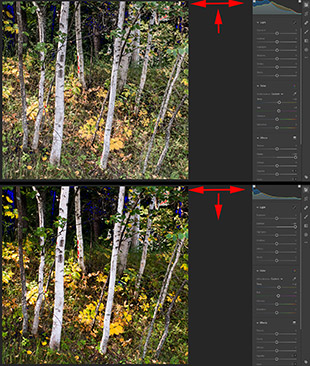
(I switched to Lightroom for Photo #4 to better illustrate the difference between a Contrast adjustment versus a Clarity adjustment.)
On the upper example photo (within Photo #4), I maxed out the Clarity setting. Look at what happened to the histogram. Clarity pushed pixels outward toward the shadow end and also the highlight end while maintaining the mid-tone range.
On the lower example photo (within Photo #4), I maxed out the Contrast setting. Look at what happened to the histogram. Contrast ‘also’ pushed pixels outward toward the shadow end and the highlight end but did so at the expense of the mid-tones!
Quick Tip: Adjusting the contrast of your photograph should be a combination of the Contrast and Clarity sliders. Use the histogram to accurately gauge your results. Also, use your eyes, not every picture will be its best with perfect contrast! Remember, Clarity increases contrast while maintaining the mid-tones. In addition, another advertised benefit to the Clarity setting is that it increases the apparent ‘sharpness’ of a photo without creating artifacts.

Photograph #5 By Kent DuFault
Photo #5 is my final edited photograph. In this case of fundamental editing, it was a combination adjustment of Contrast and Clarity with an emphasis on Clarity to maintain the mid-tones.
Photograph #6 By Kent DuFault
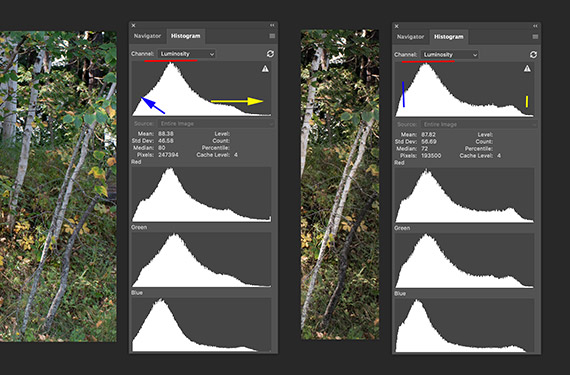
Let’s compare the histograms from the original to the final version.
On the left of Photo #6 is the original histogram, and on the right is the final edited photo’s histogram.
I wanted you to see this because, at first glance, they may not appear all that different.
Photograph #7 By Kent DuFault
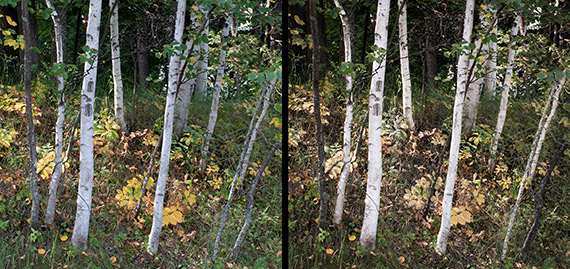
The original photograph is on the left and the post-processed photo is on the right.
Quick tip: Even a small amount of movement of the histogram scale can make a gigantic difference in the appearance of your final photograph!
About the Author:
Kent DuFault is an author and photographer with over 35 years of experience. He’s currently the director of content at the online photography school, Photzy.
For Further Training on Photo Editing:
This is a complete step by step guide to photographic editing from author Kent DuFault. Fundamental editing includes edits that aren’t going to fundamentally change the concept of the original photograph. It covers the steps required to take your original photo, as it came out of the camera, and turn it into the best image that it can be without going overboard. It is currently marked down 62% off if you want to check it out.
Digital photography is so intrinsically tied to the editing process that you can’t really consider doing one without doing the other. I know many new photographers try and resist this at first. I was guilty of that myself.
Deal ending soon: The Fundamental Photo Editing Guide at 62% Off
- - - - - - - - - - - - - - - - - - - - - - - - - - - - - - - - - - - - - - - - - - - - - - - - - - - - - - - - - - - - - - - - - - - - - - - - - -
Did you appreciate this newsletter? Please help us keep it going by Joining Our Patreon Supporters
What are your thoughts on this article? Join the discussion on our Facebook Page
PictureCorrect subscribers can also learn more today with our #1 bestseller: The Photography Tutorial eBook
- - - - - - - - - - - - - - - - - - - - - - - - - - - - - - - - - - - - - - - - - - - - - - - - - - - - - - - - - - - - - - - - - - - - - - - - - -
The post Adjusting Contrast vs Clarity for Better Photos appeared first in the Photography Tips category on PictureCorrect.
from PictureCorrect https://ift.tt/siwURuP
via IFTTT


0 kommenttia:
Lähetä kommentti