maanantai 12. toukokuuta 2025

PictureCorrect.com: Milky Way Camera Settings and Gear

When you photograph the sky during night time, you may be surprised at what you can capture with an extended shutter speed. With the correct gear and long exposure photography technique, you can collect enough light on your sensor to clearly make out the milky way in the night sky.

It’s astonishing to see how much information a camera can record. It allows us to have a glimpse of the deep sky without the use of highly sophisticated equipment. There are however certain considerations you need to make to ensure that you capture a decent looking milky way photograph. And that includes using the right gear and the right camera settings to get the job done.

Relevant reminder: sale going on now for the Milky Way Mastery Course

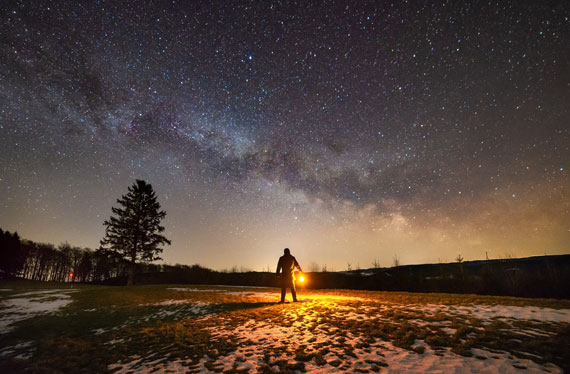
milky way camera settings

Photo captured by Evgeni Tcherkasski; ISO 3200, f/2.8, 14mm, 25 seconds.

Gear for Milky Way Photography

Camera: If you have an option, then go with a full frame camera as they typically have better high ISO performance. However any camera where you can set the shutter speed manually and focus manually may be able to do the trick. Many entry level cameras are able to do to this, and even some smartphones offer manual exposure settings now too.

Lens: Photographing the milky way means capturing the hundreds and thousands of stars of our galaxy in a single frame. It simply means that you’ll be working with a wide angle lens for the purpose. If you’re using a full frame camera, use something wider than 35mm, and in case of an APS-C camera, use something wider than 24mm.

Tripod: Milky way photography requires that you expose the sensor for a prolonged period of time. A good sturdy tripod is thus mandatory.

Remote shutter release or self-timer feature: Any type of shake becomes prominent in long exposure photography; even the ones caused when pressing the shutter release button. Using a remote shutter release or self-timer, you can trigger the shutter release without having to even touch the camera. This reduces camera shake and lands you sharper images.

Light pollution filters: While it is best to photograph the milky way in perfect dark conditions, finding such locations can be very difficult. If the location that you’re shooting from has some amount of light pollution from the city lights, you can use light pollution filters that help to ignore the city light and create images with better contrast.

App to locate the milky way: Photopills, Sun Surveyor, and Skyguide are popular options.

Besides these camera gears, don’t forget to pack a flashlight with you. As you’ll be working in pretty dark conditions, you will need them for moving around, and even for changing the camera settings.

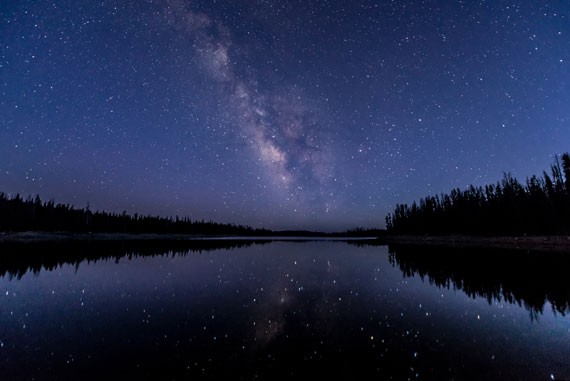
milky way photograph

Photo captured by Jackson Hendry; ISO 1600, f/2.8, 14mm, 20 seconds.

Camera Settings for Milky Way Photography

Aperture: You’d want as much light entering the camera as possible owing to the low light condition. Set your lens to the widest aperture setting possible. Depending on the lens you’re using it may be f/1.8, f/2.8, f/4, f/5.6 etc or whatever your widest aperture setting is.

Focusing: Set your lens to manual focus mode and focus on a bright star manually. The live view feature on many cameras can help magnify into the scene or you can set your lens to approximately the infinity marker. Once done, leave it there. You can even tape the focus ring to avoid accidentally changing it later.

Shutter speed: Longer shutter speeds will result in greater amount of light passing to the sensor. That’s great for low light photos, right? Right, but there’s a catch. Since the earth is moving relative to the stars, very long shutter speed will result in star trails. And you don’t want that when shooting the milky way.

A general rule of thumb to determine the longest shutter speed you can use without getting star trails is to divide the number 500 with the full frame equivalent of the focal length that you’re using. So, if you’re using a 24mm lens, the longest you can go without getting star trails is:

500 / 24 = 20.8s

In this case, you’ll thus need to have the shutter speed 20 seconds or shorter to avoid star trails.

ISO: Tweak your ISO based on the intensity of the milky way you’re able to capture using the widest aperture and the longest shutter speed. While lower ISO is better for less noise, for milky way photography, you may need to bump it to around 1600-6400 depending on the conditions. Start with a lower ISO setting and if your result is too dark keep increasing it.

For Further Training:

If there was a simple way to take stunning pictures of the the Milky Way would you be interested? You do not need top-of-the-line gear for Milky Way Mastery. In fact, during this course they show you why old fashioned accessories are often better for astro photography. It is currently 67% off today if you want to check it out.

milky way mastery

Milky Way Mastery Night Photography Course

The “secret” to exceptional astro photography isn’t your gear… it’s how you use it. Milky Way Mastery shows you how to use average equipment to take above average pictures.

Deal ending soon: Milky Way Mastery at 67% Off


from PictureCorrect https://ift.tt/JPrFxYf
via IFTTT

keskiviikko 7. toukokuuta 2025

PictureCorrect.com: Milky Way Photography & Photo Editing Tips

Milky way season is in full-effect so I thought I’d share a few pointers that I’ve learned about shooting and processing it.

Relevant reminder: sale going on now for the Milky Way Mastery Course

“But Steve, what the heck is milky way season?”

Good question.

It’s the time of year when the galactic core is visible and it runs from Feb/March til around Oct/Nov.

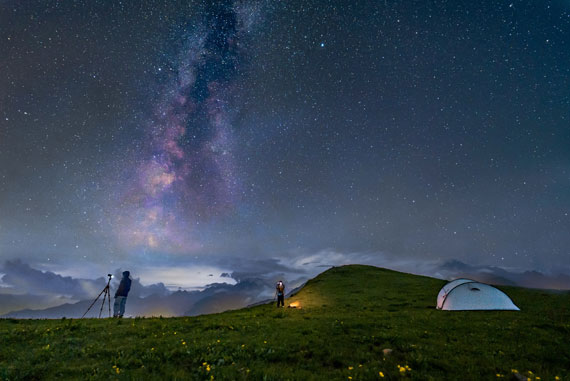
milky way photographers

Photo by Nicola Pavan; ISO 12800, f/2.8, 15 seconds.

Us southern-hemispherites are lucky that our season is a couple of months longer than folks in the northern half of the planet.

But wherever you’re reading this, my goal is for you to you be able to get out on a clear night to capture a half-decent shot of it.

I’ll admit though, I’m by no means an expert at shooting the milky way. I know the basics, and I’ve learned a few things (which I’m going to list in a second).

Given that, here’s a list of pointers that I’ve learned, so maybe you’ll find them useful too:

1: Don’t fight the fog

Ideally, we want to shoot on a perfectly clear night. But depending on location, those conditions might be quite rare. When I took the shot below I was by the ocean, air humidity was high and sea mist was lingering.

I started out trying to completely remove the mist in post processing, but decided it wasn’t worth it in the end. Too fiddly (yes, even for me lol). It was redder than you can see in the shot above thanks to the light from the nearby town it was reflecting, so rather than try to eliminate these colours, I went the other way and made them a feature!

2: Don’t over-brighten the milky way.

I’ve processed milky way shots both ways. 1) a glowing milky way against a jet black sky, and 2) the more subtle approach

I prefer the latter. Sure, I’ve made the milky way stand out by adding contrast and a touch of warmth, but the sky is also quite bright in comparison. To me, this looks more natural. Your mileage may vary.

3: Test which of these two shooting methods gives less noise.

A high ISO is usually needed when shooting the milky way because we are restricted to exposure times below 30 seconds (any longer and the sky starts to rotate, and the stars become blurry).

But it’s worth testing whether using a high ISO produces more noise than using a lower ISO and then brightening the shot in post processing.

Depending on your camera, you might notice one of these methods gives less noise than the other in the finished image.

Try both and compare. You might not notice a difference, but it’s worth the test.

4: It’s not ALL about the sky.

I don’t know why, but it’s too easy to forget that a great milky way shot isn’t ONLY about the sky, so we forget the basic rules of composition.

It’s probably the most common mistake I used to make when shooting the milky way and as a result, the images would lack context without at least a good foreground subject.

5: Try not to overexpose the brightest stars in post processing

Most of the stars in the sky will be on the verge of blowing out at any moment, but for some reason it’s easy to miss until the end of your editing workflow. Suddenly you realize half of the stars in the sky are three times their original size and are just big white blobs! lol

It will be unavoidable with some already-large stars, but just remember to keep an eye on it whenever brightening or adding contrast to the sky.

6: Have fun!

Ok this is a cheesy one, but hey, if we’re not having fun then what’s the point, right? Except, sometimes it’s easy to get so caught up in capturing shot after shot that we forget to just look up, take it all in, and contemplate the enormity and wonder of this universe we find ourselves in!

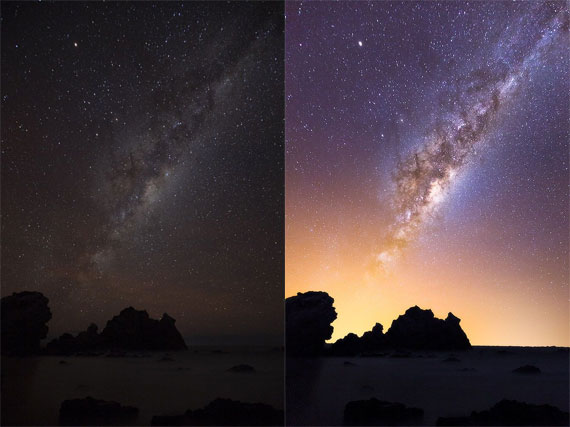
For your reference, here’s what a RAW file looked like before and after processing.

milky way edit

Before and After Post-Processing Milky Way

For Further Training:

If there was a simple way to take stunning pictures of the the Milky Way would you be interested? You do not need top-of-the-line gear for Milky Way Mastery. In fact, during this course they show you why old fashioned accessories are often better for astro photography. It is currently 67% off today if you want to check it out.

milky way mastery

Milky Way Mastery Night Photography Course

The “secret” to exceptional astro photography isn’t your gear… it’s how you use it. Milky Way Mastery shows you how to use average equipment to take above average pictures.

Deal ending soon: Milky Way Mastery at 67% Off


from PictureCorrect https://ift.tt/T2XPiY0
via IFTTT

tiistai 6. toukokuuta 2025

PictureCorrect.com: Taking and Processing Fog & Mist Photos

Related reminder: there is a free webinar going on now with 7 Powerful Photoshop Composite Secrets. Seats are filling fast—you may want to check it out.

Taking beautiful images of mist and fog can be challenging, but it’s a skill worth learning. Fog and mist usually form during the night and are seen at their best in the early morning as the sun rises. Be prepared to get up early to catch the best shots!

Use Manual Focus

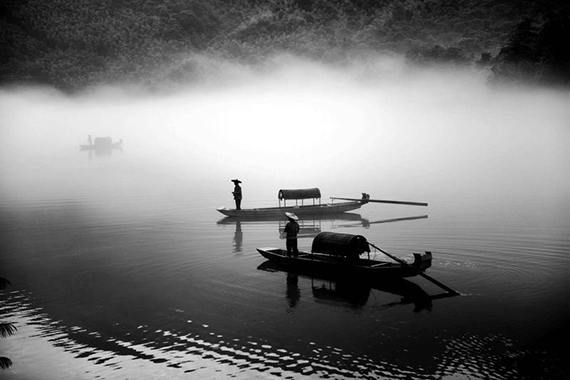
fog and mist photography

Manual Focus

Your autofocus will probably struggle in mist and fog. The reason being that autofocus needs to find differences in contrast to focus, and fog and mist don’t have a lot of contrast. You may struggle to focus on something even in manual—it can help to pre-focus to a set distance, or widen your depth of field by stopping your lens down.

Use a Tripod For Steady Shots

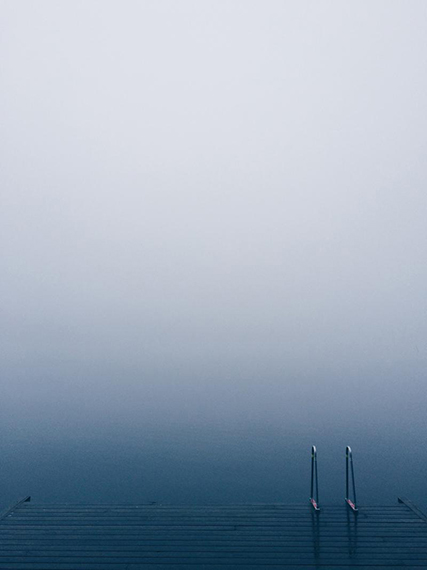
water surface mist

Use a Tripod

If you want to be certain of sharp images, use a tripod instead of hand-holding your camera. This will also help if you need to use slow shutter speeds, as it will reduce camera shake. You’ll need to be ready to shoot when the sun comes up, so it’s wise to get all your gear set up in plenty of time, and this includes your tripod.

Shoot in RAW Format

Shooting in RAW format is best, not only because you have a far higher resolution image than JPEG, which you can post-process without fear of degrading image quality, but because you can fine-tune your white balance in post-processing. Fog and mist can sometimes mess with your white balance settings, but if you don’t want to shoot in RAW, put your camera’s WB on overcast or cloudy.

Exposure Issues

Camera metering systems are often confused by mist and fog, as they are with snow, because fog, mist, and snow are reflective. This fools your camera into thinking that there’s more light than there actually is. The resulting images can often be underexposed, with the white of the fog becoming dark and not at all how you saw it! If you are using an auto-exposure mode, try using some exposure compensation; try it around a full stop more to start with, but experiment.

Find a Focal Point

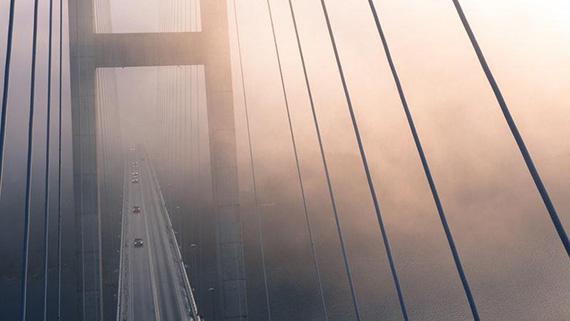
aerial fog and mist

Find a Focal Point

Because fog and mist lower the contrast and warp perspective, you sometimes need something to add a sense of distance or depth in the shot. Try adding leading lines into the image, such as a fence, hedge, wall or road that leads the eye into the photograph. You can also try framing the fog and mist by using natural features such as tree branches in the foreground of your image.

If you focus on objects that are close to you, the resulting shots will create a sense of distance in the image, as the object in the foreground will have more color and contrast. This saturation and contrast will gradually fall off the further away from the camera the objects in the image are.

Silhouettes

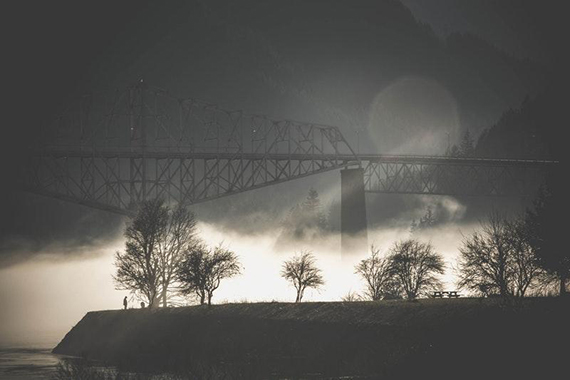
bridge fog mist

Silhouettes

You can get some great silhouette shots in mist and fog, by working out where the sun is coming up and putting your subject between you and the sun. If you shoot into the rising sun, your subject will be beautifully backlit against the fog.

Light Rays

sun rays

Light Rays

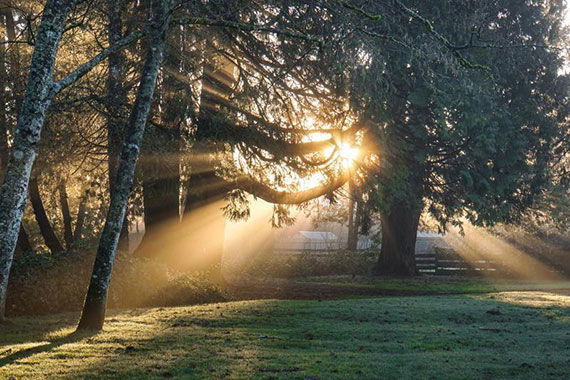
Light rays in a shot of a foggy day can really make an image magical, by shining down on an object or part of a path or road. These light rays coming through the fog can be from the sun, or from any artificial light source, as long as it’s at an angle to your camera. You must be quick, though, before the sun burns the fog away.

Post Processing

Lens Correction

Sometimes, your images will come out with perspective distortions and slanted horizons. It’s easy enough to fix in Photoshop with these simple steps:

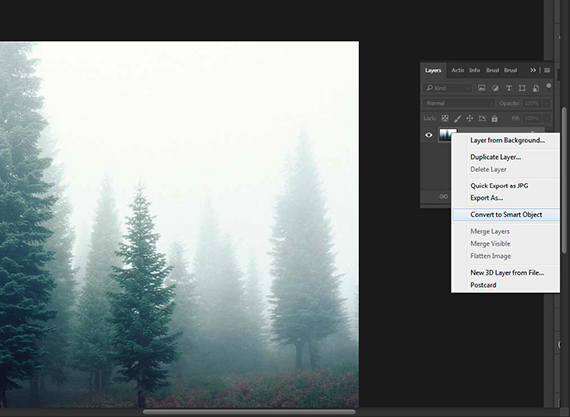
  1. Open the image you want to fix in Photoshop. Right-click on the background layer and choose Convert to Smart Object. This allows you to make non-destructive changes to your image.
post processing fog photography

Convert to Smart Object

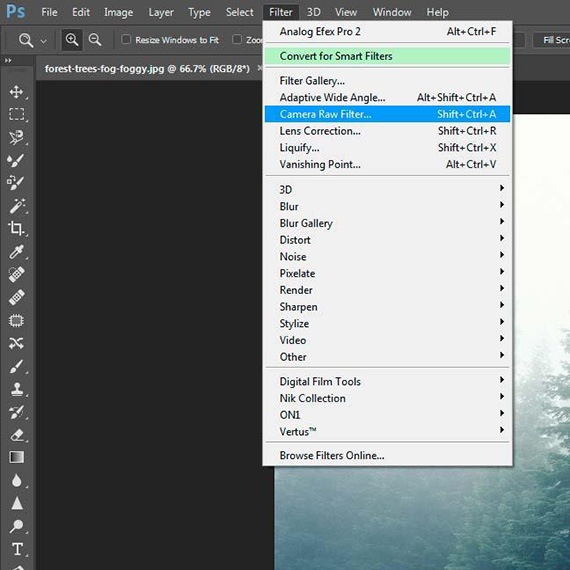
  1. Go to the Filter menu, choose Camera Raw Filter. This brings up the Adobe Camera Raw window.
filter menu

Camera Raw Filter

post-processing fog photography tutorial

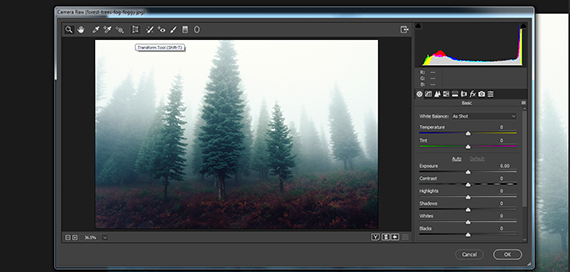
Adobe Camera Raw

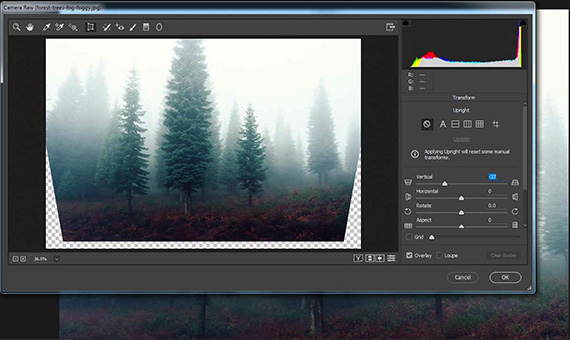
  1. On the top row of icons in the Camera Raw Workspace, there is the Transform tool. Click on that to bring up the full selection of options. This includes Auto, Horizontal, Vertical and Full. Try Auto first, it’s usually fairly accurate, and it should also straighten any wonky horizons. You may end up with parts of your image in a checkerboard pattern after you’ve made these adjustments. You will have to crop these out with the crop tool.
straightening image

Transform Tool

  1. If you want to try to correct distortion, go to the Lens Correction icon, which is underneath the histogram on the right-hand side. Move the slider either way so you can see what the distortion will do to your image. Once you’re happy with your image, press OK. As you did the work using a smart filter, the changes you made are non-destructive, and can be changed.

Histogram Adjustment

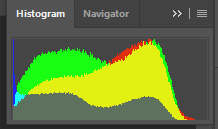
Your image histogram displays the tonal range of your image. It’s basically a graph which shows how the pixels are distributed by number of pixels at each of the 256 brightness levels in an image. The higher the line from the bottom axis of the graph, the more pixels of that brightness level are present. In this histogram, there is a pretty even distribution of brightness, with no blown highlights at the right end of the scale, and a small amount of dark shadows at the left.

histogram

Histogram

From “reading” a histogram, you can decide whether the image contains enough detail in the shadow, midtone and highlight areas, and you can choose which adjustments you need to make from it.

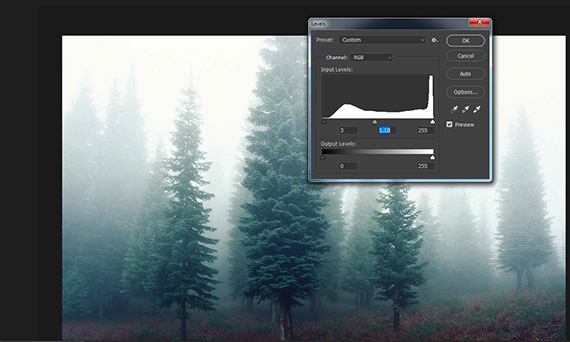
A simple way of adjusting your lights, darks, and shadows is the Levels adjustment tool. Curves adjustment is also used too, but Levels is a quick and easy tool when you are in a hurry.

Create a duplicate layer from the Layers menu. Go to Image/Adjust/Levels in the menu at the top of the window in Photoshop. Choose Levels, and this window will open up over your image:

photoshop levels

Levels

By adjusting the sliders under the levels histogram, you can lighten or darken your image.

When you are happy with your image, click OK. Your changes have been saved on a duplicate layer, so your original image is still untouched. If you like your changes, you can go to the layer adjustment drop-down menu and choose Flatten Image. This will merge the changes on to your original image.

Cropping Your Image

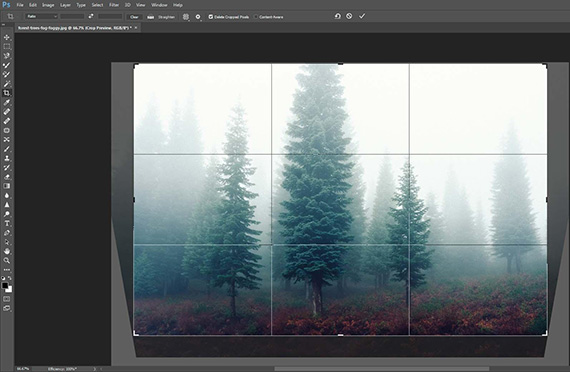
Cropping means using the crop tool to remove unwanted elements from a shot or to zoom in to a smaller detail and make it larger in the frame. I don’t advise cropping to zoom in on an object, as the more you crop away from the image, the more pixels you remove. Eventually, if you go small enough with your crop, your image will become pixelated at normal viewing size.

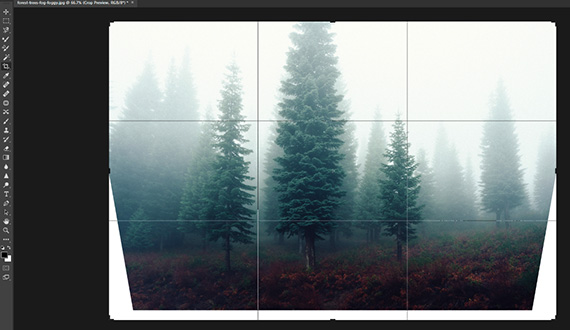
In the image below, I decided to crop out the checkerboard pattern left from the lens correction processing:

crop grid

Cropping

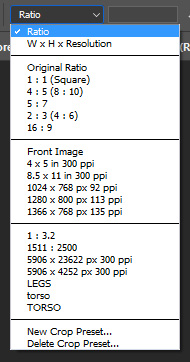
Choose the Crop tool from the tool menu running down the left-hand side of the screen in Photoshop. You can choose what ratio to crop at by choosing from the drop-down menu at the top:

ratio drop down menu

Ratio

  • Or you can choose to free crop without being constrained by a ratio.
  • Grab one of the little handles at the edges of the crop grid, and start pulling inwards until you’ve removed the distractions at the edges of the image:
remove distractions

Remove Distractions

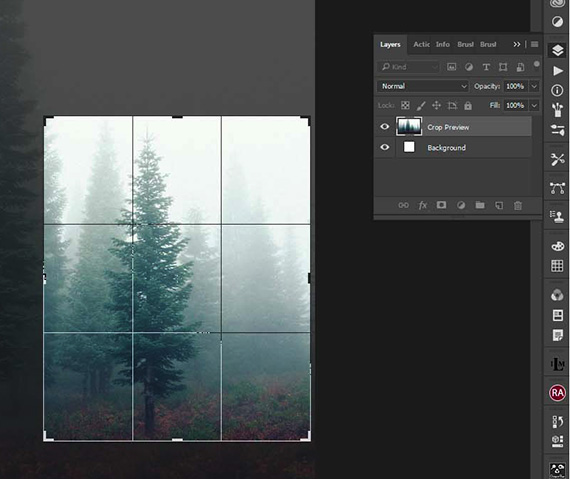
  • You can also use the mouse pointer to click and drag the crop box around an object in the photo:
fog photo post process

Crop Box

  • Click Enter when you’re happy with the crop.

Adjusting Colors

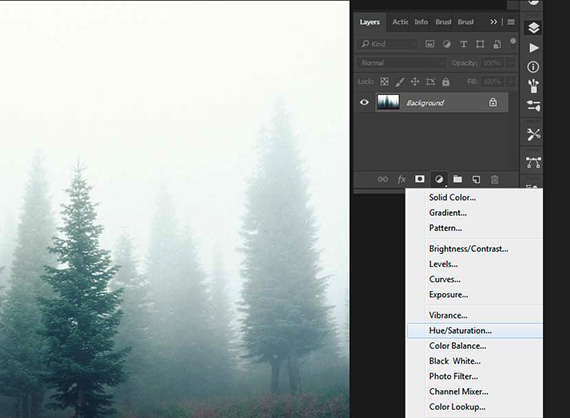
To adjust colors in Photoshop, you can use the Hue/Saturation adjustment layers. Go to the Layer panel on the right in Photoshop, and click the drop-down menu for the adjustment layers:

color adjustment

Hue/Saturation

Play around with the sliders until you’re happy with the results, then go back to the layer panel and flatten the image.

You can use a plugin for Photoshop, such as Macphun.com’s Luminar, or the free Nik Effects software to add presets to your images. Presets are basically a recipe for the colors and contrasts etc. in an image, and when you apply one to your image, it will change it according to the ‘pre-set’ parameters.

The good thing about presets is that they apply a uniform look to all the images you apply it to, and that’s good if you have a lot of images to edit. You can get presets for portrait, landscape, urban, weddings, black & white, grunge, and just about any other type of image you can think of. It’s like an Instagram filter for your desktop, but it can be fine-tuned with other adjustments.

Sharpening

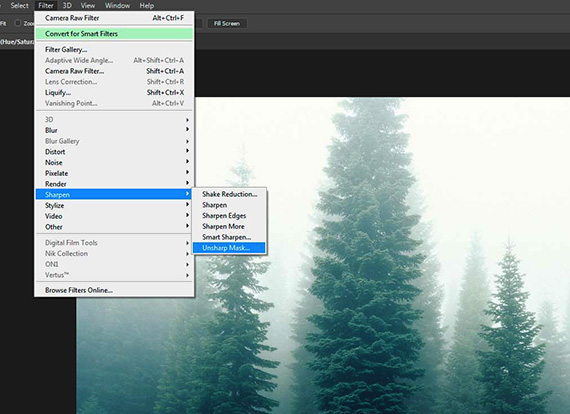
Sharpening should be the last thing you do. Sharpening in Photoshop can be done with Smart Sharpen or Unsharp Mask—or indeed any of the other sharpening variations, as well as using the High Pass filter. Unsharp Mask is perhaps the simplest of these, and to get it, go to the Filter menu at the top of Photoshop and choose Sharpen/Unsharp Mask:

unsharp mask

Unsharp Mask

A new dialogue box will open up with options. Play around and experiment with them, but always apply less sharpening than you think you will need. If you keep it at the default settings, drop the amount to about 20–30 percent or less, and keep checking what your image looks like at 100 percent and at 50 percent. Too often images are over-sharpened, and when your image detail goes a little ‘crunchy’ and just looks wrong, then it’s way overdone.

You can get plugins for Photoshop that will take the guesswork out of sharpening, like Plugsandpixels Focal Blade. Nik Software also has an easy-to-use sharpening tool.

Final Thoughts

reflection fog mist silhouette

Fog and Mist Photography

Mist and fog photos are wonderfully atmospheric. They can be either sinister and brooding, or light and beautiful, depending on what you are trying to convey. I hope that this article has at least inspired you to set your alarm, get up early, and go take some mist and fog shots!

About the Author:
Max Therry writes for PhotoGeeky, his passion for photography developed during his time in art school, where he would borrow his friends’ cameras and take photos of everything unusual around him. When this passion gained almost obsession-like traits, he bought his own Sony system and vowed to take as many photos as he could. After about a decade of filling up multiple hard drives, he says it’s time to share his experiences with whoever’s interested.

For Further Training on Post-Processing:

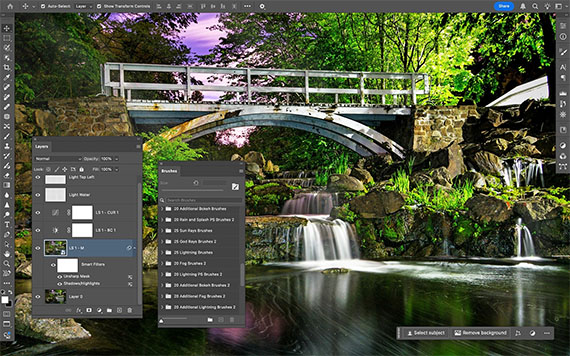
Create stunning, seamless, and jaw-dropping photo composites. Struggling to bring your vision to life in Photoshop? This free class, 7 Powerful Photoshop Composite Secrets Webinar, will likely be helpful–plus, all webinar attendees get three free bonuses.
photoshop compositing

Whether you’re a beginner or a Photoshop pro, these techniques will unlock new creative possibilities. Beyond just technical skills, you’ll also gain a deeper understanding of how to approach image editing with a creative mindset.

Only a few spots left: 7 Powerful Photoshop Composite Secrets Webinar


from PictureCorrect https://ift.tt/M6RBlgn
via IFTTT

maanantai 5. toukokuuta 2025

PictureCorrect.com: How to Find Your Unique Voice As a Photographer

It’s not just enough to be good – you’ve got to find your own unique voice. The question is – how?

Relevant note: there is a free webinar going on now about Advanced Photo Editing Techniques. Seats are filling fast—you may want to check it out, it has been really helpful.

unique photographer

Photo captured by John Hernandez; ISO 800, f/1.4, 1/1200s.

This article will take you though several things that you can to do help you discover and carve out your own one-of-a-kind path as a photographer.

1. Focus on what interests you

This may seem obvious, but there are still a lot of people who go about this all the wrong way. They ask themselves, “What field of photography has the most demand right now? What area will be the most lucrative?” And then they go out and try to fit themselves into that picture.

But you will never be as successful doing this as you could be taking pictures of what interests you.

Why? Because when you are interested in something, you will enjoy it more. You will go out of your way to portray it in a good light. You will be more creative and want to try new things. This is so important and yet most people don’t even think twice about it.

If you love food, take pictures of food. If you are an animal whisperer, maybe you would adore being a pet photographer. If there’s nothing in the world that feeds your soul like going for a hike, you would probably make an excellent nature or landscape photographer.

When you are passionate about what you do, it is a simple fact that your joy will propel you forward. You will not be dragging yourself out of bed, you will be leaping from the mattress full of excitement and enthusiasm, and that in turn will carry over into your work.

2. Ask yourself: “How could I do this in another way?”

This powerful question will get your mind working on new possibilities. Though you may not have an epiphany each time you ask yourself this, you are always encouraging your brain to make new pathways and connections. And every once in a while, you will have an “ah-HA!” that makes it all worthwhile.

If you are serious about photography, you should always be taking pictures of what you are most passionate about. But it’s also just as beneficial to try new things and take pictures of different subjects, too. This doesn’t necessarily mean forcing yourself to take pictures of things that you aren’t interested in, but finding ways of taking pictures of anything in such a way that you find it interesting. It pushes you to always stay fresh and always continue learning and growing. Reading books and taking classes is fine, but I believe that the best teacher is firsthand experience. If you are continually searching for new subjects and new ways of photographing them then you are keeping yourself on your toes, and you work will never become stale.

Passion and excitement are the fires that fuel brilliance, and in order to keep that flame stoked you will need to look for ways to keep your own interest pulsing within you. I know from firsthand experience that when I go out and do something I’ve never done before with my photography I take a giant creative leap and everything that I learn carries over into each project I take on next.

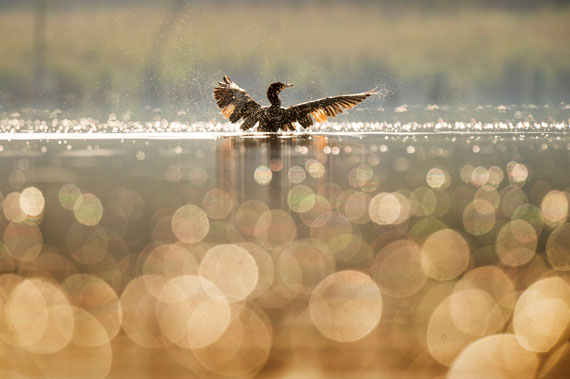
bird bokeh

Photo captured by Ray Hennessy; ISO 400, f/6.3, 1/1600s.

3. Avoid the #1 creativity killer

Contrary to popular belief, reading more books and taking more classes does not always make you a better photographer. Don’t get me wrong; they can be incredibly helpful tools that help you learn and grow – to an extent. However, there is a point that most photographers reach where studying and learning stops being helpful and becomes counterproductive. How do you know that you’ve reached that point?

When you find yourself critiquing and criticizing your work more than you are simply enjoying it.

You might be thinking, “Now wait a minute. Hold on. Critiquing helps me to get better! That’s how I learn. I see what worked, what didn’t, and I can correct and improve.”

Yes, in an ideal world. And usually this works in moderation. However, I’ve seen more photographers shut themselves down long before they ever truly delved into their potential because of this #1 creativity-killer: perfectionism. They over-analyze all of the details of their photos, attempting to make everything in each one of them just right.

Photography is not supposed to be perfect. There are technical tools that we can use to improve our photographs, but they are only that: tools – not rules. Just like people, photos are technically imperfect – and yet that’s what makes them so beautiful. Each photo is an impression of a moment in time that will never again be recaptured. And only you, from your unique viewpoint, have the ability to take that picture.

Some of the most famous photos, considered by many to be the best of the best, have imperfections! In fact, most of them do! Not only that, everyone has different tastes. Something that one person might call a “problem area” might be the reason that someone else LOVES that exact same photo. Are you going to deprive dozens of people the enjoyment of your art simply because one person said “this part isn’t in perfect focus.” Screw focus! Seriously!

unique pattern

Photo captured by Ricardo Gomez Angel; ISO 400, f/10.0, 1/1200s.

If you take the picture and you like it, then what anyone else says doesn’t matter. The “rules” are great to a certain extent, and then after that they start to hinder you. You may discover that you like those blurry abstract photos more than the ones in crisp, clear focus. And you might just find that there are a lot of other people out there who love this type of photography and would even hang it on their wall. But if you stop after that first blurry photo because some teacher or even just random person said that it makes it a bad photo, you may have just shut down the possibility of an incredible photography career because you limited yourself to the same box that everyone else lives in.

Stop trying to make your photos adhere to everyone else’s rules, and they will stop looking like everyone else’s photos.

The true “greats” in any field not only break the rules, but reinvent them.

4. Take photos every single day

Most photographers believe that searching for the problems and imperfections is not just the best way to improve, but the only way to improve. I disagree. Although this can be helpful to an extent, it is way more beneficial to just go out and take photos.

In fact, this is the best way to get good at anything: do it. Over and over and over and over and over again. By doing it, you train yourself to see the beauty in things and intuitively find the best angles. You get to the point where you don’t even have to think about it any more because it comes so naturally.

Take hundreds of photos. Don’t limit yourself. Yes, you can ask yourself as you are taking the picture, “How can I make this better? How can I frame this in order to enhance the features that I want?” But in this day and age, there’s no excuse not to take a photo if something catches your eye. With a digital camera, there are no negative consequences for filling up your memory card (unless you don’t have another one and still need to take more photos.) The more you take, the more selection you have to choose from.

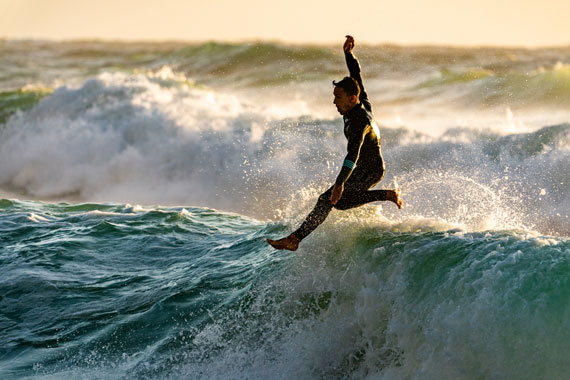
where going

Photo captured by Rendy Novantino; ISO 250, f/1.4, 1/500s, 85mm.

Some of my very favorite photos that I’ve taken were simply on a whim. I saw something and thought, “hmm, I like that. I don’t know if it’ll make a very good photo, but there’s only one way to find out.” Click, click, click, click…. click. I’ll take the same picture from a few different angles. I’ll zoom out, zoom in, try different things. And often the one that I took as an extra is the very best one.

Try different things! Take the “technically correct” photo. Then break ALL off the rules! That’s how you step outside of the box and do new things.

Oh, and avoid those stupid forums where photographers sit around critique each others’ work. Well, you don’t have to if you don’t want to, but I’ve learned to stay away from them. People spend more time critiquing photos than they do taking them, and they’ve gotten so good at looking for problems that they see them everywhere. I’ve uploaded pieces of my best work to those sites, pieces are well loved by my agent, the design industry, my followers, and gotten critiques like, “Sorry, but there are parts of this that aren’t in focus. It’s just confusing and the photo doesn’t work.” Then other people rave over it and hang it on their wall and treasure it.

Just because one person says it doesn’t mean it’s true. Don’t let yourself get discouraged. Photography should be first and foremost, fun!

5. Don’t worry if you “miss” opportunities

Every photographer experiences those moments when we miss that perfect shot. That rare species of eagle (so to speak) flies over our head and we weren’t ready, or the exposure wasn’t right, or we got the shot, but it was blurry, and so on. I’ve seen a lot of people spend hours, and even occasionally days, agonizing over what they missed.

Photography isn’t how many shots you get or miss, it’s about how many you take – and keep taking. I have missed thousands of great shots – and screwed up thousands more. I take more “bad” photos than good, and though I do feel disappointed sometimes when I really wanted to get something and it didn’t work out, I always shrug my shoulders and say, “hey, it wasn’t meant to be.” Then I get out my camera, and go take some more pictures.

missed photo

Photo captured by Guy Kawasaki; ISO 250, f/8.0, 1/500s.

I can’t even tell you how many times I tried to get pictures of a bird of prey feasting on it’s dinner, and the shots didn’t turn out. I had so many “missed” opportunities. And then one day I looked out my grandmother’s kitchen window and just two yards away was this hawk eating a mouse. Because of the window between us, I was able to get as close as I wanted without scaring the bird away. There are always more opportunities.

When you have the attitude of not worrying about whether you get a shot or not and just enjoy the process, you invite more opportunities in. Life becomes magical.

6. Take photos because you love to – for no other reason

The #1 most important thing you can do to improve your photos and find your unique voice is to HAVE FUN!

Is it really that simple? Yes, yes, and yes!

When you are having fun and trying new things and exploring and enjoying yourself, you are naturally more creative. Ideas will occur to you that you never thought of before. Things will naturally fall into place. Having fun is the key to being good. Seriously.

Taking beautiful photographs is something that comes from the heart, not the mind. So many photographers spend all their energy researching the perfect equipment and collecting fancy lenses and filters. They strive for the technically perfect photo, and if they don’t achieve it they criticize their own work and hide it away.

Before I started photography, I don’t think I ever truly saw what was around me. In a sense, I was walking blind through my world, never noticing how pretty the cracks in the sidewalk were, or just how many colors there are in a single flower. To me, that’s the gift of photography; not the end result, but the ability to see the beauty of the world around me in a new way, and have the chance to capture it and share it with others. I do it for the joy of it, and if other people can share in that joy then it is wonderful. Still, even if others don’t, photography has been one of the greatest gifts of my life.

Photography is a journey. If you are trying to create work in order to sell it, you are probably over-thinking it. If you do it because you love it, you are creating what comes from your heart and soul. Do it because taking photos makes you feel good, and people will see it and like it because it resonates with them, and makes them feel good.

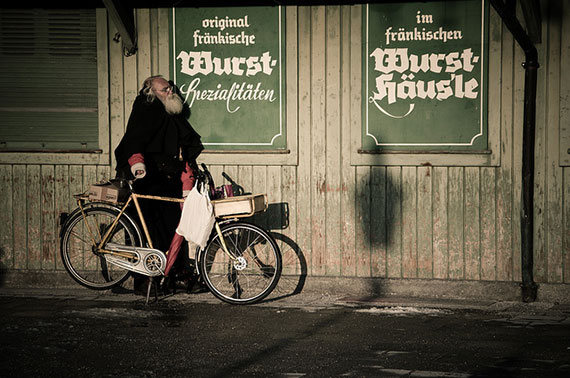
how to develop your unique eye in photography

Photo by Susanne Nilsson; ISO 400, f/5.0, 1/13-second exposure.

7. Get inspired!

Being truly unique is about getting all of the other voices out of your head about what you could do and what you should do and how things are supposed to be done. It’s about quieting all your thoughts and then listening to the stillness and the silence where all of the new ideas are and getting in touch with your spirit. This is where you will hear the inspiration that will cause you to make uncommon connections and spawn new and great creations.

Do those things that feed your soul – eat delicious foods, read inspiring books, spend time with creative people, listen to music that transports you to a whole new world. It is often in those moments when you are simply enjoying life that the best ideas occur or you have the most wonderful photo opportunities.

Those very things that inspire you are often hints and nudges in the direction that you could take your photography to move it to the next level.

About the Author:
Tien Frogget (paradigmdrift blogspot) is a third generation artist with a passion for creativity and beauty. She is a virtual renaissance woman and enjoys a wide variety of creative media besides photography, including painting, writing, filmmaking, music, cooking, dancing, and graphic design. It is the diversity of her experiences and passion for living that fills her creations with unique perspective.

For Further Training on Photo Editing Style:

Create stunning, seamless, and jaw-dropping photo composites. Struggling to bring your vision to life in Photoshop? This free class, 7 Powerful Photoshop Composite Secrets Webinar, will likely be helpful–plus, all webinar attendees get three free bonuses.

photoshop compositing

Whether you’re a beginner or a Photoshop pro, these techniques will unlock new creative possibilities. Beyond just technical skills, you’ll also gain a deeper understanding of how to approach image editing with a creative mindset.

Reserve a spot: 7 Powerful Photoshop Composite Secrets Webinar


from PictureCorrect https://ift.tt/9zTkXUA
via IFTTT

lauantai 3. toukokuuta 2025

PictureCorrect.com: Elements That Make a Striking Photograph

What does it take to create a really stunning image? There are six basic elements and certain factors that influence composition and make a really great image. If you can understand these and learn to apply them successfully, then you’re on your way to top photos.

Relevant reminder: only a 1 day left for the Capture it All May Day Sale

Now although there are all of these elements to consider, you still need to understand that a really stunning image is composed in the simplest way. So with these factors in mind, use your photographic eye to create images that have them present. Let’s take a look at the elements.

1. Shape

Shape is fundamental to your images. Without shape you cannot identify your subjects. If you are unable to identify the shape of a lion under a tree when hiking through a reserve then you are in trouble. Shape is what the viewer sees first and allows them to relate all of the elements in the image.

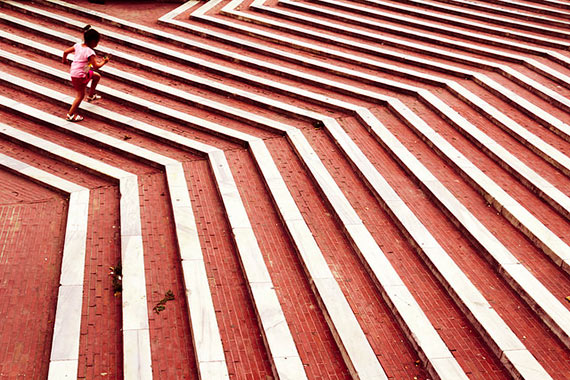
2. Line

This is the strongest of all the elements and comes into play very often. If you can use strong lines in your images they will be striking. Learning to use lines is essential if you are to progress in your photography. As you learn digital photography use them often. From horizontals to diagonals and from verticals to converging, all of these will strengthen your images.

using lines in photography composition

photo by Tuncay

3. Form

Now shape is two dimensional but when we get to form we add a third dimension, depth. Form is very dependent on light. How the light hits the form creates the feeling of depth which is essential in a stunning image. Squares, circles and triangles reveal their form when strong side lighting hits them. The contrast between shadows and light turns shape into form.

4. Patterns

Patterns to me are exciting. Finding patterns where you least expect them adds a new dimension to your images. Repeated patterns and broken patterns both reveal interesting aspects in a photo. Patterns can be used as the subject or as a background to an image. The careful use of these patterns will always help in creating a really great image. Patterns can be found everywhere and by identifying them will add interest to the overall image. Use them to your advantage.

pattern

photo by Simon Schlegl

5. Color

Use color to your advantage as well. Color is the most striking of the elements when used correctly. Contrasting and complementary colors will create an amazing image but used incorrectly will wash out an otherwise great photo. Color evokes deep emotion. We think in color and feel in color and use color to describe those feelings. Red gives a feeling of passion while orange shows warmth. Black denotes anger and fear while green represents growth and peace. If you can add color to an image that already has elements that evoke the emotion, the final image will be exceptional.

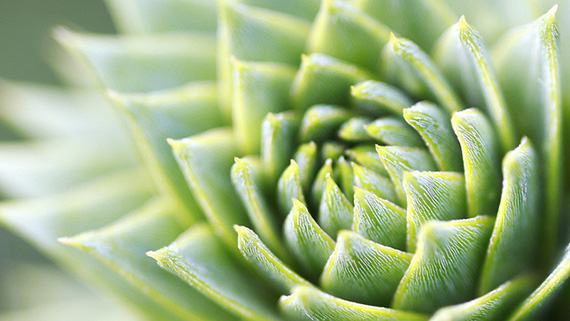
6. Texture

Out of all the elements I think that texture evokes the biggest emotional response by a viewer. The challenge here is to photograph it in such a way that the light causes the texture to reveal itself in a way as to create a feeling. Side lighting is important as it lifts the texture out of the image so as to almost create the actual texture for you to feel. More than any other element, it is important to get in close so that the fibers, cracks, or rough stone are clearly visible.

texture

photo by eiji ienaga

These elements of design can all make that outstanding image when used by themselves or when combined. By regularly looking for them and applying them in your images you will learn just how much they help to create great photos. Happy shooting!

About the Author:
Wayne Turner has been teaching photography for 25 years and has written three books on photography. He has produced 21 Steps to Perfect Photos; a program of learner-based training using outcomes based education.

For Further Training:

Did you know that most people use less than 10% of the iPhone camera? Imagine using less than 10% of your car. Pretty silly, huh? So why do the same with your iPhone? This popular course, Capture it All, is designed to show photographers EVERYTHING an iPhone camera can do. During the May Day sale today they are currently letting in new students at 86% off if you want to check it out.

capture it all

New: Capture it All Course (see preview videos)

Some iPhone camera features are hidden. Others are confusing. Most take YEARS of practice to get them right. It also includes a full happiness guarantee, if you are not satisfied with the course for any reason simply let them know for a full refund – so there is no risk in trying it.

Only 1 day left: Capture it All In-depth Course at 86% Off


from PictureCorrect https://ift.tt/NqG306u
via IFTTT

perjantai 2. toukokuuta 2025

PictureCorrect.com: Capture it All May Day Photography Event

Did you know that most people use less than 10% of the iPhone camera? Imagine using less than 10% of your car. Pretty silly, huh? So why do the same with your iPhone? This popular course, Capture it All, is designed to show photographers EVERYTHING an iPhone camera can do. During the May Day Sale this weekend they are currently letting in new students at 86% off if you want to check it out. Found here: Capture it All May Day Event

capture it all

New: Capture it All Course (see preview videos)

Some iPhone camera features are hidden. Others are confusing. Most take YEARS of practice to get them right. And the user manual is nowhere to be found. So how can you master everything your iPhone camera can do?

You could spend 10 years traveling. Keep shooting every day for hours. Make all the beginner mistakes. Until you know the iPhone camera inside out.

That’s exactly what Clifford Pickett did…

And 10 years later brands like Clinique, British Airways, and National Geographic hire him for high-budget projects…

Using nothing but his iPhone!

Or you could try the first online course to cover it all.

Learn at your own pace. Anywhere in the world:

  • 65 videos
  • 510 minutes
  • Lifetime access

Instructors you can trust:

  • 10+ years in business
  • 648k paying customers
  • 4.9/5 customer satisfaction
  • 3.1 million Facebook followers
  • 4.3 million Instagram followers
  • 822k Youtube subscribers
iphone photo tutorials

Lifetime access

5 Free Bonuses During the May Day Sale:

  1. Shooting Videos Tutorials – Life happens in motion. Why stop at capturing still images? Cinematic shots. Settings. Gimbals. Video editing. A studio in your pocket. Memories for a lifetime. Value: $99
  2. Flying Drones Tutorials – If you could put a camera anywhere in the air. Or have it glide through the sky smoothly. How much more could you capture? Aerial photography. Cinematic drone footage. Shot by a drone that fits in your pocket. Value: $99
  3. Travel Photo eBook – Capture It All Free Ebook. You probably take photos while traveling. But how do you capture the essence of a place? Or show what it feels like to visit a destination? Find out how in this bonus eBook. Value: $99
  4. Photo Assignments – You’ll discover so much in this course. But true mastery is only possible if you try out the same techniques yourself. 25 optional homework assignments will help you practice everything you’ve learned. And get feedback from your fellow students! Value: $149
  5. Private Community – Join thousands of iPhone photography students in their private Facebook community. Share your work. Get feedback. Stay inspired. Get a free lifetime membership.

How to Get a Discount Today:

During the May Day sale, the full course is on sale at a deeply discounted price along with other bonuses included. It also has a full happiness guarantee, if you are not satisfied with the course for any reason simply let them know for a full refund – so there is no risk in trying it.

Deal ending soon: Capture it All In-depth Course at 86% Off


from PictureCorrect https://ift.tt/IU1okTQ
via IFTTT
torstai 1. toukokuuta 2025

PictureCorrect.com: When & Why Do Photographers Use Compositing?

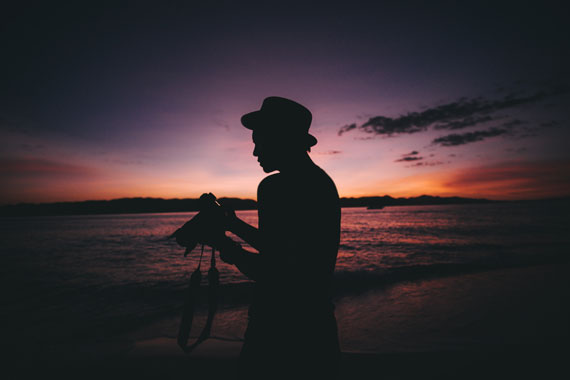
Compositing is one of the most powerful tools in a photographer’s creative arsenal. It allows you to go beyond what the camera sees and build a final image from multiple photos, layers, or elements. But when exactly should photographers use compositing—and why?

Relevant note: there is a free webinar going on now with 7 Powerful Photoshop Composite Secrets. Seats are filling fast—you may want to check it out, it has been really helpful.

Let’s break it down.

What Is Compositing?

Compositing involves blending elements from two or more images into a single, cohesive photo. This can be as simple as swapping a sky or as complex as crafting an entirely surreal scene using dozens of separate photos.

When Photographers Use Compositing

1. To Overcome Technical Limitations

Sometimes it’s physically impossible to capture a scene as imagined in a single frame. For instance:

  • High dynamic range (HDR): Combining multiple exposures helps balance out overly bright skies and dark shadows.
  • Group photos: Merging several shots ensures everyone’s eyes are open and smiles are perfect.
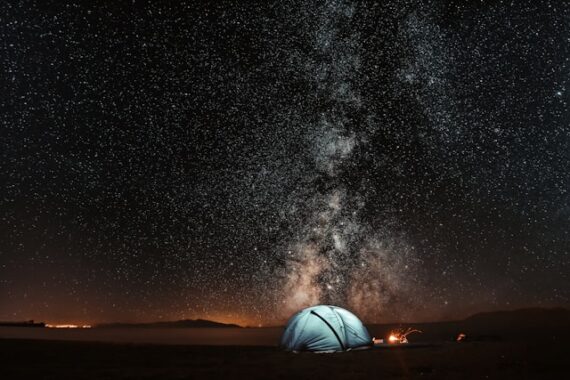
  • Night skies: A sharp foreground and a crisp Milky Way often require different exposures blended together.
milky way

Photo captured by Pars Sahin

2. For Artistic Storytelling

Compositing allows photographers to bend reality to tell a more powerful or fantastical story. Think of:

  • Fine art portraits with dreamlike settings.
  • Conceptual photography where gravity-defying elements or surreal landscapes play a role.
  • Fantasy and sci-fi scenes built from stock photos and original captures.

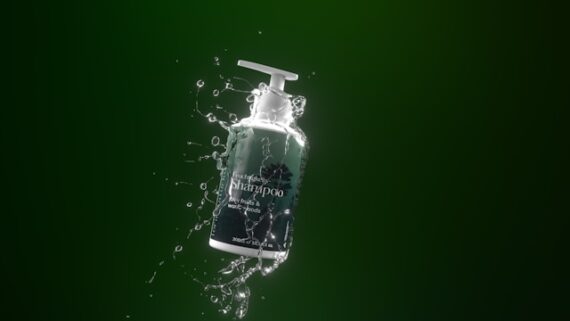
3. For Commercial or Product Photography

Marketers and brands need clean, controlled visuals. Photographers often:

  • Composite multiple shots to create flawless product images.
  • Replace backgrounds for flexibility across ad campaigns.
  • Add lighting effects or reflections digitally for enhanced impact.
product composite

Photo captured by Lora Seis

4. To Save Time and Money on Location

Instead of flying to five countries, a travel ad might be built using composited backgrounds and model shots in studio. This is common in:

  • Movie posters
  • Fashion ads
  • Tourism campaigns

Why Photographers Use Compositing

  • Creative Control: You can create visuals that wouldn’t exist otherwise.
  • Problem Solving: Fix lighting issues, remove distractions, or change elements after the shoot.
  • Client Expectations: Commercial clients often expect perfection—compositing helps meet that standard.
  • Efficiency: It saves reshoots, travel costs, and sometimes even makes the impossible… possible.

Is It Cheating?

Some purists argue compositing isn’t “true photography.” But in reality, it’s just another tool—like lighting, framing, or post-processing. Whether you use it depends on your goals. For documentary work, heavy compositing is a no-go. For commercial, fine art, or creative work, it’s often expected.

Conclusion:

Compositing opens up a world of creative possibilities for photographers who want more than a single shutter click can offer. Whether you’re perfecting a scene, telling a surreal story, or meeting a client brief, understanding when and why to use compositing can elevate your work to a whole new level.

For Further Training on Photoshop Compositing:

Create stunning, seamless, and jaw-dropping photo composites. Struggling to bring your vision to life in Photoshop? This free class, 7 Powerful Photoshop Composite Secrets Webinar, will likely be helpful–plus, all webinar attendees get three free bonuses.

photoshop compositing

Whether you’re a beginner or a Photoshop pro, these techniques will unlock new creative possibilities. Beyond just technical skills, you’ll also gain a deeper understanding of how to approach image editing with a creative mindset.

Reserve a spot: 7 Powerful Photoshop Composite Secrets Webinar


from PictureCorrect https://ift.tt/r6Batzo
via IFTTT