


Understanding your camera’s built-in light meter is crucial for achieving proper exposure in your photographs. In a YouTube video by photographer Phil Steele, he explains how the light meter works, how it determines proper exposure, and how it can sometimes be a hindrance when trying to capture certain scenes:
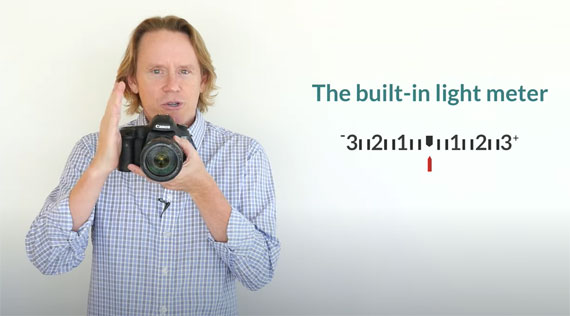
Most DSLR cameras have a built-in light meter that is represented by a little graph in the viewfinder, indicating the current exposure value with a little arrow or pointer. The exposure is considered correct when the arrow is at the center mark, which means the camera does not consider it underexposed or overexposed.
The light meter’s function is to tell you when you have a proper exposure by indicating whether there is too much light (overexposed), too little light (underexposed), or just the right amount of light (correct exposure) in your photo. The light meter is always trying to allow enough light to come into the camera to create an exposure level known as middle gray, which is also known as 18 percent gray.
The light meter in your camera is always trying to create middle gray, which is a gray that is about halfway between black and white. If the light meter could have its way, every one of your photos would look like middle gray. Phil Steele demonstrates this by taking a photo of a black card and a white card in aperture priority mode, where the light meter is in charge of creating the exposure. The resulting photos look kind of gray because the camera is always trying to create middle gray.
However, the real world is more complicated than middle gray, and not every scene looks best averaged out to middle gray. For example, when photographing a bride in a white dress, the camera sees all of that white in the dress and thinks the photo is terribly overexposed because it’s so bright on average. Similarly, when photographing a groom in a black tuxedo, the camera sees all that black and thinks the photo is terribly underexposed. If you let the camera make the choice, it will increase or decrease the exposure to average it out to neutral gray, which may not be the desired effect.
To overrule the camera’s middle gray obsession, you can shoot in full manual mode, where you control the aperture, shutter, and ISO. In this case, the camera’s light meter is only giving you advice, and you’re free to ignore the advice and adjust the settings as you see fit.
Understanding your camera’s built-in light meter is crucial for achieving proper exposure in your photographs. By knowing how the light meter works, how it determines proper exposure, and how to overrule it when necessary, you can capture stunning photos that go beyond middle gray.
For further training: Understanding Your Camera Course
- - - - - - - - - - - - - - - - - - - - - - - - - - - - - - - - - - - - - - - - - - - - - - - - - - - - - - - - - - - - - - - - - - - - - - - - - -
Did you appreciate this newsletter? Please help us keep it going by Joining Our Patreon Supporters
What are your thoughts on this article? Join the discussion on our Facebook Page
PictureCorrect subscribers can also learn more today with our #1 bestseller: The Photography Tutorial eBook
- - - - - - - - - - - - - - - - - - - - - - - - - - - - - - - - - - - - - - - - - - - - - - - - - - - - - - - - - - - - - - - - - - - - - - - - - -
The post Mastering Exposure: How Your Camera’s Light Meter Works appeared first on PictureCorrect.
from PictureCorrect https://ift.tt/3EQrW5s
via IFTTT


0 kommenttia:
Lähetä kommentti