


Whether you’re photographing a product or food, there’s nothing quite like a “splash” to make it more appealing. Andrew Lanxon, a skilled product and macro photographer, knows all about how to capture liquids in their best form — be it splashing or sloshing! In his Macro Ideas at Home video, he guides us through how to shoot macro splash photography.
Perfect Your Setup
Andrew uses his 100mm macro lens for this shoot. A tripod is also ideal, as you’ll need a hand free to splash water on your subject. Before you start shooting, elevate your subject by suspending or spearing it on a needle or stick anchored to a pot or the like with white tac. Also, be sure to insulate the area with a towel or something absorbent to catch the water. For this shoot, his camera is set to f/8, 1/200 shutter speed, ISO 400, and manual focus.
He advises that you leave enough space around your subject in the frame to capture splashes. You can also place the subject slightly to the side for a better composition. Ideally, you want to focus on the tips or edges of the subject but can shoot multiple AF points to stack later. Andrew does advise taking multiple shots to combine to optimize the sharpness of the subject, especially when shooting with a macro lens.
Just one image isn’t going to do it… but, by combining all of those different shots, by combining all the different splashes coming from different angles, what we’ve done is created a really, really cool looking shot…
Lighting is Everything
For this shoot, you’ll need intense light. Andrew uses his Godox AD600 Pro strobe with a reflector dish, trained on the subject, so the background remains dark. You can also use flash guns or speedlights, but he doesn’t advise using LED or natural light. Flash is best as it sends out a short burst of light that freezes the water splash motion.
To start shooting, make sure your camera flash is off, as it will interfere with the strobe light or flash gun. First, take a test shot and check that the entire image is totally black. Next, take another test image of the subject with the flash gun or strobe and adjust any settings if necessary.
Play Around With Water
When you shoot, you can create a whole lot of effects depending on how, how much, and how fast you splash or pour water on your subject. Do some test shots, playing around with water to find out what’s best. He keeps the water in a spirit measure and “splashes” it on the subject with a pipette. You can hold your pipette or container higher up to create more voluminous splashes. When shooting, also shoot in burst mode and turn off live mode to reduce memory demands. You’ll capture more photos and water splashes to play around with and stack later.
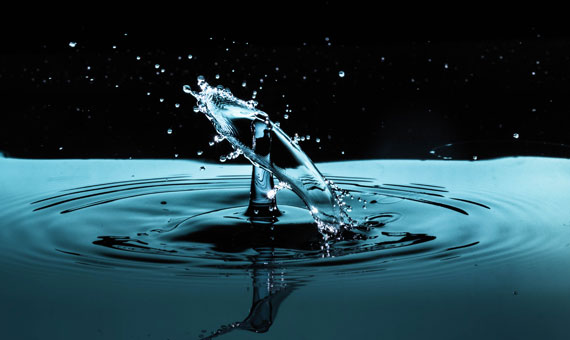
Water splash captured by Lanju Fotografie
Post-Production is Key
Post-production editing is a key step in the splash macro photography process. Andrew imports his images to Lightroom, selects the most attractive, and deletes ones with no splashes. He also adjusts the lighting, syncing the same settings across all images before moving them to Photoshop as layers. In Photoshop, select one as a base image and apply the “lighten” blending mode and a layer mask to others. Then, use the paintbrush set to a smaller size, white, and high flow (50%) to paint in the best droplets.
Finally, flatten the image, then remove the spike or needle using the clone stamp and polygonal lasso tools. You can use the spot healing brush to remove any unwanted splashes after, such as discolored, small, or messy ones. Or use the lasso tool to copy splashes to duplicate, place elsewhere, flip around, or resize. The CameraRaw filter is also ideal for adjusting lighting, improving droplet clarity, and fixing inconsistent black backgrounds. Once complete, you can flatten and import your image to Lightroom to play around with its final lighting settings.
Conclusion
Shooting small objects and unpredictable subjects like water make for a fun macro photography exercise. Playing around with different subjects and water patterns is key, as is doing so with your post-production. Andrew loves the process, advising each photographer to have fun and experiment.
- - - - - - - - - - - - - - - - - - - - - - - - - - - - - - - - - - - - - - - - - - - - - - - - - - - - - - - - - - - - - - - - - - - - - - - - - -
Did you appreciate this newsletter? Please help us keep it going by Joining Our Patreon Supporters
What are your thoughts on this article? Join the discussion on our Facebook Page
PictureCorrect subscribers can also learn more today with our #1 bestseller: The Photography Tutorial eBook
- - - - - - - - - - - - - - - - - - - - - - - - - - - - - - - - - - - - - - - - - - - - - - - - - - - - - - - - - - - - - - - - - - - - - - - - - -
The post Splash Photography Technique with Compositing appeared first in the Photography Tips category on PictureCorrect.
from PictureCorrect https://ift.tt/omwe9aS
via IFTTT


0 kommenttia:
Lähetä kommentti