


You already have a nice camera and a set up that you’re very comfortable with. Your eyes intuitively know what to do with your camera’s aperture and focal settings – so why don’t your photos pop? Maybe you need bounce flash. Bounce Flash creates the kind of nice soft lighting that is so much easier on the eye than the harsh look of built-in or hotshoe mounted direct flash and can turn your photography from amateurish to stunning. So, let’s look at what bounce flash is and see how you can enhance your photography with this technique.
Bounce Flash, what’s that?
Simply put, Bounce Flash is the method by which the light from your flash hits the surfaces around your subjects rather than the person or subject themselves, bathing your subject in soft, natural looking light.
Why not just point the flash at the person I’m shooting?
Direct flash creates an unnatural, washed out, hard light. Why does someone caught in a car’s headlights at night look so unnatural? That is because usually we see people in daylight illuminated by the sun where light bounces off the ground and other objects before hitting the subject. The trick is to duplicate that effect using bounce flash.
But what if you don’t want the natural look? Sometimes you want drama. Bounce Flash can help you here too by allowing you to control the shadows on your subject without any additional equipment. Let’s say you want to darken your subject’s face for a moodier effect. Simply bounce the flash off the wall behind them so their back is lit and their face is seen in a gentle shadow. This technique allows you to achieve nuances in your photography without mounted lights or complicated set ups.
What tools do you need to start using Bounce Flash in your photography?
You’ll need a flash that can be controlled independently of the aperture setting.
I should add that when using a ceiling to bounce the flash I’d recommend using a light modifier on the flash unit to “pop” a little light into the eyes of the subject. Some units have a small catchlight panel built in but if your flash hasn’t then I’d add something like a piece of foamcore or cardboard and I’ve even seen a seasoned pro use a plastic spoon held on with two rubberbands– anything just to get that small highlight in the eyes!
Down to the nitty gritty
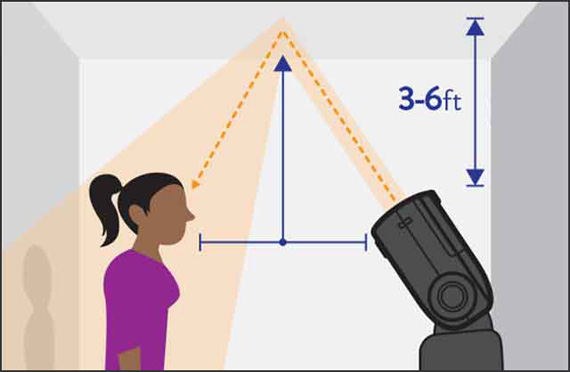
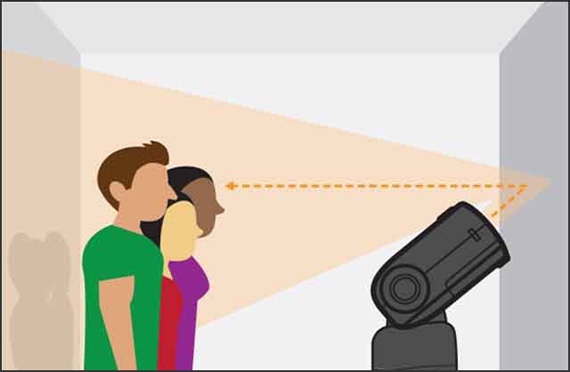
Angles
Think of your flash as a ball on a pool table. You want to bank your shot to hit a ball in the middle of the table. You automatically figure out where the ball should hit so it will bounce off the other ball. Apply the same reasoning to photography. Bounce the flash at the correct angle and you’ll hit your target. It’s fun and instructive to try out different angles and different lighting schemes until you feel comfortable with the technique.
Colors
Unless you’re trying to go for a certain effect, bounce your flash off a neutral-colored surface. The color of the surface that you’re bouncing off can change the color of the light that hits your target. Now you might want to use colored surfaces to make the light warmer (more red) or cooler (more blue) and so fine-tune your photo. But be aware that the color you bounce off will influence the final product. So, aiming your flash off a surface that is neutral in color is a good way to keep the light quality consistent.
Brightness
Correct exposure is crucial to using Bounce Flash. Because you are scattering your flashlight you must manually set the flash for a longer exposure time so the light will be intense enough to properly illuminate your target. Does your photo seem to be too washed out? Then reduce the power of the bounce flash and shoot again or just decrease your aperture. On the other hand, if the flash is not enough increase the power and see if that extra umph makes your photo look better. Have fun and experiment with your camera set-up and your flash until you have a shot you’re happy with.

sample portrait using bounce flash
Close quarters
Consider the size of your space and the distance to your target. If you throw a bucket of water off a 6-foot ladder the droplets don’t spread as far as if you tossed the water from a second-story window. In the same way your light will spread out when you bounce your flash but if the area is too big or your target is too far from your bounce point there won’t be enough light. Therefore, you may want to avoid trying this method outdoors. There’s just too many places for your light to dissipate.
Conclusion
Now it’s time to head out for a day of experimentation as you discover the many uses of Bounce Flash. Soon you’ll be a Bounce Flash master and the real fun will begin.
About the Author:
From Martin Sheerin at LightUpMyPhotos.com. Until recent retirement, Martin spent many years working as a photographer in Ireland and the US. His work has appeared in The Irish Times, The Times of London, The New York Times, The Melbourne Age and a lot of newspapers and magazines in between.
Go to full article: How do you Bounce Flash for Soft Lighting?
What are your thoughts on this article? Join the discussion on Facebook
PictureCorrect subscribers can also learn more today with our #1 bestseller: The Photography Tutorial eBook
The post How do you Bounce Flash for Soft Lighting? appeared first on PictureCorrect.
from PictureCorrect https://ift.tt/3d8O62O
via IFTTT


0 kommenttia:
Lähetä kommentti