


Silhouettes are about shape, which is one of the five elements of design. In fact, the silhouette is the purest of all shapes, as it’s void of detail, texture, and pattern.
Silhouettes are created when there is an extreme luminance (brightness) difference between the subject that is in shade and the brightly lit background. Silhouettes can be created any time of the day in nature as well as indoor studio lighting, as long as you have a brightly lit background. Some of the most dramatic silhouettes are at sunset or shortly afterward when you have a brightly lit background of orange, yellow, and magenta juxtaposed against a stark black background.
Aperture
When setting up to do a silhouette, keep in mind that the f-stop is not as important as in other situations, since the f-stop determines the depth of field (DOF), and the larger the f-stop (e.g. f/16), the greater the DOF. This not always a critical factor in creating a silhouette.
ISO
The ISO setting I use is a low setting—under ISO 400—due to the fact that I don’t need to expose for foreground that normally would require detail and sharpness.
Metering
The most important aspect of the setup is how you meter the scene. Here it best to use manual mode. Keep in mind a point and shoot won’t work; you need a DSLR camera. Also, a good sturdy tripod is essential.
As you set your camera to manual mode, set your metering mode to spot metering. Most DSLR cameras by default are set to multisegment or evaluative, depending upon the model (as in, Nikon versus Canon). If you don’t how to do this, see your user manual. Your camera has a reflective light meter. Its job is to expose everything at 18 percent gray. In a silhouette you don’t want to expose for the entire scene. Therefore, with your camera in manual mode set to spot metering, you want to meter for the brightest part of the scene: the sky. This in turn will give you a correct exposure for the sky, causing the foreground to go underexposed. I like to go -2/3 EV, assuring me the foreground will be underexposed.
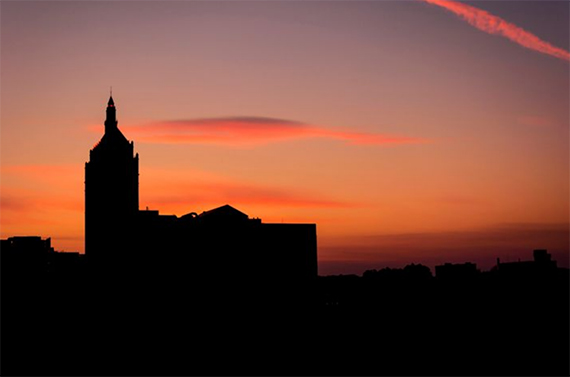
Last, notice the image above, where my settings were f/5.6, ISO 100, at 1/15 second. This is why you need a tripod.
Also, I always shoot in RAW format to ensure I capture all the info needed. From there I upload to my photo editing software to do any minor tweaking that’s needed.
About the Author:
Anthony Paladino has been a photographer for over twenty years, his passion in photography is scenic landscapes as a freelance photographer.
Go to full article: How to Shoot a Silhouette
What are your thoughts on this article? Join the discussion on Facebook
PictureCorrect subscribers can also learn more today with our #1 bestseller: The Photography Tutorial eBook
The post How to Shoot a Silhouette appeared first on PictureCorrect.


from PictureCorrect https://ift.tt/2qy8yBl
via IFTTT


0 kommenttia:
Lähetä kommentti