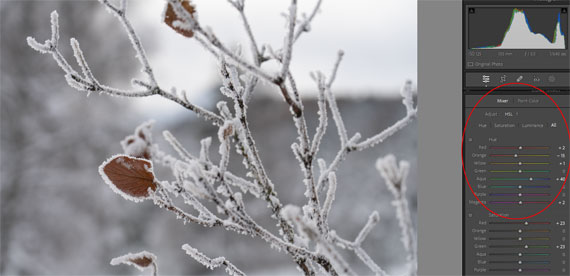
Today, we’re diving into one of the most powerful tools in Adobe Lightroom – the HSL panel (more recently called the Mixer panel). HSL stands for Hue, Saturation, and Luminance, and mastering this panel can transform your photos from good to breathtaking. Whether you’re a professional or a hobbyist, understanding how to use the HSL panel effectively is a game-changer for your photo editing process.

What is the HSL Panel?
The HSL panel in Lightroom is a feature that allows you to adjust the hue, saturation, and luminance of specific colors in your image. It gives you the ability to fine-tune colors in a way that can dramatically impact the mood and feel of your photos.
- Hue: This alters the ‘shade’ of the colors. For instance, you can change a red flower to a more orange or pink hue.
- Saturation: This controls the intensity of the colors. Increasing saturation makes colors more vivid, while decreasing it will make them more muted.
- Luminance: This affects the brightness of the colors. Increasing luminance makes colors brighter, and decreasing it makes them darker.
How to Use the HSL Panel:
- Open Your Image: Start by importing and opening your photo in Lightroom.
- Locate the HSL Panel: In the Develop module, find the HSL or Mixer panel. It might be collapsed, so click on it to expand and view the options.
- Adjusting Hue: Click on the ‘Hue’ tab. You’ll see a range of colors like red, orange, yellow, etc. By moving the sliders for each color, you can change the hue of that specific color in your image.
- Tweaking Saturation: Switch to the ‘Saturation’ tab. Here, you can increase or decrease the saturation for individual colors. This is particularly useful for making skies bluer or grass greener.
- Fine-tuning Luminance: Finally, click on the ‘Luminance’ tab. Adjust the brightness of specific colors. Be cautious with luminance; too much adjustment can lead to unnatural looking images.
Practical Tips:
- Selective Adjustments: The beauty of the HSL panel is in its ability to target specific colors. For example, you can enhance the blue of the sky without affecting the blue in other areas of the photo.
- Use in Portraits: Adjusting skin tones can be done subtly using the orange and red sliders in the HSL panel.
- Create Mood: Altering colors can change the mood of your image. Cooler tones can create a somber feel, while warmer tones can evoke happiness and energy.
The HSL panel is a powerful tool in your Lightroom arsenal. With practice, you can use it to bring your creative vision to life, enhancing your photos in ways that are both subtle and dramatic. Remember, the key to great editing is subtlety – it’s about enhancing, not overpowering your images.
For Further Training:
There is a new comprehensive online course aimed at photographers seeking to enhance their photo editing skills in Lightroom and Photoshop. Created by Josh Dunlop along with digital artist Anna Maghradze and landscape photographer Zach Doehler, the course promises to simplify the photo editing process. It is currently 70% off to start the new year if you want to check it out.
It includes a step-by-step approach to reveal hidden details in raw photos, the use of presets for efficient editing, and techniques for creating photoshop masterpieces. The goal is to make photo editing intuitive and accessible, enabling photographers to transform their images quickly and creatively.
Deal ending soon: The Effortless Editor at 70% Off
- - - - - - - - - - - - - - - - - - - - - - - - - - - - - - - - - - - - - - - - - - - - - - - - - - - - - - - - - - - - - - - - - - - - - - - - - -
The post How to Edit with the HSL Mixer Panel in Lightroom appeared first on PictureCorrect.
from PictureCorrect https://ift.tt/9EQr6af
via IFTTT


0 kommenttia:
Lähetä kommentti