This article is based on concepts from Collier’s Guide to Night Photography. Our readers can get a discount by using the promo code picturecorrect at checkout.
Part I – Civil Twilight
Whenever I photograph at a popular landscape photography location, I usually see a mass exodus of photographers as soon as the sun goes down. For many years, I was part of this exodus, as I believed the best light was gone as soon as the sun set. This was before I discovered the magic of twilight. Now, I see the sunset not as the end of my photo shoot, but as the beginning.
There are three stages of twilight – civil twilight, nautical twilight, and astronomical twilight. Each of these stages lasts about 30 minutes, though it can be longer or shorter depending on where you are on the planet and what time of year it is. You can determine the exact times each of these twilight stages occurs on many websites, including the astronomy section of WeatherUnderground. You can also find this information on apps like PhotoPills or The Photographer’s Ephemeris.
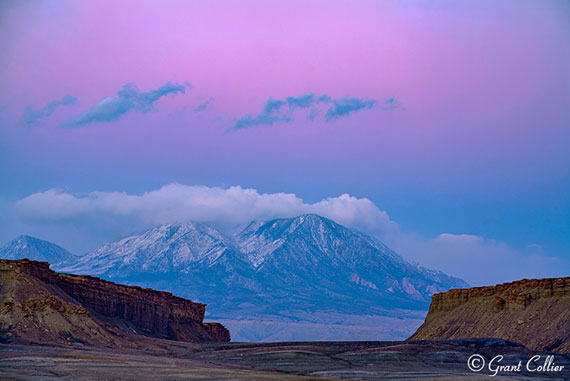
The Belt of Venus shines above Utah’s Henry Mountains. f7.1, 0.3 seconds, ISO 100
The first stage of twilight after sunset and the last stage before sunrise is known as civil twilight. It occurs during the time the sun is between 0 to 6 degrees below the horizon. During this time, you can often get vibrant colors in the sky, since a lot of light from the sun is scattered and refracted by the atmosphere. The clouds may have some of the bright orange or pink glow that you would see at sunrise or sunset. You can also capture images of Earth’s shadow, which is the shadow that Earth casts on its atmosphere. This shadow will usually appear with a bright pink band of sky above it, known as the Belt of Venus or the anti-twilight arch.
If you’re lucky, you may also see anticrepuscular rays rising towards the heavens shortly after sunset. These can appear at the spot where the sun set or directly opposite the spot the sun set.
Civil twilight is an excellent time to capture images of the moon and some of the brightest stars and planets. The moon will be visible throughout this time, while some stars and planets will be visible towards the end of civil twilight in the evening (or the beginning of it in the morning).
The period when the stars and planets are just visible is often referred to as the blue hour (even though it only lasts about 20 minutes in most locations). During this time, blue wavelengths of light from the sun are more easily refracted by the atmosphere back onto the land, making the scene appear bluer than usual. This effect is most pronounced near the end of civil twilight in the evening (or the beginning of civil twilight in the morning), though it is noticeable before and after this time.
You can capture some intriguing images during the blue hour. If you are photographing something that is already blue, like the ocean, it can further deepen the blues, giving a somewhat surreal effect to the photo. This may not be as desirable if you are photographing objects that aren’t blue, as it can give the appearance of a color cast across the image. In this scenario, you can increase the white balance temperature until the colors look better.
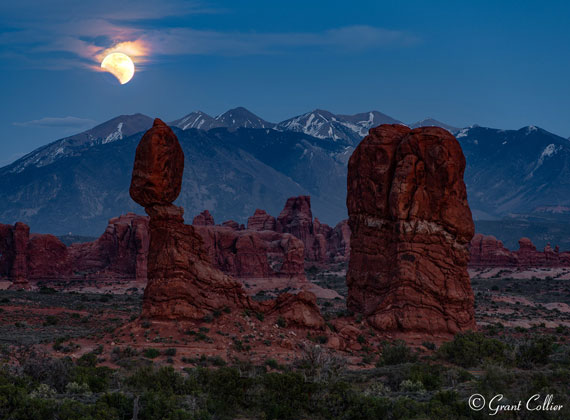
A partially-eclipsed moon rises above Balanced Rock in Utah. f5.6, 1/10 seconds, ISO 100
During civil twilight, it will usually be light enough to get good exposures using your camera’s exposure meter. However, you should check the histogram after you take your photos. Make sure the data extends to the right side of the histogram, without blowing out any highlights.
After civil twilight in the evening comes nautical twilight.
Part II – Nautical Twilight
Although civil twilight is a great time to capture landscape photos, the magic of twilight does not end there. After civil twilight in the evening (and before it in the morning) is a period known as nautical twilight.
This stage occurs from the time the sun is 6 to 12 degrees below the horizon. During this time, you can get unique images that convey the brief moment in time between the dark of night and the light of day.
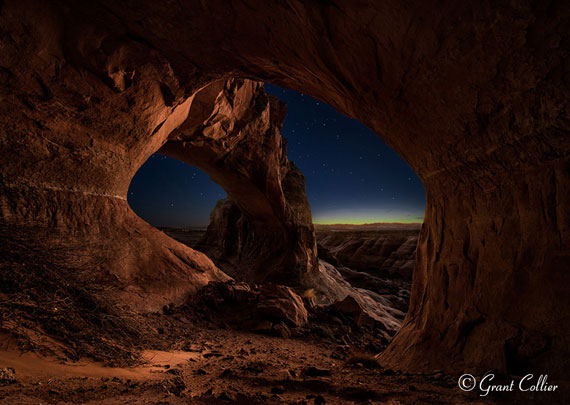
A remote natural arch is seen from a small cave in Utah. f2.8, 15 seconds, ISO 1000.
During nautical twilight, it will start to become too dark to use your camera’s exposure meter. You’ll need to switch to manual exposure on your camera. You should use the widest aperture you can, while still getting everything in focus. You’ll need to use longer and longer exposures (up to about 20 seconds) and start raising the ISO to properly expose your image and get data extending to the right side of your histogram.
It will start to look quite dark to the naked eye during nautical twilight. However, your camera can still capture light from the sun that is refracted by the atmosphere. You’ll usually get the best light on the land when facing away from the spot the sun set (or is about to rise). If, on the other hand, you face towards the direction of the sun, you can often get vivid colors in the sky above the horizon. If there was a vibrant sunset, some of the colors on the clouds might last until nautical twilight.
During the beginning of nautical twilight in the evening (or the end of it in the morning), it will often be light enough to get a good exposure of both the land and the sky with a single shot. As the light fades, you’ll likely need to combine two exposures if you want to get good detail in the land. You can take a longer exposure for the land and a shorter exposure for the sky and blend them in post-processing. I go into this in more detail in Collier’s Guide to Night Photography.
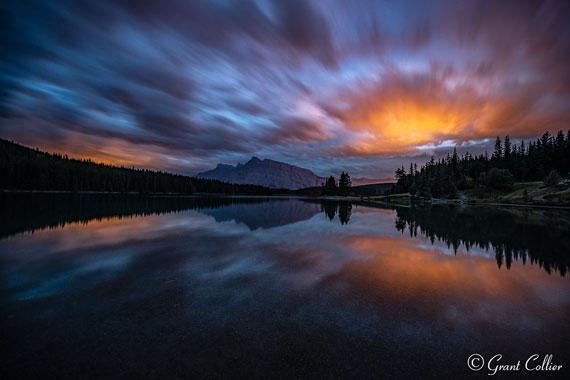
Light from a distant town bonces of clouds above Two Jack Lake in Canada. f2.8, 30 seconds, ISO 400.
The sky will appear blue throughout nautical twilight, and your camera will be able to capture quite a few stars in the sky. However, it won’t be dark enough to produce dramatic images of the Milky Way. To do this, you’ll need to wait until the next stage of twilight, called astronomic twilight.
Part III – Astronomical Twilight
After nautical twilight in the evening (and before it in the morning) is a period known as astronomical twilight. This stage of twilight occurs when the sun is 12-18 degrees below the horizon. The sky will appear almost completely dark to the naked eye, but there will still be some light from the sun refracted through the atmosphere that can be picked up by a camera.
At the beginning of astronomical twilight in the evening, the sky will still have a bluish color to it. If there is no moon out, the sky will fade to purple and then to black at the end of twilight. There may also be some reds or yellows in the direction the sun set (or is about to rise).
If there is no moon or a thin crescent moon, the skies will become sufficiently dark that you will be able to capture many stars and the Milky Way in your images. If there is a brighter moon out, the light from it will likely overpower any light refracted through the atmosphere from the sun. Your images will look about the same as photos taken under a moon in the dark of night – the sky will appear blue, the foreground will be lit up, and some stars will be obscured.
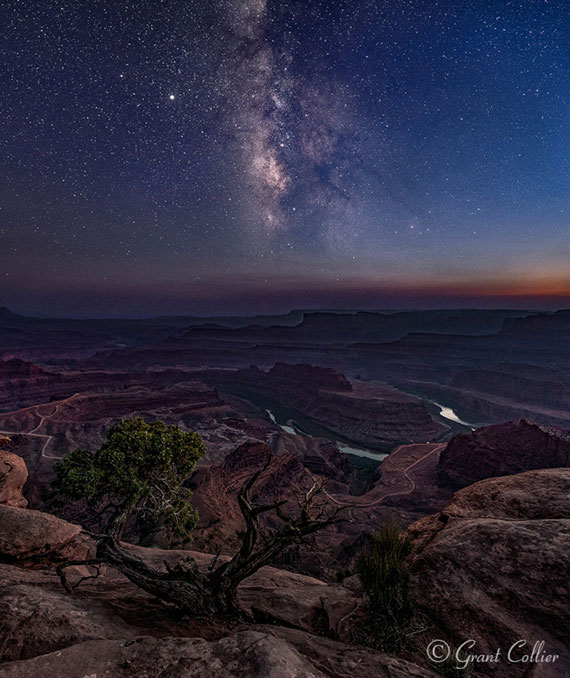
The Milky Way rises above Dead Horse Point in Utah. Stacked images, f1.8, 13 seconds, ISO 1600.
Even if there is no moon out, you can still get a little light on the foreground if you are facing away from the spot the sun set (or is about to rise). However, unless you are photographing something with a very bright, reflective surface, you’ll probably need to illuminate the foreground with a flashlight or stack multiple exposures, as described in my book Collier’s Guide to Night Photography, to get good detail throughout the image.
You will need to use a manual exposure setting to capture photos during astronomical twilight. You should generally use the widest aperture on your lens and a higher ISO setting of around 1600 to get good exposures. Your shutter speed can be set using the rule of 500 to keep the star trails to a minimum. Just take 500 divided by the focal length of your lens to get the exposure time in seconds (for cropped sensors, you’ll need to multiply by the crop factor of your lens to get the effective focal length). For example, if you use a 24mm lens, you would take 500 / 24 = 20.8. So 20 seconds would be your exposure time.
Fortunately, you won’t have to stop shooting after the end of astronomical twilight in the evening. There will no longer be light refracted through the atmosphere, but you can often get some green and red color in the sky from airglow. The skies will also be at their darkest, making it a great time to shoot the Milky Way. There really is no bad time to shoot at night. You can take images as soon as the sun sets and keep shooting as long as you want, while the light of day fades into the blackness of night.
For Further Training on Night Photography:
In this fully-updated 2nd edition, Grant Collier sheds light on how to capture these otherworldly images by sharing secrets he has learned over the past 17 years. He explains how to take photos of the Milky Way, northern lights, meteors, eclipses, lightning, and much more.
Our readers can get a discount by using the promo code picturecorrect at checkout which ends soon.
Found here: Night Photography Guide 2nd Edition
- - - - - - - - - - - - - - - - - - - - - - - - - - - - - - - - - - - - - - - - - - - - - - - - - - - - - - - - - - - - - - - - - - - - - - - - - -
Did you appreciate this newsletter? Please help us keep it going by Joining Our Patreon Supporters
What are your thoughts on this article? Join the discussion on our Facebook Page
PictureCorrect subscribers can also learn more today with our #1 bestseller: The Photography Tutorial eBook
- - - - - - - - - - - - - - - - - - - - - - - - - - - - - - - - - - - - - - - - - - - - - - - - - - - - - - - - - - - - - - - - - - - - - - - - - -
The post The Magic of Twilight appeared first on PictureCorrect.
from PictureCorrect https://ift.tt/GfiVrB1
via IFTTT


0 kommenttia:
Lähetä kommentti