This article is based on concepts from The Advanced Composition Guide if you want to dig deeper for further training.
One of the challenges that we face as photographers is the ability to create a meaningful composition path through our photographs. The effort needs to be recognizable to many different minds to reach a broad and accepting audience.

Photo by Dimitris Vetsikas
A focal point attracts attention via one or more of these attributes: shape, color, tonal contrast, color contrast, relationship between sizes, juxtaposition and, on occasion, the texture of an object.
Close your eyes, and then open them while viewing the beautiful sunset landscape photo above.
When you open your eyes, what is the first thing you see?
It’s the two people standing in the distance.
They are a focal point due to their shape, size relationship and tonal contrast.
Critical Thought: A well-placed human being, within a composition, will almost always create an energetic and practical focal point.
Are those two individuals the subject of the image? Good question! Perhaps not.
Remember This: A focal point can support the subject of a photo composition, and it can also be the subject of the composition.
In the landscape shot, the individuals are in support of the subject—which is the landscape.

The sun setting behind the boat is a focal point that is supporting the subject, which is the schooner. (Photo by Kent DuFault)
The sun setting behind the boat above is a focal point that is supporting the subject, which is the schooner.
Try This!
Step outside your home. Take up a position where you can see your street, your neighbors or whatever else is around your home. Close your eyes. Count to 10. When you open your eyes, make a mental note of the first five things that you notice.
The above exercise is the basis of finding focal points.
Human vision doesn’t sit still. It scans continuously, then it stops at points of interest. This scanning is called a scanpath. The stopping points are fixations—our eyes dart between these fixations in movements known as saccades.
But enough anatomy.
Critical Point: The essential takeaway from this is that the human traits of scanning and fixations provide the photographer with a potent visual tool—the focal point. The focal point is a fixation.
I think it is relatively easy to grasp the concept of what is a focal point.
The learning curve comes with how to execute a focal point within a photographic composition properly. That becomes even trickier when you include multiple focal points!
Idea: A scene can contain more than one focal point. The trick is to ensure that the multiple focal points have varying levels of visual interest, or visual weight. Think of your focal points as signs along a path. The first sign says, “Go here.” You follow it. A second sign—the focal point—says, “Now go here.” The viewer of the photo follows the second sign along the path. Now imagine a third sign on the trail. It says, “You’re here!”
This example demonstrates three focal points, each acting as a signpost through the composition of the photo.

Photo via Pixabay
This bridge photo is an excellent example of multiple focal points. We have the boat wake on the lower right. We have the two pylons under the bridge. Finally, we have the repeating triangular pattern of bridge construction.
What is the subject of the photograph discussed above? It’s the bridge. The bridge and the landscape surrounding it are the subject.
Do you see how the focal points are helping to guide viewers’ eyes through the picture?
Key Point: Effective focal points don’t have to be ostentatious. Put this picture of the bridge in front of you and close your eyes. When you open your eyes, they go immediately to the right side of the bridge. The bright yellow highlights on the bridge and the boat wake, as well as the shape and contrast of the two protective piers and bridge uprights, create focal points. This photograph is an example of multiple focal points in use.
What is the most common photographer-related mistake concerning focal points?

Photo by Kat Jayne
The boy and his finger create a focal point. However, this is an excellent example of a mistakenly placed focal point!
Critical Point: The most common problem with focal points is that they are misplaced and don’t serve the subject very well. That is the problem with the boy pointing. If a focal point does not support the subject, then it becomes a composition problem known as an eye snag. It snags the viewer’s eyes away from the subject.
The subject of this photo is the rainbow. It’s quite clear that the photographer set this up to show the boy as a focal point pushing the viewer’s eyes toward the rainbow. The raised hand and pointing finger also emphasize that function.
Except he isn’t pointing at the rainbow. He’s pointing to the right of it. As a viewer, you tend to think, “What is the boy pointing at?” You scan the landscape looking for something else of interest.
The focal point is misplaced. It isn’t correctly supporting (pointing toward) the subject.
Let’s talk about the second biggest composition mistake involving focal points.
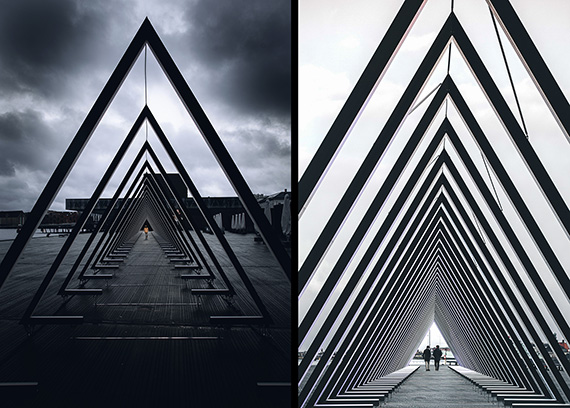
Photos by Kasper Rasmussen
Here we have two different photos taken at the same location and utilizing the similar techniques of a focal point and repetition.
One of these example images is successful—the other one is less so.
For the photo on the left, poor choices have left the focal point (the man) almost invisible. The version on the right is much better and quite effective.
The difference? Visibility!
Remember: A focal point must stand out from the surrounding scene. It should be the first or second most prominent spot within the composition. Why do I say first or second? If the focal point is also the subject, it should be the most prominent. If the focal point is a supporting element for the subject, then it should be the second-most prominent.
The example image on the right is a classic focal point photograph. The walking couple creates a focal point due to their size, shape, contrast, and positioning within the composition. In this case, the focal point is also the subject. What is the triangular sculpture? It’s a frame. It is framing the subject!
A focal point operates within the confines of the space of the image frame. This fact of composition has to be taken into consideration when composing a photo.

Original photo by Tembela Bohle
Do you see this shot as having a focal point? What is the subject—the girl or the landscape?
The visual weight between the girl and the background is too evenly balanced in this composition.
The photographer’s intent was for the “shape” of the rock to be a focal point, which then establishes the girl as the subject. However, it’s not visually strong enough to accomplish this.
Now, consider this:

Change of frame
A different arrangement of the focal point within the space of the frame creates a more robust composition.
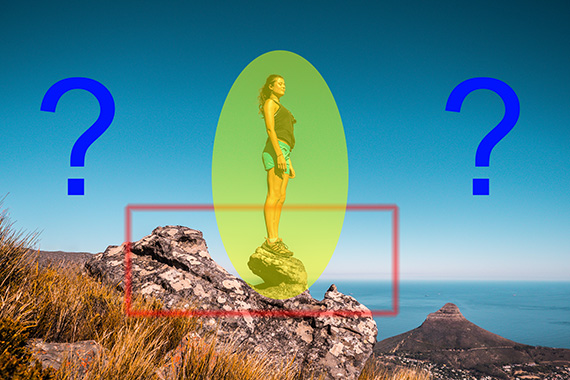
Focal point change
By changing the frame, we have now accomplished several things:
- The woman is now clearly the subject.
- The interesting shapes in the rocks are now working very well as a focal point to the woman as the subject.
- The rest of the picture area provides background and storytelling details.
Critical Thought: When contemplating a focal point in your photo, consider its placement relative to the subject and also its location within the entire frame.
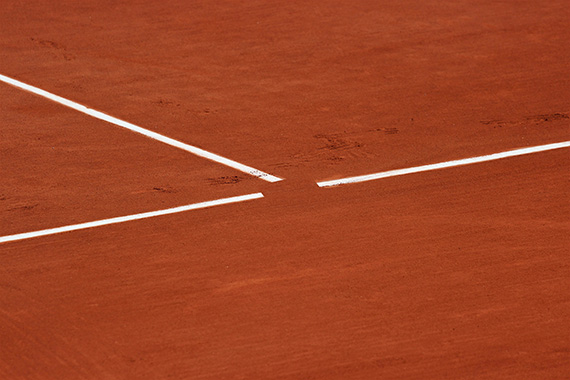
Photo by Erwan Hesry
A focal point can also be created by something that isn’t present in the frame!
Remember: A focal point can be created by what’s not there. The abstract photo above relies on a pattern. The break in the design makes a focal point! An object that seems like it should be in the picture but isn’t—this can also create a fixation for the eyes.
The best focal points relate to the overall theme, subject and story of the final photograph.

Photo by Ben Pham
The speaker in the building above meets much of the criteria for a focal point. However, in this case, it’s a weak element. The speaker doesn’t relate or provide an interesting point of view for the rest of the frame.
So, although it attracts immediate attention, that attention dies right there.
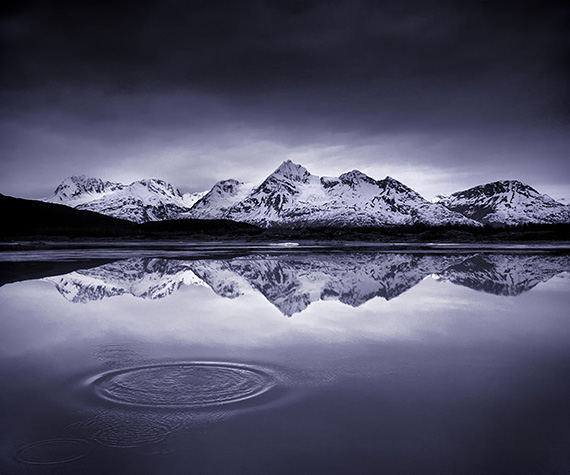
This circular focal point relates to the theme and subject of the entire frame. (Photo by Kent DuFault)
Focal Points Are Fun!
Since we are programmed internally to see focal points (eye fixations), they are one of the most straightforward composition solutions to grasp and learn.
They are so much fun because they can be used in so many different ways.
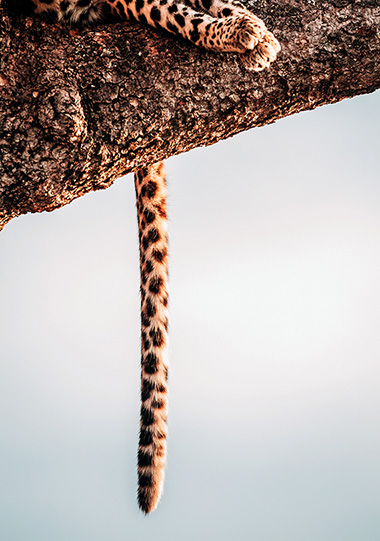
Photo by Geran de Klerk
What is the subject of the photograph above? It’s a big cat. The dangling tail is a strong focal point.
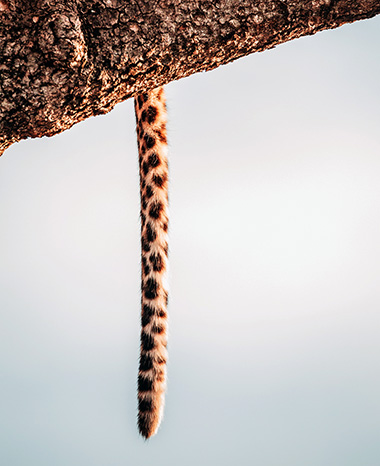
Cropped out paws
What if the paws are removed? Is the subject still the big cat? Or, have we made the focal point the subject by changing the frame?
In Conclusion
Keep these learning points in mind when using focal points in your photo compositions:
- A focal point attracts attention through size relationships, shape, color, tonal contrast, color contrast, juxtaposition and occasionally texture.
- A well-placed human being in a photograph will almost always provide the potential for a strong focal point.
- A focal point can support the subject in a composition—or it can also be the subject.
- Focal points are natural composition tools because of the human trait known as saccades or fixations.
- The human mind continually scans with the eyes. This eye movement is known as a “scanpath”.
- A picture can have one focal point or multiple focal points. The key to success is to compose images so that each point has varying levels of visual weight that lead a viewer’s eyes in the correct direction within the frame.
- If a focal point doesn’t direct viewer attention toward the subject area, then it becomes a problem known as an eye snag.
- A focal point must be obvious to work. Don’t get clever and hide your focal points!
- The placement of the focal point within the overall frame is vital.
- When something is missing from a picture, and our mind feels that it should be there, that missing element creates a focal point!
- The best focal points relate well to the subject, theme and story of the final photo.
Now it’s your turn.
Spend an afternoon shooting photos and hunting for focal points. Landscapes, cityscapes and architecture lend themselves well to photographers looking to hone their focal point skills.
How did you do?
- Did you find different types of focal points: size, shape, color, tone/color contrast or position?
- Do your focal points work well within the overall composition?
- When doing the eye-closure test, do your eyes immediately go to your intended focal points and subject?
About the Author:
Kent DuFault is an author and photographer with over 35 years of experience. He’s currently the director of content at the online photography school, Photzy.com.
For Further Training:
This recently updated & expanded in-depth guide rolls years and years of practical knowledge, condensed into 239 pages packed with training, illustrations, and assignments. Advanced Composition goes far beyond knowing what composition is… (or, even knowing what the tools of composition are). Develop the SKILLS of anticipation, pre-visualization, and timing that are core to capturing great photography. It is currently 77% off today if you want to check it out.
Broken into 84 key lessons, 38 assignments, & 117 self-check questions – it delves DEEP into the artistic and technical aspects of photographic composition. With this guide you will learn to SEE light, shadow, lines, curves, space, repetition, and focal points.
Deal ending soon: The Advanced Composition Guide at 79% Off
- - - - - - - - - - - - - - - - - - - - - - - - - - - - - - - - - - - - - - - - - - - - - - - - - - - - - - - - - - - - - - - - - - - - - - - - - -
Did you appreciate this newsletter? Please help us keep it going by Joining Our Patreon Supporters
What are your thoughts on this article? Join the discussion on our Facebook Page
PictureCorrect subscribers can also learn more today with our #1 bestseller: The Photography Tutorial eBook
- - - - - - - - - - - - - - - - - - - - - - - - - - - - - - - - - - - - - - - - - - - - - - - - - - - - - - - - - - - - - - - - - - - - - - - - - -
The post Focal Points: The Smallest Important Elements in a Photo appeared first on PictureCorrect.
from PictureCorrect https://ift.tt/BNSldUR
via IFTTT



0 kommenttia:
Lähetä kommentti