


In a recent video, renowned photographer Robert Vanelli shared his insights on using the Magic Light Extension, a newly released feature in Luminar Neo, to create visually stunning photographs. In this blog post, we’ll discuss the key takeaways from his tutorial and provide tips on how to use the Magic Light Extension effectively.
Use Magic Light as a supporting element
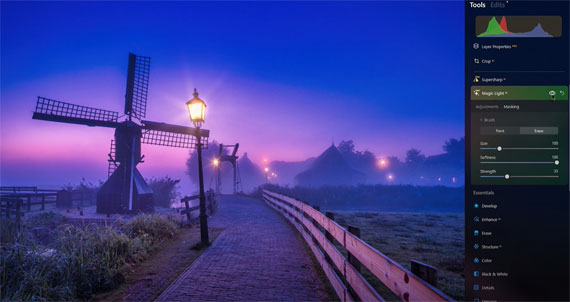
Vanelli emphasizes that the Magic Light Extension should be used as a supporting element rather than the main focus of the photograph. Overusing the effect can shift the focus away from the main subject, undermining the overall composition.
Adjust the intensity and size of the Magic Light effect
When using the Magic Light Extension, it’s essential to fine-tune the intensity, size, and glow of the effect to achieve the desired outcome. The goal is to create a natural-looking light source that complements the scene without looking overly artificial.
Combine Magic Light with other editing tools
To enhance the overall look of your photographs, combine the Magic Light effect with other editing tools such as portrait tools, tone tools, and vignetting. This will help create a cohesive and visually appealing image.
Be strategic in your editing process
When asked whether to use the Magic Light effect early or late in the editing process, Vanelli suggests experimenting to find the best approach for each image. In some cases, applying the effect first and then adding other adjustments may work best, while in others, a different order might yield better results.
Apply Magic Light to enhance starburst effects
Magic Light can be used to create beautiful starburst effects, especially when shooting at smaller apertures like f/16 or f/22. By adjusting the intensity and masking areas of the image, you can create a gradual starburst effect that adds depth and interest to your photos.
The Magic Light Extension is a powerful tool that, when used correctly, can add a spark to your photographs, enhancing their visual appeal. Remember to use the effect as a supporting element, adjust its intensity and size, combine it with other editing tools, and experiment with different editing strategies to achieve the best results. With practice and experience, you can master the Magic Light Extension and create stunning, captivating images.
See how it works: Magic Light in Luminar Neo
- - - - - - - - - - - - - - - - - - - - - - - - - - - - - - - - - - - - - - - - - - - - - - - - - - - - - - - - - - - - - - - - - - - - - - - - - -
Did you appreciate this newsletter? Please help us keep it going by Joining Our Patreon Supporters
What are your thoughts on this article? Join the discussion on our Facebook Page
PictureCorrect subscribers can also learn more today with our #1 bestseller: The Photography Tutorial eBook
- - - - - - - - - - - - - - - - - - - - - - - - - - - - - - - - - - - - - - - - - - - - - - - - - - - - - - - - - - - - - - - - - - - - - - - - - -
The post How to Use the Magic Light Extension in Luminar Neo appeared first on PictureCorrect.
from PictureCorrect https://ift.tt/noe3Rl6
via IFTTT


0 kommenttia:
Lähetä kommentti