


Final reminder: only hours left for the Lightroom Made Easy Course at 40% Off
Creating a preset of your photo editing style in Adobe Lightroom allows you to apply your preferred adjustments to multiple images quickly and consistently. Here’s a step-by-step guide on how to create a preset in Lightroom Classic and Lightroom CC (the cloud-based version):
Lightroom Classic:
- Import and select the photo you want to work with.
- In the Develop module, apply your desired adjustments and edits to the photo.
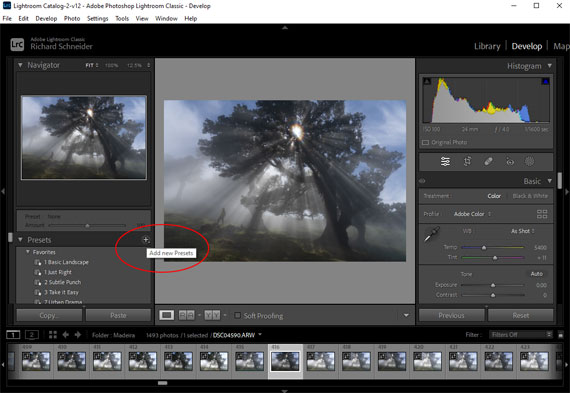
- On the left-hand panel, find the Presets section.
- Click the “+” icon located in the upper-right corner of the Presets panel, and select “Create Preset.”
- In the “New Develop Preset” dialog, give your preset a name and choose a folder to save it in (either an existing one or create a new one).
- Select the settings you want to include in the preset by checking the boxes next to each adjustment. This way, only the adjustments you want to apply to other photos will be saved in the preset.
- Click “Create” to save the preset.
Lightroom CC:
- Import and select the photo you want to work with.
- Apply your desired adjustments and edits to the photo using the editing panels on the right side.
- Click on the “Presets” button located at the bottom of the editing panels.
- In the Presets panel, click the three-dot icon in the upper-right corner, and select “Create Preset.”
- In the “Create Preset” dialog, give your preset a name.
- Choose a group to save your preset in (either an existing one or create a new one by selecting “New Group”).
- Select the settings you want to include in the preset by checking the boxes next to each adjustment. This way, only the adjustments you want to apply to other photos will be saved in the preset.
- Click “Save” to save the preset.
Now your preset will be available in the Presets panel, and you can apply it to other photos by simply clicking on it. Keep in mind that you might need to make minor adjustments to individual photos, as the same settings might not work perfectly for every image.
For Further Training:
With every new version Lightroom gets better and better, but every time they change things up it means photographers have to dedicate some time to continuing education on how to use those new features. Pro photographer Phil Steele recently updated his popular training course on how to master all aspects of the program, including new features in the latest version of Lightroom. It is currently 40% off until the end of the month, April 30.

Lightroom Training Course
There are photo editing demonstrations on a wide variety of photo types in the course lessons, ranging from portraits, to landscapes, architecture, events, fashion, sports, and more. You’ll also see black-and-white conversions, sepia tones, and other special effects.
Only hours left: Lightroom Made Easy at 40% Off
- - - - - - - - - - - - - - - - - - - - - - - - - - - - - - - - - - - - - - - - - - - - - - - - - - - - - - - - - - - - - - - - - - - - - - - - - -
Did you appreciate this newsletter? Please help us keep it going by Joining Our Patreon Supporters
What are your thoughts on this article? Join the discussion on our Facebook Page
PictureCorrect subscribers can also learn more today with our #1 bestseller: The Photography Tutorial eBook
- - - - - - - - - - - - - - - - - - - - - - - - - - - - - - - - - - - - - - - - - - - - - - - - - - - - - - - - - - - - - - - - - - - - - - - - - -
The post How to Create a Preset of Your Photo Editing Style in Lightroom appeared first on PictureCorrect.
from PictureCorrect https://ift.tt/ghRmEFi
via IFTTT


0 kommenttia:
Lähetä kommentti