


Photographer Steve Arnold unveils a hidden feature in Photoshop that allows you to make selective adjustments based on the depth of elements within your landscape. In this blog post, we will discuss the most important takeaways from his tutorial video and how you can apply this technique to your own work:
Step 1: Create a Depth Map using Photoshop’s Neural Filters
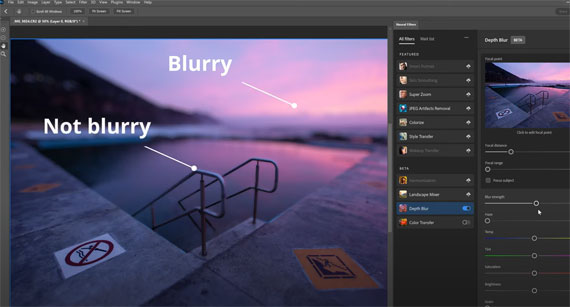
To create a depth map, go to Photoshop’s Neural Filters menu option and choose the Depth Blur filter. This filter analyzes your image to determine the distance of objects from the camera. Make sure to select the ‘Output Depth Map Only’ option and output the result to a new layer.
Step 2: Enhance the Depth Map (Optional)
You may want to increase the contrast of the depth map to create more separation between elements. Press Control or Command+L to open a Levels adjustment and increase the contrast as needed.
Step 3: Add a Curves Adjustment Layer
Add a curves adjustment layer to your image. This will be the layer on which you apply the depth-based adjustments.
Step 4: Copy the Depth Map into the Layer Mask
Select and copy the depth map layer (Control or Command+A, then Control or Command+C), and then Alt or Option-click the layer mask of your curves adjustment layer. Paste the depth map directly into the layer mask (Control or Command+V).
Step 5: Hide the Depth Map Layer
Hide the depth map layer to reveal your image again. You can delete it if you don’t need it later.
Step 6: Make Adjustments using the Curves Layer
Now, as you make adjustments using the curves layer, you will notice that the effect is stronger in the background, medium in the middle ground, and weaker in the foreground.
Reusing the Depth Map:
You can reuse the depth map for other adjustment layers by holding Command or Control and clicking the layer mask to load it as a selection. When you add another adjustment layer, the depth map will be loaded into its mask automatically.
Fixing Halo Issues:
If you notice halos around some edges in your image, watch Steve Arnold’s next video to learn how to fix them and avoid other halo issues during your editing process.
By using Photoshop’s hidden depth map feature, you can make adjustments to your images based on the depth of elements within the scene. This powerful technique can enhance your landscape photography, allowing for more nuanced and realistic edits. Experiment with this approach and discover new possibilities for your creative projects.
For further training: Steve Arnold’s Photoshop 101 Course
- - - - - - - - - - - - - - - - - - - - - - - - - - - - - - - - - - - - - - - - - - - - - - - - - - - - - - - - - - - - - - - - - - - - - - - - - -
Did you appreciate this newsletter? Please help us keep it going by Joining Our Patreon Supporters
What are your thoughts on this article? Join the discussion on our Facebook Page
PictureCorrect subscribers can also learn more today with our #1 bestseller: The Photography Tutorial eBook
- - - - - - - - - - - - - - - - - - - - - - - - - - - - - - - - - - - - - - - - - - - - - - - - - - - - - - - - - - - - - - - - - - - - - - - - - -
The post Depth-Based Adjustment Technique in Photoshop appeared first on PictureCorrect.
from PictureCorrect https://ift.tt/YhRiWjT
via IFTTT


0 kommenttia:
Lähetä kommentti