sunnuntai 30. huhtikuuta 2023

PictureCorrect.com: Interesting Photo of the Day: Tracking the Milky Way

Filled with rich color and fine details, well-executed astrophotography never ceases to amaze us. Today’s show-stopping image courtesy of photographer Daniel Stein is no exception. But when you find out everything that went into making this shot possible, you’ll gain a whole new level of appreciation.

Milky Way pano in Adirondacks, NY by Daniel Stein. (Via Reddit. Click for larger image.)

The panorama above is actually composed of 28 tracked shots and 34 untracked shots. That’s a grand total of 62 exposures, all stitched together to create this amazing scene.

Finding a picturesque perch deep in the Adirondack Mountains of New York, Stein began working with his Nikon z6 as darkness draped the valley. To create the untracked foreground sequence,  he began making a series of 20 second exposures at f/1.8, ISO 800.

As stars began to pop into view, he used an RRS PG-01 pano-head to track their subtle movements. The series of images focusing on the sky are composed of 1 minute exposures made at f/2.2, ISO 800.

After some initial adjustments in Adobe Lightroom, Stein transferred his images to image stitching software PTGui. After creating separate composite images of the foreground and sky, he applied some further edits in Photoshop and Pixinsight. Finally, he merged the two, masked out any undesirable details, and added final touches to the photo.

Most of us admire astrophotography, but it’s an intimidating medium that many photographers hesitate to take on. Kudos to Daniel for making this complicated task look easy to master!

- - - - - - - - - - - - - - - - - - - - - - - - - - - - - - - - - - - - - - - - - - - - - - - - - - - - - - - - - - - - - - - - - - - - - - - - - -

Did you appreciate this newsletter? Please help us keep it going by Joining Our Patreon Supporters

What are your thoughts on this article? Join the discussion on our Facebook Page

PictureCorrect subscribers can also learn more today with our #1 bestseller: The Photography Tutorial eBook

- - - - - - - - - - - - - - - - - - - - - - - - - - - - - - - - - - - - - - - - - - - - - - - - - - - - - - - - - - - - - - - - - - - - - - - - - -

The post Interesting Photo of the Day: Tracking the Milky Way appeared first on PictureCorrect.


from PictureCorrect https://ift.tt/MBcrR0w
via IFTTT

PictureCorrect.com: 5 Lightning Photography Tips

It’s a stormy day outside with crazy rain. What do you do? Simple. Get your camera and head out to take some lightning photos! That’s the life of a photographer. But you wouldn’t want to be stuck outside in such difficult conditions struggling to take photos, would you now? To help you with lightning photography, photographer Pierre T. Lambert shares his five secret tips:

1. Use a Slow Shutter Speed

Lightning strikes pretty fast. The chance of you pressing the shutter button and the lightning striking at the exact time is minimal. So what you can do instead is use slow shutter speed. Leaving the sensor exposed for a bit longer increases your chances of photographing lightning by a lot. Use something like 1 to 4 seconds exposure to photograph lightning without depending on luck too much.

2. Underexpose Your Shot

Lightning is a source of light itself. It appears for a split second but can really brighten up the surroundings. So, when setting up your shot, be sure to underexpose.

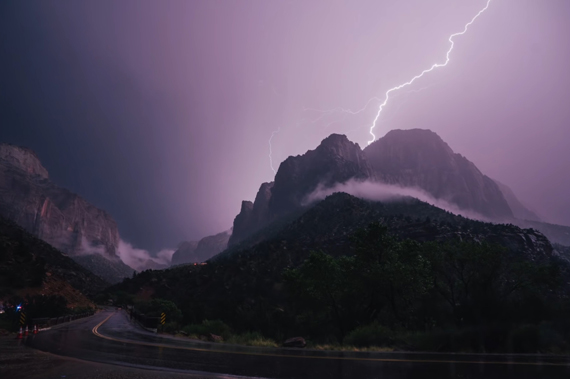
bright lightning strike

3. Use an Intervalometer

Even using longer shutter speeds doesn’t guarantee that the lightning bolts will be captured by the camera. Who knows when the lighting will occur? To remove luck from the equation, Lambert suggests using an intervalometer. Some cameras have the intervalometer function built in. If yours doesn’t, you’ll need to purchase one separately.

“It’s simply a function that allows you to tell your camera to shoot a picture every X seconds.”

The camera will continue taking pictures automatically without you having to press the shutter button every time.

4. Stay Away From the Tripod

When capturing lightning photographs in an open place using a tripod, it’s a good idea to stay far away from the setup. Have your camera well protected using a rain cover, and stay back while keeping an eye on the setup. Get in your car maybe. A tripod can act as a lightning rod. And being struck by lightning definitely isn’t fun.

5. Enjoy the Show

Nature puts up a magnificent show when it comes to lightning. Set your camera up, have something warm and refreshing drink, and enjoy the show. The camera will capture everything for you while you take the time to see what nature has to show.

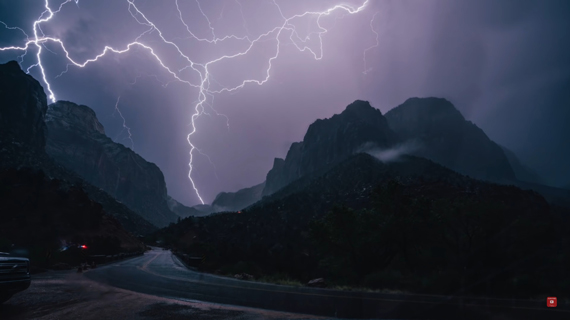
dramatic lightning

Next time there’s a thunderstorm, get out there and shoot some lightning photographs. Just be sure to take care of yourself and your gear while you’re out!

- - - - - - - - - - - - - - - - - - - - - - - - - - - - - - - - - - - - - - - - - - - - - - - - - - - - - - - - - - - - - - - - - - - - - - - - - -

Did you appreciate this newsletter? Please help us keep it going by Joining Our Patreon Supporters

What are your thoughts on this article? Join the discussion on our Facebook Page

PictureCorrect subscribers can also learn more today with our #1 bestseller: The Photography Tutorial eBook

- - - - - - - - - - - - - - - - - - - - - - - - - - - - - - - - - - - - - - - - - - - - - - - - - - - - - - - - - - - - - - - - - - - - - - - - - -

The post 5 Lightning Photography Tips appeared first on PictureCorrect.


from PictureCorrect https://ift.tt/iAVj5PB
via IFTTT

lauantai 29. huhtikuuta 2023

PictureCorrect.com: Interesting Photo of the Day: Radiant Flowers in Darkness

A dramatic Icelandic sky never fails to mesmerize. And then when someone adds a foreground subject as beautiful as this, it becomes even more breathtaking:

flowers against a dark gray background

“Flowers shining light in the darkness, Iceland” by cryptodesign (Via Reddit. Click image to see full size.)

Albert Dros shot this photo in Iceland. The bright white and yellow daisies form a stunning contrast to the darkness of the gray clouds and the overall dark palette of the scene

The photo inspires many a metaphor. Hope, surviving against odds, the silver lining, courage.

- - - - - - - - - - - - - - - - - - - - - - - - - - - - - - - - - - - - - - - - - - - - - - - - - - - - - - - - - - - - - - - - - - - - - - - - - -

Did you appreciate this newsletter? Please help us keep it going by Joining Our Patreon Supporters

What are your thoughts on this article? Join the discussion on our Facebook Page

PictureCorrect subscribers can also learn more today with our #1 bestseller: The Photography Tutorial eBook

- - - - - - - - - - - - - - - - - - - - - - - - - - - - - - - - - - - - - - - - - - - - - - - - - - - - - - - - - - - - - - - - - - - - - - - - - -

The post Interesting Photo of the Day: Radiant Flowers in Darkness appeared first on PictureCorrect.


from PictureCorrect https://ift.tt/oTMqs8G
via IFTTT

PictureCorrect.com: Controlling Light and Depth of Field in Macro Photography

When it comes to studio photography, a common topic of discussion is how the size of a light source determines how hard or soft the light is. And another point of interest is how depth of field is affected by the camera to subject distance. Photographer Daniel Norton from Adorama ponders on these two topics while explaining macro photography:

Size of Light Source in Macro Photography

The size of the light source determines whether the light is soft or hard. However, it’s all relative. This means that you need to consider the size of the light source relative to the size of the subject.

For instance, if you were to use a 1-foot softbox to photograph a person, it would produce hard light. This is because the person is much larger than the light source. But for macro photography, since your subjects are pretty small, the light source will be relatively gigantic. When it comes to macro photography, you can produce soft light by using a smaller light source and placing it close to the subject.

soft light in macro photography

Controlling Depth of Field

A common problem faced when shooting macro photos is with depth of field. Macro lenses have the ability to focus on subjects that are pretty close. However, when they do so, the depth of field is razor-thin. To increase the depth of field, you could narrow the aperture down, but you’ll need more light. You’ll also need to compromise on the image quality, as the lens performs best at apertures around f/8.

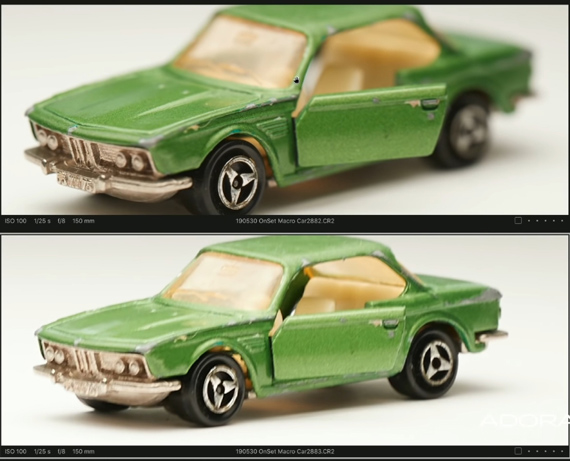
This is where the relation between depth of field and camera-to-subject distance comes into play. A greater camera to subject distance translates to a greater depth of field, and a lesser camera to subject distance translates to a shallower depth of field. Therefore, if you need a greater depth of field without having to change the aperture, move the camera farther away from the subject. This will result in an image with more of the subject in focus.

greater depth of field with distance

The top image shot from up close has a shallower depth of field than the bottom image which was shot from a greater distance.

However, keep in mind that since you’re moving away, you will need to crop in a bit to get a decent sized image. Having a camera with a greater megapixel count will come in handy when you need to crop.

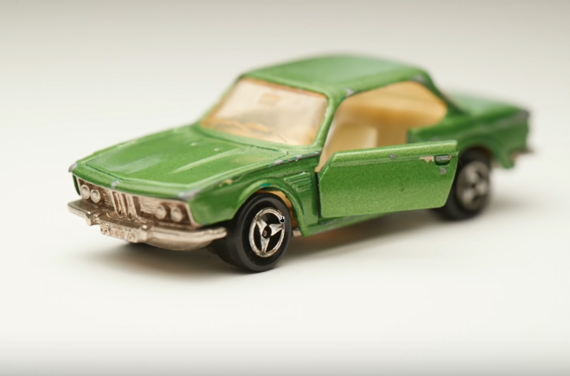
flat macro image with overhead lighting

Playing Around with Lighting

As you might have noticed, the image with overhead lighting has come out pretty flat. You can play around with lighting to add a bit of interest to the image.

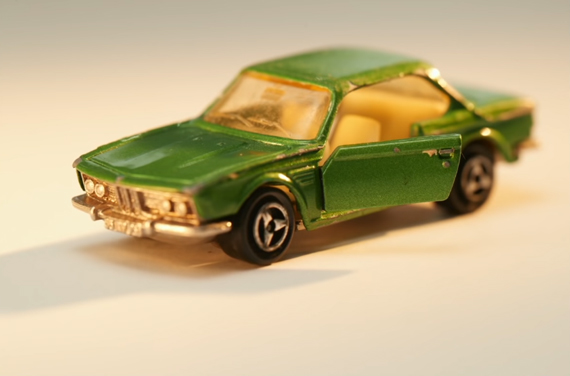
In this case, Norton first decreases the intensity of the 1-foot softbox by raising it. He then adds in one more light to illuminate the toy car with a warm tone from behind. The idea is to use this second light as the key light, while the 1-foot softbox will now act as a fill light.

By doing so, you can see that there are shadows created by the two light sources which add further depth to the image. And finally, to illuminate the hood of the car, Norton uses a small silver reflector.

two light sources in macro photography

If you want to add a creative punch to your macro photos, give these tips a try.

- - - - - - - - - - - - - - - - - - - - - - - - - - - - - - - - - - - - - - - - - - - - - - - - - - - - - - - - - - - - - - - - - - - - - - - - - -

Did you appreciate this newsletter? Please help us keep it going by Joining Our Patreon Supporters

What are your thoughts on this article? Join the discussion on our Facebook Page

PictureCorrect subscribers can also learn more today with our #1 bestseller: The Photography Tutorial eBook

- - - - - - - - - - - - - - - - - - - - - - - - - - - - - - - - - - - - - - - - - - - - - - - - - - - - - - - - - - - - - - - - - - - - - - - - - -

The post Controlling Light and Depth of Field in Macro Photography appeared first on PictureCorrect.


from PictureCorrect https://ift.tt/ug7JMBh
via IFTTT

PictureCorrect.com: How to Create a Preset of Your Photo Editing Style in Lightroom

Final reminder: only hours left for the Lightroom Made Easy Course at 40% Off

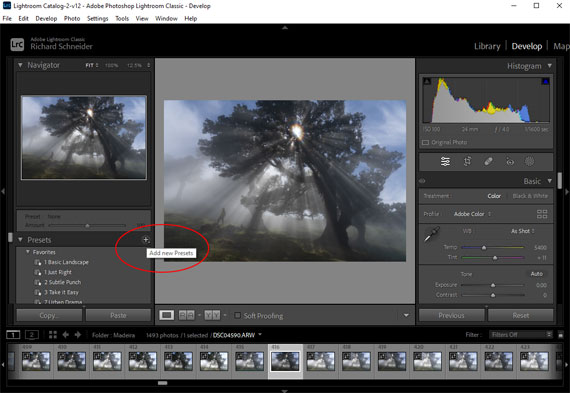
Creating a preset of your photo editing style in Adobe Lightroom allows you to apply your preferred adjustments to multiple images quickly and consistently. Here’s a step-by-step guide on how to create a preset in Lightroom Classic and Lightroom CC (the cloud-based version):

create lightroom preset

Lightroom Classic:

  1. Import and select the photo you want to work with.
  2. In the Develop module, apply your desired adjustments and edits to the photo.
  3. On the left-hand panel, find the Presets section.
  4. Click the “+” icon located in the upper-right corner of the Presets panel, and select “Create Preset.”
  5. In the “New Develop Preset” dialog, give your preset a name and choose a folder to save it in (either an existing one or create a new one).
  6. Select the settings you want to include in the preset by checking the boxes next to each adjustment. This way, only the adjustments you want to apply to other photos will be saved in the preset.
  7. Click “Create” to save the preset.

Lightroom CC:

  1. Import and select the photo you want to work with.
  2. Apply your desired adjustments and edits to the photo using the editing panels on the right side.
  3. Click on the “Presets” button located at the bottom of the editing panels.
  4. In the Presets panel, click the three-dot icon in the upper-right corner, and select “Create Preset.”
  5. In the “Create Preset” dialog, give your preset a name.
  6. Choose a group to save your preset in (either an existing one or create a new one by selecting “New Group”).
  7. Select the settings you want to include in the preset by checking the boxes next to each adjustment. This way, only the adjustments you want to apply to other photos will be saved in the preset.
  8. Click “Save” to save the preset.

Now your preset will be available in the Presets panel, and you can apply it to other photos by simply clicking on it. Keep in mind that you might need to make minor adjustments to individual photos, as the same settings might not work perfectly for every image.

For Further Training:

With every new version Lightroom gets better and better, but every time they change things up it means photographers have to dedicate some time to continuing education on how to use those new features. Pro photographer Phil Steele recently updated his popular training course on how to master all aspects of the program, including new features in the latest version of Lightroom. It is currently 40% off until the end of the month, April 30.

lightroom made easy

Lightroom Training Course

There are photo editing demonstrations on a wide variety of photo types in the course lessons, ranging from portraits, to landscapes, architecture, events, fashion, sports, and more. You’ll also see black-and-white conversions, sepia tones, and other special effects.

Only hours left: Lightroom Made Easy at 40% Off

- - - - - - - - - - - - - - - - - - - - - - - - - - - - - - - - - - - - - - - - - - - - - - - - - - - - - - - - - - - - - - - - - - - - - - - - - -

Did you appreciate this newsletter? Please help us keep it going by Joining Our Patreon Supporters

What are your thoughts on this article? Join the discussion on our Facebook Page

PictureCorrect subscribers can also learn more today with our #1 bestseller: The Photography Tutorial eBook

- - - - - - - - - - - - - - - - - - - - - - - - - - - - - - - - - - - - - - - - - - - - - - - - - - - - - - - - - - - - - - - - - - - - - - - - - -

The post How to Create a Preset of Your Photo Editing Style in Lightroom appeared first on PictureCorrect.


from PictureCorrect https://ift.tt/ghRmEFi
via IFTTT

perjantai 28. huhtikuuta 2023

PictureCorrect.com: How to Use Layers for Portrait Effects in Luminar Neo

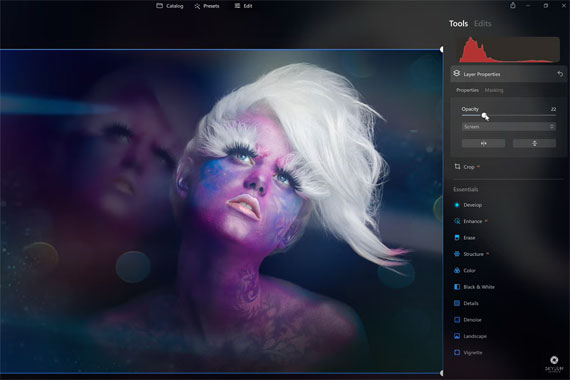
In a recent video, photographer Robert Vanelli demonstrated how to unleash your creativity with layers in Luminar. In the video, Vanelli worked with a portrait photograph and showed viewers how to create a unique and visually appealing image. Here are the key takeaways from the video:

Break the rules: Vanelli explained that, in this particular image, he broke the rules of traditional portrait photography by having the subject pose in an off-balance manner. This decision was made to give the image a unique and different look.

Use layers to create effects: Vanelli added multiple layers to the image to achieve various effects. He started with a base layer and then added subsequent layers for the eyes, skin, and hair. He also added layers to create a blurred background effect and to introduce bokeh and light leaks.

Work with masks: To control where the effects were applied, Vanelli used masks. This allowed him to selectively apply adjustments to specific areas of the image, such as the subject’s eyes or hair.

Export and re-import for more control: To further refine the image, Vanelli exported it and then re-imported it as a new layer. This allowed him to apply additional adjustments and effects, such as a vignette, without affecting the underlying layers.

portrait effects

Use built-in Luminar tools: Throughout the process, Vanelli made use of Luminar’s built-in tools, such as the crop tool, development tool, and various overlays. By using these tools, he was able to achieve his desired creative vision for the image.

By combining various adjustments and effects, and using masks and built-in tools, photographers can create visually stunning images that stand out from the crowd.

See how it works: Luminar Neo Photo Editor

- - - - - - - - - - - - - - - - - - - - - - - - - - - - - - - - - - - - - - - - - - - - - - - - - - - - - - - - - - - - - - - - - - - - - - - - - -

Did you appreciate this newsletter? Please help us keep it going by Joining Our Patreon Supporters

What are your thoughts on this article? Join the discussion on our Facebook Page

PictureCorrect subscribers can also learn more today with our #1 bestseller: The Photography Tutorial eBook

- - - - - - - - - - - - - - - - - - - - - - - - - - - - - - - - - - - - - - - - - - - - - - - - - - - - - - - - - - - - - - - - - - - - - - - - - -

The post How to Use Layers for Portrait Effects in Luminar Neo appeared first on PictureCorrect.


from PictureCorrect https://ift.tt/AvuVwJo
via IFTTT

PictureCorrect.com: Interesting Photo of the Day: Arctic Aurora Borealis

Whenever we come across an image of the aurora borealis, the magical light is obviously the focal point. Rarely do we come across an image where the foreground is equally engaging. But the following image by photographer Andrei Baskevich seems to be the exception. Have a look for yourself:

aurora borealis in the Arctic region

“Northern Lights from the Arctic” by Andrei Baskevich (Via Reddit. Click image to see full size.)

The image is a 10-second exposure that Baskevich shot with a Sigma 20mm f/1.4 lens on a Nikon D750 body at ISO 1000 and f/7.1. He shot it in the city of Murmansk, Russia, which lies north of the Arctic Circle.

“Night, frost, gusts of wind, waist-high snow… and real magic happens in the sky. This aurora was more dynamic than ever.”

The clear dark sky contrasts beautifully with the white snowy landscape, and the glow of the northern lights only adds to the beauty. While the overall look of the image is ethereal, things get more interesting as we dig deeper and observe the intricacies.

The Arctic conditions combined with the direction of the moonlight give an unreal look to the snow. If you look closely, it almost appears like it’s rendered: you might guess it’s foam or silver.

Then, the curves of the aurora are balanced by the curves in the foreground. It’s as if they represent the ying and yang of the sky and Earth. Absolutely magnificent!

Would you dare go out in the Arctic at night to enjoy moments like these? Let us know in the comments.

- - - - - - - - - - - - - - - - - - - - - - - - - - - - - - - - - - - - - - - - - - - - - - - - - - - - - - - - - - - - - - - - - - - - - - - - - -

Did you appreciate this newsletter? Please help us keep it going by Joining Our Patreon Supporters

What are your thoughts on this article? Join the discussion on our Facebook Page

PictureCorrect subscribers can also learn more today with our #1 bestseller: The Photography Tutorial eBook

- - - - - - - - - - - - - - - - - - - - - - - - - - - - - - - - - - - - - - - - - - - - - - - - - - - - - - - - - - - - - - - - - - - - - - - - - -

The post Interesting Photo of the Day: Arctic Aurora Borealis appeared first on PictureCorrect.


from PictureCorrect https://ift.tt/9JGPIe1
via IFTTT

torstai 27. huhtikuuta 2023

PictureCorrect.com: Mastering Lightroom Organization: Tips for a Tidy Catalog

Organizing photos in Adobe Lightroom is essential for efficient workflow and easy navigation. Here are some of the best strategies to help you keep your photos well-organized:

lightroom organization

Photo captured by Joseph Pearson

Import settings:

  • Apply metadata and keywords during the import process, making it easier to sort and find your photos later.
  • Use a consistent and logical file naming convention for your images, such as date, event, or location.

Folder structure:

  • Organize your photos in a hierarchical folder structure based on the year, month, and event or project. This will help you easily locate specific photos in the future.
  • Keep the folder structure consistent across all your photo collections.

Collections and Collection Sets:

  • Use Collections to group related images or for a specific purpose, like a portfolio or blog post.
  • Use Collection Sets to organize Collections further into a hierarchy, such as grouping Collections based on a specific theme, location, or project.

Keywords and metadata:

  • Assign relevant keywords to your photos, making it easier to search and filter them later.
  • Add or update metadata like captions, titles, copyright, and other useful information to your images for better organization and future reference.

Star ratings and color labels:

  • Use star ratings (1-5) to rate your photos based on their quality or importance.
  • Apply color labels to your images to categorize them further, such as “for editing,” “to print,” or “to share.”

Flagging and rejecting photos:

  • Use flags to mark your best photos as “Picks” or reject the ones you don’t want to keep.
  • Regularly review and delete rejected photos to keep your catalog clean and organized.

Smart Collections:

  • Create Smart Collections to automatically group photos based on specific criteria, such as keywords, ratings, or capture date.

Regular maintenance:

  • Periodically review your catalog to ensure that your folder structure, collections, and keywords are up-to-date.
  • Remove duplicates and backup your catalog regularly to avoid data loss.

By implementing these strategies, you can create a well-organized and efficient Lightroom catalog that will make your photo editing and management process much smoother.

For Further Training:

With every new version Lightroom gets better and better, but every time they change things up it means photographers have to dedicate some time to continuing education on how to use those new features. Pro photographer Phil Steele recently updated his popular training course on how to master all aspects of the program, including new features in the latest version of Lightroom. It is currently 40% off today if you want to check it out.

lightroom made easy

Lightroom Training Course

There are photo editing demonstrations on a wide variety of photo types in the course lessons, ranging from portraits, to landscapes, architecture, events, fashion, sports, and more. You’ll also see black-and-white conversions, sepia tones, and other special effects.

Deal ending soon: Lightroom Made Easy at 40% Off

- - - - - - - - - - - - - - - - - - - - - - - - - - - - - - - - - - - - - - - - - - - - - - - - - - - - - - - - - - - - - - - - - - - - - - - - - -

Did you appreciate this newsletter? Please help us keep it going by Joining Our Patreon Supporters

What are your thoughts on this article? Join the discussion on our Facebook Page

PictureCorrect subscribers can also learn more today with our #1 bestseller: The Photography Tutorial eBook

- - - - - - - - - - - - - - - - - - - - - - - - - - - - - - - - - - - - - - - - - - - - - - - - - - - - - - - - - - - - - - - - - - - - - - - - - -

The post Mastering Lightroom Organization: Tips for a Tidy Catalog appeared first on PictureCorrect.


from PictureCorrect https://ift.tt/W1Y9pmb
via IFTTT

PictureCorrect.com: Depth-Based Adjustment Technique in Photoshop

Photographer Steve Arnold unveils a hidden feature in Photoshop that allows you to make selective adjustments based on the depth of elements within your landscape. In this blog post, we will discuss the most important takeaways from his tutorial video and how you can apply this technique to your own work:

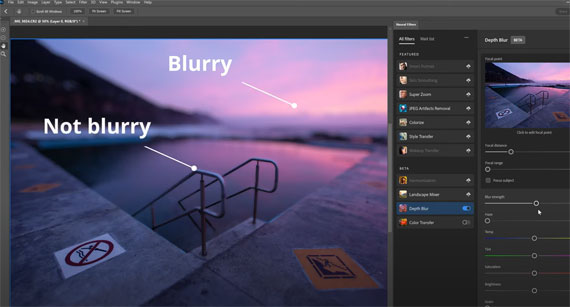
Step 1: Create a Depth Map using Photoshop’s Neural Filters

To create a depth map, go to Photoshop’s Neural Filters menu option and choose the Depth Blur filter. This filter analyzes your image to determine the distance of objects from the camera. Make sure to select the ‘Output Depth Map Only’ option and output the result to a new layer.

Step 2: Enhance the Depth Map (Optional)

You may want to increase the contrast of the depth map to create more separation between elements. Press Control or Command+L to open a Levels adjustment and increase the contrast as needed.

Step 3: Add a Curves Adjustment Layer

Add a curves adjustment layer to your image. This will be the layer on which you apply the depth-based adjustments.

Step 4: Copy the Depth Map into the Layer Mask

Select and copy the depth map layer (Control or Command+A, then Control or Command+C), and then Alt or Option-click the layer mask of your curves adjustment layer. Paste the depth map directly into the layer mask (Control or Command+V).

depth adjustment

Step 5: Hide the Depth Map Layer

Hide the depth map layer to reveal your image again. You can delete it if you don’t need it later.

Step 6: Make Adjustments using the Curves Layer

Now, as you make adjustments using the curves layer, you will notice that the effect is stronger in the background, medium in the middle ground, and weaker in the foreground.

Reusing the Depth Map:

You can reuse the depth map for other adjustment layers by holding Command or Control and clicking the layer mask to load it as a selection. When you add another adjustment layer, the depth map will be loaded into its mask automatically.

Fixing Halo Issues:

If you notice halos around some edges in your image, watch Steve Arnold’s next video to learn how to fix them and avoid other halo issues during your editing process.

By using Photoshop’s hidden depth map feature, you can make adjustments to your images based on the depth of elements within the scene. This powerful technique can enhance your landscape photography, allowing for more nuanced and realistic edits. Experiment with this approach and discover new possibilities for your creative projects.

For further training: Steve Arnold’s Photoshop 101 Course

- - - - - - - - - - - - - - - - - - - - - - - - - - - - - - - - - - - - - - - - - - - - - - - - - - - - - - - - - - - - - - - - - - - - - - - - - -

Did you appreciate this newsletter? Please help us keep it going by Joining Our Patreon Supporters

What are your thoughts on this article? Join the discussion on our Facebook Page

PictureCorrect subscribers can also learn more today with our #1 bestseller: The Photography Tutorial eBook

- - - - - - - - - - - - - - - - - - - - - - - - - - - - - - - - - - - - - - - - - - - - - - - - - - - - - - - - - - - - - - - - - - - - - - - - - -

The post Depth-Based Adjustment Technique in Photoshop appeared first on PictureCorrect.


from PictureCorrect https://ift.tt/YhRiWjT
via IFTTT

keskiviikko 26. huhtikuuta 2023

PictureCorrect.com: Black and White Photography: A Two-Skill Process

This article is based on concepts from the Better B&W Photography Guide if you want to dig deeper for further training.

There are two essential skills you must develop to become great at black and white photography.

The first is learning to see—to identify—a great black and white subject. Some subjects demand to be rendered in color, and others scream for a black and white treatment.

The second skill is taking the necessary and precise steps to convert a color image file into black and white. Yes, some cameras allow you to originate your picture in black and white. However, that’s not recommended. You have given up control over how the colored hues will be rendered into shades of gray.

In this article, we will discuss the following skill points:

  • Choosing a proper black and white subject matter
  • How to identify tone value in a scene
  • Composing in black and white using light, shadow, shape, contrast and texture
  • How colors convert to black and white in photography
  • How to properly expose for black and white photography
black and white photo tutorial

Photo by Shahin Khalaji

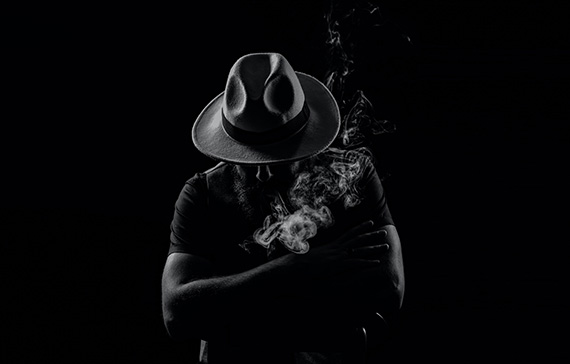
Black and white photography relies on tone (light to dark shades of gray), as there are no color contrasts to compose in your picture.

Remember this: When searching or deciding on a subject for black and white photography, look for the following:

  • Intense light and dark values within the scene
  • Dominant shapes and lines
  • Light to dark contrast
  • Noticeable and revealing texture

The example photograph above hits every one of those bullet points. Now, let’s examine each concept separately.

black and white photo tutorial

Photo by Aline Berry

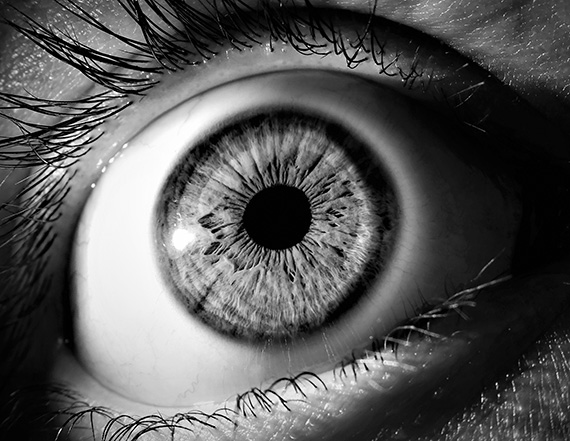
A photograph such as the one above gains its visual power through tone and shape. The elimination of color forces viewers to explore the outward repeating and radiating patterns of dark and light tones. It also emphasizes the darkness of the pupil.

Imagine if the cornea of this eyeball were blue. It would steal the show, and the rest of the compositional elements would be significantly reduced in their impact. A viewer would home in on that bright blue color versus the whole of the eye.
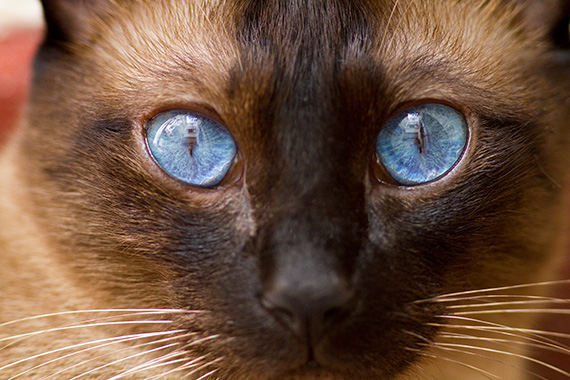
blue cat eyes

Photo by Kent DuFault

What do you see when you look at the photograph above? You can’t see anything but the blue eye color. Right? The cat’s face practically disappears.

The close up of the human eye was a perfect subject for black and white photography because there are strong light and dark values within the frame. There are dominant shapes. Plus, there are light and dark contrasting lines.

Critical Thought: If the eye cornea was bright blue (such as in the cat photo), and the picture was rendered in color, would that be a bad photo? No—it would merely change the dynamic of the final image. The picture of the cat’s eye picture isn’t bad. I think it’s rather good. It’s a matter of what message you the photographer want to communicate to your viewers. What if the eye color was a dark brown? Would that change its value as a black and white photograph? Good question. I’ll address that momentarily when we discuss color conversion.

black and white photo tutorial

Photo by Carlos Quintero

Try This: When determining if a subject might be best produced in black and white or color, ask yourself, “What is the element I find interesting here—a shape, line, contrast, shadow or texture?” If the answer is yes to any of these, the subject is likely a good candidate for a black and white photo. Now ask, “Is color important to the message?” If the answer is no, then you have an excellent candidate for black and white photography.

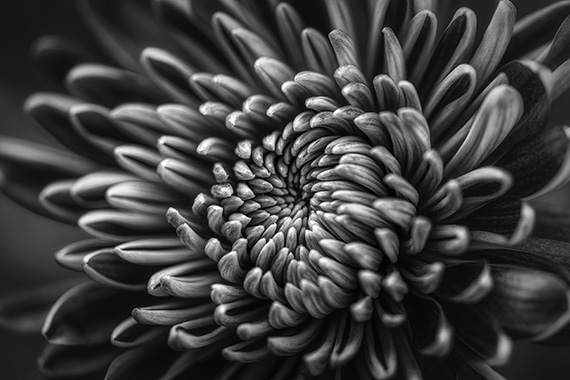
Let’s consider the flower photograph above. It would have been beautiful as a color photograph as well. But what interested the photographer was the shape and the repetition of form.

By choosing the black and white presentation, the photographer communicated what they found most interesting about this flower. They’ve isolated the essential component!

Critical Thought: When shooting black and white film, the photographer is forced to make all these considerations while taking the picture. As a digital photographer, we have leeway to make these considerations after the fact.

Pro Tip: If you have trouble seeing in tone versus color, buy yourself a pair of sunglasses with the absolute darkest lenses you can find. As you try to determine the levels of tone in a scene, put the sunglasses on. They will help eliminate color and you will see the scene in shades of tone.

black and white photo tutorial

Photo by Shahin Khalaji

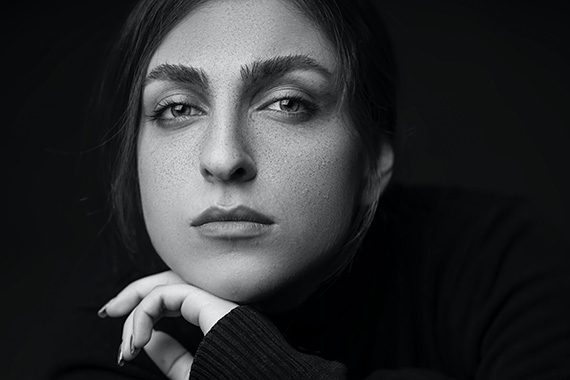
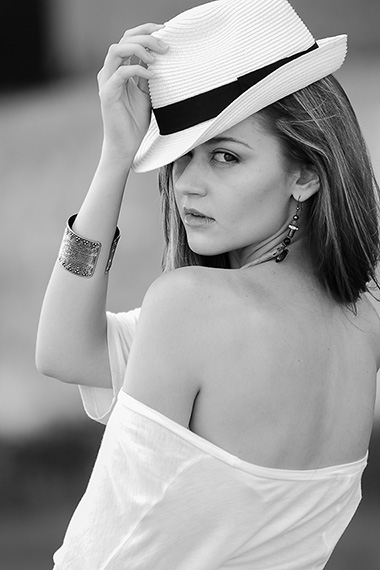
The image above is an exquisite use of texture in black and white photography. The texture would be completely overwhelmed in a color photograph. It would still be there—however, the color of the model’s eyes, skin and nails would overtake the texture as leading points of interest.

When you look at this photo, what do you notice first, and then where do your eyes return to linger? It’s the texture of her skin!

I think the texture is the magic element in this portrait. It humanizes this woman.

Now that you’ve learned what elements to look for in a black and white photography subject, and how you can better communicate a specific type of message with black and white photography, let’s talk about the second skill—the conversion process of turning color to black and white.

color tones

Graphic by Kent DuFault

When color is converted to black and white, the conversion process considers the tone and not necessarily the hue. This means greens, blues and reds of the same approximated tone can convert to the same approximate shade of gray in black and white.

A bit of nostalgia

Black and white film photographers use colored glass filters on the front of the lens to control how the film would behave toward the various colors of the spectrum.

  • Red filters block blue and green, darkening blue skies and lightening red objects such as flowers
  • Green filters block red, lightening green objects such as foliage while darkening red flowers
  • Blue filters block red, yellow and orange; blue subjects, such as the sky, will lighten, while red objects will turn almost black
  • Yellow filters block blue, darkening blue skies for better contrast to clouds, and lightens red, orange, green and yellow subjects. This filter is often used to lighten skin tones in black and white portraits
  • Orange filters work similarly to yellow—blues become darker and all warmer tones appear brighter than green

Consider this: It’s essential to understand how colored filters work on black and white film. You will use that same knowledge to convert your digital color files to black and white!

black and white photo tutorial

Photo by Shahin Khalaji

Let’s take this full-color image and convert it to black and white while applying the different filters to see how the image is affected.

black and white photo tutorial

Black and white conversion

This first example is a black and white photograph—with no filtration or adjustment by me—as determined by the Photoshop algorithm.

Below, we have the same picture with four different filters applied during the conversion. It’s pretty clear how a color filter can change your black and white image.
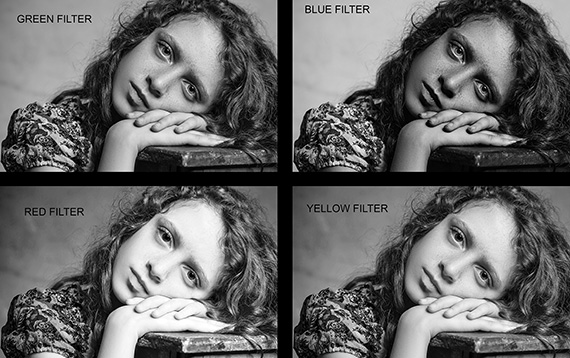
black and white photo tutorial

Filters

Let’s look at another example with a different type of subject matter:

black and white photo tutorial

Photo by Jason Blackeye

The above image is our full-spectrum color landscape image. Below, we have a black and white photograph, with no filtration or adjustment by me, as determined by the Photoshop algorithm.
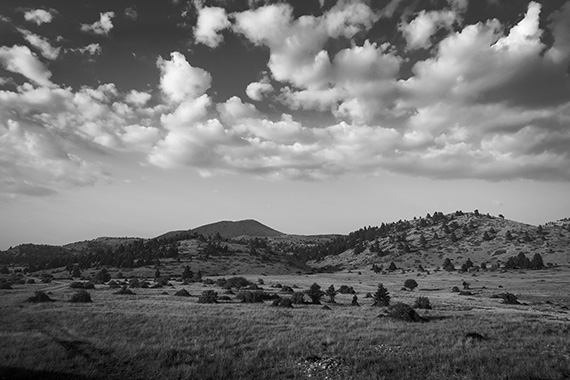
black and white photo tutorial

Black and white conversion in Photoshop

Knowing how color filtration will affect your black and white conversion is critical to producing pro-level work in black and white photography.
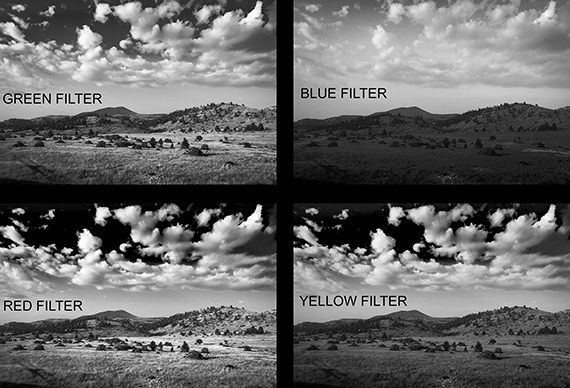
black and white photo tutorial

Filters

This is why I am not a fan of presets or actions for black and white conversions. There is too much at stake to leave the decisions up to a computer.

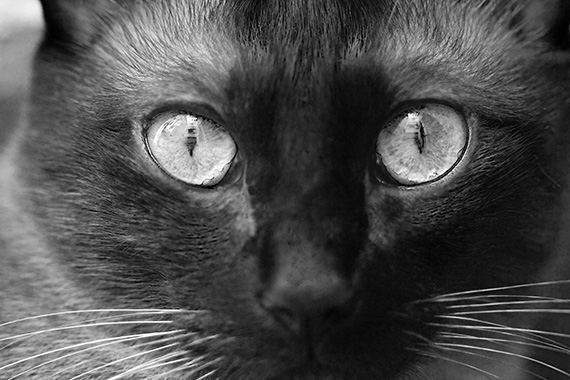
Now, let’s return to the photograph of the Siamese cat for an exciting comparison experiment.
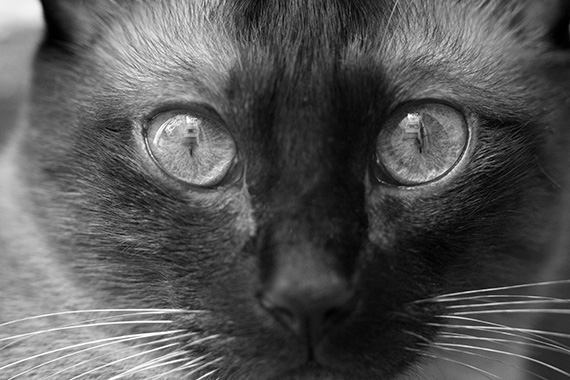
black and white photo tutorial

Black and white

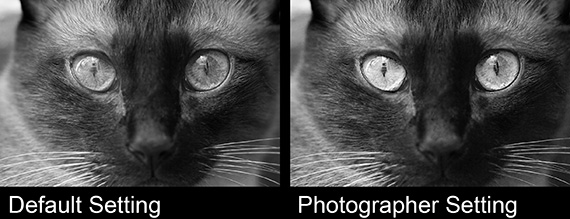
Let’s say I wanted to convert this color picture to black and white, but I still wanted to emphasize the eyes. This first example, above, is a default conversion. As you can see, the software went for a broad range of tones with little emphasis placed anywhere:
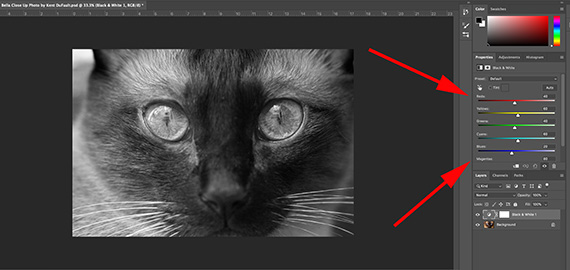
black and white photo tutorial

Adjusting sliders

This screenshot is what the default conversion looks like in Photoshop using the black and white adjustment layer feature.

Notice the various sliders with different colors. These have the same effect as the colored-glass filters we discussed earlier.

The algorithm of the software has decided what would be the best settings for those six sliders.

What the software doesn’t realize is that I would like to emphasize the eyes of the cat. So, I need to put my creative input into this conversion.
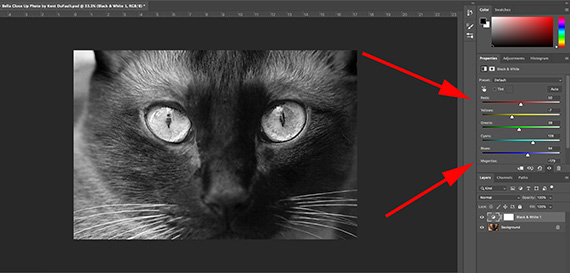
black and white photo tutorial

Emphasizing eyes

Having my intent for the photograph established, I moved the filter sliders until the eyes became emphasized through the tone conversion.
black and white photo tutorial

Conversion with eyes emphasized

Above is my photographer-approved conversion of the color image file.

Let’s look at the two side-by-side.
black and white photo tutorial

Default vs custom

You can see a vast difference. My understanding of color to black and white conversion has improved this photograph and cemented my intent into the minds of my viewers.

Proper exposure in black and white

black and white photo tutorial

Original photo by Andreea Chidu

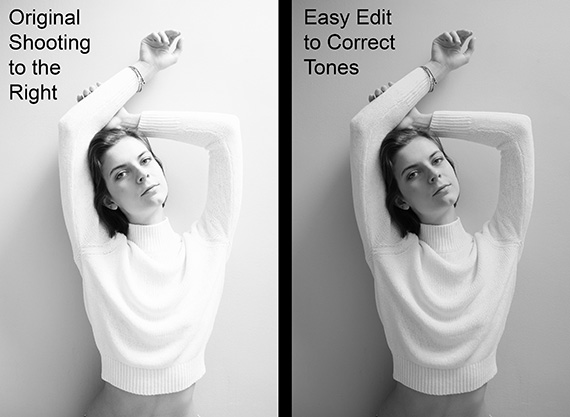
Have you heard of the phrase, “Shoot to the right”?

Shooting to the right tells us that an overexposure error is better than an underexposed one.

Shooting in RAW makes this statement even more accurate.

The phrase also references the camera’s histogram, where—on the right side of the scale—all the highlights and whites are located.

And in black and white photography, it’s essential to bear this advice in mind as the finished photograph has only tone to rely on.

Lost shadow detail is lost. End of story. This should only be the case if the effect that you’re striving for: deep, dense blacks with no detail.

Practice shooting to the right in your exposures.

The example photos of the model clearly illustrate how effectively the highlights can be adjusted in post-processing with a RAW file.

Let’s recap!

The best subjects for black and white photography have bright whites, deep blacks and a full range of tones in between. An inexpensive  black and white viewing filter, such as sunglasses, will teach you to see in “tone” versus color.

black and white photo tutorial

Photo by Nathan Dumlao

Great subjects for black and white photography will often display strong shapes and textures.

Vastly different colors can convert to very “similar” tones. When converting to black and white, try and separate the tonal values of different color channels.

If the color values present in a scene aren’t particularly interesting, look to black and white as an alternative—only if the scene offers distinct tonal values, textures and/or intense shadows.

Pop Quiz

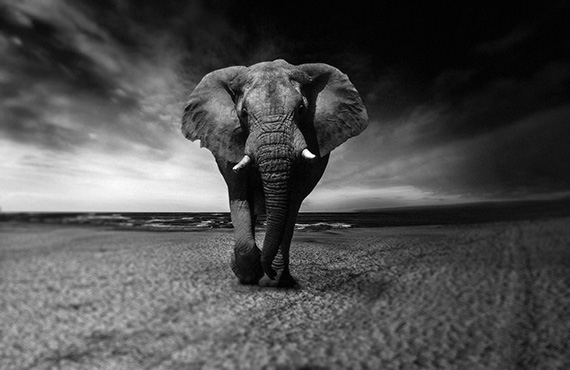
What filter darkened that sky in the elephant photo?

Now it’s your turn!

Take an afternoon and go for a photo safari. Your assignment is to hunt down subjects that meet the criteria discussed. For each shot, establish your intent for the photo. Write it down, so you don’t forget.

Photograph your chosen subjects while remembering to shoot to the right.

Now convert your color files to black and white using what you learned about color filtration, while emphasizing your original intent.

Have fun!

About the Author:
Kent DuFault is an author and photographer with over 35 years of experience. He’s currently the director of content at the online photography school, Photzy.com.

For Further Training:

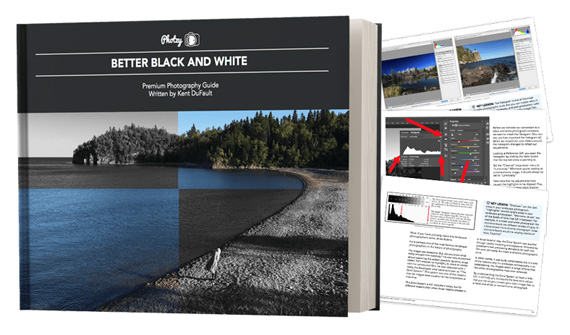
Have you ever quickly converted your shots to black & white, hoping to make them “Better”? And the result was bland to say the least? This is a very common occurrence. Knowing how to convert color to B&W with a working understanding of tone and contrast in post-processing is a very different story. This in-depth eBook is designed to cover EVERYTHING you need to know about producing your own powerful and professional B&W images.
black and white photo guide

Better Black & White Photography Guide (See What’s Inside)

Every step is detailed in all three programs: Photoshop, Lightroom, & Elements. But even if you don’t have these applications, there’s enough information in here to help you achieve the same results with the software you already have. It is currently 76% off if you want to check it out.

Deal ending soon: The Better Black & White Photography Guide at 76% Off

- - - - - - - - - - - - - - - - - - - - - - - - - - - - - - - - - - - - - - - - - - - - - - - - - - - - - - - - - - - - - - - - - - - - - - - - - -

Did you appreciate this newsletter? Please help us keep it going by Joining Our Patreon Supporters

What are your thoughts on this article? Join the discussion on our Facebook Page

PictureCorrect subscribers can also learn more today with our #1 bestseller: The Photography Tutorial eBook

- - - - - - - - - - - - - - - - - - - - - - - - - - - - - - - - - - - - - - - - - - - - - - - - - - - - - - - - - - - - - - - - - - - - - - - - - -

The post Black and White Photography: A Two-Skill Process appeared first on PictureCorrect.


from PictureCorrect https://ift.tt/OawTnPk
via IFTTT

PictureCorrect.com: Focal Length Blending Photoshop Tutorial

Many landscape photographers take a long time to realize this, but foregrounds are an integral part of any successful image. Foregrounds set the context and draw viewers’ eyes into the image.

But don’t worry if you don’t have a powerful foreground in your image; you can always create one by using a technique called “focal length blending” or “perspective blending”. Landscape photographer and media designer Christian Möhrle shows you how it’s done:

Möhrle starts off by showing how you can use different global and local adjustments to retouch your image. It is always a good idea to make those adjustments prior to making any compositional changes.

Next, he shows how easily you can take two separate images of the same scene, taken at different focal lengths, and create a composite with a stronger foreground element. The trick is to clone the foreground from the image where the foreground is more prominent and interesting, and then stamp it over the target image.

He also shows you how you can fine-tune the overlay using pixel grids, the layer-transparency tool and layer masks, so the blend is seamless.

“The benefit of this method is you can nicely fill the foreground.”

As a bonus, toward the end of the video, Möhrle demonstrates how he cleans the image up for a more refined look. Furthermore, you can also see how he makes the flowers in the foreground fill the frame using the perspective-warp tool in Photoshop.

This is a great and a simple trick that you can use to take your images to the net level. If you have an image that you love so much but it’s weak on the foreground, give this trick a shot.

- - - - - - - - - - - - - - - - - - - - - - - - - - - - - - - - - - - - - - - - - - - - - - - - - - - - - - - - - - - - - - - - - - - - - - - - - -

Did you appreciate this newsletter? Please help us keep it going by Joining Our Patreon Supporters

What are your thoughts on this article? Join the discussion on our Facebook Page

PictureCorrect subscribers can also learn more today with our #1 bestseller: The Photography Tutorial eBook

- - - - - - - - - - - - - - - - - - - - - - - - - - - - - - - - - - - - - - - - - - - - - - - - - - - - - - - - - - - - - - - - - - - - - - - - - -

The post Focal Length Blending Photoshop Tutorial appeared first on PictureCorrect.


from PictureCorrect https://ift.tt/2voydbH
via IFTTT

tiistai 25. huhtikuuta 2023

PictureCorrect.com: How to Use ISO Effectively

When starting out in photography, almost everyone tells you to shoot at the lowest ISO setting. Well, it’s not a bad idea since you do get cleaner images with a lower ISO. However, if you always try and limit yourself to using the base ISO, then you’ll be missing out on a lot of opportunities. It’s thus quintessential that you understand when it’s best to crank up those ISO values. So, in today’s video, photographer Paul Farris from Photo Genius shares some important tips to help you use ISO effectively:

Increasing your camera’s ISO value tells the camera to amplify the signals collected by the sensor. This makes the images appear brighter, which puts you at an advantage when working in dimly lit situations.

In low light conditions, when you use a very slow shutter speed, your images will come out blurry and unusable if the subject moves. By increasing your ISO in such situations, you get to use faster shutter speeds and thus lower the chance of blurry images. And as Farris highlights in the image, this tip comes in handy not only in low light conditions. Whenever you’re doing sports or wildlife photography, you’ll find it useful to boost the ISO by a few stops to aid you in working with faster shutter speeds and freezing action.

The downside of using your camera at higher ISOs is the introduction of digital noise and the loss of details. That’s why it’s very important that you understand the capabilities of your camera before you really push the limit. Farris shares a pretty easy method you can follow for this. Simply start taking photos from the camera’s base ISO and work your way up. Then review your images and determine the highest ISO at which the image appears workable. You’ll then know the comfortable range in which the camera’s ISO performance is optimal without having to feel uncertain. You can make your life even easier by setting the camera to “Auto ISO” mode. But be sure to set the upper and lower ISO limit based on the camera’s ISO performance.

After watching this video, are you still only going to take photos at the camera’s base ISO? Let us know in the comments.

- - - - - - - - - - - - - - - - - - - - - - - - - - - - - - - - - - - - - - - - - - - - - - - - - - - - - - - - - - - - - - - - - - - - - - - - - -

Did you appreciate this newsletter? Please help us keep it going by Joining Our Patreon Supporters

What are your thoughts on this article? Join the discussion on our Facebook Page

PictureCorrect subscribers can also learn more today with our #1 bestseller: The Photography Tutorial eBook

- - - - - - - - - - - - - - - - - - - - - - - - - - - - - - - - - - - - - - - - - - - - - - - - - - - - - - - - - - - - - - - - - - - - - - - - - -

The post How to Use ISO Effectively appeared first on PictureCorrect.


from PictureCorrect https://ift.tt/oXnO2r4
via IFTTT

PictureCorrect.com: Interesting Photo of the Day: Cannon Beach Patterns

Cannon beach in Oregon never fails to make it to the list of best beaches of the world. Besides the sandy and gorgeous shoreline, Haystack rock is another wow factor of this place. When you see it, you get to feel how majestic it really is. Photographer Nathaniel Merz took the following image of the place during sunset, and it surely gives you a hint of how beautiful the beach really is:

“Sunset From Cannon Beach, Oregon” by Nathaniel Merz (Via Reddit. Click image to see full size.)

Merz took the image with his Canon 5D mark IV and the 24-105mm f/4 lens. The interesting patterns on the sand with the sun-kissed dune grass together make for an interesting foreground. The golden glow from the setting sun has really done its magic making even the grass appear interesting. And how can we miss the Haystack rock crowning the sandy beach and standing tall in the background. The dramatic evening sky with a purple tint set as the backdrop to the ocean and the Haystack rock adds to the overall aesthetic of the image.

Have you had a chance to visit the beautiful Cannon beach?

- - - - - - - - - - - - - - - - - - - - - - - - - - - - - - - - - - - - - - - - - - - - - - - - - - - - - - - - - - - - - - - - - - - - - - - - - -

Did you appreciate this newsletter? Please help us keep it going by Joining Our Patreon Supporters

What are your thoughts on this article? Join the discussion on our Facebook Page

PictureCorrect subscribers can also learn more today with our #1 bestseller: The Photography Tutorial eBook

- - - - - - - - - - - - - - - - - - - - - - - - - - - - - - - - - - - - - - - - - - - - - - - - - - - - - - - - - - - - - - - - - - - - - - - - - -

The post Interesting Photo of the Day: Cannon Beach Patterns appeared first on PictureCorrect.


from PictureCorrect https://ift.tt/mSd2ePB
via IFTTT

maanantai 24. huhtikuuta 2023

PictureCorrect.com: How to Photograph Light Trails

If you’ve ever wanted to create light trails but didn’t know where to start, this article is for you.

how to photograph light trails

photo by Strevo

What You Need for Light Trail Photography

You’re going to practice creating light trails by photographing passing vehicles. You’ll need a tripod for this technique (or some other way to stabilize your camera) as you will be opening up your shutter for a few seconds or more at a time, and you need your camera to stay perfectly still. Otherwise, you’ll get camera shake, and your photos will be blurry. You will also need a camera that lets you control the shutter speed. And, you will need to be doing this technique during or after twilight, on a night that has little or no wind (to avoid camera shake).

Recommended Settings

Here a few settings to get you started–you will need to experiment, as not every situation is the same. The lighting, the time of night, and the speed of traffic will all influence the shutter speed you need to use. To start off, I’d advise that you use the recommended settings and experiment from there.

  • Shutter Priority mode
  • Shutter speed of 6 seconds (or use bulb mode–more on this below)
  • ISO 100, or as low as you can get it
  • Tripod (turn your image stabilizer off if using a tripod)
  • Shutter release cable or the camera’s two-second timer
  • You won’t be using a flash!
  • Optional: warm clothing, a torch to see what you are doing, extra person for security

Find yourself a safe place to stand off the road that lets you get a good image of the traffic. Position yourself so you have something of interest in the background (so you can get a photo of the lights of the car going past your point of interest). This technique will also create a striking image from up high on a bridge, looking down and capturing the light trails of cars below you, or from the vantage point of a curve or corner in the road so you can create lights that bend.

Once your camera is set up at your ideal vantage point, remember you will have to play around with your shutter speed a bit until you’re happy with the results. Start with six seconds and go from there. Use a shutter release cable or the two second timer on your camera so you don’t risk bumping your camera during the photo. Wait until the cars (or even better, buses, due to their distinctive coloring!) are about to go past. Then press the shutter button. If you’re using your 2 second timer you will need to press this 2 seconds earlier to allow for the timer.

The following video demonstrates this general light trail technique:

Troubleshooting

If you still see the vehicles in your photo you need a longer shutter time—unless that’s the picture you’re going for. If you’re shooting a long stretch of road you will need a longer shutter speed to capture a long light trail.

If there are gaps in your trail, try a longer shutter speed. As alluded to earlier, you can use ‘bulb mode’ if your camera has the function to. Bulb mode lets you control how long your shutter is open. You press your shutter down when the subject enters the frame and release it when the subject leaves the frame. This way you don’t have to guess how long to leave the shutter open.

If you’re having problems with overexposure, decrease your aperture size (by going up to a larger f-stop number), and if your images are underexposed, do the opposite and increase your aperture size (by going down to a smaller f-stop number). But most of all, just practice and enjoy!

About the Author:
Giovanna lives in London, England and is originally from Christchurch, New Zealand. She writes for ExploreTravelPhotography. “Examine every possibility… Search and travel for the purpose of discovery… Explore.”

- - - - - - - - - - - - - - - - - - - - - - - - - - - - - - - - - - - - - - - - - - - - - - - - - - - - - - - - - - - - - - - - - - - - - - - - - -

Did you appreciate this newsletter? Please help us keep it going by Joining Our Patreon Supporters

What are your thoughts on this article? Join the discussion on our Facebook Page

PictureCorrect subscribers can also learn more today with our #1 bestseller: The Photography Tutorial eBook

- - - - - - - - - - - - - - - - - - - - - - - - - - - - - - - - - - - - - - - - - - - - - - - - - - - - - - - - - - - - - - - - - - - - - - - - - -

The post How to Photograph Light Trails appeared first on PictureCorrect.


from PictureCorrect https://ift.tt/IgdqK5W
via IFTTT

PictureCorrect.com: Interesting Photo of the Day: Portrait with Light Painting

It’s usually when you think out of the box that you get some mind boggling images. For instance, it’s not everyday that you come across a portrait that was taken with a long exposure. Photographer Adrian Mechocki specializes in the art of light painting and took the following portrait using the technique:

long exposure portrait

“Portrait With Light Painting” by Adrian Mechocki (Via Reddit. Click image to see full size.)

This image is a long exposure of almost a minute that Mechocki took in a completely dark room. The model had to be perfectly still throughout the entire exposure as even the slightest movement would cause the image to be blurry. What’s really interesting is that the image is a sole result of light painting without any sort of post processing.

“I did the light trails by moving the LED lights in the air for a few minutes. The duration depends on what I want to achieve and it differs on every photo.”

The mix of colors along with the intense look on the face of the model gives a really moody look to the image. Also, if you look closely at the light trails, they appear as brush strokes. This further adds to the artistic feel of the image. And not to forget, it’s worth appreciating how still the model appears since there is hardly any noticeable motion blur.

Do you know someone who would be able to stay perfectly still for over a minute?

- - - - - - - - - - - - - - - - - - - - - - - - - - - - - - - - - - - - - - - - - - - - - - - - - - - - - - - - - - - - - - - - - - - - - - - - - -

Did you appreciate this newsletter? Please help us keep it going by Joining Our Patreon Supporters

What are your thoughts on this article? Join the discussion on our Facebook Page

PictureCorrect subscribers can also learn more today with our #1 bestseller: The Photography Tutorial eBook

- - - - - - - - - - - - - - - - - - - - - - - - - - - - - - - - - - - - - - - - - - - - - - - - - - - - - - - - - - - - - - - - - - - - - - - - - -

The post Interesting Photo of the Day: Portrait with Light Painting appeared first on PictureCorrect.


from PictureCorrect https://ift.tt/EJYnrde
via IFTTT

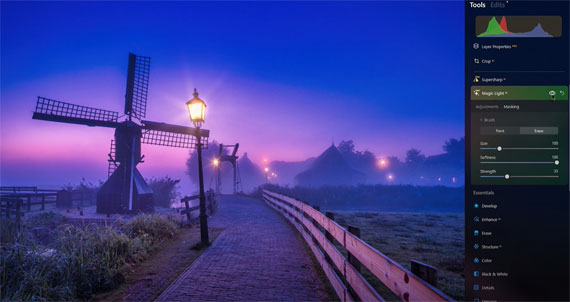
PictureCorrect.com: How to Use the Magic Light Extension in Luminar Neo

In a recent video, renowned photographer Robert Vanelli shared his insights on using the Magic Light Extension, a newly released feature in Luminar Neo, to create visually stunning photographs. In this blog post, we’ll discuss the key takeaways from his tutorial and provide tips on how to use the Magic Light Extension effectively.

Use Magic Light as a supporting element

Vanelli emphasizes that the Magic Light Extension should be used as a supporting element rather than the main focus of the photograph. Overusing the effect can shift the focus away from the main subject, undermining the overall composition.

Adjust the intensity and size of the Magic Light effect

When using the Magic Light Extension, it’s essential to fine-tune the intensity, size, and glow of the effect to achieve the desired outcome. The goal is to create a natural-looking light source that complements the scene without looking overly artificial.

Combine Magic Light with other editing tools

To enhance the overall look of your photographs, combine the Magic Light effect with other editing tools such as portrait tools, tone tools, and vignetting. This will help create a cohesive and visually appealing image.

Be strategic in your editing process

When asked whether to use the Magic Light effect early or late in the editing process, Vanelli suggests experimenting to find the best approach for each image. In some cases, applying the effect first and then adding other adjustments may work best, while in others, a different order might yield better results.

magic light

Apply Magic Light to enhance starburst effects

Magic Light can be used to create beautiful starburst effects, especially when shooting at smaller apertures like f/16 or f/22. By adjusting the intensity and masking areas of the image, you can create a gradual starburst effect that adds depth and interest to your photos.

The Magic Light Extension is a powerful tool that, when used correctly, can add a spark to your photographs, enhancing their visual appeal. Remember to use the effect as a supporting element, adjust its intensity and size, combine it with other editing tools, and experiment with different editing strategies to achieve the best results. With practice and experience, you can master the Magic Light Extension and create stunning, captivating images.

See how it works: Magic Light in Luminar Neo

- - - - - - - - - - - - - - - - - - - - - - - - - - - - - - - - - - - - - - - - - - - - - - - - - - - - - - - - - - - - - - - - - - - - - - - - - -

Did you appreciate this newsletter? Please help us keep it going by Joining Our Patreon Supporters

What are your thoughts on this article? Join the discussion on our Facebook Page

PictureCorrect subscribers can also learn more today with our #1 bestseller: The Photography Tutorial eBook

- - - - - - - - - - - - - - - - - - - - - - - - - - - - - - - - - - - - - - - - - - - - - - - - - - - - - - - - - - - - - - - - - - - - - - - - - -

The post How to Use the Magic Light Extension in Luminar Neo appeared first on PictureCorrect.


from PictureCorrect https://ift.tt/noe3Rl6
via IFTTT

sunnuntai 23. huhtikuuta 2023

PictureCorrect.com: Interesting Photo of the Day: Chilly Winter Morning Sunrise

Landscape photographers never get enough of sunrises and sunsets. And neither do we. It’s like nature has a different color palette, made just for these magic hours. Fine art landscape photographer Arpan Das captured this enchanting image of sunrise over Vermillion Lake that supports this notion:

sunrise over Vermillion lake

“Sunrise Over Vermillion Lake” by Arpan Das (Via Reddit. Click image to see full size.)

Although the appearance of the clouds might suggest that the image is a long exposure, it’s not; Das exposed it for a mere 1/2 second.

The way Das has composed this shot is really thoughtful. The snowy foreground, the reflection of the mountain and the sunset in the middle, and the colorful sky in the background all gel together so well to create this interesting image. And that signature warm tone of the early morning light adds drama.

- - - - - - - - - - - - - - - - - - - - - - - - - - - - - - - - - - - - - - - - - - - - - - - - - - - - - - - - - - - - - - - - - - - - - - - - - -

Did you appreciate this newsletter? Please help us keep it going by Joining Our Patreon Supporters

What are your thoughts on this article? Join the discussion on our Facebook Page

PictureCorrect subscribers can also learn more today with our #1 bestseller: The Photography Tutorial eBook

- - - - - - - - - - - - - - - - - - - - - - - - - - - - - - - - - - - - - - - - - - - - - - - - - - - - - - - - - - - - - - - - - - - - - - - - - -

The post Interesting Photo of the Day: Chilly Winter Morning Sunrise appeared first on PictureCorrect.


from PictureCorrect https://ift.tt/lhmYLgr
via IFTTT

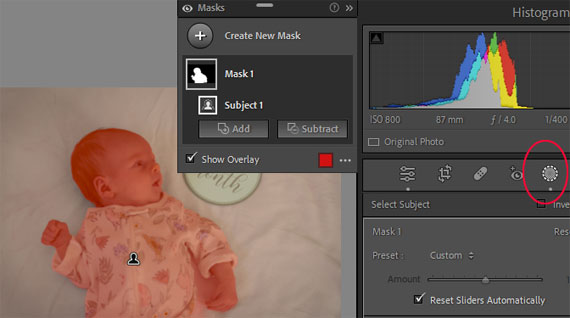
PictureCorrect.com: How to Use the Masking Tool in Lightroom

The Masking tool in Adobe Lightroom is a powerful feature that allows you to selectively apply adjustments to specific areas of your photos. It’s useful for making targeted edits, enhancing specific details, or balancing the exposure and color in certain areas of an image.

masking tool lightroom

You may want to use the Masking tool in various situations, such as:

  • Selective adjustments: When you want to apply adjustments to a specific part of the image without affecting the rest, such as brightening a subject’s face or enhancing the colors of a certain object.
  • Balancing exposure: If you have an image with a wide dynamic range, like a landscape with a bright sky and a dark foreground, you can use the Masking tool to selectively adjust the exposure in each area, bringing out more detail and creating a balanced final image.
  • Color correction: If you want to adjust the colors in a specific area of your photo, such as removing a color cast or enhancing the saturation of a particular object, the Masking tool allows you to make these targeted adjustments without affecting the entire image.
  • Sharpening and noise reduction: You may want to apply sharpening to certain areas of an image, like the subject’s eyes, or apply noise reduction to a noisy background without affecting the entire image.

To use the Masking tool in Lightroom, follow these steps:

  1. Open your image in Lightroom’s Develop module.
  2. Choose the adjustment you want to apply (e.g., exposure, contrast, saturation) from the right-hand panel.
  3. Click on the “Masking” icon (the circle with a dashed outline) located above the panel, which opens a dropdown menu with different masking options.
  4. Select the desired masking option, and then click and drag on your image to create the mask. You can adjust the size, feather, and opacity of the mask using the sliders in the Masking panel.
  5. Once you’ve created the mask, apply your desired adjustments using the sliders in the right-hand panel. The adjustments will only affect the masked area.
  6. You can create multiple masks and adjust each one independently to refine your edits further.

Remember to experiment and practice with the Masking tool to become more proficient in using it for various editing scenarios.

For Further Training:

With every new version Lightroom gets better and better, but every time they change things up it means photographers have to dedicate some time to continuing education on how to use those new features. Pro photographer Phil Steele recently updated his popular training course on how to master all aspects of the program, including new features in the latest version of Lightroom. It is currently 40% off today if you want to check it out.

lightroom made easy

Lightroom Training Course

There are photo editing demonstrations on a wide variety of photo types in the course lessons, ranging from portraits, to landscapes, architecture, events, fashion, sports, and more. You’ll also see black-and-white conversions, sepia tones, and other special effects.

Deal ending soon: Lightroom Made Easy at 40% Off

- - - - - - - - - - - - - - - - - - - - - - - - - - - - - - - - - - - - - - - - - - - - - - - - - - - - - - - - - - - - - - - - - - - - - - - - - -

Did you appreciate this newsletter? Please help us keep it going by Joining Our Patreon Supporters

What are your thoughts on this article? Join the discussion on our Facebook Page

PictureCorrect subscribers can also learn more today with our #1 bestseller: The Photography Tutorial eBook

- - - - - - - - - - - - - - - - - - - - - - - - - - - - - - - - - - - - - - - - - - - - - - - - - - - - - - - - - - - - - - - - - - - - - - - - - -

The post How to Use the Masking Tool in Lightroom appeared first on PictureCorrect.


from PictureCorrect https://ift.tt/RMX2T9k
via IFTTT
PictureCorrect.com: Film Photography Travel Packing Tips

In this recent video, Jonathan Paragas shared his insights on how to travel with film photography gear. He covered topics like protecting your gear, making sure your film gets hand-checked at airports, and more. In this blog post, we will summarize the key takeaways from the video for those who are planning to travel with their film photography equipment:

Tip 1: Use a protective bag or case

Film cameras are often more delicate than their modern counterparts, so it’s essential to use a protective case or bag when traveling with them. Jonathan recommends using a camera-dedicated bag, like the Brevity bag or an Evergreen camera case, which has customizable compartments and is carry-on approved.

Tip 2: Carry your valuable gear as a carry-on

To minimize the risk of lost or stolen gear, carry all your valuable equipment as a carry-on item. This way, you can keep an eye on it and have better control over its safety.

Tip 3: Use film storage cases

Protect your film by storing it in film storage cases or lead-lined bags. Evergreen also offers waterproof cases specifically designed for film storage, which are a great option.

Tip 4: Hand check your film at airports

When going through airport security, ask TSA officers to hand-check your film instead of passing it through X-ray scanners. This can help prevent potential damage to your film caused by the scanners.

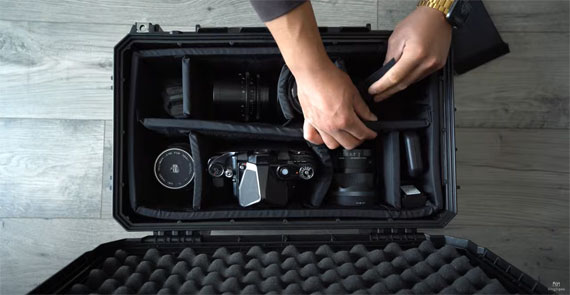
Tip 5: Take your gear apart

When packing your gear, separate your lenses from the camera bodies and store them in individual compartments. This can help minimize damage in case of an accidental drop.

film travel tips

Tip 6: Use soft cases within protective cases

For extra protection, use soft cases or pouches for individual lenses and camera bodies before placing them in your protective bag or case. You can even use socks as makeshift soft cases!

Tip 7: Don’t bring multiples

Try not to bring multiple cameras or lenses that offer the same results. Instead, focus on bringing a variety of lenses that will provide different shooting experiences.

And remember, sharing travel tips with the photography community can make everyone’s adventures more enjoyable and successful.

- - - - - - - - - - - - - - - - - - - - - - - - - - - - - - - - - - - - - - - - - - - - - - - - - - - - - - - - - - - - - - - - - - - - - - - - - -

Did you appreciate this newsletter? Please help us keep it going by Joining Our Patreon Supporters

What are your thoughts on this article? Join the discussion on our Facebook Page

PictureCorrect subscribers can also learn more today with our #1 bestseller: The Photography Tutorial eBook

- - - - - - - - - - - - - - - - - - - - - - - - - - - - - - - - - - - - - - - - - - - - - - - - - - - - - - - - - - - - - - - - - - - - - - - - - -

The post Film Photography Travel Packing Tips appeared first on PictureCorrect.


from PictureCorrect https://ift.tt/KJ7kidz
via IFTTT