This article is based on concepts from The Photography Tutorial eBook which is currently 83% off for a Summer Sale if you want to dig deeper.
Remember how we drew the sun when we were kids? The sun would have a smiling circular face with light streaks around it. But, did you know that we can photograph the sun that way; minus the face though.
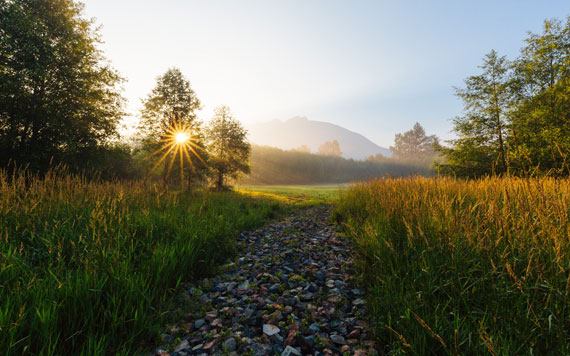
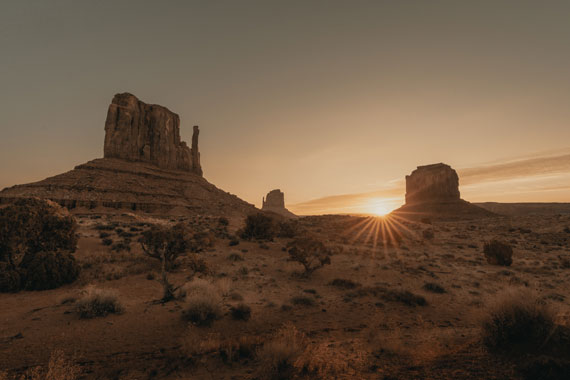
Commonly known as the sun star effect or the starburst effect, it results in the image of the sun appearing as a star-like shape. Typically, you can see this effect being used in conjunction with landscape or cityscape photography. When used effectively, a sun star adds some depth, and a sense of excitement to the image. And if other elements in your frame are not making much sense, you can even consider making the sun star the focal element of your image.
Taking an image with the sun star effect is not as simple as pointing your camera to the sun, and pressing the shutter button. Let’s have a look at some of the settings and considerations you need to make when taking an image with the sun star effect.
Use a narrow aperture
Your choice of aperture plays the most important role when it comes to photographing sun stars. In order to get those light streaks, it is important that you narrow down the aperture size. This essentially means that you need to set your lens at a higher f-stop value. Basically f/11 or higher works best. You’ll also need to consider that very small aperture settings will soften the image a bit due to diffraction.
Know your lens
If you want a greater number of light streaks in your image, be sure to use a lens that has an odd number of aperture blades. Interestingly, lenses with an odd number of aperture blades produce spikes that’s two times the number of the aperture blades. On the other hand, lenses with an even number of aperture blades produce spikes equal to the number of the aperture blades.
For instance, a lens with 5 aperture blades will result in a sun star with 10 spikes. But, a lens with 6 aperture blades will produce a sun star with 6 spikes only.
Manage the exposure
With the sun shining directly into the camera, it is quite obvious that the light meter’s calculation will be off by miles, thereby underexposing the landscape in the foreground. It is therefore a good idea to use a spot meter for this purpose and meter the scene in an area that doesn’t have the sun in it. Doing so can however over expose the sun. So again, it is up to you to maintain a good balance between the exposures in the landscape and the sun. You can do so by taking different exposures at varying shutter speeds and evaluating the results. Bracketing is a feature that works well for this.
Make the sun peek
Try to compose your frame in a way that the sun looks like it’s peeking from behind of a mountain, a tree, a building, or anything. Doing so has two advantages. First, you can control the size of the sun star using this method. Generally, the greater the contrast between the sun and the barrier, the greater the sun star will be. Second, it blocks out some portion of the light from the sun making it a little easier for you to get the exposure on the foreground right.
Avoid filters
Filters can produce unnecessary glares and flares when pointed directly at the sun. It is thus a good idea to avoid using them for this purpose.
Besides using these tips for creating sun stars, also be sure to keep safety in mind. It is always a risk to peep through the viewfinder when the sun is in frame. The sun can seriously damage your eyes. Use the live view instead.
For further training on camera settings, equipment, and working with the sun in your frame, you may want to check out the Sunstar Effect chapter and more while The Photography Tutorial eBook is on sale.
Summer Sale Ending Soon:
This #1 bestseller is the most in-depth eBook on how to capture amazing photography anywhere. Over 250 pages of photography tips & tricks from industry insiders. Currently 83% off today for a Summer Sale if you want to check it out.
It is the product of over a DECADE of research as an insider in the photography industry, assembled to help you learn quickly and avoid the mistakes that I made along the way.
Deal ending soon: The Photography Tutorial eBook Summer Sale
- - - - - - - - - - - - - - - - - - - - - - - - - - - - - - - - - - - - - - - - - - - - - - - - - - - - - - - - - - - - - - - - - - - - - - - - - -
Did you appreciate this newsletter? Please help us keep it going by Joining Our Patreon Supporters
What are your thoughts on this article? Join the discussion on our Facebook Page
PictureCorrect subscribers can also learn more today with our #1 bestseller: The Photography Tutorial eBook
Want to learn on-the-go? Throw these Snap Cards in Your Camera Bag
- - - - - - - - - - - - - - - - - - - - - - - - - - - - - - - - - - - - - - - - - - - - - - - - - - - - - - - - - - - - - - - - - - - - - - - - - -
The post Sunstar Photography Tips appeared first on PictureCorrect.
from PictureCorrect https://ift.tt/cJIXGnW
via IFTTT


0 kommenttia:
Lähetä kommentti