perjantai 31. heinäkuuta 2020

PictureCorrect.com: The Importance of a Focal Point

A focal point is the part of an image that draws the eye of a viewer to the most important part of the image or the area that you want to highlight. How you do this will make or break the final image. If you don’t know how to create this point then you will not achieve much in your photography.

point of interest in photographs

photo by Dominic Alves

The professionals have all worked this one out and if you are attempting to create similar images then learn this point well. It frustrates the eye of a viewer if there is no focal point, as the eye is not drawn to any one particular part of the photo. The focal point only occupies a small part of the scene but will make or break the whole image. The simplest form of this is an isolated object seen from a distance on a plain background.

So how is this achieved successfully? Let’s take a look at a few pointers.

1. The Rule of Thirds

Fundamental to photography this rule needs to be learnt well and executed to perfection. If you know where to place your focal point then you will shoot great images every time. A focal point needs to be off centred and never in the middle of an image. The rule of thirds places it at a point that is very pleasing to the eye as discovered by the ancient Greeks. This golden rule will bring you success every time. Imagine a noughts and crosses or tic-tac-toe grid. Two lines across the image and two lines down the image—vertically and horizontally placed. Equally spaced, they cut the image up into thirds. Where these lines intersect are your focal points. The horizontal lines are where you place your horizons. The human eye loves to view subjects placed at these intersections. Take a magazine or travel book and take a look at how many times this rule is used effectively and see how your eye is drawn to them.

2. Selective Focus

This is an incredibly effective way to focus attention on your subject of focal point. You need to know how aperture and depth of field works in order to use it properly. But, basically it’s very simple. Your settings (e.g. f/2.8, f/4, f/5.6 and so on) change the size of your aperture all the way up to f/32. You only need to be concerned with the lower apertures for this effect. If your lens goes to f/1.2, brilliant, but most lenses won’t take you below f/4 or f/2.8, as they get more expensive the wider the aperture. Depth of field is the area of focus in front of and behind your subject. With the aperture wide open at f/2.8 you will have very little in focus which makes it so effective with selective focusing. Everything not on the same focal plane as the subject will be out of focus and thereby excluded from the viewer’s attention. The longer your lens, the less depth of field you will have and the more you will be able to selectively focus.

It’s a great way of drawing attention when used in conjunction with the rule of thirds.

3. Exposure

By underexposing parts of the image (i.e. making them darker), the areas that are light will stand out. If you are able to able to use this effectively the light parts will stand out as focal points and whatever you place here will become the point of focus in the photo. This really works well if you have a subject that is lighter than the underexposed, darker areas. Key to the process is knowing what the final image will look like in mind’s eye.

4. Light Source

This really pushes your photographic eye to the limits and if you see the opportunity and go for it, will result in a stunning photo. How this works is that when you see a shaft of light or a ray of sunlight entering a window or coming through the clouds, use it to place your subject. A patch of late afternoon sun in dimming light will create an area that is much lighter than the surroundings. When you shoot an image and take the metering off this area, the surrounding environment will appear darker. The image now has a focal point that draws the eye in to the image. This will also work at night where a solitary window is lit and the surrounding area is dark. Experiment with this technique and you will soon be creating dramatically lit photos.

5. Eyes

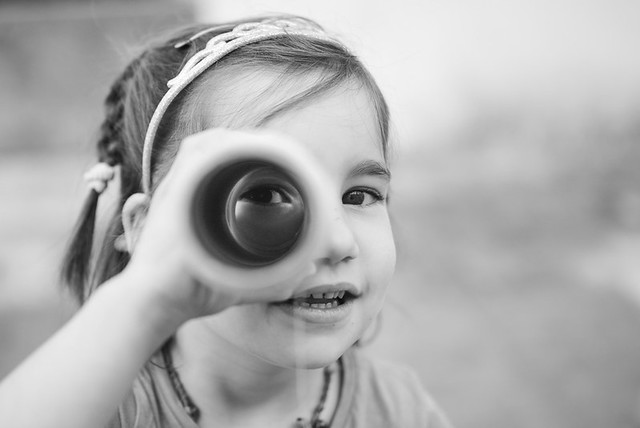
By placing a person’s eyes on a two thirds intersection a viewers eyes are immediately drawn to that area. When the subject is looking down on something else like a child or an object your eye will be naturally drawn to the point where the subjects eyes are focused. Whenever you shoot a person eyes they will automatically become the focal point so if they are the focal point then you have a problem and they will compete for attention.

6. Two Focal Points

Sometimes you will have two focal points and there will be competition, but, you can offset this by using size. One of the focal points must be considerably larger which will draw the eye but immediately your focus will move to the smaller focal point. If they are the same size the viewer’s eyes will dart between them. So be very careful when using a double focal point.

A focal point is essential to any great image and you need to be able to create this in every image. An image lacking this will appear flat and without impact. As you learn digital photography it will become easier and easier to place it in the right position. Happy shooting!

About the Author:
Wayne Turner has been teaching photography for 25 years and has written three books on photography. He has produced 21 Steps to Perfect Photos; a program of learner-based training using outcomes based education.


Go to full article: The Importance of a Focal Point

What are your thoughts on this article? Join the discussion on Facebook

PictureCorrect subscribers can also learn more today with our #1 bestseller: The Photography Tutorial eBook

The post The Importance of a Focal Point appeared first on PictureCorrect.


from PictureCorrect https://ift.tt/2L2yXjS
via IFTTT

PictureCorrect.com: Interesting Photo of the Day: Ouse Valley Viaduct

The Ouse Valley Viaduct, also known as the Balcombe Viaduct, carries the London-Brighton Railway Line over the River Ouse in Sussex. Thanks to the ornate design, it looks aesthetically beautiful. This is why many describe the structure as probably the most elegant viaduct in Britain. It spans around 1,600 feet in a straight line, and has over 37 identical arches. The perfect symmetry is what makes this viaduct an engineering marvel. Just have a look at this image of the place taken by photographer Rory Browne:

Ouse Valley Viaduct

“Ouse Valley Viaduct” by Rory Browne (Via Reddit. Click image to see full size.)

It’s really amazing how precisely this viaduct has been constructed. Everything is so symmetrical and the alignment is just perfect. Each consecutive arch naturally appears to be smaller than the previous one, which adds a great sense of depth in the image. It causes our eyes to converge at the elliptical figure right at the center.

The stacked appearance of the arches also makes it feel as if it’s a portal of some sort. Maybe the subject is thinking of jumping into it? The continuous repetition also looks like a mirror effect creating a somewhat trippy vibe.  While Browne could have just photographed the structure alone, the addition of a subject is a nice touch. The person gives a good sense of scale and makes us realize just how grand this viaduct actually is.

Browne has indeed done a marvelous job capturing this fantastic structure.


Go to full article: Interesting Photo of the Day: Ouse Valley Viaduct

What are your thoughts on this article? Join the discussion on Facebook

PictureCorrect subscribers can also learn more today with our #1 bestseller: The Photography Tutorial eBook

The post Interesting Photo of the Day: Ouse Valley Viaduct appeared first on PictureCorrect.


from PictureCorrect https://ift.tt/3fjJOEz
via IFTTT

PictureCorrect.com: Photography and Memories

Photography is a powerful tool. It allows you to freeze a particular moment in time. In other words, you have the ability to peek into a fragment of time that’s already passed. In this way, photography is something like a time machine that only lets you travel to the past. Old photos have the power to invoke strong feelings and that’s what makes them so special. Moments that didn’t seem significant then could turn out to be really special today. Photographer Thorsten Overgaard talks about why you should go back to your archives and dig up old photos, and why you should always wear a camera:

Not all photos instantly seem valuable once they’re taken. That’s because we’re living in the moment and things are familiar. But once time flies by, the same moment can seem more valuable thereby increasing the value of the same photograph.

Remember the last time you went through your old family photos and how nostalgic you felt? That’s the power of photos. Images that were taken on film or even a low-tech camera seem more valuable today emotionally than the ones that we take today on a 50-megapixel camera.

“It was much more a pleasant moment to look at 15-year old photos from a 3.2-megapixel camera than it is to look at Instagram.”

So, it’s a great idea to take some time out from your daily routine and go through your old archives. See how it affects you emotionally. Also, it’s important that you continue building on those memories. Continue taking photos. The camera on your smartphone today will do a great job. Ten or twenty years down the lane, you’ll have loads of memories to cherish!


Go to full article: Photography and Memories

What are your thoughts on this article? Join the discussion on Facebook

PictureCorrect subscribers can also learn more today with our #1 bestseller: The Photography Tutorial eBook

The post Photography and Memories appeared first on PictureCorrect.


from PictureCorrect https://ift.tt/310kIp2
via IFTTT

torstai 30. heinäkuuta 2020

PictureCorrect.com: Black and White Portrait Photography Tips

There are no hiding places in a black and white portrait. With no distraction from color, the physical characteristics of the subject are revealed. Monochrome exposes intimate details such as bone structure, texture, and expression to a much greater level than an equivalent color image. This article will help you take advantage of the medium and show how to take creative portraits using a home studio setup.

black and white portrait photography

“fondamenta 3.0” captured by Stefano Montagner

Successfully capturing a quirky look or expression gives the viewer an immediate insight into the subject’s world and personality. Black and white photographs create vulnerability, and if we are able to see just who the subject is through the image captured, then this is a sign of a winning portrait. Although this all sounds a bit serious, black and white does not need to be used only to record austerity. Subtle changes of lighting, for example, can transform the mood to romantic, sultry, or even comical. Black and white can be an extremely versatile medium.

One of the joys of black and white portrait photography is that traditional beauty is not a requirement. Look for something unusual to capture in the subject. This could be using someone who is known for having a serious nature, getting them to let their hair down, and allowing the viewer to see another side of their personality. If you do not already know them, it can be difficult to get them to let their inhibitions out, but helping them relax will go a long way.

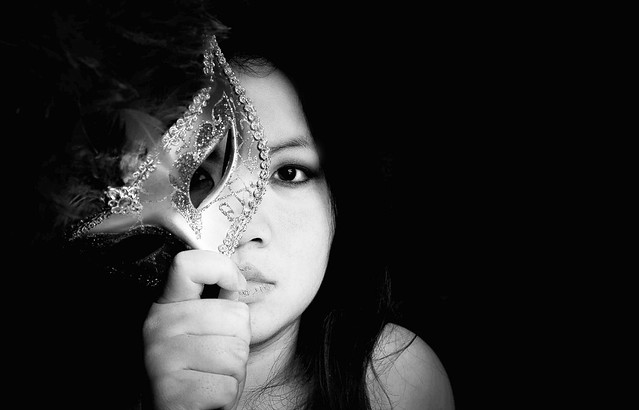
b&w portraits

“Day 165: 2 Self Portraits” captured by Sodanie Chea

You may have a list of poses in mind that you want to run through, but also keep an eye on your subject and look out for any characteristics that may be specific to them. Once they feel relaxed, you should spot moments worth capturing, so try to take some informal shots which may be of use, as well as the more formal poses. Decide which shot suits the subject best, such as close ups of the face, shots from the side, or full body. To capture a sense of character, a close up shot is best.

Location shots are ideal for a sense of context. The focus should ultimately be on the subject, so it’s best to find somewhere that won’t impact this. It is a good idea to select somewhere that has a link to the subject, either directly or visually. If they had a favorite childhood haunt where they used to hang out, this may make for some memorable photos, because of their previous association with it. Hopefully they have some happy memories, which will show up in the final image. The link with a location could be visual, where the surroundings simply suit the subject.

black and white portrait

“workstation” captured by hobvias sudoneighm

These are just a handful of ideas to consider when tackling black and white portraits. Studying further techniques will make your explorations into this exciting genre ever more pleasurable and rewarding.

About the Author:
Article written by Paul Summers from PhotographyCourseOnline.


Go to full article: Black and White Portrait Photography Tips

What are your thoughts on this article? Join the discussion on Facebook

PictureCorrect subscribers can also learn more today with our #1 bestseller: The Photography Tutorial eBook

The post Black and White Portrait Photography Tips appeared first on PictureCorrect.


from PictureCorrect https://ift.tt/2LeEWma
via IFTTT

PictureCorrect.com: Interesting Photo of the Day: Evening Railway

The allure of the sunset shot has captivated audiences and photographers for decades. The high contrast and fascination with light and color entices photographers to use the last remaining sunlight to set the mood and tone of their shots:

sunset railroad photography gradient

“This Evening Railway” by Lauxxx. (Via Imgur. Click image to see full size.)

This particular photograph sends us in the direction of the obscure vanishing point, faintly highlighted by the disappearing sunset. Lauxxx captured this photograph at one of the last possible moments before the sun disappeared over the horizon line. Its final glow shoots across the rails and creates a powerful gradient that displays the sky’s shifting colors, reminding us why we value sunsets and patiently await the sunrise.


Go to full article: Interesting Photo of the Day: Evening Railway

What are your thoughts on this article? Join the discussion on Facebook

PictureCorrect subscribers can also learn more today with our #1 bestseller: The Photography Tutorial eBook

The post Interesting Photo of the Day: Evening Railway appeared first on PictureCorrect.


from PictureCorrect https://ift.tt/2J0cFh9
via IFTTT

PictureCorrect.com: Landscape Photography: Quality vs Quantity

When you’re out on the field taking photos, typically there are two ways you can work. You might either spend hours and take a handful of photos, or take lots and lots of photos within a very short period. And it’s important to note that each of these methods has its own set of advantages and challenges. While working hastily ensures that you have a greater pool to select from, working patiently lets you emphasize on high quality and precise work. Landscape photographer Nigel Danson prefers the latter category, and in this video he explains how the method brings him more success:

“I’d rather end up, at the end of the year, with a a few amazing shots rather than hundreds of average shots.”

Spending a greater amount of time taking fewer shots means that you can pay more attention to the details in each shot. This way, you take that extra bit of time to fine-tune the image and make it near perfect. You really get to analyze the nitty-gritties of your composition when working patiently. The benefits of spending more time on fewer shots will come together and help you improve the quality of your work by miles. There’s also the added benefit of having to spend less time going through photos while working in post-processing later. You’ll save a ton of storage this way too.

“If you take multiple shots, you’ll end up getting multiple average shots.”

When you’re out for some photography, keep this idea in mind and try investing more time per shot. Sure, there might be a better shot, but don’t worry about that. Focus on a few shots and give them your best.


Go to full article: Landscape Photography: Quality vs Quantity

What are your thoughts on this article? Join the discussion on Facebook

PictureCorrect subscribers can also learn more today with our #1 bestseller: The Photography Tutorial eBook

The post Landscape Photography: Quality vs Quantity appeared first on PictureCorrect.


from PictureCorrect https://ift.tt/3hT7LnG
via IFTTT

keskiviikko 29. heinäkuuta 2020

PictureCorrect.com: Interesting Photo of the Day: Golden Morning in Florence

Mornings are a great time to walk around taking photos. The same holds true not only for photographing landscapes but also for cityscapes. When the sun hangs low it provides a perfect opportunity to photograph the city in a phase that most people don’t often get to see. Besides, the soft light adds a touch of magic and makes the entire scene appear mystical if you catch it at the right moment. The following image by photographer Michael Sidofsky is an example:

golden morning in Florence

“Golden Morning in Florence” by Michael Sidofsky (Via Reddit. Click image to see full size.)

The image is actually a composite of two images that Sidofsky took. He chose to do this in order to capture the high dynamic range in the scene. He took one bright image and then a dark one, and selectively blended in light from one image on top of the other. This also allowed him to shape the lighting in the scene and draw the eyes toward the cyclist with more control.

“I use this technique whenever I have good light in a file and want more of a dramatic look.”

It’s also worth mentioning that he had to wait patiently in order to get this shot. While the sun was peaking through the building, he took a bunch of shots when and happened to capture this exact image with the cyclist passing by – the decisive moment that really make this image. And the morning glow has set a beautiful mood to the already beautiful city of Florence. Sidofsky has truly encapsulated the spirit of the city in this photograph.

All in all, the image is a beautiful mix of old and new, bright and dark, color and desaturation. Truly an artistic approach by the photographer.


Go to full article: Interesting Photo of the Day: Golden Morning in Florence

What are your thoughts on this article? Join the discussion on Facebook

PictureCorrect subscribers can also learn more today with our #1 bestseller: The Photography Tutorial eBook

The post Interesting Photo of the Day: Golden Morning in Florence appeared first on PictureCorrect.


from PictureCorrect https://ift.tt/2Xb8Gbd
via IFTTT

PictureCorrect.com: LED Flash Tutorial for Beauty Photography

LED lights have been on the photography scene for quite some time now. And videographers have been using constant LED lights as video lights for quite a while as well. Recently, companies have been developing LED flashes as an alternative to the traditional strobes that have dominated the market for years. To see if LED flashes are any good for the job, photographer Ike takes a Godox FV150 for a spin with some beauty photography:

One feature in this LED flash that you can’t find in the traditional strobes is how you can use it both as a constant light source and a flash as well. This means one less piece of gear to carry around if you plan to do both video and photo work. If portability is important to you, you’ll want to consider LED flash.

“If you want a little bit of both worlds, this might be the light for you.”

And Godox hasn’t compromised with the quality either. A CRI rating of 96 means that it’s highly color accurate. The quirks that Ike outlines are in regards to the weight of the unit, and how the output may not be suited for everyone. In his case, you can see that the flash takes a while to recycle while it’s at the maximum power setting.

Do you use LED flash for your work? If you want to share any experience with LED flash, feel free to leave your thoughts in the comments. We’d love to hear what you think.


Go to full article: LED Flash Tutorial for Beauty Photography

What are your thoughts on this article? Join the discussion on Facebook

PictureCorrect subscribers can also learn more today with our #1 bestseller: The Photography Tutorial eBook

The post LED Flash Tutorial for Beauty Photography appeared first on PictureCorrect.


from PictureCorrect https://ift.tt/3ffE52q
via IFTTT

tiistai 28. heinäkuuta 2020

PictureCorrect.com: 10 Tips to Improve Your B&W Photography

In a world of color, sometimes you just can’t beat a strong black and white image. Black and white photography can be an amazing tool to conveying a mood, story, or statement to your viewers. While a color portrait can tell a story too, the absence of color in black and white imagery often presents a much stronger impact. Here are a few tips for creating strong black and white photographs:

italian travel photo

Photo by Roberto Taddeo.

1. Subject Matter

The first thing to consider is your subject matter. Would it be strengthened by the absence of color? The truth is, not every image will look better in black and white. Sometimes color is needed to distinguish your subject from the other elements in the image. So really evaluate whether or not your chosen image will benefit from a black and white conversion.

2. Shape and Form

As previously stated, sometimes color is needed in an image to separate, distinguish, and add interest. When you shift an image to black and white, you can no longer rely on color to add interest or a focal point to your photograph. That’s why form and shape are incredibly important in black and white photography. You’ll have to look beyond colors and instead focus your attention on shapes and lines, arranging them in a way that emphasizes the most interesting aspect of the shape or that creates an intriguing composition of different shapes.

glasgow museum

Photo by Giuseppe Milo; ISO 160, f/5.6, 1/800 exposure.

3. Pattern

In color photos, patterns often go unnoticed because the colors draw all the attention away from them. However, black and white photographs give you a much better chance of capturing interesting patterns; the distraction of color is no longer present, giving subtle patterns the chance to take shape and emerge.

4. Texture

Texture is a crucial element in black and white imagery. Textures provide us with tonal contrast and relay depth to the viewer. Without textures, you would simply have a smooth flat surface showing some shade of gray, but with texture we have something interesting and inciting to view. Try combining a variety of textures, like a glossy pen next to a textured sheet of paper sitting on a dirty desk. The right textures combined together will help to add interest and appeal to your photograph.

istanbul turkey travel photos

Photo by Timothy Neesam.

5. Composition

A strong composition is even more important in black and white photography than in color imagery. Remember composition elements such as the golden ratio and leading lines when composing your image. These elements help pull viewers in and keep their interest in the absence of color.

6. Lighting, Lighting, Lighting

This, of course, is of vital importance in black and white photography. In black and white photographs, proper lighting can make or break an image. Good lighting can help increase the contrast within your image, providing more interest to your portrait–or it can be used to create drama, mystery, and moody contrasts within the image.

street photography

Photo by Giuseppe Milo; ISO 200, f/7.1, 1/500 exposure.

7. Slightly Overexpose

This is more of a personal suggestion. But I always slightly overexpose when I shoot. It helps bring all the tones up a little so you don’t lose any details in the dark shadows. Of course, you don’t want to over-do it and blow out your whites, but a slightly overexposed image can be tweaked more easily to suit your needs.

8. Avoid Noise

Sometimes grain adds to an image, but always be intentional about your use of it. Many people will shift a poorly created image to black and white to hide the noise in their image that results from poor setting choices. If you are intentionally shooting to create a black and white images, be very conscious of your settings; choose them wisely. Most of the strongest and most well known black and white images are crisp and sharp. So don’t let your ISO get too high.

9. Shoot in Color

Many cameras have the option to shoot in black and white. Even if you know you’re going to be converting your images to black and white, always shoot them in color first! When your camera internally converts your color image to black and white all kinds of detail and information is lost in the conversion. Rather than risk a sub-par creation, shoot your image in color and convert it to black and white on your computer, where you will have much more control of the finished product.

black and white landscape

Photo by Indigo Skies Photography; ISO 100, f/22, 0.3-second exposure.

10. Contrast

When converting your photograph to black and white, pump up your contrast. Whether you use an action, level layer, or curves in your conversion, your black and white photograph can handle a lot more contrast than a color image. Make your blacks a deeper black and your whites a brighter white. You can always pull up the histogram in Photoshop to check your levels; you will want a healthy looking mountain in your histogram to have a strong image.

About the Author
Stephanie lives in Central, Illinois, is married to her best friend, Ryan, and enjoys the company of her rambunctious lab-beagle pup, Kit. She is the owner of Green Tree Media (greentreemediaonline.com) and is passionate about photography.


Go to full article: 10 Tips to Improve Your B&W Photography

What are your thoughts on this article? Join the discussion on Facebook

PictureCorrect subscribers can also learn more today with our #1 bestseller: The Photography Tutorial eBook

The post 10 Tips to Improve Your B&W Photography appeared first on PictureCorrect.


from PictureCorrect https://ift.tt/2J2o187
via IFTTT

PictureCorrect.com: Interesting Photo of the Day: Heimaey Stave Church

Situated in the Skansinn area of the harbor of Vestmannaeyjabær, Iceland, is the Heimaey Stave church. It was gifted by Norway to Iceland in connection with the millennial anniversary of the conversion of Iceland to Christianity in the year 1000. This church is in fact a replica of the Haltdalen Stave Church in Norway. What makes the Heimaey Stave church so unique is the fact that it’s painted completely black, giving it a very gothic look. Photographer TJ Drysdale took the following image of the church at 2am and it looks awesomely idiosyncratic:

all black church in Iceland

“All Black Church in Iceland” by TJ Drysdale (Via Reddit. Click image to see full size.)

Drysdale took the image on a Sony A99II with a 24-70mm lens. The limited yet brilliant color palette used in the image really makes it stand out, while making so pleasing to look at as well. The yellow grass on the lawn goes well with the subject’s hair color, and her dress appears to be an echo of the sky above.

“We chose a grey dress for the storyline because white symbolized ‘good’ to us and ‘black’ would symbolize something dark and sinister as well as blend in with the church.⁣”

With grey, you can’t tell what the story is or what the motive is. Grey is a blend of black and white. Is she good? Is she sinister? Is she a little bit of both? ⁣This makes the story way more ambiguous and leaves it open for interpretation – all because of the color of the dress!⁣ The image has a wonderful balance in being beautiful, mystical, and haunting at the same time.

Kudos to the photographer for putting in such deep thought into taking this photo. What do you think the story behind this image might be?


Go to full article: Interesting Photo of the Day: Heimaey Stave Church

What are your thoughts on this article? Join the discussion on Facebook

PictureCorrect subscribers can also learn more today with our #1 bestseller: The Photography Tutorial eBook

The post Interesting Photo of the Day: Heimaey Stave Church appeared first on PictureCorrect.


from PictureCorrect https://ift.tt/2X6TcFg
via IFTTT

PictureCorrect.com: Planning for that Decisive Moment in Photography

You can never be successful in any field if you leave everything up to luck. Similarly, if you want to succeed in photography, you need to be sure of what you’re doing. Every action that you take needs to make sense. And most of the outcomes, if not all, need to be predictable. Luck can only have a tiny window to influence your work. For this to happen, you need to have things under your control. And you can do so by planning ahead. Photographer Mark Wallace from Adorama talks about three important things that you need to line up for that decisive moment:

“Decisive moment takes a little bit of planning and some luck.”

When you’re planning for your shoot, be sure to consider the time of day, and the composition beforehand. The time of day determines how your surroundings will look, and how the light, shadows, and colors will appear in the image. With composition, you get to decide what all you want to include or exclude in the frame, and what story you want to tell. It is the “action” part that’s influenced by luck. You might have to wait sometime with some luck on your side for something interesting to happen.

As Wallace shares in the video, he had to wait for the right time of day to take the photo to get the perfect lighting. He also had to experiment with a couple of different compositions until he got the one that felt just right. And as for the action part, it was his patience that really paid off. This allowed him to take a really beautiful image of the sunset by the lake with a boat moving across.

Once you’re out and about, and taking pictures again, be sure to practice these tips from Wallace. You’ll see how planning and patience will really help you take beautiful photos of those decisive moments.


Go to full article: Planning for that Decisive Moment in Photography

What are your thoughts on this article? Join the discussion on Facebook

PictureCorrect subscribers can also learn more today with our #1 bestseller: The Photography Tutorial eBook

The post Planning for that Decisive Moment in Photography appeared first on PictureCorrect.


from PictureCorrect https://ift.tt/39zdLiy
via IFTTT

maanantai 27. heinäkuuta 2020

PictureCorrect.com: Understanding Black Point for B&W Photography

This article is based on concepts from the Better B&W Photography Guide if you want to dig deeper for further training.

What is the color black?

It seems like that should be a relatively easy question to answer.

However, it’s not – especially when it comes to black and white photography.

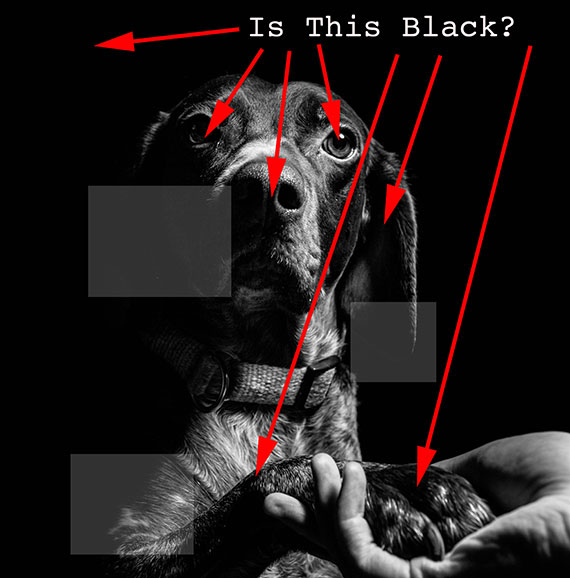
dog photo with arrows to learn about black point

Photo by Fabian Gieske (arrows and text put in by writer)

There are infinite shades of color and tone all around us.

Our brain, through the help of our eyes, categorizes and identifies each object that we view. We look at an object and say, “Oh, that’s black.”

The truth is that there are infinite shades and tones of the color black.

The cute picture of the dog illustrates this idea. What’s black in that picture?

Question

Are all of those points at the tip of the red arrows the color black?

Yes, they are, and that brings up a critical concept in black and white photography.

This concept is known as the Black Point.

If you take a moment and look at the three gray boxes in the puppy photo, you’ll see that there are areas of the dog’s ear, face, and leg that have disappeared into the background. They have quite literally melted away.

This can mean that the Black Point was not appropriately placed, and in this case, I would say that was true.

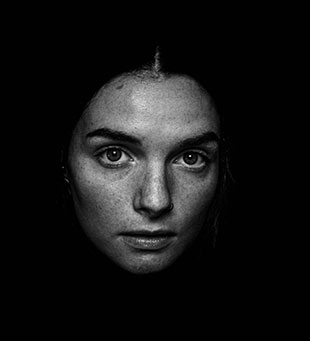
black point placed intentionally for portrait face only

Photo by Quinten de Graaf

In this second example photo, the woman’s head, neck, and shoulders disappear into the background.

The difference is that in this case, it was intentional for effect.

Knowing how to place your Black Point is a valuable skill in photography (particularly for black and white photography)!

Let’s Define Black Point

The Black Point is the darkest and most dense black area of your photograph. On a histogram, it’s located to the very far left of the scale. When you read that area with an RGB eyedropper, it reads 0,0,0.

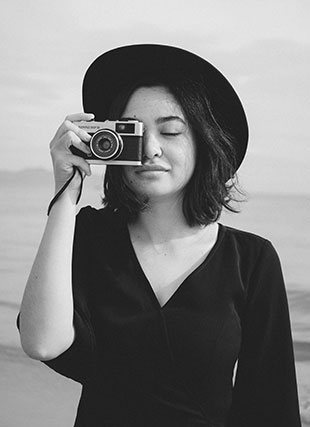
portrait with well placed black point

Photo by Huynh Tan Hau

This photograph is a superb example of a well-placed Black Point.

This woman is literally covered in black. Yet notice how you can see detail and texture in her blouse, hair, on the camera, and even under the hat.

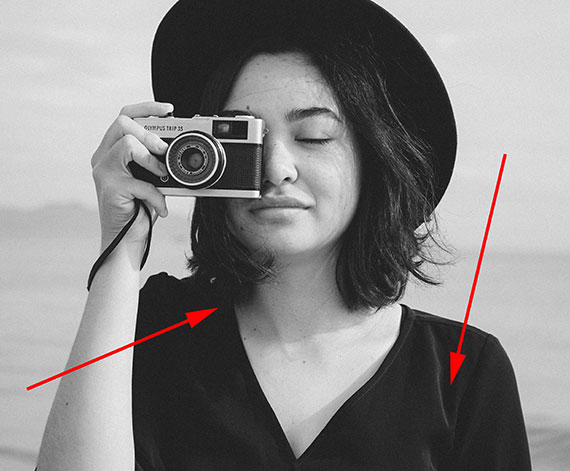
Where is the Black Point in this picture?

photo with arrows for black point

Photo by Huynh Tan Hau (arrows put in by writer)

A well-placed Black Point is typically located in a non-significant shadow area within the frame.

Here’s your Quick Tip:

Black Point is vital to your photography, especially black and white photography, as it helps to ensure that you have a full range of tone within your picture!

You place the Black Point by carefully watching the histogram as you convert a digital color file to a black and white photograph. Once you’ve made the conversion, you can further fine tune the Black Point with the Adjustment Brush and/or the Lightroom sliders labeled Shadows and Blacks.

For Further Training:

Have you ever quickly converted your shots to black & white, hoping to make them “Better”? And the result was bland to say the least? This is a very common occurrence. Knowing how to convert color to B&W with a working understanding of tone and contrast in post-processing is a very different story. This in-depth eBook is designed to cover EVERYTHING you need to know about producing your own powerful and professional B&W images.

black and white photo guide

Better Black & White Photography Guide (See What’s Inside)

Every step is detailed in all three programs: Photoshop, Lightroom, & Elements. But even if you don’t have these applications, there’s enough information in here to help you achieve the same results with the software you already have. It is currently 76% off if you want to check it out.

Deal ending soon: The Better Black & White Photography Guide at 76% Off


Go to full article: Understanding Black Point for B&W Photography

What are your thoughts on this article? Join the discussion on Facebook

PictureCorrect subscribers can also learn more today with our #1 bestseller: The Photography Tutorial eBook

The post Understanding Black Point for B&W Photography appeared first on PictureCorrect.


from PictureCorrect https://ift.tt/307EM9U
via IFTTT