Although black and white photography has been the standard for beginning film photography students for a long time, at some point every photographer should learn the basics of color photography. Learning color photography requires a firm understanding of the basic elements of photography, which can be broken down into the following easy to understand elements.

“Baseball” captured by Hector Rodriguez
It Starts with Contrast
In black and white photography, contrast refers to the difference between the lightest and darkest elements of a photograph. In essence, you can think of contrast as “how white is white?” With black and white photography, there are really only three tones: low contrast, medium, and high contrast but with color photography it gets a little more complicated. Color photography has color contrast compared to the tonal contrast of black and white.
Color contrast is determined by the way each of the colors interact with the colors surrounding it. While the contrast can still be adjusted to push the bright to dark ratio, the colors in a photograph appear different depending on what’s around them. For instance, think of a baseball sitting in bright green grass—that image has high color contrast because the bright white of the baseball stands out against the cool green of the grass.
Color Temperature
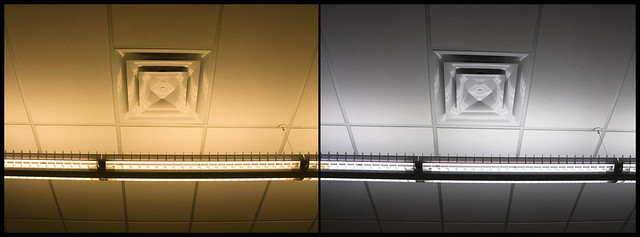
Any time you’re taking pictures in color, you have to pay attention to the temperature of the colors. Different lights result in different color temperatures, in the same way that the sun looks different at various times of day. Although there are lots of technical measurements of color temperature, the simplest way to think of it is in terms of tint.
Tint and color temperature are actually referred to as “white balance” in photography. Film and sensors are developed with a certain kind of light in mind, and any time photos are shot in different lighting circumstances it affects whether or not white looks truly “white.” For example, if you take a picture underneath a fluorescent light, it always has a green tint to it because that’s the color temperature of those lights.

“Playing with white balance” captured by Tom Check
Using Temperature
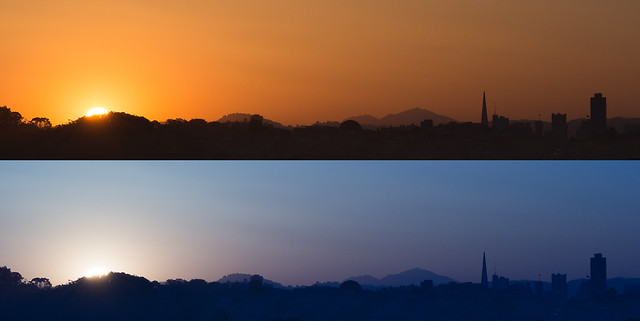
Any time you shoot, you want to understand which tint or color temperature is best for your picture. Reddish, warm tints such, as those provided by a sunset are flattering to most human skin tones, while cooler, bluish tints are best for neutral product photography.
You can adjust your white balance several different ways; you can do it with your camera, filters, or photo editing software. Similar to aperture and shutter speed, if you’re not shooting in RAW, it’s usually a good idea to take a photograph several times with different white balance settings to give yourself the most flexibility after the shoot is over.

“Color: San Francisco Sunrise in Blue” captured by Eugene Kim
Learning how to master colors is a skill that takes lots of practice. Designers often take several courses on color as part of their education, and there is no shortage of competing opinions on how color can be used best to achieve certain goals.
If you’re just starting off learning to use color, then your first goal is to accurately capture the image the way you see it. Once you can do this reliably with color photography, you can start working to manipulate these colors to add to the narrative of your photographs. And as usual, find what works works best for you and have fun doing it.
About the Author
Autumn Lockwood is a writer for Your Picture Frames. Shop online and see our selection of silver leaf picture frames in a wide variety of styles and sizes. Visit our website and see our selection of custom silver leaf picture frames online or call 1-800-780-0699.
Go to full article: Contrast and Temperature in Color Photography
What are your thoughts on this article? Join the discussion on Facebook
PictureCorrect subscribers can also learn more today with our #1 bestseller: The Photography Tutorial eBook
The post Contrast and Temperature in Color Photography appeared first on PictureCorrect.
from PictureCorrect https://ift.tt/2y6hOAu
via IFTTT


0 kommenttia:
Lähetä kommentti