


The Masking tool in Adobe Lightroom is a powerful feature that allows you to selectively apply adjustments to specific areas of your photos. It’s useful for making targeted edits, enhancing specific details, or balancing the exposure and color in certain areas of an image.
Relevant reminder: only a little while left for the Lightroom Mastery Guide at 50% Off
You may want to use the Masking tool in various situations, such as:
- Selective adjustments: When you want to apply adjustments to a specific part of the image without affecting the rest, such as brightening a subject’s face or enhancing the colors of a certain object.
- Balancing exposure: If you have an image with a wide dynamic range, like a landscape with a bright sky and a dark foreground, you can use the Masking tool to selectively adjust the exposure in each area, bringing out more detail and creating a balanced final image.
- Color correction: If you want to adjust the colors in a specific area of your photo, such as removing a color cast or enhancing the saturation of a particular object, the Masking tool allows you to make these targeted adjustments without affecting the entire image.
- Sharpening and noise reduction: You may want to apply sharpening to certain areas of an image, like the subject’s eyes, or apply noise reduction to a noisy background without affecting the entire image.
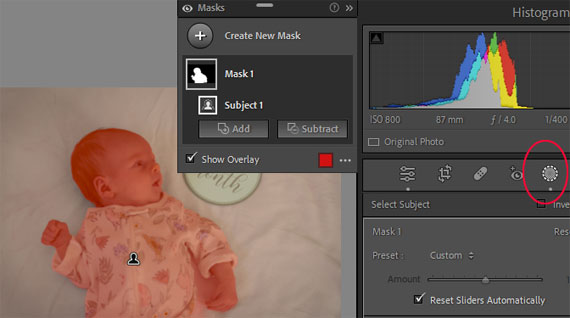
To use the Masking tool in Lightroom, follow these steps:
- Open your image in Lightroom’s Develop module.
- Choose the adjustment you want to apply (e.g., exposure, contrast, saturation) from the right-hand panel.
- Click on the “Masking” icon (the circle with a dashed outline) located above the panel, which opens a dropdown menu with different masking options.
- Select the desired masking option, and then click and drag on your image to create the mask. You can adjust the size, feather, and opacity of the mask using the sliders in the Masking panel.
- Once you’ve created the mask, apply your desired adjustments using the sliders in the right-hand panel. The adjustments will only affect the masked area.
- You can create multiple masks and adjust each one independently to refine your edits further.
Remember to experiment and practice with the Masking tool to become more proficient in using it for various editing scenarios.
For Further Training:
Are you tired of spending hours on end fiddling around in Lightroom Classic and not getting the results you expect? This in-depth eBook is designed to help photographers master Lightroom Classic to its full potential. We were able to arrange an additional 50% discount for our blog readers which ends soon.
Lightroom Mastery (Click to Learn More)
Not by droning repetitions of someone else’s editing style, but through teaching you the basic premises of the software using easy to understand, real-world language that will unlock your potential for learning.
Deal ending soon: The Lightroom Mastery eBook at 50% Off
from PictureCorrect https://ift.tt/1g0iUwf
via IFTTT


0 kommenttia:
Lähetä kommentti