sunnuntai 31. tammikuuta 2021

PictureCorrect.com: Cameras Change But Photography Basics Remain the Same

Camera manufacturers are putting bigger chips behind better glass at lower price points than any time in the history of photography.
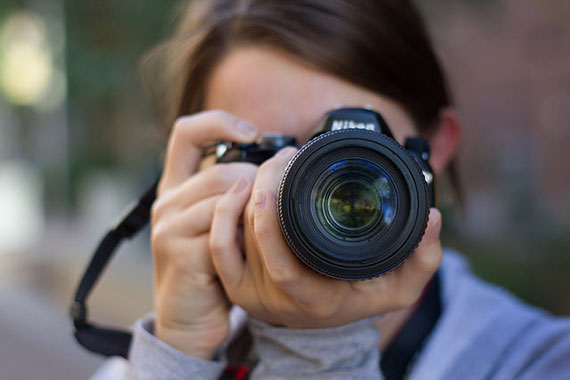
photography basics for any camera

Photo by ddworth; ISO 640, f/2.2, 1/1000-second exposure.

Some photographers grumble about modern cameras introducing low-cost competition into the market, but overall this is an exciting time to be in photography!

While modern cameras make it almost impossible to take a poorly exposed photograph, none of the technological advances have made any changes to the basics of taking good pictures. Here are a few tips for getting great photos no matter what camera you own.

Get In Close

The biggest amateur mistake in photography is having a tiny little subject in the middle of a great big picture — too much foreground and too much empty space on each side showing background elements that distract from the picture within.

cameras change but photography principles stay the same

Photo by Joseph Hooker; ISO 250, f/2.8, 1/125-second exposure.

So get in close. When you think you’re close enough, get in even closer. Take at least one or two pictures ridiculously too close. So close you can’t even fit the whole subject in the frame. You can always back up if it’s too close, but that’s a rare problem.

Use Flash Outdoors

It seems counter-intuitive to turn the flash on outdoors, but give it a try; it really works! If you don’t have a speed light, that’s okay; the built-in flash on most cameras is generally a very poor light source for taking pictures, but it can make an absolutely marvelous fill flash.
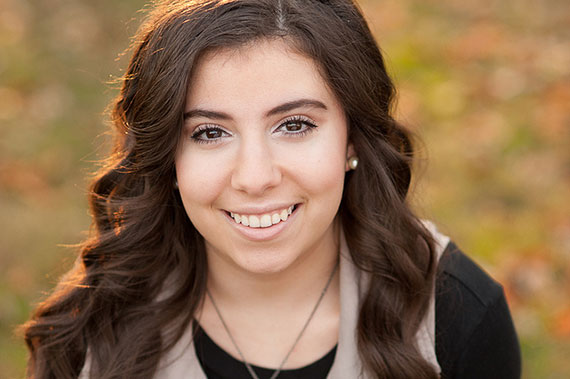
basics of photography that have stayed the same

Photo by k_mosimann; ISO 500, f/2.5, 1/500-second exposure.

Try to find some open shade for your subject, then turn on the camera flash. That tells the camera to fire the flash, even if its computer thinks it doesn’t need to. Frame your picture like you normally would and check the results.

Many professional photographers use fill flash even in full daylight.

Bend Light to Your Will

Even modern cameras are optimized to take photos in full, direct daylight, and many balance daylight slightly on the blue side. The blue bias is not always flattering to skin tones, which are more pleasing with the light shifted a little more toward the red end of the spectrum.

There are many ways to get light to do your bidding. You can wait until later in the day when the sun is lower in the sky, which scatters the blue spectrum and leaves light that is more reddish-gold in color.
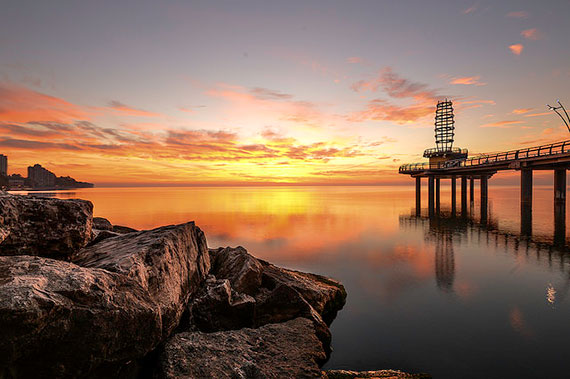
photography basics for all cameras

Photo by Freaktography; ISO 100, f/16.0, 1-second exposure.

You can put a filter over the lens that makes the colors warmer. Or, you can fool the camera into thinking the light is more blue than it actually is.

The way to tell the camera to warm up the lighting is to set your white balance to cloudy or overcast. That tells the camera to expect a blue, overcast day and prods the camera’s computer to correct the colors toward the red end of the spectrum.

Instead of taking average photos, unleash your inner photographer and have fun with your camera.

About the Author:
Peter Timko writes on behalf of Proud Photography – which offers online photography courses on a variety of subjects.


Go to full article: Cameras Change But Photography Basics Remain the Same

What are your thoughts on this article? Join the discussion on Facebook

PictureCorrect subscribers can also learn more today with our #1 bestseller: The Photography Tutorial eBook

The post Cameras Change But Photography Basics Remain the Same appeared first on PictureCorrect.


from PictureCorrect https://ift.tt/2L4jeWK
via IFTTT

PictureCorrect.com: Double Exposure Photography Tips

Multiple exposure photography is a technique in which two or more images are superimposed to get one final image. Double exposure photography was discovered by accident when film failed to advance properly. Later, photographers began utilizing this technique to come up with artistic results. Digital cameras today have a function built in that helps photographers take multiple exposure photographs in-camera. David Bergman from Adorama shares some insight on how to use these built-in modes to take double exposure photographs:

Like any other artistic effects, the double exposure effect can be achieved in Photoshop in a much more controlled manner, but doing it in-camera will challenge you to think more creatively as an artist. Bergman specifically discusses his tip for Canon camera models but this feature is built into many modern cameras. Be sure to go through your camera menu or your camera manual if you have difficulty finding it.

  1. In your camera menu, look for “Multiple Exposure” and select it.
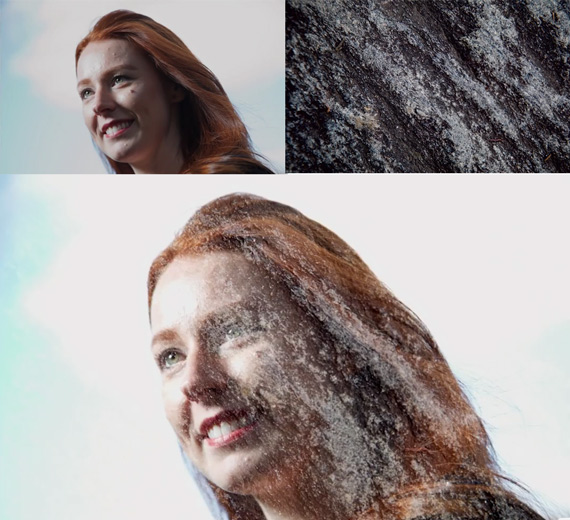
  2. You may find many modes to combine multiple images. Select “Additive” mode. In this mode, when two photos are overlaid, the brighter part of each photo wins out. Bergman shares that you can see both the exposures better if they have darker tones.
  3. For the first exposure, try to shoot against a bright background. In the video, Bergman photographs his subject by placing the bright sky as the background and filling in the subject’s face with a little bit of flash. This creates a photograph with a mixture of bright (sky and skin) and dark tones (eyes and hair).
  4. For the second exposure, try to photograph some texture, like rocks, leaves, or interesting patterns. As discussed earlier, the additive mode will blend the images so only the brighter part of the overlaid images will be visible over the darker areas of the first image. Keep this in mind as well.
  5. You can shoot in live-view mode to line up the frames for convenience.
  6. Take a lot of frames until you get some keepers.

example of double exposure photography

Remember that there are no rules for double exposure photography. You can get as creative as you want, and be sure to experiment with other camera modes as well.

“Play around with multiple exposures, and you can get some interesting images that hearken back to the early days of shooting film.”

Have you taken some interesting double exposure photographs that you would like to share? Be sure to comment below and let us know.


Go to full article: Double Exposure Photography Tips

What are your thoughts on this article? Join the discussion on Facebook

PictureCorrect subscribers can also learn more today with our #1 bestseller: The Photography Tutorial eBook

The post Double Exposure Photography Tips appeared first on PictureCorrect.


from PictureCorrect https://ift.tt/2zLGmCW
via IFTTT

PictureCorrect.com: How to Install and Use LUTs in Photoshop

If you fancy yourself the next Tarantino or Spielberg, you need to hone your visual style. Most of us, however, are a little impatient and don’t want to spend years learning colour grading in a colouring house. This is where a lookup table—or LUT—can help speed up your video and image editing process and help you develop your unique style to make your content stand out from the crowd.

What is a LUT? There are many articles out there that explain what a LUT is and what they can do, so I will keep the explanation brief for the sake of this article, and you can jump into Photoshop and start playing around sooner.

Simply put, a LUT is a way to transform an image or video from your camera into selected output values to create a final product that has its own visual identity.

It’s important to know that LUTs won’t help with exposure or white-balance issues. To get the optimum results from LUTs, you still need to take a properly exposed image or video.

As well, to use LUTs in Photoshop, you will need Photoshop CS6 or above.

Installing LUTs in Photoshop

There are two main ways of using LUTs in Photoshop. The first method is a little simpler and should be the method of choice if you are only going to use LUTs sparingly. The second method is more suitable to someone who uses LUTs on a daily basis on multiple projects.

The simple method of using LUTs in Photoshop

To get started, you need to get your hands on some LUTs. You can download free and paid LUTs online, so browse around and see which ones you like. For the sake of this post, any 3D LUTs will work.

Once you have your LUTs downloaded, unzip them to a folder on your computer and remember where you have placed them—this will be important in the next few steps. Windows and Mac operating systems come with software to unzip the LUTs, but if you don’t have them installed for some reason, do a search for a “free zip file extractor” and download one.

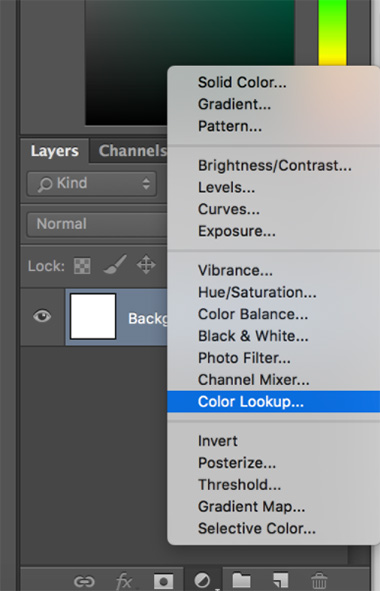
Open up your desired image in Photoshop, then create a Colour Lookup in the Adjustments tab. This can be seen in the Layers window. If you don’t see this tab, you will need to make sure that the Layers tab is visible. You can do this by navigating to Window > Layers and seeing if there is a check mark next to it.

With the Layers panel now visible, navigate to the bottom of the panel and select the option create a new fill or adjustment layer, then select Color Lookup—this icon is a half-filled circle.

photoshop luts tutorial

Colour Lookup in the Adjustments tab

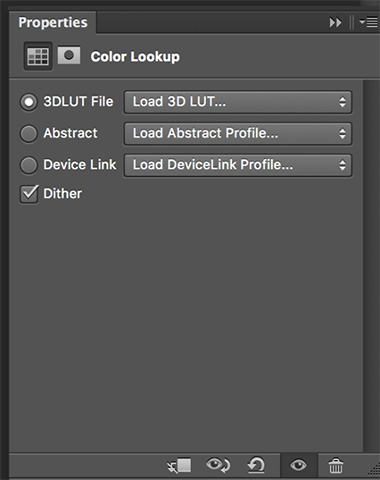
When you select Color Lookup, another screen will pop up with a few options. You should select the option to load a 3D LUT from a file and then navigate to where you saved your LUTs earlier.

photoshop luts tutorial

Color Lookup Options

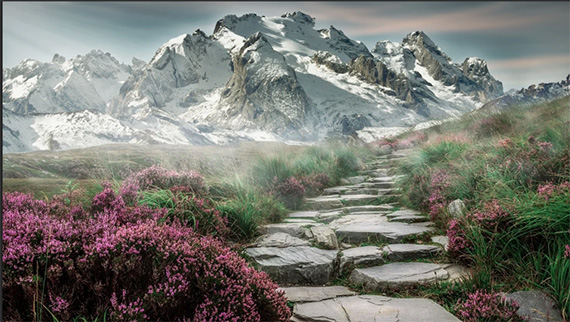
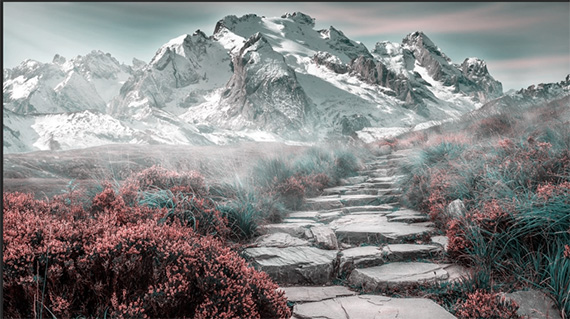
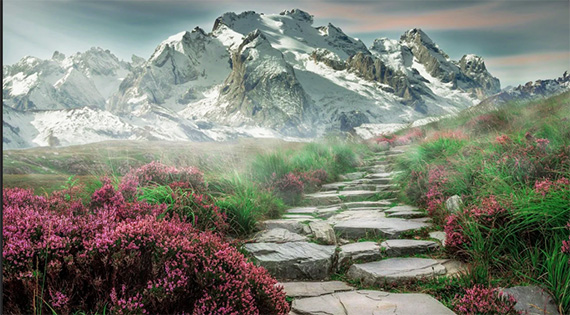
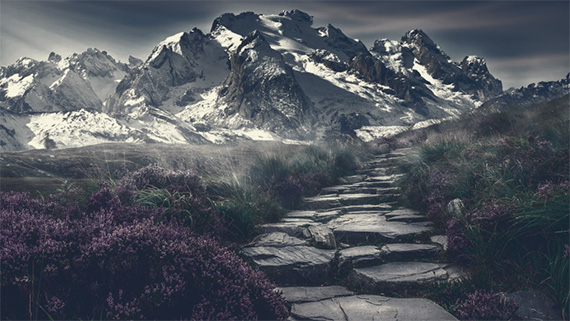
When you select the 3D LUT option, you will also notice that Photoshop comes with some standard presets you can try on your projects. Take a look at this landscape image below, and notice how adding LUTs with one click can make a huge difference in the end result:

photoshop luts tutorial

Editing with LUTs 1

photoshop luts tutorial

Editing with LUTs 2

photoshop luts tutorial

Editing with LUTs 3

photoshop luts tutorial

Editing with LUTs 4

I haven’t made any other adjustments—I only changed the LUTs. As you can see, each iteration has a different look and feel. Using LUTs can have a huge effect on your creative process.

If you don’t download any additional LUTs, even the standard ones that come with Photoshop can save you time and give you a great starting place.

A more complex method to add LUTs

For anyone familiar with Photoshop, the above method may seem simple. The only problem is you have to load your LUTs every time, and if you use them every day, this process can become annoying and time-consuming.

The second way of adding LUTs to images in Photoshop is a little more complicated, as you have to unzip your LUTs into certain Photoshop directories on your machine. Here is a quick guide to explain that process.

To add LUTs using the second method, close Photoshop and find the LUTs you want to use. Select all of these LUTs and then copy them into the following folders:

Windows users: C:\Program Files\Adobe\Adobe Photoshop *version*\Presets\3DLUTS

Mac users: Applications/Adobe Photoshop *version*/Presets/3DLUTS

Now load up Photoshop. When you create a new Colour Lookup adjustment layer, as descrobed above, you will see all of your LUTs there.

Working with LUTs in Photoshop

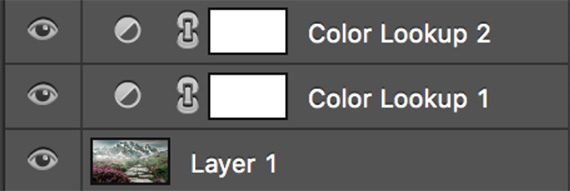
By now, you can see the benefits of using LUTs in Photoshop. They can give you a preset style in seconds. With that said, they should be used as a starting point—from here you can let your creativity take over. Combine LUTs by adding a new adjustment layer.

photoshop luts tutorial

Combining LUTs with Adjustment Layers

photoshop luts tutorial

Combining LUTs

You can change opacity, saturation, hues and so much more. Playing around with these values is going to give you the flexibility to create your own unique looks while saving you time in the process.

About the Author:
James Mathews writes for Bounce Color, a website that creates LUTs for photographers and videographers to help them speed up their editing process.


Go to full article: How to Install and Use LUTs in Photoshop

What are your thoughts on this article? Join the discussion on Facebook

PictureCorrect subscribers can also learn more today with our #1 bestseller: The Photography Tutorial eBook

The post How to Install and Use LUTs in Photoshop appeared first on PictureCorrect.


from PictureCorrect https://ift.tt/2YzjksJ
via IFTTT

PictureCorrect.com: Landscape Photography: Steps to Improve

How many times have you been driving and wanted to stop and take a shot of that breathtaking landscape. You then stop, look around and the shot even looks better. Your heart even skips a beat. You go for it and return to the car with a huge smile.

best landscape photography tips

Photo by Giuseppe Milo; ISO 400, f/8.0, 1/450-second exposure.

When you get back home you download your pictures, process them, and then you find out that what you shot was not what you placed your eyes on. What went wrong? Well, it’s simple; your lens and the sensor of your camera do not work like your eyes and your brain. You select different parts of the scene and produce beauty out of them—your sensor doesn’t.

So what do you do? For landscape photography, you need time and a couple of tips; follow them, practice, and your shots will improve.

Maximize Depth of Field

The general rule for landscape photography is to keep as much of the scene in focus as possible. This means that you have to maximize the depth of field or DOF. In other words you have to choose a small aperture setting (remember small in this case means a large number) to obtain a greater depth of field. The greater the DOF, the more focus you will achieve. This also means that your shutter will stay open longer.

Stabilize Your Camera

Since you are now using a longer shutter speed to maximize your Depth of Field, you need to ensure that your camera is stable and not shaking. The best thing to do is to use a tripod and a cable or wireless shutter release mechanism so your camera will not shake and your photo will be not blurry.

Choose a Focal Point

Decide what your central point will be. What is your subject, where is it, what size is it, does it have enough contrast with the rest of the picture, and how does its shape compare to the rest of the composition? Your central point, know as focal point, is what will make your shot stand out and keep the eyes of the viewer from wandering. The focal point in landscape photography can take the shape of many different things: a building, a tree, a rock, a person, etc. The placement of your subject is very important; use the rules of composition for this purpose.

Keep the Horizon Level

Your horizon is the next step to consider and an important one. Make sure your horizon is straight and in the lower third or the top third of the photo. The rule of thirds applies very well to landscape photography.

Use Leading Lines

Now look for lines in your shot. Lines are a way to guide the eye. It gives your image a sense of direction. Lines should direct the viewer toward your subject. A line can be a road, a river, a shoreline, mountain edges, etc.

Include a Foreground Object

Another element of your landscape composition that can create an amazing landscape shot is a foreground object. This creates depth in your shot and prevents it from being flat. The foreground will help you balance your image.

landscape photography techniques

Photo by Albert de Bruijn

Show Movement

When possible convey and transmit the movement that you see: wind, water, moving clouds, a bird. A static image is less dramatic than one that showcases movement; it adds drama and creates a point of interest.

Shoot During the Golden Hours

Shoot landscapes either early morning or at dusk; light is the best at this point, and colors, textures, and patterns will pop out and impact your image.

Change Your Perspective

Take your time before taking the final shot. Try different points of view. The same image will look completely different if you go lower or if you go higher. So walk around, climb a little, get on your knees or in a ditch. You will be surprised at what you see.

About the Author:
This article was written by Joaquin Duenas. PhotoBlog: theduenitas.blogspot.com. The Duenitas Digital World is based in Miami, Florida and covers South Florida, the Caribbean, Mexico and Central America.


Go to full article: Landscape Photography: Steps to Improve

What are your thoughts on this article? Join the discussion on Facebook

PictureCorrect subscribers can also learn more today with our #1 bestseller: The Photography Tutorial eBook

The post Landscape Photography: Steps to Improve appeared first on PictureCorrect.


from PictureCorrect https://ift.tt/39wCqpu
via IFTTT

lauantai 30. tammikuuta 2021

PictureCorrect.com: Interesting Photo of the Day: Edinburgh Castle Above the Fog

Built on Castle Rock, the historic fortress of Edinburgh Castle dominates the skyline of the beautiful city of Edinburgh. Due to its strategic positioning atop Castle Rock – a defensive positioning, the scene can look quite astounding when fog rolls over the rocky structure. It can appear as if the castle is floating above the city on the clouds. Have a look at the following image taken by photographer Adam Bulley:

Edinburgh castle above the clouds

“Majestic Edinburgh Castle Above the Fog” by Adam Bulley (Via Reddit. Click image to see full size.)

Bulley took the image with a Canon 5D Mark IV camera and the Canon 70-200mm lens. With thick fog covering the entire city, it appears like a dreamy scene from some Disney movie. The lights from the city’s homes add a magical glow and give a soothing vibe to the image. It’s simply breathtaking. How can you not love the calm and dreamy feel that the fog and light create together?

And then there’s the majestic castle in the far background standing tall and proud. It’s fantastic how the thick fog doesn’t bother it at all. Talk about being royal!


Go to full article: Interesting Photo of the Day: Edinburgh Castle Above the Fog

What are your thoughts on this article? Join the discussion on Facebook

PictureCorrect subscribers can also learn more today with our #1 bestseller: The Photography Tutorial eBook

The post Interesting Photo of the Day: Edinburgh Castle Above the Fog appeared first on PictureCorrect.


from PictureCorrect https://ift.tt/3t8w9Iu
via IFTTT

PictureCorrect.com: Things to Know When Self-Publishing a Photography Book

If you’ve been working as a photographer for quite some time, chances are that the thought of publishing your photo book must’ve crossed your mind at least once. There could be various reasons for this. It could be that you want to see your photos in printed form, to keep a record of progress as a photographer, to have a physical portfolio, or just to give it as a gift to someone. While the idea is definitely a good one, approaching publishers with this idea is not something that’s feasible for everyone. A better option can thus be to self-publish your own book. In today’s video, photographer Sean Tucker shares a bunch of advice that’ll help you put your own book together:

First off, it’s good to know that publishing a photobook is not collecting a bunch of photos and handing them over to a printer. The process is in fact a series of meticulous tasks where every single step is crucial.

Tucker’s books include images that he’s taken throughout the year. For him, it’s not about showcasing his older work. You need to carefully plan out what you want to include in your photo book. Set a theme if you want. Also, decide the number of photos you want to have in the book. Choose whether you want all of the images to be in color, monochrome, or a mix of photos in color and other in black and white. These are some of the considerations that you need to make when planning a photo book.

Once you have your book planned out, it’s now about building your collection. Keep taking photos as often as you can and keep all the ones you like in one place. Build on this collection and keep on reviewing them at certain intervals to funnel the best ones to be featured in the photo book. Remember, this is a continuous process and can’t be done in a day. Once you’ve got your collection ready, things don’t end there. Sort out the best sequence of images so that when readers flick through the pages, they have a pleasurable experience. This process determines the journey you want the readers to take. Like your collection, keep on reviewing the flow until everything snaps in place.

“Having the right order, and having the beginning, a middle, and the end, and making sure that the sequence flows will be what makes that book a good book.”

Then comes the aesthetic and technical aspects of actually giving the photobook a final shape – deciding the type of paper you want to print on and actually getting the book printed. No matter how good your photos are, people will not pay attention to them unless they’re presented in a pleasing manner. This is why Tucker strongly suggests that you seek help from a professional designer when working on the layouts. Their understanding of the workflow will make your life so much easier. A good design gives a cohesive feel to the book and adds that “wow factor”.

A tricky thing that you should consider is regarding the paper media. Printers have various paper types to choose from and each of them treats the colors differently. While some paper types, like glossy paper, exaggerates the color and contrast, uncoated paper can flatten the images and reduce saturation. So, order samples and closely study how each paper type affects your images under different lighting. Based on your final decision, you may need to slightly adjust your post-processing as well.

Finally, once your photo book is ready, don’t assume that people will instantly flock to buy it. This doesn’t usually happen unless you have a strong follower base or good regular traffic to your website. Also, self-publishing a book means that you have to market, sell, and handle any customer grievances. Don’t forget to prepare yourself in this regard. And if needed, you may need to channel your supply through local book vendors. So, sort out the way you want to go with selling your photo books beforehand.

If you’re planning to publish your own photo-book, we strongly suggest that you go through the entire video. The insights that Tucker shares will definitely come in handy.


Go to full article: Things to Know When Self-Publishing a Photography Book

What are your thoughts on this article? Join the discussion on Facebook

PictureCorrect subscribers can also learn more today with our #1 bestseller: The Photography Tutorial eBook

The post Things to Know When Self-Publishing a Photography Book appeared first on PictureCorrect.


from PictureCorrect https://ift.tt/3oxOMSJ
via IFTTT

PictureCorrect.com: Landscape Photography Elements

There are many factors that go towards creating great landscape photography. Some of the most popular and successful landscape photos usually follow a few of the elements described in this article while ignoring a others in order to create a unique scene. Here are a few items to consider while setting up your shot.

what are the components of landscape photography

Photo by Anita Ritenour; ISO 100, f/22.0, 2-second exposure.

Lens
Using an ultra wide angle lens is standard, in order to pack us much of a scene as possible into the picture. However, it’s worth experimenting with a telephoto lens too.

Composition
Pay attention to the rule of thirds, i.e. break the image down into a nine square grid, then place any lines in the picture, or focal points, along the lines of the grid.

Focal/interest points
Placing a person, trees, or a building in the foreground can give a focal point and add a sense of scale to an image.

Light
Some landscape photographers never shoot during the day, only at dawn and dusk when the light can strike life into a landscape. It’s not just the reds and pinks of sunrises and sunsets that can create drama, but the golden light of a low sun can warm a scene and create surprising textures and patterns thanks to its low angle. Similarly, storms, mist, thunderous clouds and dark skies can be much more exciting to work with than a sunny day or a beautiful sunset.

important parts of landscape photography

Photo by Jamie Barlow; ISO 100, f/11.0, 1/160-second exposure.

Depth of field
When using an SLR, or a digital SLR, combine a slow shutter speed with a small aperture to make sure your photograph has sharp focus up to the very edges. For this you will need to ensure your camera is steady as any handshake can create blur. The obvious solution is a tripod or if you don’t have one try to find something on which to rest the camera.

Exposure
Because the sky is usually very bright and the ground not so, this presents all cameras with exposure issues. If you can, then using a graduated filter will help to even out the brightness.

Location
Walk around the location to find the best place from which to take a shot. Time spent preparing is never time wasted, especially when you find a more interesting point of view to shoot from. Wander around, get down low or climb a tree to find that interesting vantage point.

Atmosphere
Shooting in black and white can produce some dramatic landscape images. If shooting film and you have two cameras, you could simply switch cameras to the one loaded with black and white film. Alternatively, with a digital SLR camera, it is simple convert it to monochrome in Photoshop afterwards.

Sky
In most landscape shots, either the foreground or the sky will dominate. If the sky isn’t particularly dramatic, place it in the upper third. Conversely, if the sky is full of interesting colours and cloud shapes, place the horizon in the bottom third.

landscape photography components to include

Photo by Hernán Piñera

Movement
Few landscapes are as truly still as we might imagine. Birds flying through the sky, clouds blowing, water running and waves in the sea are all examples of potential motion in landscape shots. Incorporating motion can add drama and focal points to a photograph, although it will mean that you will probably need to employ a longer shutter speed (up to a few seconds). Because this will mean greater exposure, you will have to use a smaller aperture or an appropriate filter.

About the Author:
Miranda Wilson writes about Digital SLR Photography for Calumet Photographic.


Go to full article: Landscape Photography Elements

What are your thoughts on this article? Join the discussion on Facebook

PictureCorrect subscribers can also learn more today with our #1 bestseller: The Photography Tutorial eBook

The post Landscape Photography Elements appeared first on PictureCorrect.


from PictureCorrect https://ift.tt/3al9hwG
via IFTTT

perjantai 29. tammikuuta 2021

PictureCorrect.com: Interesting Photo of the Day: Dew Covered Dragonfly

The stunning image below, taken by David Chambon, has been making its rounds on the Internet because of its sheer beauty. Using a macro lens to allow for a very close up image, Chambon was lucky enough to photograph the dragonfly, which is usually a very jittery insect:

Part of David Chambon’s series of dew-covered insects. (Via Imgur. Click for larger size.)

The weight of the water is enough to immobilize the bug. That’s presumably how the photographer was able to get in close enough to snap this image.


Go to full article: Interesting Photo of the Day: Dew Covered Dragonfly

What are your thoughts on this article? Join the discussion on Facebook

PictureCorrect subscribers can also learn more today with our #1 bestseller: The Photography Tutorial eBook

The post Interesting Photo of the Day: Dew Covered Dragonfly appeared first on PictureCorrect.


from PictureCorrect https://ift.tt/2LIsDyf
via IFTTT

PictureCorrect.com: Wooden Food Photography Backdrop DIY Tutorial

Your choice of background plays a crucial role when it comes to product photography. As the images will primarily be used for marketing the products, it becomes vital that the background is pleasing and that it complements the product well. This notion is equally applicable to food photography as well. This is why you’ll find photographers investing a good sum for pristine photo backgrounds. But as professional food photographer Skyler Burt demonstrates in this video, spending a big amount is not the only solution. He shows how you can easily make your own food photography backdrops at home. Let’s check it out:

“The food photography backdrop is probably one of the most important styling decisions. And finding that perfect backdrop is one of the most difficult parts of that process.”

As Burt demonstrates in the video, all you need is some planks of wood, some screws, stain, and weathered crackle glaze. Get yourself some wood planks that have some classy textures in them. This alone will impact your final look so much. So be choosy here. Secure them using some screws and then apply the stain of your choice. Applying a stain gives a darker look to the background and adds a rusty vibe to the image. It also adds more contrast to the image and allows the food to be highlighted better.

You can apply a layer of weathered crackle glaze in between two layers of stain to add a weathered look to your backdrop. It’ll add cracks to the background and give the image an overall classy look.

This is indeed a cost-effective way of making backdrops for your food photography projects. If you’re in need of a good number of backdrops, and you’re ready to explore your creative side, this can be a good exercise for you.


Go to full article: Wooden Food Photography Backdrop DIY Tutorial

What are your thoughts on this article? Join the discussion on Facebook

PictureCorrect subscribers can also learn more today with our #1 bestseller: The Photography Tutorial eBook

The post Wooden Food Photography Backdrop DIY Tutorial appeared first on PictureCorrect.


from PictureCorrect https://ift.tt/3tbncOL
via IFTTT

torstai 28. tammikuuta 2021

PictureCorrect.com: High Dynamic Range Photography (HDR)

High dynamic range (HDR) photography captivates viewers through its bedazzling attention to details and its stunning array of color. Rich and beautiful images created using HDR techniques directly responds to the age old problem of not being able to record what the eye can see. HDR overcomes this limitation and more.

columbus circle

Photo by Joe Schulz.

From the earliest days of photography, the days when photographers created glass negatives using a mixture of silver nitrate and egg whites, photographers complained about being unable to record a scene on film as the eye sees that scene. Many photographers learned to master these limitations, think about Ansel Adams’ Zone System for black and white photography, learning to manipulate exposure with filters, film sensitivity, developing processes, and much darkroom gymnastics.

The result was, and remains, stunning imagery. For amateurs and serious hobbyists, however, found themselves fighting against murky shadow detail and washed out skies. The struggle was real even for the seasoned professional.

The problem originates in the real world. The dynamic range of what the eye can see across the visible spectrum is enormous. Our eyes evolved to see the entire range from deep shadow to bright highlight and everything in between. Capturing that range on film or using a digital sensor presents one with an efficiency problem. Film, digital sensors and the techniques for printing not to mention computer monitors, are simply not up to the task of capturing detail across a wide dynamic range. HDR photography changed all that forever. Photographers using HDR techniques are now able to capture light across the widest dynamic range with relative ease.

circus ride

Photo by Jimmy McIntyre.

What is this dynamic range I keep referring to? In its simplest terms the dynamic range refers to the variation in luminance from the brightest to the darkest light values in any given exposure and high dynamic range photography refers to the ability to capture light across all or most of the dynamic range of the scene being photographed. HDR is accomplished by exposing from 3 to 7 bracketed exposures across a range of f-stops and/or shutter speeds and then recombining those exposures into a single merged image which now reflects exposures made for highlights, midtones as well as shadows.

Every bracketed image contributing to a finished HDR image inputs important information about the image being created. Underexposed images contribute to highlight detail while overexposed images provide information about the shadows. When combined, the bracketed exposures produce an hdr file that contains all of the information necessary to produce the hdr image. A second step, often referred to as tone mapping, converts the hdr file into a usable image that may then be saved as a TIFF or JPEG file. The tone mapped image is the one that is most useful when we print an HDR image. The tone mapped image displays the full range of color and detail in both the shadow areas and the highlight areas while holding the midtones true and rich.

HDR doesn’t just happen. This should come as no surprise. No photography, at least not good photography, ever just happens and HDR is certainly no different. Long before the first picture is taken one must have a good feel for the technical aspects of the equipment being used. Knowing how to successfully bracket, how many exposures to make and what intervals are appropriate for a bracketed series is important. Knowing how to manage images on your computer is a boon to speeding your workflow as you process your images. Paying attention to the details of HDR goes a long way to helping you create rich HDR images.

borobudur indonesia

Photo by Jimmy McIntyre.

Is HDR perfect? Heck no! It is appropriate for some but not all conditions, it is not appropriate for all subjects. In fact, most subjects that display a large degree of motion are generally not candidates for HDR photography. But when the conditions and subjects are right, HDR solves many dynamic range problems.

About the Author:
Roger Passman is an award winning professional photographer located in Northern Illinois. His online store is found at Cool Shots Photography Online Gallery. He often leads creative photo workshops designed for beginning through intermediate amateur photographers.


Go to full article: High Dynamic Range Photography (HDR)

What are your thoughts on this article? Join the discussion on Facebook

PictureCorrect subscribers can also learn more today with our #1 bestseller: The Photography Tutorial eBook

The post High Dynamic Range Photography (HDR) appeared first on PictureCorrect.


from PictureCorrect https://ift.tt/2jEOOJN
via IFTTT