tiistai 30. kesäkuuta 2020

PictureCorrect.com: How to Take Fireworks Photos

Fireworks are the visual rulers of the nighttime universe. No matter how many times we see and experience their bombastic splendor, we always return to see what new designs will be exploded into the darkened sky.

how to take fireworks photos

Photo by Chris Phutully; ISO 100, f/6.3, 4-second exposure.

Watching fireworks is easy. Taking fantastic fireworks photos is not. Although photographing these light shows is more challenging than capturing a daylight portrait of Uncle Ben, it is not impossible. By following these four fireworks guidelines, you will take years off your learning curve and come away with fantastic fireworks photos.

There are four main categories of guidelines to understand in order to take fireworks photos that aren’t all black or out of focus:

1. Equipment

In addition to the standard equipment list, including batteries, memory cards, camera bag, etc., here is a shortened list of critical fireworks-specific equipment to bring along:

  • Tripod — Realize that unless you use a tripod, you will most likely NOT like your fireworks photos.
  • External shutter release (a.k.a. a “cable release”)
  • Tiny flashlight so you won’t be fumbling around in the dark trying to move camera controls
  • Chair that is easy to get in and out of

For best results, your camera should be able to focus manually, and you should be able to set desired shutter speeds of up to 15 seconds, or bulb. If you have never taken a picture with your camera other than in the automatic setting, it’s time to review your owner’s manual and determine your camera’s maximum shutter speed.

2. Location

Choosing the optimal location is a little bit harder than deciding how you can squeeze into a piece of 2 foot x 3-foot real estate on the lawn.

how to take fireworks photos

Photo by Miroslav Petrasko.

  • Look for the optimum vantage point. Avoid sitting in an area with obstructions, such as streetlights, overhead wires, or trees.
  • Decide if you want to capture additional elements (such as reflections off bodies of water or landmarks), and if so, position yourself accordingly.
  • Allow enough scouting time. If you are going to be taking fireworks photos, it is worth your time to spend 30 minutes before the show begins to pick out the best location.

3. Camera Controls and Settings

Unlike taking pictures in the daytime, there is a little bit more setup involved with nighttime photography. For starters, change the ISO setting to 200 or 400. You want your camera to be more sensitive to light but not so sensitive that it will create digital noise.

Change the focusing mode on your camera to manual and focus your camera to infinity.

  • Set up and level the tripod.
  • Attach the remote shutter release to the camera and use that to fire the shutter.
  • Adjust the shutter speed. If you have a bulb setting, this is the time to use it.
  • If you don’t have a bulb setting, use a mid-range aperture such as f/5.6, and set the shutter speed to at least 1 to 2 seconds.

4. Photographing Fireworks

Obviously, this is what it all comes down to. It doesn’t matter that you’re perfectly prepared with the perfect equipment if you don’t take any pictures. Your camera is on its tripod and the shutter release cable is attached. What’s next?

how to take fireworks photos

Photo by Matthew Paulson; ISO 200, f/8, 8-second exposure.

  • Verify that the manual focus is set to infinity.
  • Point your camera toward the area of sky where you believe the fireworks will be exploding. (Don’t be too disappointed if you need to reposition the target area; most do at first.)
  • Your shutter speed is on bulb or set for AT LEAST 1 to 2 seconds. When do you fire the shutter? Unlike daylight photography, firing the shutter BEFORE the fireworks go off is a good idea.
  • Nobody can tell you when to fire the shutter because it is based on what type of fireworks photograph you want to capture. With that said, here are four possible indicators of when you might want to trip the shutter:
  • When you hear the next rocket being launched
  • When the launch trail becomes visible
  • Just BEFORE the rocket explodes, or
  • Just AFTER the rocket explodes

About the Author:
Robert Bezman is a professional photographer and owner of Custom Photographic Expressions. Robert has created best-family-photography-tips.com to help the digital photography users create better photographs.


Go to full article: How to Take Fireworks Photos

What are your thoughts on this article? Join the discussion on Facebook

PictureCorrect subscribers can also learn more today with our #1 bestseller: The Photography Tutorial eBook

The post How to Take Fireworks Photos appeared first on PictureCorrect.


from PictureCorrect https://ift.tt/2IGIKu1
via IFTTT

PictureCorrect.com: Interesting Photo of the Day: Colorful Autumn in Australia

Autumn truly is a fantastic time of year. The air has the perfect amount of bite to it and nature puts on a shade of yellow, red or orange that makes everything appear so beautiful. Photographer Dillon Monopoli took the following image of a tram during autumn in Victoria Parade, Australia. The image perfectly captures the autumn vibes in the region:

Victoria Parade Tram in Autumn

“Colorful Autumn in Victoria Parade, Australia” by Dillon Monopoli (Via Reddit. Click image to see full size.)

Monopoli took the image with his Nikon D7500. The color in the image is what makes it quite interesting to look at. The instant you look at the image, the dominance of the orange shade immediately gives you a sense of autumn. That’s the power of color. A great example of how colors can work as a visual stimulant. The only greens you can see is on the tree at the back and some grass on the right. This gives a strong indication that autumn is in full swing. And quite interestingly, the scroll and lights on the tram are also similar in color to the leaves, which complements the image well.

Besides color, the composition is quite well configured. The tracks work as strong leading lines drawing us right into the incoming tram. And even the tree branches do a great job of working as a frame and emphasizing the tram.

Are autumns in your area this colorful?


Go to full article: Interesting Photo of the Day: Colorful Autumn in Australia

What are your thoughts on this article? Join the discussion on Facebook

PictureCorrect subscribers can also learn more today with our #1 bestseller: The Photography Tutorial eBook

The post Interesting Photo of the Day: Colorful Autumn in Australia appeared first on PictureCorrect.


from PictureCorrect https://ift.tt/2NLk2xG
via IFTTT

Axminster Photography Group Photos: Paddleboard Silhouette


via Axminster Photography Group Photos Feed https://ift.tt/3ijvXAD

Axminster Photography Group Photos: Heading out contre-jour


via Axminster Photography Group Photos Feed https://ift.tt/38h0NoQ

Axminster Photography Group Photos: Carried in on the Tide


via Axminster Photography Group Photos Feed https://ift.tt/2Bf1d3l

Axminster Photography Group Photos: Spoilt for Choice


via Axminster Photography Group Photos Feed https://ift.tt/2YLJ6eg

Axminster Photography Group Photos: Home Safe


via Axminster Photography Group Photos Feed https://ift.tt/2Vwf2Bf

Axminster Photography Group Photos: Axmouth Evening


via Axminster Photography Group Photos Feed https://ift.tt/3ifBzMq

Axminster Photography Group Photos: Upstream from Axmouth Harbour


via Axminster Photography Group Photos Feed https://ift.tt/2YIDe5j

Axminster Photography Group Photos: Teasel by the Harbour


via Axminster Photography Group Photos Feed https://ift.tt/3eMPAPz

Axminster Photography Group Photos: Stranger on the Shore


via Axminster Photography Group Photos Feed https://ift.tt/3iiPbq0

Axminster Photography Group Photos: Working Gear


via Axminster Photography Group Photos Feed https://ift.tt/2BnMPpm

Axminster Photography Group Photos: Axmouth


via Axminster Photography Group Photos Feed https://ift.tt/2ZmrRiG

Axminster Photography Group Photos: Axmouth Harbour


via Axminster Photography Group Photos Feed https://ift.tt/2ZqCX6j

Axminster Photography Group Photos: Rocks and Shadows


via Axminster Photography Group Photos Feed https://ift.tt/2NL3WUs

Axminster Photography Group Photos: Where are the Aphids?


via Axminster Photography Group Photos Feed https://ift.tt/3ihRRUU

Axminster Photography Group Photos: Walking By


via Axminster Photography Group Photos Feed https://ift.tt/2ZmZHEb

Axminster Photography Group Photos: The New and The Old


via Axminster Photography Group Photos Feed https://ift.tt/2YLgbaf

Axminster Photography Group Photos: The Calm at Sunrise


via Axminster Photography Group Photos Feed https://ift.tt/2Zq5hFE

Axminster Photography Group Photos: Solitary Trees


via Axminster Photography Group Photos Feed https://ift.tt/38kNdRx

Axminster Photography Group Photos: The Sea Awaits


via Axminster Photography Group Photos Feed https://ift.tt/2VyoNih

Axminster Photography Group Photos: Recreation


via Axminster Photography Group Photos Feed https://ift.tt/2YNL7ql

Axminster Photography Group Photos: Incoming Tide


via Axminster Photography Group Photos Feed https://ift.tt/38cFyVe

maanantai 29. kesäkuuta 2020

PictureCorrect.com: How to Do Shaped Bokeh Photography in 5 Easy Steps

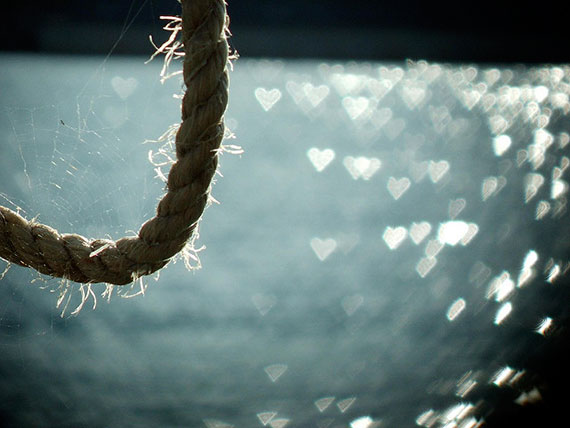
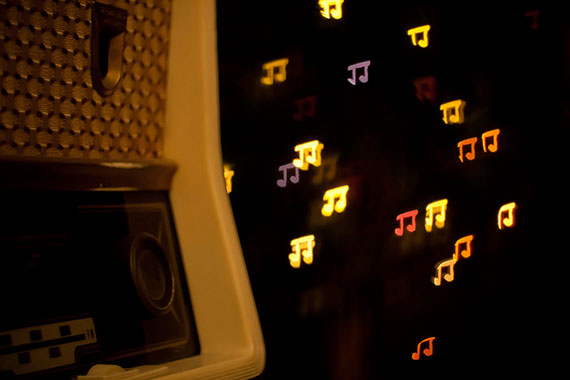
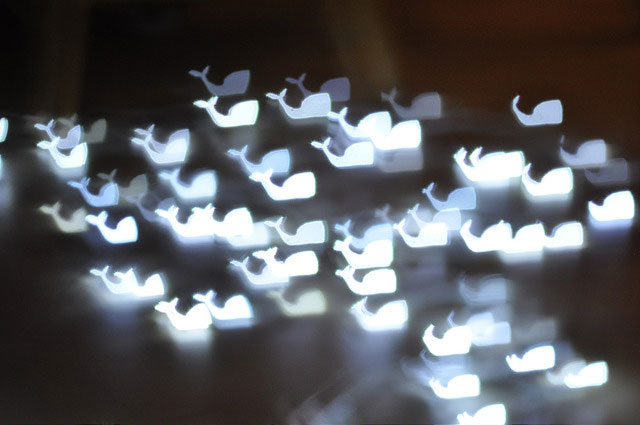
It’s amazing what you can do with a camera. Light can be captured in different ways, and this opens up many possibilities for the keen photographer. Creating your own shaped bokeh is a fun and exciting way of shaping light as it enters the camera, and it leads to spectacular results.

Bokeh refers to the out-of-focus or blurry regions in a photo that occur outside the depth of field. This is especially evident when you have small background highlights that create high contrast.

custom bokeh tips

Photo by ruben alexander; ISO 200, f/1.8, 1.6-second exposure.

Taking this concept, you can change the shape of your bokeh by manipulating the lens. You can easily master this cool camera trick by following these five steps:

how to make custom bokeh

Photo by Smallest Forest; ISO 64, f/3.1, 1/420-second exposure.

how to make bokeh shapes

Photo by Francesca Cappa; ISO 800, f/1.8, 1/20-second exposure.

  1. You’ll need dark colored construction paper, preferably black. Cut a strip of paper with a length that will fit around the lens of your DSLR camera. It’s best to use a lens with a wide aperture to create bokeh. Wrap the strip of paper around the outside of your lens, forming a cylinder, and hold it together with tape.
  2. Next, you need a circle-shaped piece of the black paper to form the cap on the paper tube, which will fit over your lens. To do this, you can measure the lens of your camera and draw the circle on the paper with a compass set to half the lens width. Or, you can get the paper tube you made, place it on the paper, and trace around it to get your circle.
  3. Cut out the circle and use a paper punch to make a custom shape in the middle of the circle. If you don’t have a custom paper punch, you can use an X-Acto knife to cut out the shape you want. The shape should be between 1/2 and 3/4 of an inch. It can be anything–a heart, cloud, star, you name it. Make as many circles as you want with different cut out shapes. Some will work better than others, so you’ll need to experiment.
  4. Prepare to place the paper tube and circle over the lens. Putting a strip of tape along one edge of the tube will make it easier for you to remove and change the shape cutouts. You should tape the circle to the tube so that it forms a cap that will fit nicely over your lens.
  5. You are ready to shoot! If you want to make the best bokeh, make sure the focused subject is positioned close to the camera. Bright background highlights should be at a distance. The background can be any tiny points of light, such as sunlight between leaves or Christmas lights. Set your camera to full manual or aperture priority mode, and make sure your aperture is as wide as possible.
change bokeh shapes

Photo by Hannah Morse; ISO 800, f/2.8, 1-30-second exposure.

With your own custom shaped bokeh, you can make awesome and creative images. This useful and simple photo trick is just about manipulating the aesthetic blur to create something magical in your photos.

About the Author:
Swee Shiong Chong writes for sgeastphoto, a photography blog on techniques and equipment that is used in creating all types of photography from around the world.


Go to full article: How to Do Shaped Bokeh Photography in 5 Easy Steps

What are your thoughts on this article? Join the discussion on Facebook

PictureCorrect subscribers can also learn more today with our #1 bestseller: The Photography Tutorial eBook

The post How to Do Shaped Bokeh Photography in 5 Easy Steps appeared first on PictureCorrect.


from PictureCorrect https://ift.tt/2gTJB2j
via IFTTT

PictureCorrect.com: Interesting Photo of the Day: United We Stand

Not all photographs make it to the history books for the world to remember. Think of Steve McCurry’s “Afghan Girl”, or Dorothea Lange’s “Migrant Mother”. They’ve been able to convey important stories for the whole world to understand. You may not realize immediately that the photo you’ve taken has captured a historical milestone. But who knows? Maybe some day it could end up being iconic too. The following photograph, taken by photographer Merry Pranksta, looks like something that could perhaps one day end up in the pages of a history book:

protestors in LA

Photo captured by Merry Pranksta (Via Reddit. Click image to see full size.)

Pranksta took the image with his Sony A7II and 24-70mm lens during an event in LA.

Excellent capture by the photographer.


Go to full article: Interesting Photo of the Day: United We Stand

What are your thoughts on this article? Join the discussion on Facebook

PictureCorrect subscribers can also learn more today with our #1 bestseller: The Photography Tutorial eBook

The post Interesting Photo of the Day: United We Stand appeared first on PictureCorrect.


from PictureCorrect https://ift.tt/38blyCo
via IFTTT

PictureCorrect.com: How to Keep Your Camera Gear Clean in Dusty Conditions

Your camera and lenses are equipment that help you to capture a moment in time. If you’re a professional, they’re the tools that help you get the job done. And no, you don’t have to treat your gear like your babies. But it’s important that you handle them with care. And care becomes even more important when you’re traveling. You don’t want to end up with non-functioning equipment in a new place. Photographer Janine Krayer from Pangolin Photo Safaris shares some simple measures to care for your photography gear when you’re traveling:

You really don’t need to carry around professional kits to clean your camera gear by yourself. A basic camera kit works just fine. Krayers demonstrates how you can keep the body and the front element of the lens clean along with certain precautionary measures. And it’s not only the outside that gets dirty right? Sensor spots are a common bother that many of us face when shooting in dusty conditions. Krayers also explains how you can get rid of the dust on the camera’s sensor using a simple air blower.

“If you come from a really dusty safari, you should clean your equipment literally daily to keep it nice and spotless.”

And if you’re one of those people on the clumsy side and tend to bump your equipment regularly, consider getting a silicone protective cover. They work like the case that we put on our phones to protect them.

What other techniques do you use to take care of your photography equipment?


Go to full article: How to Keep Your Camera Gear Clean in Dusty Conditions

What are your thoughts on this article? Join the discussion on Facebook

PictureCorrect subscribers can also learn more today with our #1 bestseller: The Photography Tutorial eBook

The post How to Keep Your Camera Gear Clean in Dusty Conditions appeared first on PictureCorrect.


from PictureCorrect https://ift.tt/31usfhS
via IFTTT

sunnuntai 28. kesäkuuta 2020

PictureCorrect.com: Dog & Puppy Photography Ideas

Move away from ordinary pet photos by trying out these five fun dog photography ideas:

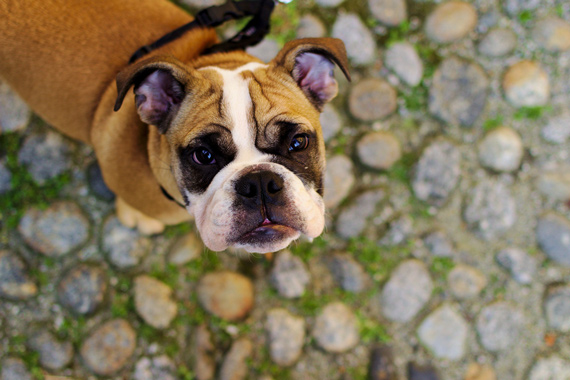
dog portrait

“Guardian of the Front Yard” captured by Matt Deavenport

1. Climb a Tree

No, not your dog silly. You! Climb a tree (preferably a sturdy one that is bigger than Charlie Brown’s Christmas tree). Bring a treat and your camera. Take a picture of your pup looking up at you or drop a ball from the tree. Turn up your shutter speed and start shooting.

pet portrait

“Dog the Boss” captured by Giuseppe Martino

2. Go For a Dip in the Water

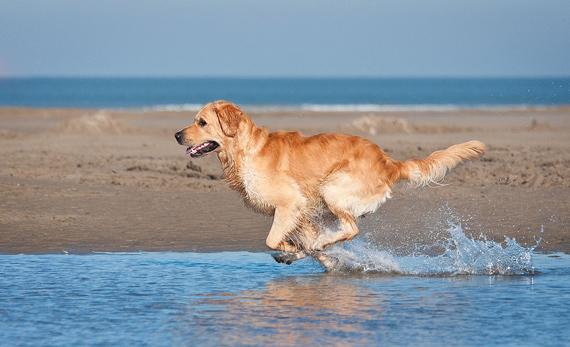
Taking a picture of a dog running through the water without the “blur” effect is no easy task.

dog running on beach

“Run Doggie Run” captured by Thierry Marysael

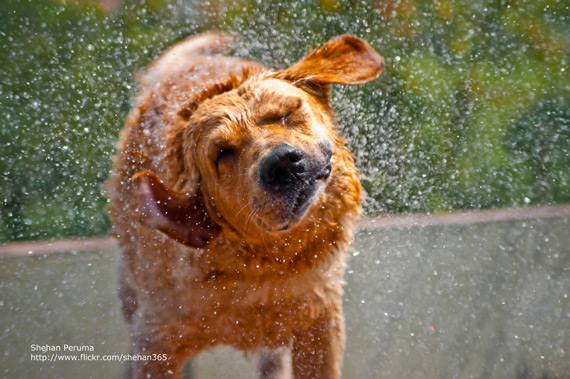
Follow these steps to success: Set your camera to the sports mode or choose a fast shutter speed. Crouch down and aim at the water. Have a friend throw the ball in the water. Snap away as the dog swims back to you and exits the water. Extra Bonus: Wait an extra minute and right when Fido shakes off that extra water, click the shutter. You’ll get lots of weird dog shaking, silly photos that will evoke a few laughs. If you are not near a body of water, a hose in the backyard works great, too.

dog shaking off water

“Untitled” captured by Shehan Peruma

3. Consider Graffiti

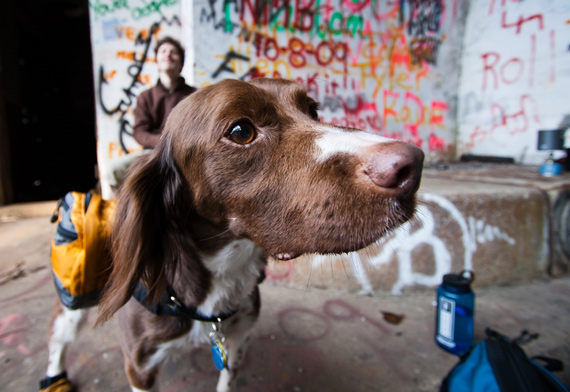
Graffiti walls and dogs are a wonderful combo! If you’re in Denver, 29th Street between Walnut and Larimer has a fantastic display of graffiti. Put Fido in front (about eight feet away from graffiti wall so you get that “magical” colorful blur or “bokeh” background). Use either voice commands, a cat meowing, noise-makers, or treats. Start clicking and ta da! Dog art for your walls.

pet photography

“Frederick’s Snout” captured by Jason Pratt

4. Use a Glass Table

Do you have an old glass table? Well, bring it out and let’s pop your dog on it. Note: This is ONLY for breeds under 20 pounds. I would never want to put a dog in harm’s way. (I can just see someone putting a Great Dane on a glass nightstand!) Position the table so that the dog is facing the sun. Turn off your flash, get under the table, and start clicking!

5. Have a Snack

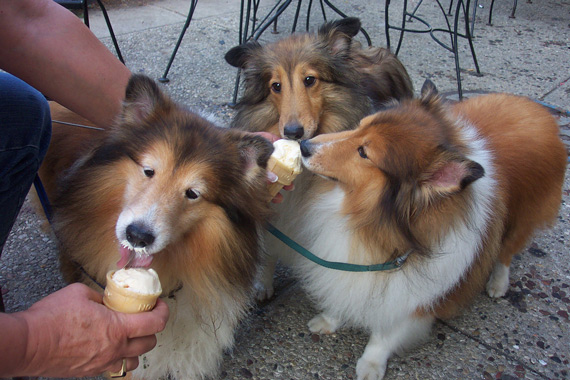
A dog eat ice cream tops my list of funny things to watch. Buy some non-chocolate ice cream (chocolate is dangerous for dogs!) in a cone. Set your camera to Portrait mode (or choose a wide aperture). Stay around 12 inches away from your dog’s face (that gives your camera some room to focus) and start shooting. The best part is when it gets all over their face! Grab yourself a cone and indulge, too! Fido should not have all the fun!

dogs eating ice cream

“Shelties” captured by Doc Moreau

About the Author:
Jaime Rowe’s life has been filled with one-eyed guinea pigs, albino angora rabbits, blue parakeets, beta fish, stray black cats, purebred dogs and lovable mutts. She operates Barkroom, a community of people who love photography and pets.


Go to full article: Dog & Puppy Photography Ideas

What are your thoughts on this article? Join the discussion on Facebook

PictureCorrect subscribers can also learn more today with our #1 bestseller: The Photography Tutorial eBook

The post Dog & Puppy Photography Ideas appeared first on PictureCorrect.


from PictureCorrect https://ift.tt/2fC0Zsg
via IFTTT