tiistai 30. syyskuuta 2025

PictureCorrect.com: Dodge & Burn Tutorial in Luminar

Dodging and burning is an old darkroom technique, and it’s simply lightening or darkening certain areas of a photograph while leaving the other areas as they are. In the digital age, we still use dodge and burn to lighten and darken, but we use editing software to do it instead of controlling light in the darkroom.

Luminar’s Dodge & Burn tool is very simple to use; you don’t need to remember whether dodge is lighten or burn is darken, unlike some other image editors.

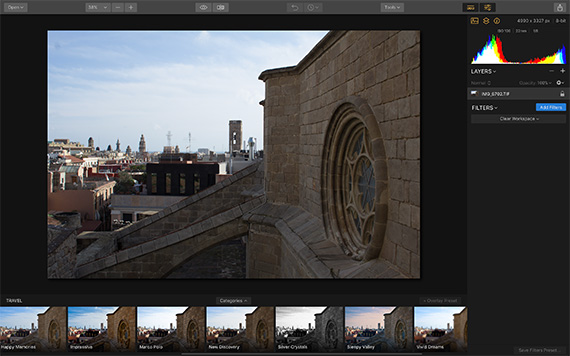
For this article, I’m using a skyline of Barcelona that was taken around midday. There are areas of deep shadow, and the sky is too light in places.You can use dodge and burn on any type of photograph, and if you just want to practice you can use Luminar’s handy sample image.

Related reminder: only a few days left to Pre-Order the New Luminar Neo Ecosystem

Note: you can use the coupon code picturecorrect20 for an additional 20% off
dodge and burn filter

Barcelona Skyline

To get the best out of the Dodge & Burn tool, you should have already made your adjustments such as exposure, contrast, color, adding an overlay etc. Dodge and burn should be one of the final steps in editing an image. Think of it as adding the finishing touches. The image I’m using today has been deliberately left unedited so you can see the dramatic changes you can get just by using the Dodge & Burn, too.

Upload your image, then click the Add Filter button on the right-hand side of the screen. A list of filters will appear.

You’ll find the Dodge & Burn tool in the Professional category of filters. Don’t be put off by it being a professional tool; it’s very easy to use even if you’ve never done dodging and burning before.

Click on the Start Painting button:
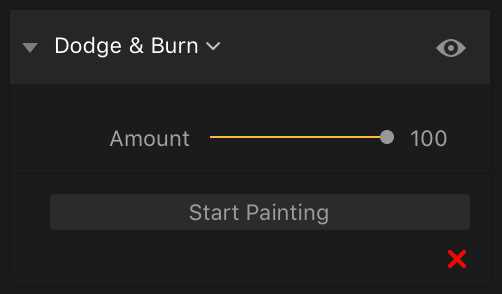
dodge and burn luminar

Start Painting

A bar will appear across the top of the screen with the dodge & burn options:

luminar dodge and burn

Bar

You can change from one to the other just by clicking the buttons. Lighten and darken will give you a brush that will lighten or darken the parts of your image that you paint on. Erase will rub out the changed areas, which is great if you make a mistake, and Reset will completely undo all of the painting you have done up to that point.

The Size and Strength options are to control the brush. You can adjust the size of your brush tip by changing the slider under Size, but there’s a handy keyboard shortcut by using the bracket ( ) keys to make your brush larger or smaller.

The strength option is set at 50 percent by default, but I find that’s too strong, and can make your adjustments look unnatural. I always move the Strength slider down to between five and ten percent to start with. If that’s not enough, I will then move it up by stages until I have the perfect strength for that image. Each photo is different, so while some may need a lot of adjusting, others only need a light touch.

The shadow sides of the buildings in this image could do with lightening up. Once I had set up the strength and size of my brush, I simply brushed over the areas on the image that needed lightening. Luminar has a built-in sophisticated masking system, so it will blend the edges of your brush strokes for a natural look.
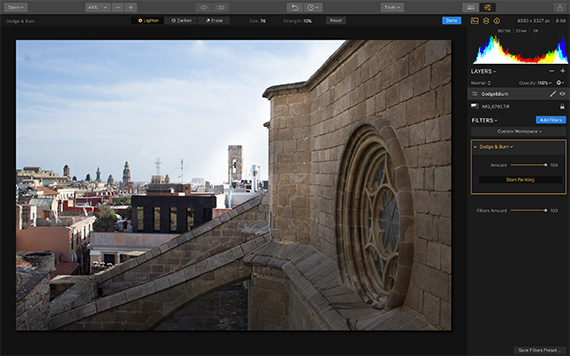
dodge burn tool

Lightening

I darkened the sky and the buildings that were in direct sunlight using the Darken tool. This is great if you have areas of your image that are a bit washed-out or slightly overexposed. If you have totally blown highlights, there will be no detail left in them to recover by darkening, so it’s not worth doing on really overexposed images.

It’s best to build up your brushwork gradually, and every now and then stop and take a look at the whole image to make sure you like all the changes. You can also toggle between Before and After views by using the eye icon along the top menu bar. This will allow you to see how far you have come from the original image.

This is the image before and after dodging and burning:

image before editing

Before

image after editing with luminar

After

You can see the dramatic difference in both the buildings and the sky, and it looks very natural. Dodging and burning really helps to finish off an image, and can draw your viewer’s eye towards certain parts of the image that you want to emphasize.

Try it Yourself:

This fall marks one of the most exciting leaps forward in photo editing. With the 2025 Fall Upgrade, Luminar Neo expands across every major platform — now available on iOS, Android, and ChromeOS — and lays the foundation for the Luminar Ecosystem (pre-order offer ending soon).

Skylum is delivering on a vision many photographers have long dreamed of: freedom to create anywhere, share everywhere, and let inspiration flow without friction. Try the coupon code picturecorrect20 for an additional 20% off

Only a few days left: Luminar Ecosystem Pre-order Sale

The post Dodge & Burn Tutorial in Luminar first appeared on PictureCorrect.


from PictureCorrect https://ift.tt/1ae4luA
via IFTTT

sunnuntai 28. syyskuuta 2025

PictureCorrect.com: 10 Lightroom Tools for Photographers to Know

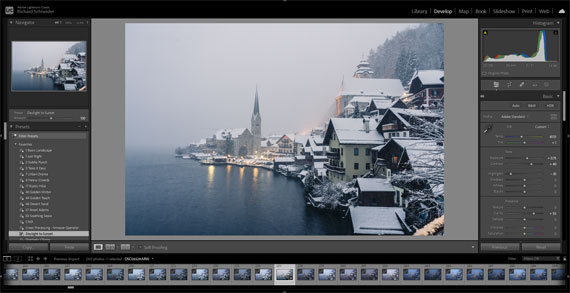
Adobe Lightroom is an essential tool for photographers, as it offers a range of features to help edit, organize, and enhance photos. Here are the top 10 most important Lightroom tools that photographers should know how to use:

Related reminder: for further training on essential photo editing knowledge, the Fundamental Photo Editing Guide is currently on sale if you want to dig deeper.

lightroom tools

Photo captured by Szabo Viktor

Histogram: The histogram provides a visual representation of the tonal range in an image. It helps you assess exposure and make adjustments as needed.

Crop and Straighten: The Crop tool allows you to trim your image to a desired aspect ratio, while the Straighten tool enables you to correct any slanted horizons or lines.

White Balance: This tool is essential for correcting color temperature in your images. You can use the eyedropper tool to select a neutral area or manually adjust temperature and tint sliders.

Tone Curve: The Tone Curve allows you to make precise adjustments to the tonal range of your image. You can control highlights, shadows, and midtones to create the desired contrast and tonal balance.

Basic Panel: The Basic Panel offers controls for Exposure, Contrast, Highlights, Shadows, Whites, and Blacks. These sliders help you adjust the overall brightness, contrast, and tonal balance of your images.

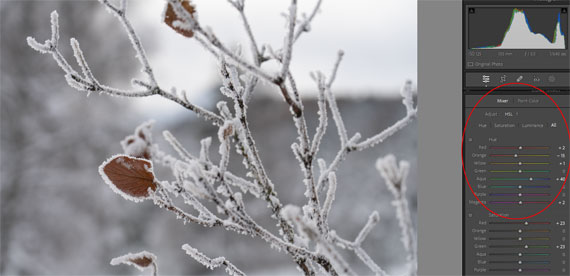
HSL / Color Panel: This panel allows you to adjust Hue, Saturation, and Luminance (HSL) for individual colors. This is useful for enhancing specific colors or correcting color imbalances in your photos.

Sharpening and Noise Reduction: These tools help you enhance image details and reduce noise, particularly in high ISO images. The Detail Panel contains the sharpening and noise reduction sliders.

Lens Corrections: Lightroom has a built-in database of lens profiles that can automatically correct common lens issues like distortion, vignetting, and chromatic aberration.

Graduated and Radial Filters: These filters allow you to apply adjustments selectively to specific areas of your image. Graduated filters are ideal for landscapes, while radial filters work well for isolating subjects and creating vignettes.

Spot Removal: The Spot Removal tool is perfect for getting rid of sensor dust, small blemishes, or other unwanted elements in your images. You can choose between Clone and Heal modes, depending on the desired effect.

By mastering these essential Lightroom tools, photographers can greatly improve their workflow and image quality.

For Further Training on Photo Editing Fundamentals:

This is a complete step by step guide to photographic editing from author Kent DuFault. Fundamental editing includes edits that aren’t going to fundamentally change the concept of the original photograph. It covers the steps required to take your original photo, as it came out of the camera, and turn it into the best image that it can be without going overboard. It is currently marked down 62% off if you want to check it out.

fundamental photo editing

The Ultimate Guide to Fundamental Photo Editing (Take a Peek Inside)

Digital photography is so intrinsically tied to the editing process that you can’t really consider doing one without doing the other. I know many new photographers try and resist this at first. I was guilty of that myself.

Deal ending soon: The Fundamental Photo Editing Guide at 62% Off

The post 10 Lightroom Tools for Photographers to Know first appeared on PictureCorrect.


from PictureCorrect https://ift.tt/g7FRAf0
via IFTTT

lauantai 27. syyskuuta 2025

PictureCorrect.com: Black and White Photography Challenge

I have decided to add in a few photography challenges – some practical exercises designed to take your photography further!

Related reminder: only a little while left for the Photo Exercises 📅 September Savings

A couple of years ago I set my camera image review to Black and White. At the time, it was more of an experiment, however, over the next 3 months I saw a dramatic improvement in my photography…..

black white

It was such a great exercise that I challenge you to do the same and I am confident that you will see an improvement in your photography too.

At the point of capture, color is nothing more than a distraction. There is nothing that we can do to improve or change the colour during capture. So why confuse our senses by reviewing it on the back of our camera?

Strong photos are made up of interesting subjects, shapes, lines and tones. Color is just the icing on the cake, however, all that pretty icing can often distract us from the strong subject, shapes, lines that we should be searching for.

Have you ever had your camera set up with a strong composition, only to end up chasing the colorful sky in another direction?

If so, you have fallen victim to the color distraction. Chances are you would have captured a better photo had you stayed with the original strong composition.

Remove all color and we are left with two elements to create interesting photography – Light and Contrast (contrast being the way light and dark interact within the frame). Through the process of creating appealing Black and White compositions, you will gain a much better understanding of the use of light and contrast in creating interesting photographs.

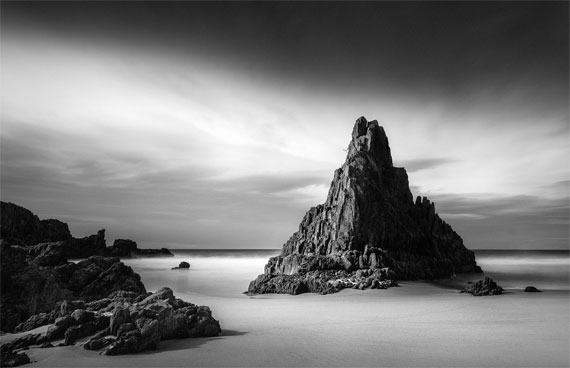
black white photographer

Photo captured by andreas kretschmer

The Challenge – Shoot in Black and White

Tip: If you shoot in Raw, you can change the “Picture Settings” in your camera menu to Monochrome. In doing this, the LCD on your camera will review in Black and White, however, once you import in Lightroom, the color will return.

If you shoot in Jpeg, you will have to commit 100% to Black and White for the challenge, however, the knowledge you gain is well worth the exercise!

I shot with my “Picture Settings” on Monochrome for roughly 1 year – that’s a little extreme. Perhaps a couple of weeks or a month would give you a great understanding of the importance of Light and Contrast within your photography.

For Further Training:

Are you ready to elevate your photography skills to the next level? Dive into our specially curated collection of 25 of the most popular and effective photography exercises designed to help you learn through practice and retain essential techniques.

September Savings Ending Soon: Photography Exercises Bundle at 85% Off

The post Black and White Photography Challenge first appeared on PictureCorrect.


from PictureCorrect https://ift.tt/QABUDMi
via IFTTT

perjantai 26. syyskuuta 2025

PictureCorrect.com: Lightroom Culling Mastery: Tips for Choosing Your Best Photos

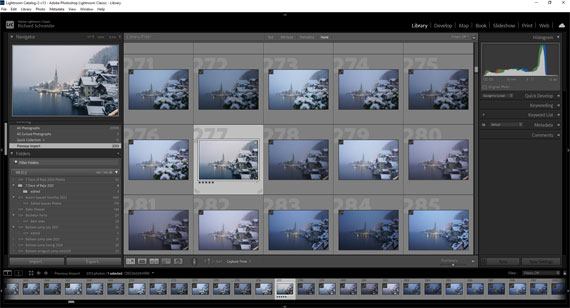
Culling photos in Adobe Lightroom is an essential step in a photographer’s workflow, allowing you to select the best images from a shoot for editing and presentation. Here are some effective strategies to streamline the culling process:

Quick reminder: for further training on essential photo editing knowledge, the Fundamental Photo Editing Guide is currently on sale if you want to dig deeper.

lightroom culling

  1. Use Flags and Ratings Efficiently:
    Flags: Quickly flag your photos as “Picks” (P key) for those you like, “Rejects” (X key) for those you don’t, and unflagged for those you’re unsure about. Later, you can filter to show only picked or rejected photos to review your selections.
    Ratings: Assign star ratings (1-5) to differentiate levels of quality or potential within your selections. This can help when you need to narrow down picks further.
  2. Use Color Labels: Assign color labels to categorize your photos further. This can be used to indicate different stages of editing, types of photos (e.g., portraits, landscapes), or priority for editing.
  3. Take Advantage of Smart Previews: If you’re working with a large batch of high-resolution images, consider using Smart Previews in Lightroom to speed up the loading and reviewing process. Smart Previews are smaller, lightweight versions of your photos that are much faster to work with. You can always switch back to the full-resolution files for detailed editing.
  4. Compare View: Use the Compare View (C key) to look at two photos side by side. This is particularly useful for choosing between similar shots.
  5. Survey View: When you have several candidates for a specific need, use the Survey View (N key) to see them all at once without distractions. It makes it easier to eliminate outliers until you find the best one.
  6. Use Auto Advance: Enable Auto Advance in the Photo menu to automatically move to the next photo after you rate or flag the current one. This can significantly speed up the culling process.
  7. Keyboard Shortcuts: Learn and use Lightroom’s keyboard shortcuts to speed up your workflow. Key shortcuts for flagging, rating, and moving between photos can save a lot of time.
  8. Initial Fast Pass: Do a quick first pass through your photos to flag obvious rejects. This can quickly reduce the number of photos you need to consider more carefully.
  9. Focus on Elimination, Not Selection: Sometimes it’s easier to eliminate the weakest photos first rather than trying to pick the best ones right away. This reduces the pool of candidates and makes final selections clearer.
  10. Take Breaks: Especially for large batches, take breaks to avoid fatigue and maintain a fresh perspective. What might look like a reject at first could be a hidden gem upon a second look.
  11. Use Collections: After culling, create collections in Lightroom for your selected photos. This helps organize your workflow and keeps your picks easily accessible for the next steps in your editing process.

These strategies can be adapted based on personal workflow preferences and the specific needs of a project. The goal is to make the culling process as efficient and accurate as possible, ensuring that you spend your editing time on the photos that best capture your vision.

For Further Training on Photo Editing Fundamentals:

This is a complete step by step guide to photographic editing from author Kent DuFault. Fundamental editing includes edits that aren’t going to fundamentally change the concept of the original photograph. It covers the steps required to take your original photo, as it came out of the camera, and turn it into the best image that it can be without going overboard. It is currently marked down 62% off if you want to check it out.

fundamental photo editing

The Ultimate Guide to Fundamental Photo Editing (Take a Peek Inside)

Digital photography is so intrinsically tied to the editing process that you can’t really consider doing one without doing the other. I know many new photographers try and resist this at first. I was guilty of that myself.

Deal ending soon: The Fundamental Photo Editing Guide at 62% Off

The post Lightroom Culling Mastery: Tips for Choosing Your Best Photos first appeared on PictureCorrect.


from PictureCorrect https://ift.tt/ruCUg5h
via IFTTT

torstai 25. syyskuuta 2025

PictureCorrect.com: Documenting Daily Life: A Photography Exercise

Photography isn’t just about capturing grand landscapes or special occasions; it’s also about finding beauty and meaning in everyday moments. Documenting your daily life can be an incredibly rewarding exercise, offering a unique glimpse into the small details that make up your routine. This exercise helps you to see the extraordinary in the ordinary, and it’s a fantastic way to improve your storytelling skills through photography. Here’s how to get started on this engaging journey.

Relevant note: only a little while left for the Photography Exercises 📅 September Savings

morning routine

Photo captured by Timothy Barlin; 21mm, f/2.5, 1/500s, ISO 200

Why Document Daily Life?

  1. Personal Reflection: Capturing your daily routine helps you to reflect on your life and appreciate the small moments that often go unnoticed.
  2. Storytelling: Everyday photos tell a story of who you are and what you do, making it a perfect exercise for developing narrative skills.
  3. Skill Development: It challenges you to think creatively about mundane subjects, improving your photography skills in composition, lighting, and perspective.
  4. Memory Keeping: It creates a visual diary that you can look back on, preserving memories for years to come.

Getting Started

Step 1: Plan Your Day

Start by planning your day and identifying key moments you want to document. Consider the following:

  • Morning routine: Making coffee, breakfast, reading the newspaper.
  • Commute: Walking, driving, public transportation.
  • Work or school: Desk setup, interactions with colleagues, tasks you perform.
  • Leisure time: Hobbies, time with family or friends, favorite places.

Step 2: Choose Your Gear

You don’t need a fancy camera for this exercise. A smartphone or a compact camera will do just fine. The key is to have a camera that you can carry with you throughout the day.

Step 3: Capture Moments

  1. Morning Light: Start with the morning light. It’s soft and can create beautiful, natural images. Try capturing the light filtering through the windows or the first cup of coffee.
  2. Routine Tasks: Document routine tasks like brushing your teeth, preparing meals, or commuting. Focus on details like the texture of food, the expression on your face, or the view from your window.
  3. Work Environment: Take photos of your workspace, tools, and any interesting details that reflect your daily tasks. If you work from home, capture the comfort of your setup.
  4. Interactions: Capture interactions with people around you. This could be family members, colleagues, or even pets. Look for candid moments that reflect genuine emotions.
  5. Leisure Activities: Document how you unwind. This could be anything from a walk in the park, reading a book, or watching TV. Show what makes these moments relaxing or enjoyable for you.
  6. Night Time: Don’t forget to capture the evening and night scenes. The artificial lighting can create interesting shadows and contrasts, adding a different mood to your photos.

Step 4: Practice Composition

Pay attention to the composition of your photos. Use techniques like the rule of thirds, leading lines, and framing to make your photos more interesting. Experiment with different angles and perspectives to add variety.

Step 5: Edit Your Photos

Editing can enhance your photos and bring out the details you want to highlight. Use basic editing tools to adjust brightness, contrast, and color balance. You can also crop your photos to improve composition.

Step 6: Create a Visual Diary

Once you’ve captured your daily routine, compile your photos into a visual diary. You can create a photo album, a digital slideshow, or even share your journey on a blog or social media.

Tips for Success

  • Be Consistent: Try to document your daily routine for at least a week to capture a broader range of moments.
  • Stay Observant: Pay attention to the small details that often go unnoticed. They can add depth to your story.
  • Tell a Story: Think about how each photo contributes to the overall narrative of your day.
  • Have Fun: Enjoy the process of documenting your life. Don’t worry about getting the perfect shot every time.

Conclusion

Documenting your daily life through photography is a powerful way to capture the essence of who you are and what you do. It’s a simple yet profound exercise that can enhance your photography skills and provide a meaningful record of your everyday moments. So grab your camera and start exploring the beauty in your daily routine. You might be surprised at the stories waiting to be told.

For Further Training:

Are you ready to elevate your photography skills to the next level? Dive into our specially curated collection of 25 of the most popular and effective photography exercises designed to help you learn through practice and retain essential techniques.

September Savings Ending Soon: Photography Exercises Bundle at 85% Off

The post Documenting Daily Life: A Photography Exercise first appeared on PictureCorrect.


from PictureCorrect https://ift.tt/Vw3cDhg
via IFTTT

keskiviikko 24. syyskuuta 2025

PictureCorrect.com: The Future of Photo Editing: Luminar’s Ecosystem

This fall marks one of the most exciting leaps forward in photo editing. With the 2025 Fall Upgrade, Luminar Neo expands across every major platform — now available on iOS, Android, and ChromeOS — and lays the foundation for the Luminar Ecosystem (pre-order offer ending soon).

Note: you can use the coupon code picturecorrect20 for an additional 20% off

If you’ve ever wished for a truly seamless editing flow across your devices, this is the moment you’ve been waiting for.

What’s New in the 2025 Fall Upgrade

The Fall Upgrade brings features designed to transform the way photographers create, restore, and share their work. Here’s what’s arriving this year:

Restoration

Breathe new life into old memories. With a single click, Restoration removes scratches, repairs fading, and revives vintage prints, making it effortless to preserve family history or reimagine classic shots.

AI Assistant

Editing guidance, simplified. The AI Assistant analyzes each photo and recommends optimal tools and adjustments, from Curves to Color Harmony. Whether you’re new to photo editing or a seasoned pro, it helps you unlock the full power of Luminar Neo.

Volume (free for all users)

Add instant drama and dimensionality. Volume intelligently enhances light and shadow to create depth without tedious manual dodging and burning.

Introducing the Luminar Ecosystem (November 2025)

This November, Luminar takes another bold step forward with the first phase of the Luminar Ecosystem. Two powerful new features are set to redefine the creative workflow:

Cross-Device Mobile-to-Desktop Editing

Edit anywhere, finish everywhere. Thanks to real-time cloud sync, every slider, mask, and adjustment carries over perfectly as you move between mobile and desktop. Start a quick edit on your phone and refine it later on your computer — no exporting, no hassle, no interruptions.

Web Galleries

Turn your edits into instantly shareable web pages. With just a few clicks, you can publish curated galleries to showcase your portfolio, passion projects, or personal memories. No coding or design experience needed — just pure visual storytelling, ready to share with the world.

Why Pre-Order?

Pre-ordering ensures early access to the Luminar Ecosystem and Fall Upgrade at the best possible price. More importantly, it means you’ll be among the first to explore this new era of cross-device creativity and effortless sharing.

The combination of intelligent editing tools and a seamless ecosystem makes Luminar Neo not just an editing platform, but a creative hub that grows with you.

Final Thoughts

With the Fall Upgrade and the Luminar Ecosystem launch, Skylum is delivering on a vision many photographers have long dreamed of: freedom to create anywhere, share everywhere, and let inspiration flow without friction. Try the coupon code picturecorrect20 for an additional 20% off

Deal ending soon: Luminar Ecosystem Pre-order Sale

The post The Future of Photo Editing: Luminar’s Ecosystem first appeared on PictureCorrect.


from PictureCorrect https://ift.tt/29PEV4G
via IFTTT

tiistai 23. syyskuuta 2025

PictureCorrect.com: The 10 Best Places in the World to Photograph Autumn Colors

Autumn, also known as fall, is a magical time when nature paints landscapes with a mesmerizing palette of reds, oranges, yellows, and browns. For photographers, it’s a season of unparalleled beauty. Whether you’re an amateur with a smartphone or a professional with high-end gear, these locations offer breathtaking views that will make your photos stand out.

Relevant reminder: deal ending soon for the Photography eBook Autumn Sale

Here’s our list of the best places in the world to capture the essence of autumn:

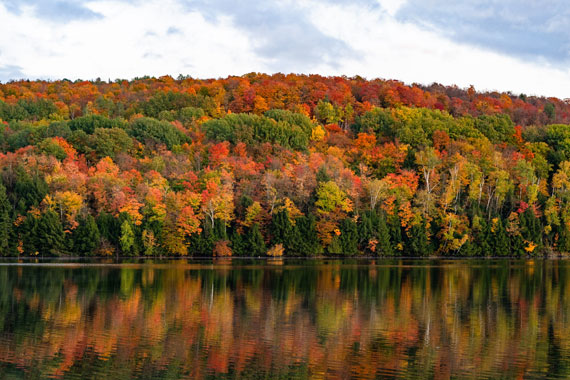
autumn colors

Photo captured by Peter James Eisenhaure in Vermont, USA

1. New England, USA

  • Why it’s special: Iconic for its fall foliage, New England’s mix of deciduous trees ensures a vibrant display of colors.
  • Best spots: The White Mountains of New Hampshire, the Green Mountains of Vermont, and Acadia National Park in Maine.
  • Tip: Plan a road trip along the scenic Kancamagus Highway in New Hampshire for varied landscapes.

2. Kyoto, Japan

  • Why it’s special: Kyoto’s historic temples and shrines framed by fiery maple trees make it a unique autumn destination.
  • Best spots: Kiyomizu Temple, Tofukuji Temple, and Eikando Temple.
  • Tip: Visit in late November when the colors are at their peak.

3. The Canadian Rockies, Canada

  • Why it’s special: Majestic snow-capped mountains contrasted with golden larch trees.
  • Best spots: Banff and Jasper National Parks.
  • Tip: Take the Icefields Parkway drive for panoramic views.

4. The Lake District, England

  • Why it’s special: Rolling hills, serene lakes, and ancient woodlands awash with autumn hues.
  • Best spots: Derwentwater, Grasmere, and Rydal Water.
  • Tip: Early morning mist can add an ethereal quality to your photos.

5. The Black Forest, Germany

  • Why it’s special: Dense woodlands that come alive with color, traditional villages, and misty mornings.
  • Best spots: Mummelsee, Triberg, and Baden-Baden.
  • Tip: Hike the Westweg trail for elevated viewpoints.

6. Transylvania, Romania

  • Why it’s special: Medieval castles set against a backdrop of colorful forests.
  • Best spots: Bran Castle, the Carpathian Mountains, and Sighișoara.
  • Tip: Capture the contrast of the red roofs of the villages against the autumn trees.

7. Loire Valley, France

  • Why it’s special: Renowned vineyards and historic châteaux surrounded by multicolored woodlands.
  • Best spots: Château de Chambord, Château de Chenonceau, and the vineyards of Sancerre.
  • Tip: A balloon ride offers a unique aerial perspective of the valley.

8. Jiuzhaigou Valley, China

  • Why it’s special: Turquoise lakes reflecting the splendid colors of fall.
  • Best spots: Five Flower Lake, Long Lake, and Panda Lake.
  • Tip: Visit during the week to avoid weekend crowds.

9. Tuscany, Italy

  • Why it’s special: Cypress-lined roads, olive groves, and vineyards turning gold.
  • Best spots: Val d’Orcia, Chianti, and Florence’s Boboli Gardens.
  • Tip: Capture the play of light during the golden hour.

10. Patagonia, Argentina and Chile

  • Why it’s special: Unique southern hemisphere fall colors in late April and May.
  • Best spots: Torres del Paine National Park, Mount Fitz Roy, and Los Glaciares National Park.
  • Tip: Be prepared for unpredictable weather.

Autumn offers photographers an opportunity to capture nature at its most vibrant. Each of these destinations offers a unique perspective on the season, so pack your camera and get ready to be amazed by the world’s autumnal beauty!

For Further Training:

This #1 bestseller is the most in-depth eBook on how to capture amazing photography anywhere. Over 250 pages of photography tips & tricks from industry insiders. Currently 78% off today for an Autumn Sale if you want to check it out.

ebook pages

Pages from The Photography Tutorial eBook

It is the product of over a DECADE of research as an insider in the photography industry, assembled to help you learn quickly and avoid the mistakes that I made along the way.

Deal ending soon: The Photography Tutorial eBook Autumn Sale

The post The 10 Best Places in the World to Photograph Autumn Colors first appeared on PictureCorrect.


from PictureCorrect https://ift.tt/MIT14uB
via IFTTT

maanantai 22. syyskuuta 2025

PictureCorrect.com: Branching Out: A Fun Tree Photography Challenge

Trees are often overlooked as subjects in photography, yet they offer an array of textures, shapes, and colors that can produce stunning images. This exercise will help you explore the beauty of nearby trees, improve your composition skills, and experiment with different lighting conditions. Whether you’re in a forest, a park, or even your backyard, there’s always a tree waiting to be photographed. Let’s dive in!

Relevant note: only a little while left for the Photography Exercises 📅 September Savings

tree photography exercise

Photo captured by Thom Holmes

Exercise Overview

Objective: To capture the essence and beauty of nearby trees through various photography techniques.

Duration: 1-2 hours

Required Gear:

  • Camera (DSLR, mirrorless, or even a smartphone)
  • Tripod (optional but recommended for stability)
  • Wide-angle or standard lens

1. Choose Your Tree(s)

Find a tree or group of trees that catch your eye. Look for interesting features such as unique bark textures, twisted branches, vibrant leaves, or even the way the light hits them.

2. Study the Lighting

Observe how the light interacts with the tree at different times of the day. Early morning and late afternoon light, known as the golden hour, can add a warm, soft glow to your photos. Midday light can create harsh shadows, but this can also be used creatively.

tree image

Photo captured by Liam Pozz

3. Composition Techniques

  • Rule of Thirds: Place the tree off-center to create a more balanced and dynamic composition.
  • Leading Lines: Use paths, branches, or shadows to lead the viewer’s eye toward the tree.
  • Framing: Use natural elements like other trees, branches, or leaves to frame your main subject.
  • Symmetry and Patterns: Capture the symmetry in tree branches or the repeating patterns in leaves and bark.

4. Experiment with Angles

  • Low Angle: Get down low and shoot upwards to emphasize the height and majesty of the tree.
  • High Angle: If possible, shoot from an elevated position to get a different perspective.
  • Close-ups: Use a macro lens or the macro mode on your camera to capture the intricate details of leaves, bark, and flowers.

5. Play with Depth of Field

  • Use a wide aperture (low f-number) to create a shallow depth of field, blurring the background and making the tree or part of it stand out.
  • Use a narrow aperture (high f-number) to keep the entire scene in focus, showing more detail in both the foreground and background.

6. Capture Different Seasons

If possible, revisit the same tree throughout different seasons. This will allow you to capture its transformation and show the passage of time through your images.

Bonus Challenges

  • Black and White: Convert your images to black and white to focus on the texture and form of the tree without the distraction of color.
  • Long Exposure: Use a tripod and a slow shutter speed to capture the movement of leaves in the wind, creating a dreamy, ethereal effect.
  • Silhouettes: Shoot against a bright sky or sunset to create striking tree silhouettes.

Trees are a rich subject for photographers, offering endless possibilities for creativity and exploration. By focusing on composition, lighting, and different perspectives, you can capture stunning images that highlight the beauty of these natural giants. So grab your camera, head outside, and start photographing the trees around you. Happy shooting!

For Further Training:

Are you ready to elevate your photography skills to the next level? Dive into our specially curated collection of 25 of the most popular and effective photography exercises designed to help you learn through practice and retain essential techniques.

September Savings Ending Soon: Photography Exercises Bundle at 85% Off

The post Branching Out: A Fun Tree Photography Challenge first appeared on PictureCorrect.


from PictureCorrect https://ift.tt/JXwuIeN
via IFTTT

sunnuntai 21. syyskuuta 2025

PictureCorrect.com: How to Edit with the HSL Mixer Panel in Lightroom

Today, we’re diving into one of the most powerful tools in Adobe Lightroom – the HSL panel (more recently called the Mixer panel). HSL stands for Hue, Saturation, and Luminance, and mastering this panel can transform your photos from good to breathtaking. Whether you’re a professional or a hobbyist, understanding how to use the HSL panel effectively is a game-changer for your photo editing process.

Quick reminder: for further training on essential photo editing knowledge, the Fundamental Photo Editing Guide is currently on sale if you want to dig deeper.

hsl panel lightroom

What is the HSL Panel?

The HSL panel in Lightroom is a feature that allows you to adjust the hue, saturation, and luminance of specific colors in your image. It gives you the ability to fine-tune colors in a way that can dramatically impact the mood and feel of your photos.

  • Hue: This alters the ‘shade’ of the colors. For instance, you can change a red flower to a more orange or pink hue.
  • Saturation: This controls the intensity of the colors. Increasing saturation makes colors more vivid, while decreasing it will make them more muted.
  • Luminance: This affects the brightness of the colors. Increasing luminance makes colors brighter, and decreasing it makes them darker.

How to Use the HSL Panel:

  1. Open Your Image: Start by importing and opening your photo in Lightroom.
  2. Locate the HSL Panel: In the Develop module, find the HSL or Mixer panel. It might be collapsed, so click on it to expand and view the options.
  3. Adjusting Hue: Click on the ‘Hue’ tab. You’ll see a range of colors like red, orange, yellow, etc. By moving the sliders for each color, you can change the hue of that specific color in your image.
  4. Tweaking Saturation: Switch to the ‘Saturation’ tab. Here, you can increase or decrease the saturation for individual colors. This is particularly useful for making skies bluer or grass greener.
  5. Fine-tuning Luminance: Finally, click on the ‘Luminance’ tab. Adjust the brightness of specific colors. Be cautious with luminance; too much adjustment can lead to unnatural looking images.

Practical Tips:

  • Selective Adjustments: The beauty of the HSL panel is in its ability to target specific colors. For example, you can enhance the blue of the sky without affecting the blue in other areas of the photo.
  • Use in Portraits: Adjusting skin tones can be done subtly using the orange and red sliders in the HSL panel.
  • Create Mood: Altering colors can change the mood of your image. Cooler tones can create a somber feel, while warmer tones can evoke happiness and energy.

The HSL panel is a powerful tool in your Lightroom arsenal. With practice, you can use it to bring your creative vision to life, enhancing your photos in ways that are both subtle and dramatic. Remember, the key to great editing is subtlety – it’s about enhancing, not overpowering your images.

For Further Training on Photo Editing Fundamentals:

This is a complete step by step guide to photographic editing from author Kent DuFault. Fundamental editing includes edits that aren’t going to fundamentally change the concept of the original photograph. It covers the steps required to take your original photo, as it came out of the camera, and turn it into the best image that it can be without going overboard. It is currently marked down 62% off if you want to check it out.

fundamental photo editing

The Ultimate Guide to Fundamental Photo Editing (Take a Peek Inside)

Digital photography is so intrinsically tied to the editing process that you can’t really consider doing one without doing the other. I know many new photographers try and resist this at first. I was guilty of that myself.

Deal ending soon: The Fundamental Photo Editing Guide at 62% Off

The post How to Edit with the HSL Mixer Panel in Lightroom first appeared on PictureCorrect.


from PictureCorrect https://ift.tt/4AyDzUR
via IFTTT

torstai 11. syyskuuta 2025

PictureCorrect.com: Subframing in Photography Composition

Subframing is a compelling composition technique that allows you to create more intriguing and layered images. By using elements within the scene to create a frame within the frame, photographers can guide the viewer’s attention, add depth, and enhance the storytelling aspect of their images. This blog post will delve into the concept of subframing, discuss its benefits, and provide tips on how to effectively use this technique to elevate your photography.

Also remember that a ☀ Summer Sale for the Cheat Sheets on all the Compositional Elements is ending soon!

subframing

Photo captured by Lucas Fields

Understanding Subframing

Subframing involves using components of your scene to create a secondary frame within your image. This could be anything from architectural elements, like windows or doorways, to natural features like tree branches or rocks. By positioning these elements around the edge of your composition, you can isolate your subject in a way that draws the viewer’s eye directly to it.

Benefits of Subframing

  • Focus on the Subject: Subframing naturally draws the viewer’s attention towards the main subject, helping it stand out amidst potentially busy or distracting backgrounds.
  • Added Depth: Using elements in the foreground and background to create a frame adds layers to your photograph, enhancing its three-dimensional feel.
  • Narrative Quality: A frame within a frame can introduce context or suggest a story, adding a narrative element to your image.
  • Aesthetic Appeal: Subframing can add a creative and artistic touch, making images more visually appealing and engaging.

Tips for Effective Subframing

  • Look for Natural Frames: Pay attention to your environment and identify potential frames such as windows, archways, or foliage.
  • Experiment with Depth of Field: Using a shallow depth of field can blur the framing elements, placing greater emphasis on your subject while still benefiting from the subframe.
  • Consider the Light: Lighting can impact how your subframe and subject interact. For instance, backlighting can silhouette your frame, highlighting the subject inside.
  • Play with Perspectives: Changing your angle or perspective can turn ordinary elements into effective frames. Sometimes, getting lower or finding a higher vantage point can reveal framing opportunities.
  • Keep It Simple: While subframing adds complexity to your composition, it’s crucial not to overcomplicate it. Ensure that the framing elements do not overshadow the main subject.
  • Use Editing to Enhance: Post-processing can help refine your subframed shots. Adjusting contrast, sharpness, or vignetting can further draw attention to your framed subject.

Framing vs Subframing:

While both framing and subframing are compositional techniques that involve the use of elements within the scene to enhance the photograph, they serve different purposes and are employed in distinct ways. Framing, in its traditional sense, refers to the use of foreground elements to create a border around the entire photograph, helping to isolate the main subject and draw the viewer’s eye towards it. This technique typically involves using the edges of the scene to enclose the subject, offering a sense of completeness and focus.

Subframing, on the other hand, is a more nuanced approach where the photographer uses elements within the scene—not just at the edges—to create a secondary, often smaller frame within the image. This internal frame leads the viewer’s eye to a particular area or subject, adding an additional layer of context or meaning. Subframing can be more subtle and complex, allowing for richer narratives and a deeper sense of space within the photograph.

subframed image

Photo captured by Mattos Berger

In essence, while traditional framing defines the outer boundary of an image, subframing introduces an inner boundary or point of interest that guides the viewer deeper into the scene. This inner frame can intersect with the edges of the photograph or float entirely within the image, offering a unique and compelling way to highlight the focal point and add depth to the composition.

Summary:

Subframing is a powerful compositional tool that can add depth, focus, and narrative to your photographs. By mindfully observing your environment and experimenting with different techniques, you can master subframing and create more impactful and meaningful images. Remember, the best way to improve is to practice, so grab your camera and start exploring the world of subframing.

Whether you’re a seasoned professional or a budding photographer, incorporating subframing into your compositional toolkit can transform your visual storytelling and elevate your photographic work.

For Further Training on Composition:

Do you ever have trouble remembering all the elements of composition? These popular Composition Cheat Sheets have you covered. With clear, concise information on all the essential elements of composition, you’ll never be unprepared again. They are currently 81% off today for a ☀ Summer Sale if you want to check them out.

composition cheat sheets

Composition Cheat Sheets (see all the elements covered)

The perfect companion for any photographer. Print one out whenever you need it. These cheat sheets consolidate crucial composition-related information, allowing you to concentrate on what truly matters – composing striking photographs.

Summer sale ending soon: The Composition Cheat Sheets at 81% Off


from PictureCorrect https://ift.tt/1a9LOUz
via IFTTT

keskiviikko 10. syyskuuta 2025

PictureCorrect.com: Skyline Photography Tips

Photography is a form of art that allows you to freeze a moment in time, to capture a view, a mood, or a perspective. One of the most rewarding forms of this art is skyline photography. It presents an opportunity to capture the soul of a city, showcasing the juxtaposition of nature and man-made structures. If you’re interested in venturing into the world of skyline photography, here are some invaluable tips to help you produce awe-inspiring images.

This article is based on concepts from The Photo Adventure Cheat Sheets which are currently 80% off for a 🌞 Summer Sale if you want to dig deeper.
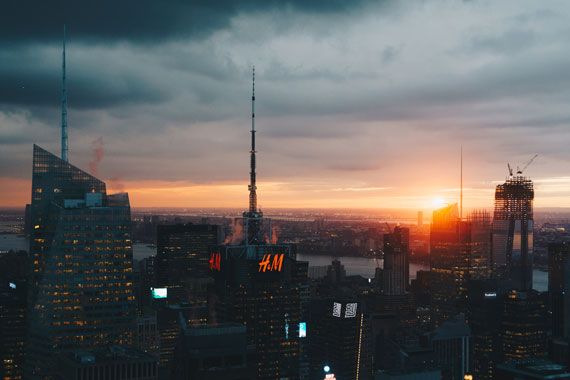
1. Golden Hour and Blue Hour are Your Best Friends

The time of day can significantly influence the tone and mood of your photographs. The golden hour, which is the first hour after sunrise or the last hour before sunset, offers a soft, warm light that brings out the nuances in colors and textures. On the other hand, the blue hour, the period just before sunrise or just after sunset, imbues your photographs with a dreamy, cool light that can lend a surreal quality to cityscapes.

skyline golden hour

Photo captured by Luca Bravo; 1/8 sec, ISO 400

2. Gear Up

A sturdy tripod is essential for skyline photography as it allows you to stabilize your camera, making it possible to use slower shutter speeds without introducing camera shake. A DSLR or mirrorless camera would be ideal due to their manual control and high-quality image sensors, but advanced compact cameras or even smartphones with manual modes can also do the job. Wide-angle lenses can help you capture the expansiveness of the cityscape while a telephoto lens can allow you to zoom into specific elements of the skyline.

3. Composition is Key

One of the fundamental aspects of skyline photography is good composition. Remember the rule of thirds and try to place interesting elements along the lines or at the intersections. Use leading lines to draw your viewer’s eye into the photograph. And don’t forget to consider vertical compositions too – these can often be more dynamic and interesting than standard horizontal shots.

4. Get the Right Exposure

Getting the right exposure in skyline photography can be challenging, particularly during twilight when the light is changing rapidly. Practice shooting in manual mode and make use of your camera’s histogram to ensure that you’re capturing the full range of tones. Bracketing shots and using High Dynamic Range (HDR) techniques can also help balance the exposure between the sky and the city lights.

5. Consider Long Exposures

Long exposure photography is perfect for skylines. It can turn bustling cities into tranquil landscapes and allow you to capture streaks of moving light, adding an artistic touch to your image. With your camera on a tripod, try using a slow shutter speed, a small aperture (large f-number), and a low ISO to capture a detailed, sharp image.

6. Scout for Unique Locations

Look for unique vantage points that will give you a fresh perspective of the cityscape. This could be a rooftop, a hill, a bridge, or even the window of a tall building. Explore the city and its outskirts – sometimes the best views are found where you least expect them.

skyline rooftop

Photo captured by Juan Di Nella; f/5.6, 1/100s, ISO 800

7. Be Patient

Skyline photography requires patience. The perfect lighting conditions can be fleeting, and you may have to wait for hours for that perfect shot. But remember, the most stunning photographs are often those that are the hardest to capture.

8. Utilize Panoramic Techniques

Incorporating panoramic techniques can elevate your skyline photography by capturing a broader field of view. To capture panoramic shots, you will need a sturdy tripod, a panoramic head for precision when rotating the camera, and a good wide-angle lens. Shoot in manual mode to keep exposure and focus consistent throughout your sequence of shots, and overlap each shot by about 30-50% for smoother blending.

Shoot panoramas vertically to capture more sky or foreground, resulting in a higher resolution image. Use software like Adobe Lightroom or Photoshop to stitch your images together, creating one seamless panoramic photo. Remember to consider your panorama’s final output, ensuring high resolution if you plan to create large prints.

9. Utilize HDR Techniques

High Dynamic Range (HDR) techniques can be incredibly effective during the golden hour and at night for skyline photography. During this time, the contrast between the bright sky and the dark buildings can be extreme, often exceeding the dynamic range of your camera’s sensor. The shadows cast by buildings are deep, while the highlights in the sky can be intense, making it challenging to capture detail in both areas in a single shot. This is where HDR comes into play.

HDR techniques involve taking multiple exposures of the same scene – typically an underexposed shot, a correctly exposed shot, and an overexposed shot. These images are then blended together in post-processing, producing a single photo with detail in both the shadow and highlight areas. By leveraging HDR techniques during the golden hour, you can capture the full tonal range of the scene, from the deepest shadows of the buildings to the bright, vibrant hues of the sky. This can lead to more detailed, balanced, and visually stunning skyline photographs.

hdr skyline

HDR skyline captured by Venti Views

10. Post-Processing Matters

Try adjusting the exposure, tweak the colors, and sharpen the details (the Topaz Photo AI editor can help) to enhance the overall mood of your image.

In conclusion, skyline photography is a fascinating way to capture the spirit of a city. It requires technical skill, creativity, and patience. But with the right approach, you can create stunning images that tell a story about the place and the time.

For Further Training:

For help remembering the camera settings for difficult situations like this, a set of Photography Adventure Cheat Sheets are designed to help. They are currently 80% off for a Summer Sale which ends soon if you want to check them out.

photography adventure

New! Cheat Sheets for Your Photography Adventures (see how they work)

The perfect companion for any photographer. Print one out whenever you need it. Whether you’re going on vacation or seeking out a specific photography adventure, these cheat sheets can provide you with the knowledge and inspiration you need to create your best work yet.

Offer ending soon: The Photography Adventure Cheat Sheets Summer Sale


from PictureCorrect https://ift.tt/rK5sRtG
via IFTTT

tiistai 9. syyskuuta 2025

PictureCorrect.com: Using Symmetry and Patterns to Create Stronger Photographs

Patterns and symmetry surround us, and our brains are naturally programmed to look for them. But incorporating symmetry and patterns into photography can be intimidating.

It’s important to understand both concepts of symmetry and patterns, and how to incorporate them to create stunning photos. This tutorial will discuss the best ways to create eye-catching compositions by using both symmetry and patterns.

Let’s get started.

This article is based on concepts from A Modern Approach to Photographic Composition which is currently 50% off if you want to dig deeper for further training.

Symmetry in Photography

Symmetry in photography refers to images where the two halves hold the same visual weight. Such images stand out because people are naturally drawn to symmetrical proportions and visuals that reflect harmony. So a simple photo with a small subject, such as fruit, can turn into a masterpiece if captured using symmetry.

Types of Symmetry

There are different types of symmetry in photography. Here are some of the most common ones you’re bound to find when you’re out and about with your camera.

symmetry examples in photography

Vertical Symmetry

Vertical symmetry is the most common and straightforward type of symmetry that can be achieved by simply keeping both sides of your photo symmetrical. You can imagine a vertical line that divides your composition straight from the center. Vertical symmetry is commonly used in architecture photography, as in the example above.

symmetry examples in photography

Horizontal Symmetry

Instead of imagining a vertical line separating your subject, place the line or visual separation horizontally using the same rule. You’ll then achieve horizontal symmetry. It’s most commonly used in landscape photography.

symmetry examples in photography

Radial Symmetry

You’ll love this type of symmetry if you like to shoot circular shapes. Radial symmetry deals with photos with shapes around a central point, such as ripples, wheels, domes and many types of flowers.

symmetry examples in photography

Reflective Symmetry

This type of symmetry, as the name would suggest, is about reflections that can be found on buildings, glass surfaces, water and other reflective materials or surfaces. If you’ve ever seen trees reflected in a very calm body of water such as a lake, then you’ve witnessed reflective symmetry.

symmetry examples in photography

Patterns in Photography

Patterns are essentially repetitive elements either found in nature or human-made structures or arrangements of objects. Our brains are wired to find patterns pleasing.

Incorporating patterns in your photos is a great way to grab attention. Being a photographer, you probably like to use lines and shapes to make unique compositions. You can also repeat those lines and shapes to create patterns. You can also take them to the next level to develop attractive textures.

The best thing about patterns is that you can use them in all types of photography in subtle and obvious ways. All you need to do is to learn ways to recognize them. The best strategy is to start finding repetition and capture them in your photos in an innovative manner that draws your viewers’ eyes.

symmetry examples in photography

Where to Find Patterns and Symmetry

As a general rule (which you can always break), to create symmetrical photos, you can duplicate a part of your picture and position it in a way that our minds can predict. Some examples include arches and doorways in a building, long views of a straight roads, the curve in a snail’s shell, petal arrangements in flowers and landscape reflections in water.

You can also capture symmetrical photos by capturing repeating patterns that any collection of similar objects makes. It can be natural or human-made, e.g., tidal patterns made by sand, roof clay tiles, logs in a woodpile, eggs in a basket or an aerial view of human heads.

Best Ways to Find Symmetry

You just need to look around, and you’ll find symmetry in countless things. Here are some great ideas to get you started.

symmetry examples in photography

Symmetrical Lines

Symmetry doesn’t only exist in nature. In fact, you can create symmetrical photos any time you want. All you need to do is have a background with a couple of solid colors and place an object right in the center where the colors meet. The line that divides the colors can be vertical or horizontal. Now you’ll need to capture the object by framing it right in the middle.

Some everyday objects are more symmetrical than others, but it’s always OK to break the rules and inject a little bit of creativity into your images.

symmetry examples in photography

Symmetrical Portrait

Symmetrical photography isn’t only about capturing non-living objects. It can also be achieved by including people in your photos. You can even capture self-portraits that reflect an element of symmetry.

All you need to do is grab a remote release and a sturdy tripod and head toward a peaceful location with a clear horizon at sunset. Now you’ll need to place yourself right in the middle of the frame at a little distance, preferably so that the camera only captures your silhouette.

Another option is to capture a portrait right in the center of the frame and place the subject’s hair and other accessories in a way that is symmetrical. Even though the human face is rarely perfectly symmetrical, it can still give a sense of a symmetrical composition. Another option is to step back and place your subject in front of a symmetrical structure or background.

Finding Symmetry in the Wild

Many animals and birds have almost perfectly symmetrical shapes, such as butterflies, elks, etc. If you love shooting wildlife, then you’ll find tons of opportunities to incorporate symmetry in your photos. But keep in mind that it’s incredibly difficult to work with animals, and you’ll need to be extra careful and stealthy. However, it will help you refine your symmetrical as well as overall photography skills.

Best Ways to Find Patterns

You can find patterns in colors, geometric shapes, lines, buildings, fruits and more. All you need to do is look for repetition, and it can be achieved whether you’re home or out in the wild. Here are some of the best ways to incorporate patterns in your photos.

symmetry examples in photography

Have Different Perspective

Most photographers capture photos from eye-level, and that can of course generate great images. But when it comes to patterns, capturing scenes from a different perspective allows you to open doors to a vast array of opportunities.

You can shoot down to find patterns in floor tiles. In the same way, you can consider shooting up in a building with a fancy ceiling to find beautiful patterns. Sometimes clouds also make a beautiful repeating pattern that you can incorporate in your photos.

Bear in mind that having a different perspective doesn’t only mean looking down or up. You can also find patterns by getting closer to objects and capturing macros, for example. On the other hand, you can also move farther and capture layers of a forest.

symmetry examples in photography

Fill the Frame

Filling the frame with repeating objects allows you to maximize the pattern effect. Moreover, it also helps you eliminate all distracting objects from the scene.

symmetry examples in photography

Break the Pattern

When dealing with patterns, it’s perfectly fine to break them by including something attractive or disruptive. It undoubtedly alters the pattern’s continuity and rhythm, but at the same time, it can add more character, scale or context to your photos. It’s a great way to produce a beautiful contrast with the complexity, shape or color of the patterns. For example, a single apple in the basket of oranges can create a strong focal point.

Final Words

Symmetry and patterns enable you to add mode clarity, vibrance and depth to your photos. You don’t necessarily need to pursue these concepts all the time, but you should try them at least once.

Incorporating symmetry and patterns in your photos can help you to improve your photography skills, but the key is to keep practicing.

For Further Training:

How do we make our photographs more powerful, more pointed? Learn all about photographic composition & express yourself through effectively composed photographs with the help of this new guide. We were able to negotiate an exclusive 50% off discount for our blog readers which ends soon if you want to check it out.

composition guide

New: Modern Approach to Photographic Composition

This eBook is broken down into 10 chapters that contain 90+ pages packed full with theory, techniques, concepts, advice, and tips & tricks to help you master composition.

Deal ending soon: Modern Approach to Photographic Composition at 50% Off


from PictureCorrect https://ift.tt/bsCqYBI
via IFTTT

maanantai 8. syyskuuta 2025

PictureCorrect.com: Ending Tonight! Lightroom Photo Editing

In the digital age, capturing a photo is only half the battle; the true magic happens in post-processing. This is where Lightroom Editing Mastery (currently 80% off until midnight), an online course meticulously designed for both budding and seasoned photographers, steps in to transform the way we enhance our photographs. Unlike the generic advice scattered across the internet, this course dives deep into the essentials of Adobe Lightroom, offering a comprehensive guide to mastering post-processing skills.

lightroom mastery

Lightroom Editing Mastery (see what’s included)

Why Lightroom Editing Mastery?

Adobe Lightroom has emerged as the quintessential tool for photo editing, favored by professionals for its efficiency and powerful features. However, its comprehensive capabilities can often seem daunting to newcomers. “Lightroom Editing Mastery” demystifies Lightroom, making it accessible and straightforward. Here’s what sets this course apart:

  • Step-by-Step Guidance: Tailored for those who may feel overwhelmed by technical jargon, the course breaks down Lightroom’s complex functionalities into digestible, easy-to-follow lessons.
  • Practical, Hands-on Learning: By providing actual photos for practice, the course ensures that learners can follow along with real examples, applying edits as they progress through the material.
  • Efficiency in Editing: Learn to fine-tune hundreds of photos within hours, a skill crucial for professionals under tight deadlines and amateurs eager to share their work.

Course Highlights

“Lightroom Editing Mastery” is not just about learning to edit; it’s about transforming your entire workflow to save time while elevating the quality of your images. Highlights include:

  • Rapid Editing Techniques: Discover how to turn ordinary shots into magazine-quality images in minutes, leveraging Lightroom’s batch processing features.
  • Comprehensive Skill Development: From basic adjustments for vibrant color and flawless exposure to advanced edits like noise reduction, perspective correction, and selective adjustments, this course covers it all.
  • Workflow Optimization: Learn to organize your photo library efficiently, ensuring you can find and edit your photos quickly, on any device.
  • Personalized Learning Experience: With lifetime access to 40 videos totaling 179 minutes of content, you can learn at your own pace, revisiting complex topics as needed.

photo editing in lightroom

Exclusive Bonuses and Satisfaction Guarantee

Enrolling in “Lightroom Editing Mastery” provides more than just educational content; it offers a toolkit for success:

  • One-Click Editing Presets: Receive a private collection of 20 Lightroom presets designed for various photography styles, enabling instant enhancements with a single click.
  • Workflow Blueprints: Gain access to bonus modules outlining common photo editing workflows, applying course techniques to real-world scenarios.

Moreover, with a 30-day money-back guarantee, the course invites you to embark on this learning journey risk-free, promising a transformative experience or a full refund.

How to Get the Course for a Discount Until Midnight:

For a limited time, “Lightroom Editing Mastery” is available at a significantly discounted rate, making professional-grade photo editing skills more accessible than ever.

Only hours left: Lightroom Editing Mastery at 80% Off


from PictureCorrect https://ift.tt/mTBOAI1
via IFTTT

sunnuntai 7. syyskuuta 2025

PictureCorrect.com: Landscape Photo Editing Workflow Example

Landscape photography captures the breathtaking beauty of nature, but even the most stunning scenes can benefit from a bit of post-processing magic. Today, we dive into a common workflow that many landscape photographers use to turn their raw captures into awe-inspiring artworks.

Related reminder: only 1 day left for Lightroom Editing Mastery at 80% Off

landscape edit workflow

Step 1: Import and Organize

Start by importing your images into your preferred editing software. Adobe Lightroom is a popular choice for its powerful cataloging features. Organize your shots by location, date, or theme for easy access.

Step 2: Basic Adjustments

  • Exposure and Contrast: Begin by adjusting the exposure. Aim for a balanced histogram, avoiding clipping in highlights and shadows. Then, tweak the contrast to add depth.
  • White Balance: Adjust the white balance to ensure the colors are true to the scene, or to create a specific mood.

Step 3: Enhance Colors

  • Saturation/Vibrance: Increase saturation for more intense colors, or vibrance for a subtler effect.
  • HSL Panel: Use the Hue, Saturation, and Luminance (HSL) panel to fine-tune specific colors. Enhance the greens of foliage or the blues of the sky, for instance.

Step 4: Detail Enhancement

  • Clarity and Texture: Add clarity to bring out details in landscapes, and use texture to enhance finer details without adding noise.
  • Sharpening: Apply sharpening judiciously. Oversharpening can introduce unwanted artifacts.

Step 5: Local Adjustments

  • Graduated and Radial Filters: Use these for localized edits, like darkening the sky or highlighting a focal point.
  • Adjustment Brush: Perfect for detailed edits, like enhancing a waterfall or a tree.

Step 6: Creative Adjustments

  • Split Toning: Add different colors to the highlights and shadows for a unique look.
  • Effects: Experiment with vignetting or grain to add character.

Step 7: Final Touches

  • Crop and Straighten: Ensure your composition is perfect. Sometimes, a slight crop can make a big difference.
  • Spot Removal: Clean up any unwanted spots or distractions.

Step 8: Export

Choose your export settings based on where your image will be displayed – web, print, etc. Always keep an original, unedited copy for archival purposes.

Remember, every photo is unique and might not need every step. Experiment and find what works best for your style!

For Further Training:

In the digital age, capturing a photo is only half the battle; the true magic happens in post-processing. This is where Lightroom Editing Mastery, an online course meticulously designed for both budding and seasoned photographers, steps in to transform the way we enhance our photographs.

lightroom mastery

Lightroom Editing Mastery (see what’s included)

For a limited time, “Lightroom Editing Mastery” is available at a significantly discounted rate, making professional-grade photo editing skills more accessible than ever.

Only 1 day left: Lightroom Editing Mastery at 80% Off


from PictureCorrect https://ift.tt/fcXWi1U
via IFTTT