


Old family photos are more than just images—they’re windows into the past. But many of those precious prints suffer from fading, blur, or low resolution. If you’ve started scanning and digitizing your family photo collection, Gigapixel’s latest update can help you take those images to the next level.
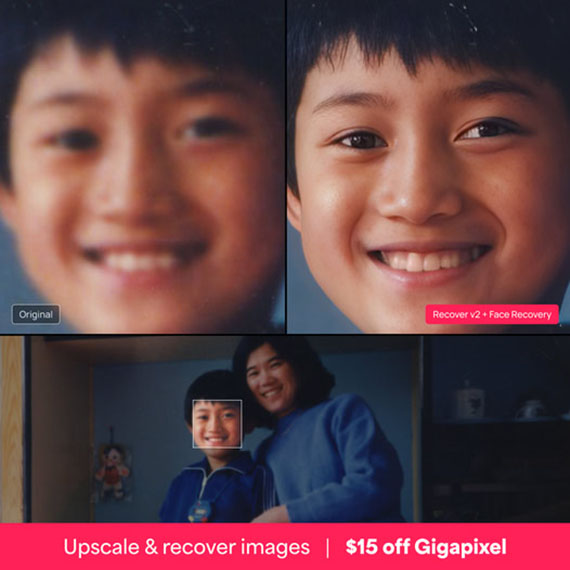
With Gigapixel’s Recover v2 model, you can upscale, enhance, and restore cherished photos with just a few clicks. Here’s how to do it:
 Step-by-Step: How to Restore Old Family Photos with Gigapixel
Step 1: Scan Your Photos
- Start by digitizing your physical prints using a flatbed scanner or a scanning app. For best results:
- Scan at a minimum of 300 DPI (600 DPI preferred)
- Save files as high-quality JPEG or TIFF
Step 2: Open Gigapixel
Download and launch Topaz Gigapixel on your computer. You’ll be greeted with a simple interface where you can drag and drop your images.
Step 3: Load Your Photo
Drag your scanned photo into Gigapixel or use File > Open to select it. The software will automatically preview the image and suggest settings.

Step 4: Choose the Right AI Model
On the right-hand side:
- Under AI Model, choose Recover Faces v2 if your photo has people in it.
- For general image restoration, try the Standard or Low Resolution model.
Step 5: Set Your Upscaling Size
Choose how much you want to enlarge your photo:
- 2x or 4x is usually ideal for improving detail without going overboard.
- You can also choose a custom width/height to fit a specific print size.
Step 6: Fine-Tune Settings (Optional)
Gigapixel gives you control over:
- Face Recovery Strength (for portraits)
- Remove Noise
- Sharpening Experiment with the sliders to get the perfect balance for your photo.
Step 7: Preview the Changes
Click the preview button to see a side-by-side comparison of the original and enhanced image. This helps you spot areas that need adjustment before exporting.

Step 8: Save the Enhanced Photo
Once you’re happy with the results:
- Click Save Image
- Choose your format (JPG, TIFF, or PNG) and destination folder
 Pro Tips
- Batch process multiple family photos to save time
- Combine Gigapixel with photo editing tools like Photoshop or Lightroom for color correction or scratch removal
- Use face recovery on childhood portraits, school photos, and wedding shots for the most dramatic improvements
Try it on your next set of scanned prints. You might be surprised how much detail and life Gigapixel can uncover. Currently $15 off today.
Deal ending soon: Gigapixel A.I. Version 8.3
Got any before-and-after results you’re proud of? Share them in the comments or tag us—we’d love to see what you bring back to life.
from PictureCorrect https://ift.tt/MOkY0ar
via IFTTT


0 kommenttia:
Lähetä kommentti