keskiviikko 18. syyskuuta 2024

PictureCorrect.com: Black and White Photography: A Two-Skill Process

This article is based on concepts from the Better B&W Photography Guide which is currently on sale.

There are two essential skills you must develop to become great at black and white photography.

The first is learning to see—to identify—a great black and white subject. Some subjects demand to be rendered in color, and others scream for a black and white treatment.

The second skill is taking the necessary and precise steps to convert a color image file into black and white. Yes, some cameras allow you to originate your picture in black and white. However, that’s not recommended. You have given up control over how the colored hues will be rendered into shades of gray.

In this article, we will discuss the following skill points:

  • Choosing a proper black and white subject matter
  • How to identify tone value in a scene
  • Composing in black and white using light, shadow, shape, contrast and texture
  • How colors convert to black and white in photography
  • How to properly expose for black and white photography
black and white photo tutorial

Photo by Shahin Khalaji

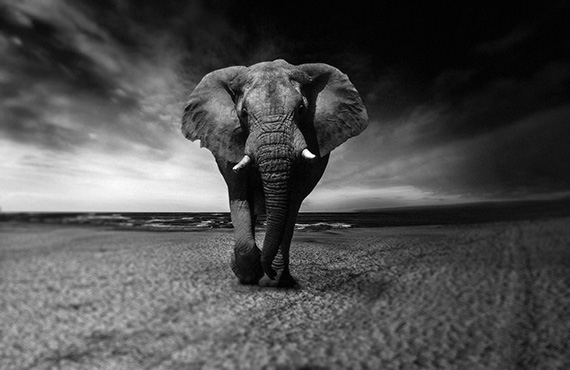
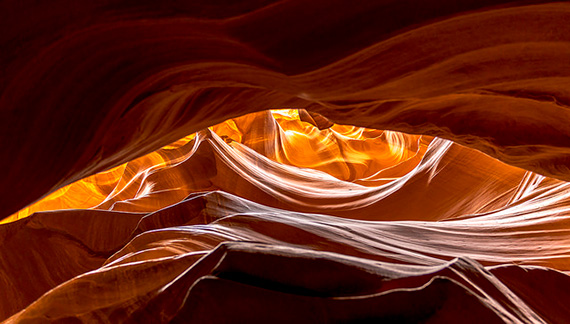
Black and white photography relies on tone (light to dark shades of gray), as there are no color contrasts to compose in your picture.

Remember this: When searching or deciding on a subject for black and white photography, look for the following:

  • Intense light and dark values within the scene
  • Dominant shapes and lines
  • Light to dark contrast
  • Noticeable and revealing texture

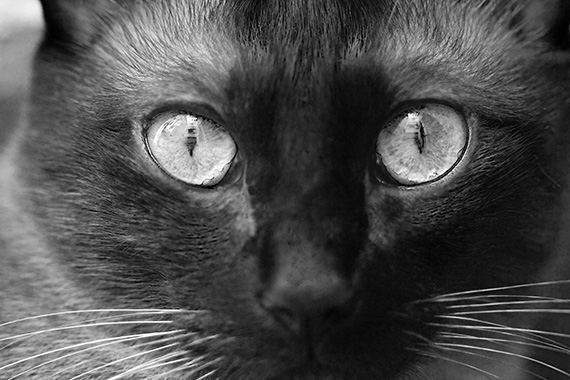
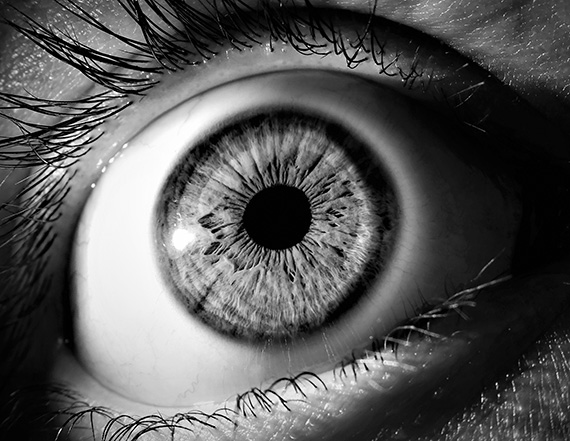
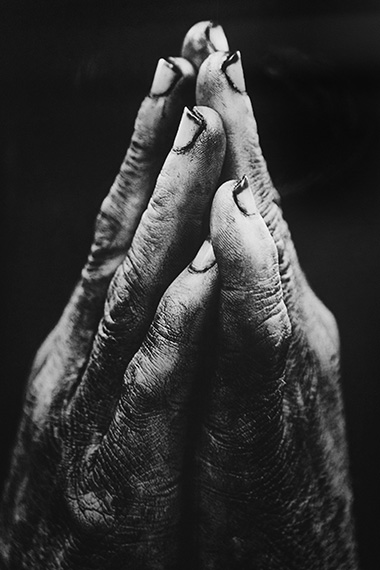
The example photograph above hits every one of those bullet points. Now, let’s examine each concept separately.

black and white photo tutorial

Photo by Aline Berry

A photograph such as the one above gains its visual power through tone and shape. The elimination of color forces viewers to explore the outward repeating and radiating patterns of dark and light tones. It also emphasizes the darkness of the pupil.

Imagine if the cornea of this eyeball were blue. It would steal the show, and the rest of the compositional elements would be significantly reduced in their impact. A viewer would home in on that bright blue color versus the whole of the eye.

blue cat eyes

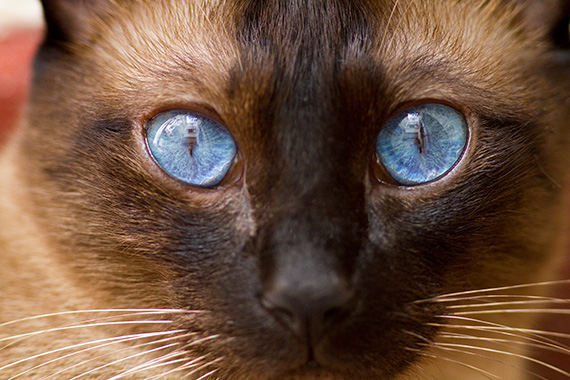
Photo by Kent DuFault

What do you see when you look at the photograph above? You can’t see anything but the blue eye color. Right? The cat’s face practically disappears.

The close up of the human eye was a perfect subject for black and white photography because there are strong light and dark values within the frame. There are dominant shapes. Plus, there are light and dark contrasting lines.

Critical Thought: If the eye cornea was bright blue (such as in the cat photo), and the picture was rendered in color, would that be a bad photo? No—it would merely change the dynamic of the final image. The picture of the cat’s eye picture isn’t bad. I think it’s rather good. It’s a matter of what message you the photographer want to communicate to your viewers. What if the eye color was a dark brown? Would that change its value as a black and white photograph? Good question. I’ll address that momentarily when we discuss color conversion.

black and white photo tutorial

Photo by Carlos Quintero

Try This: When determining if a subject might be best produced in black and white or color, ask yourself, “What is the element I find interesting here—a shape, line, contrast, shadow or texture?” If the answer is yes to any of these, the subject is likely a good candidate for a black and white photo. Now ask, “Is color important to the message?” If the answer is no, then you have an excellent candidate for black and white photography.

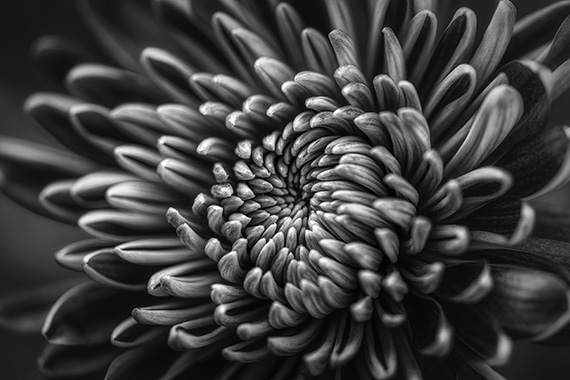
Let’s consider the flower photograph above. It would have been beautiful as a color photograph as well. But what interested the photographer was the shape and the repetition of form.

By choosing the black and white presentation, the photographer communicated what they found most interesting about this flower. They’ve isolated the essential component!

Critical Thought: When shooting black and white film, the photographer is forced to make all these considerations while taking the picture. As a digital photographer, we have leeway to make these considerations after the fact.

Pro Tip: If you have trouble seeing in tone versus color, buy yourself a pair of sunglasses with the absolute darkest lenses you can find. As you try to determine the levels of tone in a scene, put the sunglasses on. They will help eliminate color and you will see the scene in shades of tone.

black and white photo tutorial

Photo by Shahin Khalaji

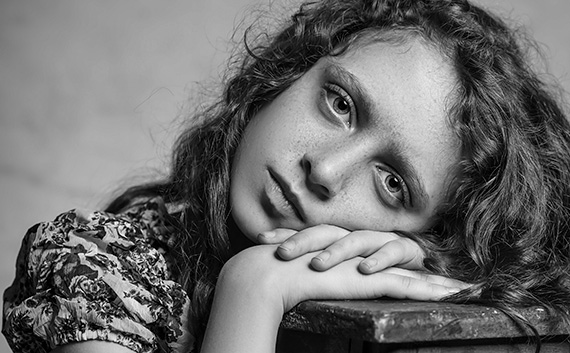
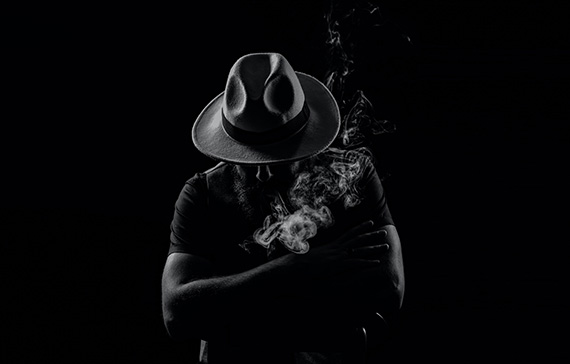
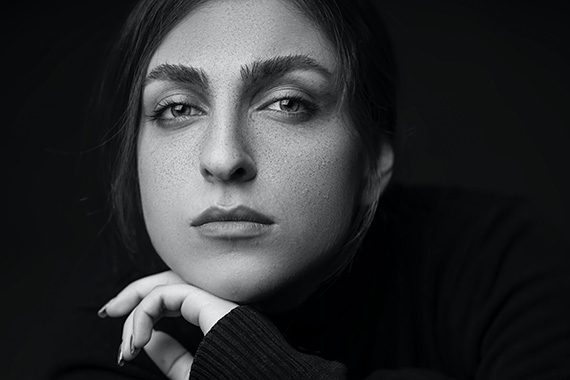
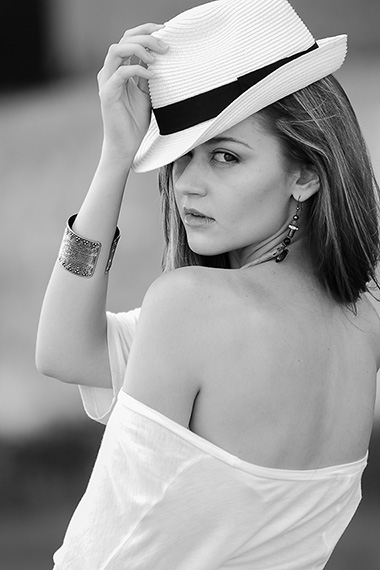
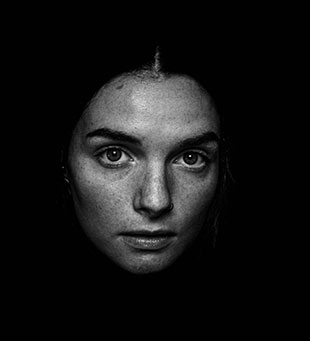
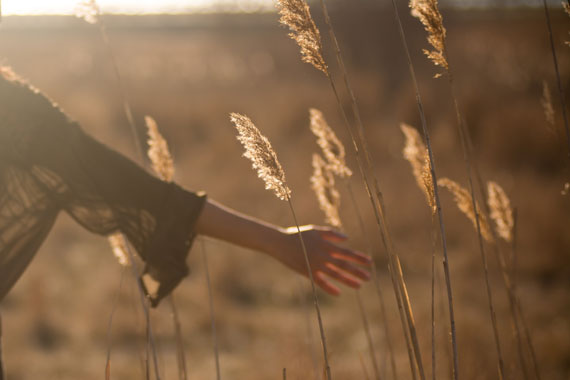
The image above is an exquisite use of texture in black and white photography. The texture would be completely overwhelmed in a color photograph. It would still be there—however, the color of the model’s eyes, skin and nails would overtake the texture as leading points of interest.

When you look at this photo, what do you notice first, and then where do your eyes return to linger? It’s the texture of her skin!

I think the texture is the magic element in this portrait. It humanizes this woman.

Now that you’ve learned what elements to look for in a black and white photography subject, and how you can better communicate a specific type of message with black and white photography, let’s talk about the second skill—the conversion process of turning color to black and white.

color tones

Graphic by Kent DuFault

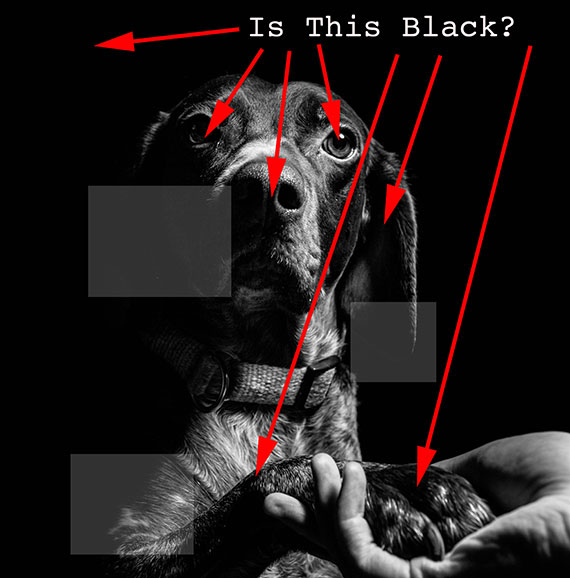
When color is converted to black and white, the conversion process considers the tone and not necessarily the hue. This means greens, blues and reds of the same approximated tone can convert to the same approximate shade of gray in black and white.

A bit of nostalgia

Black and white film photographers use colored glass filters on the front of the lens to control how the film would behave toward the various colors of the spectrum.

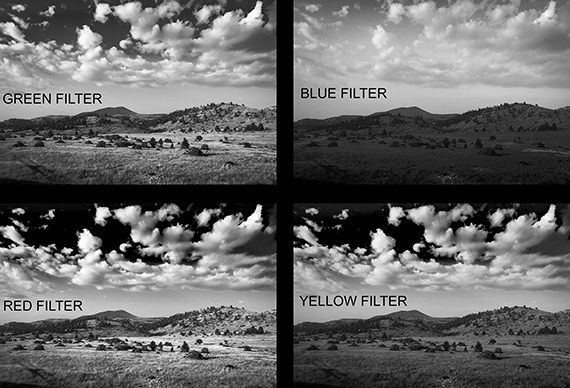
  • Red filters block blue and green, darkening blue skies and lightening red objects such as flowers
  • Green filters block red, lightening green objects such as foliage while darkening red flowers
  • Blue filters block red, yellow and orange; blue subjects, such as the sky, will lighten, while red objects will turn almost black
  • Yellow filters block blue, darkening blue skies for better contrast to clouds, and lightens red, orange, green and yellow subjects. This filter is often used to lighten skin tones in black and white portraits
  • Orange filters work similarly to yellow—blues become darker and all warmer tones appear brighter than green

Consider this: It’s essential to understand how colored filters work on black and white film. You will use that same knowledge to convert your digital color files to black and white!

black and white photo tutorial

Photo by Shahin Khalaji

Let’s take this full-color image and convert it to black and white while applying the different filters to see how the image is affected.

black and white photo tutorial

Black and white conversion

This first example is a black and white photograph—with no filtration or adjustment by me—as determined by the Photoshop algorithm.

Below, we have the same picture with four different filters applied during the conversion. It’s pretty clear how a color filter can change your black and white image.
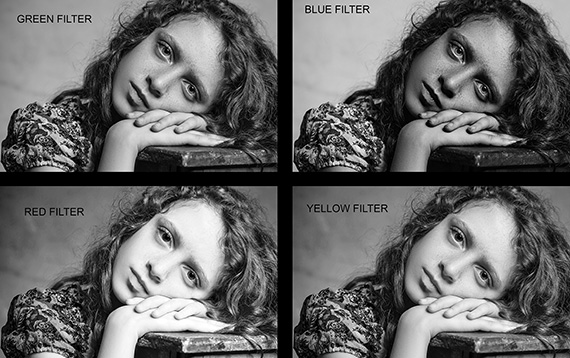
black and white photo tutorial

Filters

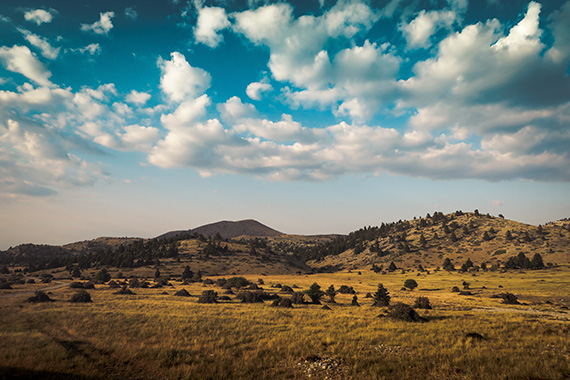
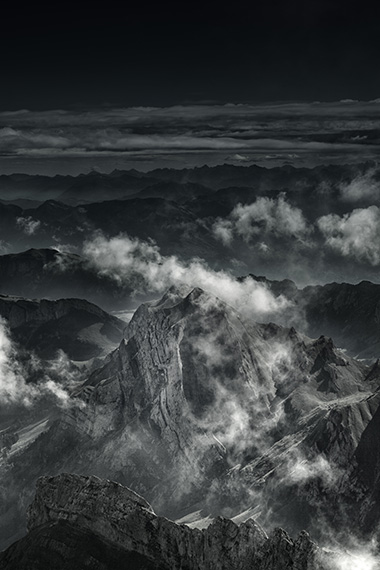
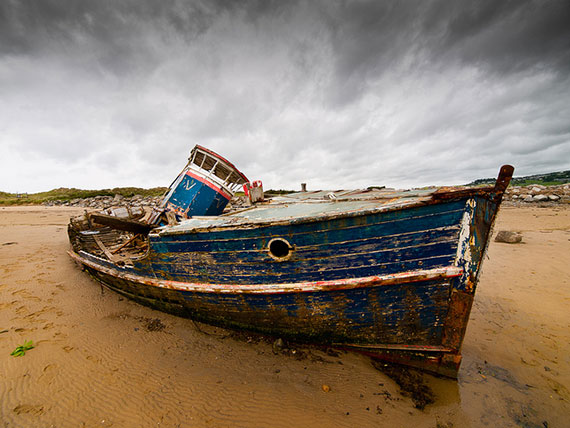
Let’s look at another example with a different type of subject matter:

black and white photo tutorial

Photo by Jason Blackeye

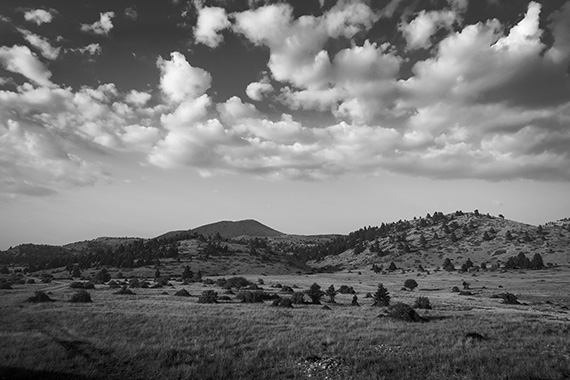
The above image is our full-spectrum color landscape image. Below, we have a black and white photograph, with no filtration or adjustment by me, as determined by the Photoshop algorithm.

black and white photo tutorial

Black and white conversion in Photoshop

Knowing how color filtration will affect your black and white conversion is critical to producing pro-level work in black and white photography.

black and white photo tutorial

Filters

This is why I am not a fan of presets or actions for black and white conversions. There is too much at stake to leave the decisions up to a computer.

Now, let’s return to the photograph of the Siamese cat for an exciting comparison experiment.

black and white photo tutorial

Black and white

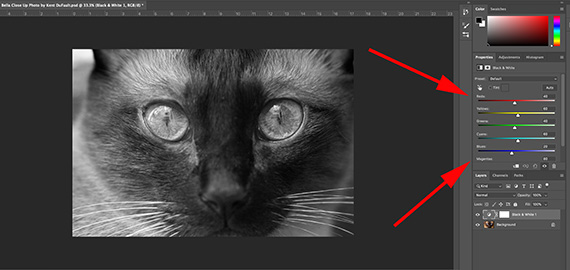
Let’s say I wanted to convert this color picture to black and white, but I still wanted to emphasize the eyes. This first example, above, is a default conversion. As you can see, the software went for a broad range of tones with little emphasis placed anywhere:

black and white photo tutorial

Adjusting sliders

This screenshot is what the default conversion looks like in Photoshop using the black and white adjustment layer feature.

Notice the various sliders with different colors. These have the same effect as the colored-glass filters we discussed earlier.

The algorithm of the software has decided what would be the best settings for those six sliders.

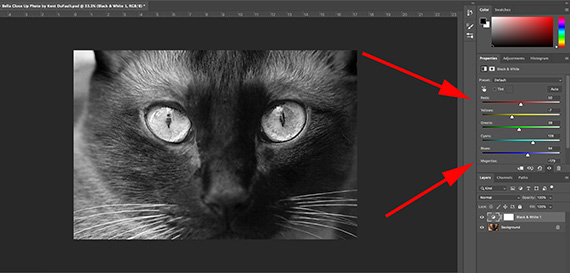
What the software doesn’t realize is that I would like to emphasize the eyes of the cat. So, I need to put my creative input into this conversion.

black and white photo tutorial

Emphasizing eyes

Having my intent for the photograph established, I moved the filter sliders until the eyes became emphasized through the tone conversion.

black and white photo tutorial

Conversion with eyes emphasized

Above is my photographer-approved conversion of the color image file.

Let’s look at the two side-by-side.
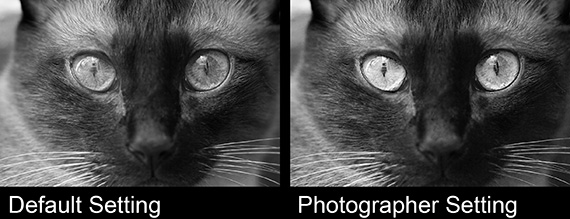
black and white photo tutorial

Default vs custom

You can see a vast difference. My understanding of color to black and white conversion has improved this photograph and cemented my intent into the minds of my viewers.

Proper exposure in black and white

black and white photo tutorial

Original photo by Andreea Chidu

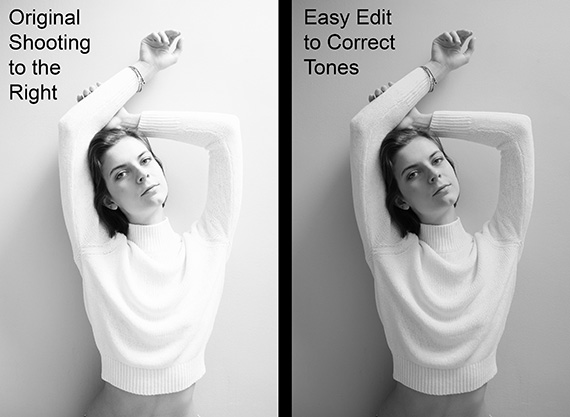
Have you heard of the phrase, “Shoot to the right”?

Shooting to the right tells us that an overexposure error is better than an underexposed one.

Shooting in RAW makes this statement even more accurate.

The phrase also references the camera’s histogram, where—on the right side of the scale—all the highlights and whites are located.

And in black and white photography, it’s essential to bear this advice in mind as the finished photograph has only tone to rely on.

Lost shadow detail is lost. End of story. This should only be the case if the effect that you’re striving for: deep, dense blacks with no detail.

Practice shooting to the right in your exposures.

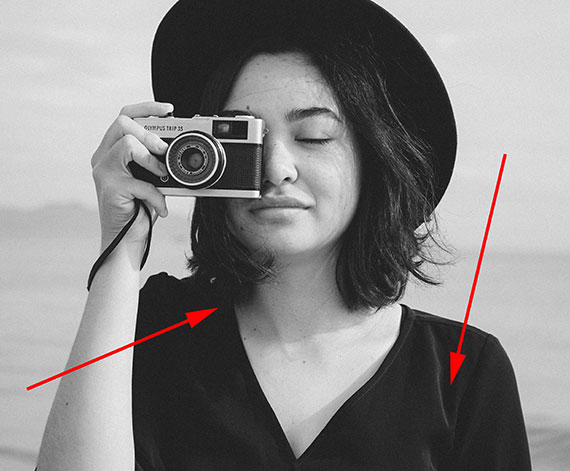
The example photos of the model clearly illustrate how effectively the highlights can be adjusted in post-processing with a RAW file.

Let’s recap!

The best subjects for black and white photography have bright whites, deep blacks and a full range of tones in between. An inexpensive  black and white viewing filter, such as sunglasses, will teach you to see in “tone” versus color.

black and white photo tutorial

Photo by Nathan Dumlao

Great subjects for black and white photography will often display strong shapes and textures.

Vastly different colors can convert to very “similar” tones. When converting to black and white, try and separate the tonal values of different color channels.

If the color values present in a scene aren’t particularly interesting, look to black and white as an alternative—only if the scene offers distinct tonal values, textures and/or intense shadows.

Pop Quiz

What filter darkened that sky in the elephant photo?

Now it’s your turn!

Take an afternoon and go for a photo safari. Your assignment is to hunt down subjects that meet the criteria discussed. For each shot, establish your intent for the photo. Write it down, so you don’t forget.

Photograph your chosen subjects while remembering to shoot to the right.

Now convert your color files to black and white using what you learned about color filtration, while emphasizing your original intent.

Have fun!

About the Author:
Kent DuFault is an author and photographer with over 35 years of experience. He’s currently the director of content at the online photography school, Photzy.com.

For Further Training:

Have you ever quickly converted your shots to black & white, hoping to make them “Better”? And the result was bland to say the least? This is a very common occurrence. Knowing how to convert color to B&W with a working understanding of tone and contrast in post-processing is a very different story. This in-depth eBook is designed to cover EVERYTHING you need to know about producing your own powerful and professional B&W images.

black and white photo guide

Better Black & White Photography Guide (See What’s Inside)

Every step is detailed in all three programs: Photoshop, Lightroom, & Elements. But even if you don’t have these applications, there’s enough information in here to help you achieve the same results with the software you already have. It is currently 76% off if you want to check it out.

Deal ending soon: The Better Black & White Photography Guide at 76% Off

- - - - - - - - - - - - - - - - - - - - - - - - - - - - - - - - - - - - - - - - - - - - - - - - - - - - - - - - - - - - - - - - - - - - - - - - - -

Photography, like any art or skill, thrives on consistency. The journey to becoming an adept photographer is paved with regular practice. Learn how PictureCorrect Insiders can help.

- - - - - - - - - - - - - - - - - - - - - - - - - - - - - - - - - - - - - - - - - - - - - - - - - - - - - - - - - - - - - - - - - - - - - - - - - -

This post Black and White Photography: A Two-Skill Process appeared on PictureCorrect.


from PictureCorrect https://ift.tt/VmWBAT1
via IFTTT

sunnuntai 15. syyskuuta 2024

PictureCorrect.com: Understanding Black Point for B&W Photography

This article is based on concepts from the Better B&W Photography Guide which is currently on sale.

What is the color black?

It seems like that should be a relatively easy question to answer.

However, it’s not – especially when it comes to black and white photography.

dog photo with arrows to learn about black point

Photo by Fabian Gieske (arrows and text put in by writer)

There are infinite shades of color and tone all around us.

Our brain, through the help of our eyes, categorizes and identifies each object that we view. We look at an object and say, “Oh, that’s black.”

The truth is that there are infinite shades and tones of the color black.

The cute picture of the dog illustrates this idea. What’s black in that picture?

Question

Are all of those points at the tip of the red arrows the color black?

Yes, they are, and that brings up a critical concept in black and white photography.

This concept is known as the Black Point.

If you take a moment and look at the three gray boxes in the puppy photo, you’ll see that there are areas of the dog’s ear, face, and leg that have disappeared into the background. They have quite literally melted away.

This can mean that the Black Point was not appropriately placed, and in this case, I would say that was true.

black point placed intentionally for portrait face only

Photo by Quinten de Graaf

In this second example photo, the woman’s head, neck, and shoulders disappear into the background.

The difference is that in this case, it was intentional for effect.

Knowing how to place your Black Point is a valuable skill in photography (particularly for black and white photography)!

Let’s Define Black Point

The Black Point is the darkest and most dense black area of your photograph. On a histogram, it’s located to the very far left of the scale. When you read that area with an RGB eyedropper, it reads 0,0,0.

portrait with well placed black point

Photo by Huynh Tan Hau

This photograph is a superb example of a well-placed Black Point.

This woman is literally covered in black. Yet notice how you can see detail and texture in her blouse, hair, on the camera, and even under the hat.

Where is the Black Point in this picture?

photo with arrows for black point

Photo by Huynh Tan Hau (arrows put in by writer)

A well-placed Black Point is typically located in a non-significant shadow area within the frame.

Here’s your Quick Tip:

Black Point is vital to your photography, especially black and white photography, as it helps to ensure that you have a full range of tone within your picture!

You place the Black Point by carefully watching the histogram as you convert a digital color file to a black and white photograph. Once you’ve made the conversion, you can further fine tune the Black Point with the Adjustment Brush and/or the Lightroom sliders labeled Shadows and Blacks.

About the Author:
Kent DuFault is an author and photographer with over 35 years of experience. He’s currently the director of content at the online photography school, Photzy.com.

For Further Training:

Have you ever quickly converted your shots to black & white, hoping to make them “Better”? And the result was bland to say the least? This is a very common occurrence. Knowing how to convert color to B&W with a working understanding of tone and contrast in post-processing is a very different story. This in-depth eBook is designed to cover EVERYTHING you need to know about producing your own powerful and professional B&W images.

black and white photo guide

Better Black & White Photography Guide (See What’s Inside)

Every step is detailed in all three programs: Photoshop, Lightroom, & Elements. But even if you don’t have these applications, there’s enough information in here to help you achieve the same results with the software you already have. It is currently 76% off if you want to check it out.

Deal ending soon: The Better Black & White Photography Guide at 76% Off

- - - - - - - - - - - - - - - - - - - - - - - - - - - - - - - - - - - - - - - - - - - - - - - - - - - - - - - - - - - - - - - - - - - - - - - - - -

Photography, like any art or skill, thrives on consistency. The journey to becoming an adept photographer is paved with regular practice. Learn how PictureCorrect Insiders can help.

- - - - - - - - - - - - - - - - - - - - - - - - - - - - - - - - - - - - - - - - - - - - - - - - - - - - - - - - - - - - - - - - - - - - - - - - - -

This post Understanding Black Point for B&W Photography appeared on PictureCorrect.


from PictureCorrect https://ift.tt/QCh6gu3
via IFTTT

lauantai 14. syyskuuta 2024

PictureCorrect.com: Photography Basics: Qualities of Natural Light

We all know that we need light to take pictures. If you’re planning to take pictures outdoors during the daytime, you might believe that light is the least of your concerns. While that might be somewhat true, many people don’t realize that natural outdoor lighting has an effect on the overall look of their pictures. Natural light has different qualities. It may have warm tones or cool tones. Natural light can also be soft or hard. The quality of the light that shows in your images will depend on outdoor conditions (weather) as well as the time of day you are taking pictures.

shadows in natural light

photo by kewlscrn

Something else to consider is the fact that sunlight creates shadows. Shadows are a part of nature, but depending on your subject, those shadows could enhance or detract from your picture. Another reason to “see the light” when you are taking pictures outdoors is the fact that the available light influences camera exposure settings that will produce a properly exposed picture. You can’t change the natural lighting outdoors, but paying attention to light will help you make better decisions about how and when you might want to take your pictures.

Cloudy Days and Sunny Days

Direct, bright sunlight on a clear day is considered to be hard light. Depending on the angle and intensity of that light, sharp edged shadows may be cast on your subject. Those shadows work well for some subjects, such as landscape scenes, but a portrait that shows one part of the subject’s face in shadows is usually not very flattering. Bright light and shadows also create more contrast in an image. Pictures with higher contrast will bring out more details in a subject or scene.

cloudy day photography

photo by William Warby

The light on a cloudy, overcast day is not as bright or as hard as the light on a sunny day. Pictures taken on cloudy days have much less contrast than those taken on bright, sunny days. Pictures taken on cloudy days have very soft shadows, if there are any at all. The overall light on a cloudy/overcast day is pretty even, making it ideal for portraits. Take note that pictures taken in shaded areas on clear days will have pretty much the same light qualities as those taken under very cloudy conditions.

Color Tone and Time of Day

Many people don’t think about the color tone that will be in their pictures while they are taking the shots. Yet, as previously mentioned, the color tone in the atmosphere can have a distinct effect on the overall look of your pictures. The color tone on a very cloudy or overcast day is considered to be cool. The overall tone on a cloudy day is slightly bluish and gray. The natural colors of a scene or subject taken on a cloudy day will still show in your images. However, they won’t appear to be as bright or vivid as the same subject taken on a clear day. The colors will appear to be more subdued or cool.

On a clear day, during the hour or two after sunrise, the early morning light has a warm, yellowish color tone. The same is true for the hour or two before sunset. The hour or so after sunrise and before sunset is known as the golden hour(s). Many photographers love taking pictures at these times because of the warm tones, but also because the light is not as hard or harsh as it might be around midday. Since the sun is still near the horizon during these hours, it produces long shadows. However, these shadows are not quite as sharp and hard as shadows produced by midday sunlight. As the sun continues to rise, the warm tones gradually fade during the hours from mid-morning to midday.

golden hour

Photo captured by Oliver Pacas; ISO 100, f/2.8, 1/2500s.

The light at midday is considered to be neutral or colorless (as far as color tone). However, the midday light is the hardest light of the day and produces hard, sharp edged shadows. This type of light may work well for some subjects, but it is probably the least desirable type of lighting for portraits. After midday, the tone of the light in the atmosphere gradually begins to become warmer as we head into late afternoon. We then head toward another golden hour before sunset. All cameras have a white balance feature, which is designed to make sure that anything white in a scene shows as white in the picture. However, depending on your camera settings, it might cause the warm glow to be eliminated from your picture. On the other hand, your camera also has settings that can enhance the warmth or coolness of your images. Check your camera’s manual to see which white balance setting will work best for the effect you want.

Once again, you can’t change outdoor conditions when you’re taking pictures. But you should get to know how natural light affects your photos. There may be times when you have something specific in mind as far as what type of natural light would work best for a particular scene or subject. Now, since you know the main qualities of natural light, you will be able to make good decisions as to how and when you take those pictures.

About the Author:
Keith Jones writes for https://www.easybasicphotography.com/, a site geared towards beginners through serious amateurs who want to learn a little more about basic digital photography.

For Further Training:

Lighting is arguably the most important aspect of photography; but do you know how to use it? These new Photography Lighting Cheat Sheets are designed to help. With critical information on ALL the types of natural light and artificial light you can use. In the spirit of summer, they are currently 80% off today for a Sunlight sale.

lighting cheat sheets

New! Cheat Sheets for Photography Lighting (see how they work)

Whether you’re a seasoned professional or just starting out, photography cheat sheets can be a valuable resource for improving your skills and taking your photography to the next level. By having all the key information you need in one place, you can focus on what’s important – capturing amazing photos.

Sunshine sale ending soon: The Photography Lighting Cheat Sheets at 80% Off

- - - - - - - - - - - - - - - - - - - - - - - - - - - - - - - - - - - - - - - - - - - - - - - - - - - - - - - - - - - - - - - - - - - - - - - - - -

Photography, like any art or skill, thrives on consistency. The journey to becoming an adept photographer is paved with regular practice. Learn how PictureCorrect Insiders can help.

- - - - - - - - - - - - - - - - - - - - - - - - - - - - - - - - - - - - - - - - - - - - - - - - - - - - - - - - - - - - - - - - - - - - - - - - - -

This post Photography Basics: Qualities of Natural Light appeared on PictureCorrect.


from PictureCorrect https://ift.tt/3gJ8Q46
via IFTTT

perjantai 13. syyskuuta 2024

PictureCorrect.com: Workflow Example in Lightroom

The most common workflow order/steps photographers use in Adobe Lightroom can vary depending on the individual’s preferences, but here’s a general workflow that many photographers follow if it helps:

Related reminder: exclusive deal ending soon for the Lightroom Mastery Guide at 50% Off

lightroom workflow

Photo captured by Mylene Tremoyet

Importing photos: Add photos to the Lightroom catalog by importing them from your camera or storage device.

Culling and organization: Browse through your imported photos and delete any unwanted images. Use flags, ratings, and color labels to sort and organize your images.

Apply metadata and keywords: Add metadata such as copyright information, location, and other details to your photos. Assign keywords to make it easier to search for specific images in the future.

Develop module: Start editing your photos by adjusting exposure, contrast, and other basic settings in the Develop module. This is where most of the creative work takes place.

Apply presets or profiles: Use presets or profiles to apply a specific look or style to your images. You can use built-in presets, create your own, or import presets from other sources.

Local adjustments: Use tools like the adjustment brush, radial filter, and graduated filter to make local adjustments to specific areas of your images.

Detail enhancement: Sharpen your images and reduce noise using the Detail panel.

Lens corrections: Apply lens corrections to fix issues such as distortion, chromatic aberration, and vignetting.

Transform and crop: Use the Transform panel to straighten and correct perspective issues, and the Crop tool to frame your image to your liking.

Spot removal: Use the Spot Removal tool to clean up any dust spots, blemishes, or other unwanted elements in your photos.

Export: Once you’re satisfied with your edits, export your images in the desired file format, size, and quality for sharing, printing, or archiving.

This is a general workflow, and photographers may adjust it to their preferences or skip certain steps if they are not applicable to their project. The key is to develop a consistent process that works best for you and your photography needs.

For Further Training:

Are you tired of spending hours on end fiddling around in Lightroom Classic and not getting the results you expect? This in-depth eBook is designed to help photographers master Lightroom Classic to its full potential. We were able to arrange an additional 50% discount for our blog readers which ends soon.

lightroom mastery

Lightroom Mastery (Click to Learn More)

Not by droning repetitions of someone else’s editing style, but through teaching you the basic premises of the software using easy to understand, real-world language that will unlock your potential for learning.

Deal ending soon: The Lightroom Mastery eBook at 50% Off

- - - - - - - - - - - - - - - - - - - - - - - - - - - - - - - - - - - - - - - - - - - - - - - - - - - - - - - - - - - - - - - - - - - - - - - - - -

Photography, like any art or skill, thrives on consistency. The journey to becoming an adept photographer is paved with regular practice. Learn how PictureCorrect Insiders can help.

- - - - - - - - - - - - - - - - - - - - - - - - - - - - - - - - - - - - - - - - - - - - - - - - - - - - - - - - - - - - - - - - - - - - - - - - - -

This post Workflow Example in Lightroom appeared on PictureCorrect.


from PictureCorrect https://ift.tt/T6ny1z0
via IFTTT

keskiviikko 11. syyskuuta 2024

PictureCorrect.com: 10 Lightroom Tools for Photographers to Know

Adobe Lightroom is an essential tool for photographers, as it offers a range of features to help edit, organize, and enhance photos. Here are the top 10 most important Lightroom tools that photographers should know how to use:

Relevant note: offer going on now for the Lightroom Mastery Guide at 50% Off

lightroom tools

Photo captured by Szabo Viktor

Histogram: The histogram provides a visual representation of the tonal range in an image. It helps you assess exposure and make adjustments as needed.

Crop and Straighten: The Crop tool allows you to trim your image to a desired aspect ratio, while the Straighten tool enables you to correct any slanted horizons or lines.

White Balance: This tool is essential for correcting color temperature in your images. You can use the eyedropper tool to select a neutral area or manually adjust temperature and tint sliders.

Tone Curve: The Tone Curve allows you to make precise adjustments to the tonal range of your image. You can control highlights, shadows, and midtones to create the desired contrast and tonal balance.

Basic Panel: The Basic Panel offers controls for Exposure, Contrast, Highlights, Shadows, Whites, and Blacks. These sliders help you adjust the overall brightness, contrast, and tonal balance of your images.

HSL / Color Panel: This panel allows you to adjust Hue, Saturation, and Luminance (HSL) for individual colors. This is useful for enhancing specific colors or correcting color imbalances in your photos.

Sharpening and Noise Reduction: These tools help you enhance image details and reduce noise, particularly in high ISO images. The Detail Panel contains the sharpening and noise reduction sliders.

Lens Corrections: Lightroom has a built-in database of lens profiles that can automatically correct common lens issues like distortion, vignetting, and chromatic aberration.

Graduated and Radial Filters: These filters allow you to apply adjustments selectively to specific areas of your image. Graduated filters are ideal for landscapes, while radial filters work well for isolating subjects and creating vignettes.

Spot Removal: The Spot Removal tool is perfect for getting rid of sensor dust, small blemishes, or other unwanted elements in your images. You can choose between Clone and Heal modes, depending on the desired effect.

By mastering these essential Lightroom tools, photographers can greatly improve their workflow and image quality.

For Further Training:

Are you tired of spending hours on end fiddling around in Lightroom Classic and not getting the results you expect? This in-depth eBook is designed to help photographers master Lightroom Classic to its full potential. It is currently 50% discount for those of you working on your photo editing skills – which ends soon.

lightroom mastery

Lightroom Mastery (Click to Learn More)

Not by droning repetitions of someone else’s editing style, but through teaching you the basic premises of the software using easy to understand, real-world language that will unlock your potential for learning.

Deal found here: The Lightroom Mastery eBook at 50% Off

- - - - - - - - - - - - - - - - - - - - - - - - - - - - - - - - - - - - - - - - - - - - - - - - - - - - - - - - - - - - - - - - - - - - - - - - - -

Photography, like any art or skill, thrives on consistency. The journey to becoming an adept photographer is paved with regular practice. Learn how PictureCorrect Insiders can help.

- - - - - - - - - - - - - - - - - - - - - - - - - - - - - - - - - - - - - - - - - - - - - - - - - - - - - - - - - - - - - - - - - - - - - - - - - -

This post 10 Lightroom Tools for Photographers to Know appeared on PictureCorrect.


from PictureCorrect https://ift.tt/faYk7pZ
via IFTTT

tiistai 10. syyskuuta 2024

PictureCorrect.com: New Outdoor Backpacks for Photographers

Peak Design has launched its latest product range, the Peak Design Outdoor Line, aimed at enhancing the carrying experience for outdoor adventurers and photographers. This new collection includes backpacks, slings, and modular packing tools, all designed for optimal organization, comfort, and ease of use.

outdoor line

Peak Design Outdoor Line

Addressing Common Outdoor Carry Issues

The Outdoor Line is designed to tackle common challenges in outdoor and photography carry, such as poor fit, bulky harness systems, and limited access to gear. The collection consists of two backpacks, two slings, and a series of packing tools to provide customizable and modular organization. The goal is to improve comfort and accessibility without sacrificing functionality or durability.

Outdoor Backpack Features

At the core of the collection are the Outdoor Backpacks, available in 45L and 25L sizes. These backpacks are built with a low-profile, adjustable harness system featuring shoulder and waist straps designed to distribute weight more evenly. Inspired by running vests, the straps aim to provide a more comfortable carry over longer distances.

The backpacks feature two access points: the Ultra Cinch™ quick-opening top hatch and a large rear access panel. These offer flexibility in packing and retrieving gear. External storage is enhanced by the Cord Hook™ carry system and Flex Pockets™, which accommodate items like water bottles, tripods, and clothing.

Outdoor Sling Features

The Peak Design Outdoor Sling is available in 7L and 2L sizes and is designed for versatility. The slings can be worn either cross-body or around the waist, with a padded, removable strap and quick-adjustment hardware.

outdoor sling

The 7L version can hold a Peak Design X-Small Camera Cube, making it suitable for carrying a camera, while both sling sizes can be attached to the Outdoor Backpacks for additional storage.

Compatibility and Durability

The new products are fully compatible with Peak Design’s Camera Cubes and Ultralight Packing Cubes, allowing users to configure their storage for a wide range of outdoor gear or photography equipment. Built to withstand rugged conditions, the bags feature PFAS-free recycled Terra Shell™ fabric, Ultra Zips™, and ultra-durable, slash-resistant UHMWPE cording.

camera cubes

Availability and Pre-Orders

The Peak Design Outdoor Line is available for pre-order through a Kickstarter campaign, running from September 3 to October 15, 2024. Pre-order discounts of 20-25% off MSRP are offered during this period, with prices ranging from $59.95 to $329.95. Products are expected to ship in January 2025, and the line will be available through Peak Design’s website, Amazon, and other retailers worldwide starting in late November 2024.

Kickstarter pre-order offer found here: Peak Design Outdoor Line

- - - - - - - - - - - - - - - - - - - - - - - - - - - - - - - - - - - - - - - - - - - - - - - - - - - - - - - - - - - - - - - - - - - - - - - - - -

Photography, like any art or skill, thrives on consistency. The journey to becoming an adept photographer is paved with regular practice. Learn how PictureCorrect Insiders can help.

- - - - - - - - - - - - - - - - - - - - - - - - - - - - - - - - - - - - - - - - - - - - - - - - - - - - - - - - - - - - - - - - - - - - - - - - - -

This post New Outdoor Backpacks for Photographers appeared on PictureCorrect.


from PictureCorrect https://ift.tt/RbJF5DV
via IFTTT

maanantai 9. syyskuuta 2024

PictureCorrect.com: Step-by-Step Guide to Better Sunset Photography

Having a DSLR or mirrorless camera to use is the ultimate thrill for a budding photographer. Taking great sunset shots should be easy with such a great tool, right? This article suggests steps you can take to optimize your camera for sunset photographs.

steps to better sunset pictures with your camera

Photo by Howard Ignatius; ISO 400, f/11.0, 1/25-second exposure.

1. Shooting Mode

Many compact cameras have a setting for sunsets, yet many DSLRs don’t, so you have to take control of the situation. Turn off your fully auto, or basic shooting modes, and use your creative zone modes of P (program mode), Tv (shutter priority), Av (aperture priority) or M (manual) so that you have full control over the camera’s parameters.

2. White Balance

Auto White Balance can neutralize a sunset’s glow, so switch to manual White Balance and choose a setting of Cloudy or Shade.

instructions for better sunset photography

Photo by Rennett Stowe; ISO 100, f/13.0, 1/160-second exposure.

3. ISO

Set your ISO at the lowest setting of ISO 100. There’s usually plenty of brightness in the sky, so this is fine. Sunsets can suffer from grainy images with higher ISO settings.

4. Metering Mode

Exposure is important in any sunset shot. It’s best to switch to partial metering mode and take a manual meter reading. This can be a difficult aspect of digital photography for beginners, so I’ll explain how to do this.

Once in partial metering mode, point the camera at a bright area of the sky, directly above the setting sun. Press the star button on the back of the camera to take a light reading and to set the exposure. Then compose your shot and press the shutter release to drive the autofocus and capture the image.

5. Composition

step by step instructions to taking beautiful sunset photos

Photo by darwin Bell; ISO 200, f/9.0, 1/250-second exposure.

Consider your composition. Silhouetted objects and figures in the foreground will add interest. Reflective surfaces, such as lake water, the sea, or wet roads will bring added color to the shot.

Beware—once the sun starts to near the horizon, it sinks surprisingly quickly. This also happens to be the optimum moment when you will catch the strongest shots, yet it can come and go in an instant. Be prepared—make sure all your settings are in place well before this time.

sunset photography advice and tips

Photo by Lukas Schlagenhauf; ISO 100, f/8.0, 1/40-second exposure.

When the sun has disappeared, it doesn’t mean you should. For another thirty minutes or so, there can often be some amazing color across the sky, so keep looking for more opportunities for great photos.

learn to take amazing sunset photography

Photo by Vincent Hou; ISO 100, f/11.0, 15-second exposure.

I hope this step-by-step sunset guide for beginning photographers has been helpful and that you can catch some beautiful sunset photos in the future. They truly are wonderful shots to look back on.

About the Author:
Article written by Paul Summers from PhotographyCourseOnline.

- - - - - - - - - - - - - - - - - - - - - - - - - - - - - - - - - - - - - - - - - - - - - - - - - - - - - - - - - - - - - - - - - - - - - - - - - -

Photography, like any art or skill, thrives on consistency. The journey to becoming an adept photographer is paved with regular practice. Learn how PictureCorrect Insiders can help.

- - - - - - - - - - - - - - - - - - - - - - - - - - - - - - - - - - - - - - - - - - - - - - - - - - - - - - - - - - - - - - - - - - - - - - - - - -

This post Step-by-Step Guide to Better Sunset Photography appeared on PictureCorrect.


from PictureCorrect https://ift.tt/PQ581gn
via IFTTT

perjantai 6. syyskuuta 2024

PictureCorrect.com: Shooting from the Hip: Street Photography Tips for Travelers

Street photography is an art form that captures the candid moments of life, often in urban settings. For travelers, it offers a unique way to document the essence of a place, its people, and its culture. One popular technique in street photography is “shooting from the hip,” which involves taking photos without raising the camera to the eye. This method can yield spontaneous and unposed shots, but it also comes with its own set of challenges, ethics, and safety concerns.

Related note: sale going on now for the Street Photo Editing Presets at 67% Off

Let’s delve into the world of hip-level street photography for travelers.

shooting from the hip photo

Photo captured by Richard Schneider

1. What is “Shooting from the Hip”?

Shooting from the hip is a technique where the photographer takes a photo without looking through the viewfinder or at the screen. The camera is typically held at waist level, and the shot is taken discreetly. This approach allows for more candid shots, as subjects often don’t realize they’re being photographed.

2. Why Use this Technique?

  • Candidness: People act more naturally when they don’t know they’re being photographed. This can lead to more authentic and spontaneous images.
  • Discretion: In busy streets or markets, raising a camera can attract attention. Shooting from the hip can be more discreet.
  • Unique Perspective: Photos taken from waist level offer a different viewpoint than those taken from eye level, adding variety to your shots.

3. Tips for Shooting from the Hip

When shooting from the hip in street photography, you’ll want to optimize your camera settings to ensure you capture sharp, well-exposed images, especially since you won’t be using the viewfinder or screen to compose or focus. Here are some recommended settings:

hip camera settings

Aperture (f-stop):

  • Wide Depth of Field: Use a smaller aperture (larger f-number) like f/8 or f/11. This provides a wide depth of field, ensuring that more of the scene is in focus. This is especially useful since you’re not looking through the viewfinder to focus.

Shutter Speed:

  • Freeze Motion: To ensure sharp images, especially in bustling street scenes, use a faster shutter speed. A good starting point is 1/125s, but if there’s a lot of movement or you’re walking, consider going faster, like 1/250s or 1/500s.

ISO:

  • Adaptable ISO: If you’re shooting in manual mode, adjust the ISO to achieve the correct exposure given your chosen aperture and shutter speed. In brighter conditions, a lower ISO (e.g., ISO 100 or 200) is ideal. In lower light, you might need to increase the ISO.
  • Auto ISO: Many modern cameras offer an Auto ISO feature. When using this, the camera will automatically adjust the ISO based on the lighting conditions, ensuring a proper exposure. This can be handy for street photography where lighting can change frequently.

Focus:

  • Zone Focusing: Pre-focus your lens to a specific distance (e.g., 8-10 feet) and use a smaller aperture to maximize depth of field. This way, everything within a certain range will be in focus.
  • Autofocus: If you trust your camera’s autofocus system, set it to continuous autofocus (often labeled AF-C or AI Servo). This will continuously adjust the focus as subjects move. Pair this with a center or wide-area focus point setting.
street shop picture

Photo captured by Mika Baumeister

Drive Mode:

  • Burst Mode: Also known as continuous shooting mode, this allows you to take several shots in quick succession by holding down the shutter button. This increases the chances of getting a well-composed and sharp image.

Lens Choice:

  • Wide-Angle Lens: A lens with a focal length between 24mm and 35mm (on a full-frame camera) is ideal. It offers a broad field of view, which is forgiving when shooting without looking.

Camera Mode:

  • Aperture Priority (Av or A): This mode lets you set the desired aperture, and the camera will automatically adjust the shutter speed. It’s a good balance between control and adaptability.
  • Manual (M): If you’re comfortable with it and the lighting conditions are relatively consistent, manual mode gives you full control over both aperture and shutter speed.

Image Stabilization:

  • If your camera or lens offers image stabilization (IS or VR), consider turning it on. It can help reduce the effects of camera shake, especially if you’re moving.
    Remember, these settings are starting points. Street photography often requires adaptability, so be ready to adjust based on the specific conditions and scenes you encounter. With practice, adjusting these settings will become second nature, allowing you to focus on capturing the moment.

4. Ethics in Street Photography

Street photography can be invasive, so it’s essential to approach it with sensitivity and respect.

  • Respect Privacy: Avoid taking photos of people in vulnerable situations or compromising positions. If someone indicates they don’t want to be photographed, respect their wishes.
  • Be Transparent: If confronted, be honest about what you’re doing. Offer to show or delete the photo if someone is uncomfortable.
  • Research Local Customs: In some cultures, taking photos without permission is considered highly disrespectful or even illegal. Always be aware of local customs and norms. Here are some examples:

France: While you can take photos in public, France has strict privacy laws. It’s illegal to publish or distribute photos of people without their consent, even if they were taken in a public space. This means that while you can take candid shots, sharing them without the subject’s permission can lead to legal complications.

Germany: Similar to France, Germany values individual privacy. You can take photos in public, but publishing images without the subject’s consent can be problematic, especially if the person is the main subject or focus of the image.

Hungary: In 2014, Hungary introduced laws that made it necessary to get permission from everyone in a photograph before it’s taken, even if it’s shot in a public place. However, the interpretation and enforcement of this law can vary.

Austria: While public photography is generally allowed, if the person is recognizable and the image is published without their consent, it can lead to legal issues.

South Korea: Taking candid photos without consent can be considered a violation of a person’s portrait rights, especially if the image is shared or published.

Japan: While street photography is popular in Japan, there are concerns about “portrait rights.” It’s generally advised to seek permission if you intend to publish or sell the photo.

Saudi Arabia: It’s crucial to be cautious when taking photos in public, especially of people, government buildings, palaces, and even some public streets. Taking an unauthorized picture can sometimes constitute a crime.

United Arab Emirates: Taking photos of people, especially women, without permission can be considered disrespectful and can lead to legal issues.

Greece: Taking photos of people without their consent for commercial use is prohibited. While personal use might be more lenient, it’s always best to be cautious.

Quebec (Province in Canada): Quebec’s civil law protects a person’s image, meaning you could face legal issues for taking and publishing a photo of someone without their consent.

street photo from the hip

Photo captured by Jacek Dylag

5. Safety Concerns

  • Stay Aware: When you’re focused on photography, it’s easy to become oblivious to your surroundings. Always be aware of traffic, obstacles, or potentially unsafe situations.
  • Avoid Risky Areas: Especially when traveling, be aware of areas that might be unsafe for tourists. Always prioritize your safety over getting a shot.
  • Secure Your Gear: Use a strap to secure your camera. Be aware of pickpockets, especially in crowded areas.

Shooting from the hip in street photography offers travelers a unique way to capture the essence of a place. While it can lead to incredible, candid shots, it’s essential to approach the technique with respect, ethics, and safety in mind. With practice and sensitivity, you can document your travels in a way that truly reflects the spirit of the places you visit.

For Help with Photo Editing:

To help with a street photo editing workflow, these presets are designed to help photographers instantly bring out the best attributes of their street photography with exposure adjustments, clarity, vibrance, saturation, split toning, highlights, shadows, sharpening, noise reduction, vignetting, graduated filter adjustments and much more. They are currently 67% off today if you want to check them out.

street presets

Amazing street photo edits in seconds (see how they work)

As street photographers, it’s our job to catch the emotional essence of a city and show it to others through street portraits, documenting moments, and more. In many cases it’s about being in the right place at the right time. How can you do that if you are always stuck at your computer editing photos?

Deal ending soon: The Street Photographer’s Presets at 67% Off

- - - - - - - - - - - - - - - - - - - - - - - - - - - - - - - - - - - - - - - - - - - - - - - - - - - - - - - - - - - - - - - - - - - - - - - - - -

Photography, like any art or skill, thrives on consistency. The journey to becoming an adept photographer is paved with regular practice. Learn how PictureCorrect Insiders can help.

- - - - - - - - - - - - - - - - - - - - - - - - - - - - - - - - - - - - - - - - - - - - - - - - - - - - - - - - - - - - - - - - - - - - - - - - - -

This post Shooting from the Hip: Street Photography Tips for Travelers appeared on PictureCorrect.


from PictureCorrect https://ift.tt/Y3AcyVM
via IFTTT