Everyone loves a great fireworks show and it seems that lots of people take pictures while they are at the show. Here is a question for you. How many great pictures of fireworks have you seen taken by any of your friends or relatives?
I’ll bet your answer is not many. Now, have you ever wondered why everyone doesn’t have at least a couple of really good shots of fireworks? After all, the shows are free and the people there seem to be snapping pictures like crazy.
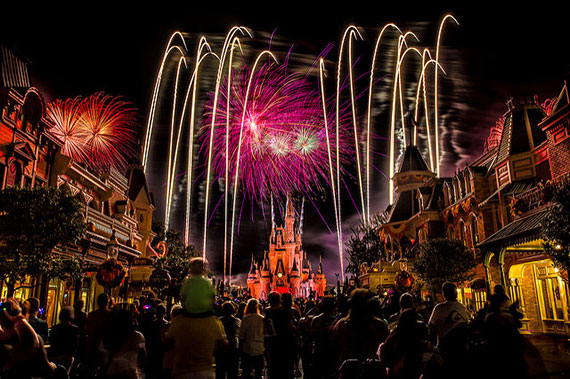
Photo by Brett Kiger; ISO 100, f/11.0, 15-second exposure.
I’ll answer the question for you. It is because a little preparation and planning is needed to increase your chances of getting some really nice shots at a fireworks display.
The following are a few tips that might help when you are photographing fireworks.
Use a Tripod: This fireworks photography tip applies no matter what kind of digital camera you are using. The reason you will need a tripod is because it is best to photograph fireworks at slow shutter speeds.
Slower shutter speeds allow the camera to gather more light from the fireworks scene against the dark sky. When a camera is hand held and a slow shutter speed is used, the result will be a blurred picture.
If you don’t have a tripod, try placing the camera on a steady surface when taking the pictures. Sometimes, even the roof of your car might help.
Arrive early, claim a good spot: If you have time before the show, this fireworks photography tip can be very useful. As you probably know, fireworks shows are usually pretty crowded and you don’t want to have to reach over someone’s head to take a shot.
Some people might like to be close to the fireworks, but from a photography standpoint, it is better to be a little distance away from the actual scene. It is better to be able to shoot towards the fireworks rather than shooting straight up at them.
Also, if you are not right upon the fireworks, you might be able to include a little more than the fireworks burst in your picture. A building, a monument, or a skyline along with the fireworks bursts might make the images a little more interesting.
Photo captured by Jamie Fenn
It is up to you to decide if you want anything but fireworks in your pictures. However, no matter what you decide, make sure you have a clear line of vision before you begin to photograph the fireworks.
Horizontal or Vertical? It doesn’t make a whole lot of difference if you hold the camera in the vertical or horizontal position when photographing the fireworks. However, since fireworks are shot upward in a vertical plane, it might not be a bad idea to shoot single bursts with the camera in the vertical position. On the other hand if there are several bursts going on at one time, the horizontal position will give you more room to frame the whole scene.
Exposure settings for photographing fireworks: If you are using a compact digital camera, you cannot manually change exposure settings. Try using the fireworks scene mode of your camera. The fireworks mode will automatically set a slow shutter speed to photograph fireworks. (once again that is why you need a tripod or a steady surface for the camera).
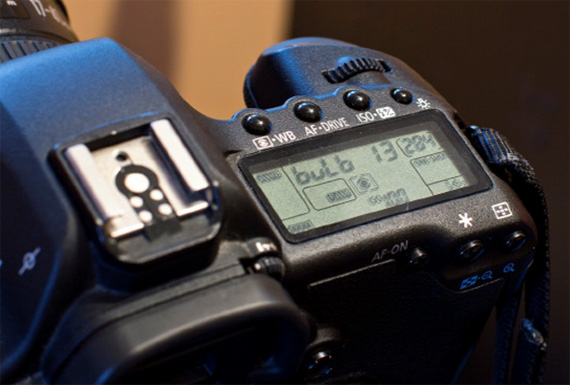
If you are a Digital SLR user, use your cameras’ manual mode. It would be great if you use the bulb “B” shutter setting. The “B” setting allows you to keep the shutter as long as you like. That way can open the shutter just before the burst, and close it right after if you choose to do so.
If you don’t use the “B” setting, experiment with shutter speeds from 2-8 seconds. Also, try using a remote shutter release to avoid camera shake from pressing the shutter button.
As for the camera lens aperture settings, use smaller aperture openings between F8 and F16 if possible. Although the sky is dark, the fireworks are bright and overexposure is possible when using large aperture and slow shutter speed.
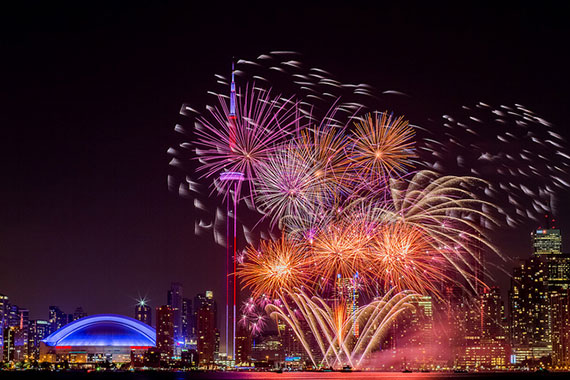
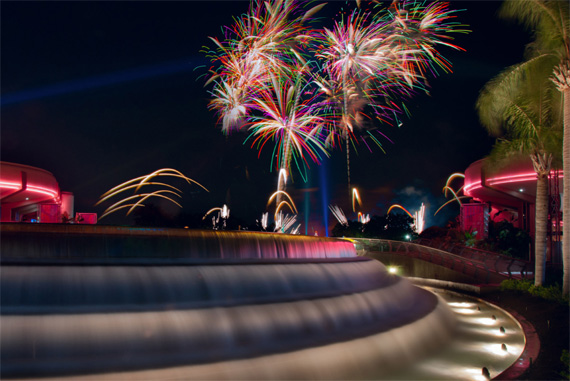
Photo by Duncan Rawlinson – Dunca; ISO 100, f/18.0, 17-second exposure.
Use low ISO settings like ISO 100 if possible: Higher ISO setting like ISO 800 or ISO 1600 might produce grainy looking images. (depending on what camera you use.) So try to use an ISO setting of ISO 200 or less.
Timing is everything: Fireworks bursts will appear quickly and disappear just as fast. Pre focus your digital compact camera on an area where the fireworks are being generated from. Hold that focus until you are ready to take your next shot. You will save time by not having to focus once the firework is in the air.
If you are using a Digital SLR camera use your manual focus feature prior to or during the first burst. You won’t have to refocus if you stay in the same location and use the same focal length.
Listen for a thump like sound or a whistling sound in the air. Those sounds indicate that fireworks have just been shot into the air. For best results do not wait until you see the bright explosion. Press the shutter as soon as you know something has been fired into the air. That way your camera will get the full effect of the burst from the beginning.(that is if your camera is already pointed right at the area of the fireworks and set at a slow shutter speed).
Photographing fireworks might be a little tricky at first. However, with a little practice you should come out with some pleasing results.
I hope these tips on photographing fireworks will be useful to you.
About the Author:
Keith Jones writes for https://www.easybasicphotography.com/, a site geared towards beginners through serious amateurs who want to learn a little more about basic digital photography.
For Further Training on Fireworks Photography:
With 4th of July Independence Day celebrations quickly approaching, we have been receiving requests for more training on how to photograph fireworks. Fireworks photography is indeed one of the most daunting types of photography. This in-depth tutorial eBook explains the process from start to finish, everything from gear and camera settings to composition and post-processing to achieve great results with fireworks of any kind. Currently 55% off to help photographers prepare for the July 4th!
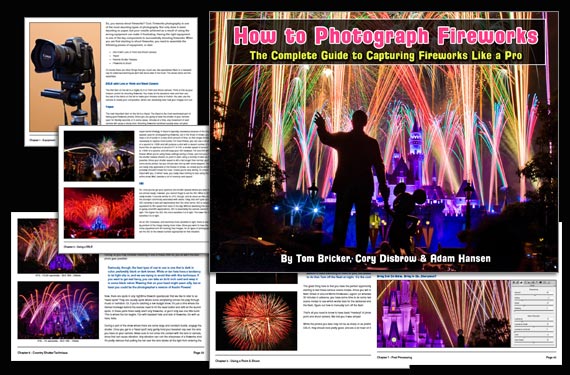
The How to Photograph Fireworks eBook
A common result of photographers new to fireworks photography is capturing nothing but bright white spots instead of colorful bursts. But with the guidance of this eBook in hand, you should be fully prepared to photograph brilliant fireworks displays.
Deal ending soon: How to Photograph Fireworks Guide at 55% Off
- - - - - - - - - - - - - - - - - - - - - - - - - - - - - - - - - - - - - - - - - - - - - - - - - - - - - - - - - - - - - - - - - - - - - - - - - -
Photography, like any art or skill, thrives on consistency. The journey to becoming an adept photographer is paved with regular practice. Learn how PictureCorrect Insiders can help.
- - - - - - - - - - - - - - - - - - - - - - - - - - - - - - - - - - - - - - - - - - - - - - - - - - - - - - - - - - - - - - - - - - - - - - - - - -
This post Fireworks Photos: Preparation and Planning appeared on PictureCorrect.
from PictureCorrect https://ift.tt/qJTaMcI
via IFTTT