


In photography, aperture is a crucial element that controls the amount of light entering the lens, affecting both brightness and depth of field. Although traditionally associated with DSLR and mirrorless cameras, modern smartphones like the iPhone now offer adjustable aperture settings, even after a photo has been taken. This feature is especially useful in portrait photography, where achieving the perfect balance between subject sharpness and background blur (bokeh) is key. In this post, we’ll delve into the steps and tips for adjusting the aperture in iPhone portraits post-capture.
Understanding Aperture in iPhone Photography:
The iPhone’s adjustable aperture feature relies on computational photography. Unlike traditional cameras, where aperture adjustment is achieved mechanically, the iPhone uses software to simulate various aperture values. This digital flexibility allows photographers to fine-tune the depth of field effect after the shot has been captured.
Steps to Adjust Aperture Post-Capture:
1. Open the Photos app:
Locate and open the Photos app on your iPhone to find the portrait photo you wish to adjust.
2. Select the desired photo:
Browse through your photos and tap on the portrait photo you want to edit.
3. Tap ‘Edit’:
In the upper right-hand corner, you will find the ‘Edit’ button. Tap on it to enter the editing mode.
4. Adjust the Depth Control:
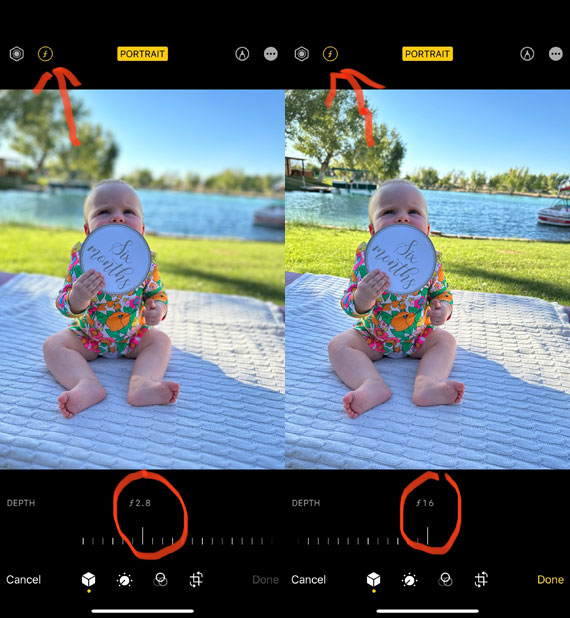
You will see a depth control slider (indicated by an ‘f’ symbol followed by a number) at the bottom of the screen.
Drag the slider left or right to adjust the aperture value. Moving it to the left (lower f-stop numbers) will create a shallower depth of field, blurring the background more. Conversely, sliding to the right (higher f-stop numbers) will increase the depth of field, making more of the scene in focus.
5. Compare Before and After:
Use the ‘Before and After’ feature by pressing and holding on the photo to see how your adjustments have changed the image.
6. Save Your Edits:
Once satisfied with the adjustment, tap ‘Done’ to save your edits.
Tips for Better Aperture Adjustment:
- Understanding the Effect: Familiarize yourself with how aperture affects your photos. Experiment with different settings to see how they impact the depth of field and the overall look of your portraits.
Consider the Lighting: Lighting conditions can significantly impact how the aperture adjustment will look. Ensure there’s adequate lighting to get the desired effect.
Utilize Third-Party Apps: Explore third-party apps like Focos or Halide that provide more advanced depth and aperture control, allowing for even more creative flexibility in your portrait photography.
Here’s a breakdown of how it operates:
Depth Mapping:
When you take a photo in Portrait mode, the iPhone’s dual or multi-lens camera system captures the scene from slightly different angles. This data is used to create a depth map of the scene, understanding which objects are closer and which are farther away.
Computational Photography:
The depth information is then utilized by the software to apply a depth effect to the image. The term computational photography refers to the use of software algorithms to enhance or extend the capabilities of digital photography.
Simulated Aperture Adjustment:
- When you adjust the aperture post-capture, what you’re essentially doing is instructing the software how much blur to apply to the different areas of the image based on the depth map.
- A lower f-stop number (e.g., f/1.4) will result in more blur, simulating a shallower depth of field, while a higher f-stop number (e.g., f/16) will result in less blur, simulating a deeper depth of field.
- This is a simulation of what adjusting the aperture on a traditional camera lens would do. However, unlike a traditional camera, the iPhone is using software algorithms to achieve this effect, not a physical change in the lens aperture.
Real-Time Preview and Adjustment:
The iPhone allows you to see these changes in real-time as you slide the depth control slider, making it easy to find the exact look you want.
Saving the Adjustment:
Once you’ve adjusted the aperture to your liking, you can save the image, and the software renders the final image with the chosen depth of field effect.
Adjusting the aperture post-capture on your iPhone is a powerful tool to enhance your portrait photographs. With a bit of practice and experimentation, you can master this feature and significantly up your photography game.
For Further Training:
iPhone Photo Academy is an in-depth online course that will show you how to take incredible iPhone photos. With the right knowledge an iPhone can be used to take photos that are so good that most people would never even believe that they were taken with a phone. It is currently 84% off which ends soon!
iPhone Photography Tricks (Click to See More Examples)
The best camera is the one that is always with you. But having the iPhone with you is only half of the equation. The other half is knowing how to use it to take outstanding photos.
Deal ending soon: The iPhone Photography Academy at 84% Off
- - - - - - - - - - - - - - - - - - - - - - - - - - - - - - - - - - - - - - - - - - - - - - - - - - - - - - - - - - - - - - - - - - - - - - - - - -
Did you appreciate this newsletter? Please help us keep it going by Joining Our Patreon Supporters
What are your thoughts on this article? Join the discussion on our Facebook Page
PictureCorrect subscribers can also learn more today with our #1 bestseller: The Photography Tutorial eBook
- - - - - - - - - - - - - - - - - - - - - - - - - - - - - - - - - - - - - - - - - - - - - - - - - - - - - - - - - - - - - - - - - - - - - - - - - -
The post Aperture Adjustment in iPhone Portrait Mode Post-Capture appeared first on PictureCorrect.
from PictureCorrect https://ift.tt/8IFfmst
via IFTTT


0 kommenttia:
Lähetä kommentti