keskiviikko 30. kesäkuuta 2021

PictureCorrect.com: Fireworks Photos: Preparation and Planning

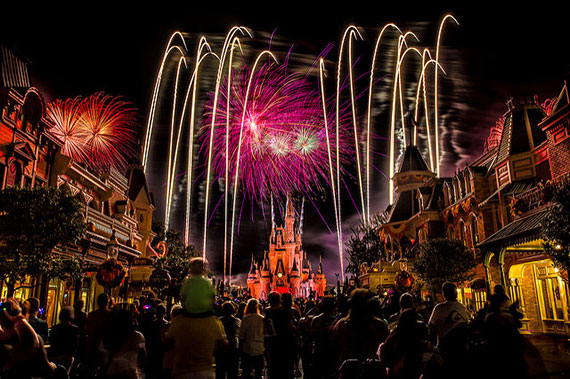
Everyone loves a great fireworks show and it seems that lots of people take pictures while they are at the show. Here is a question for you. How many great pictures of fireworks have you seen taken by any of your friends or relatives?

I’ll bet your answer is not many. Now, have you ever wondered why everyone doesn’t have at least a couple of really good shots of fireworks? After all, the shows are free and the people that there seem to be snapping pictures like crazy.

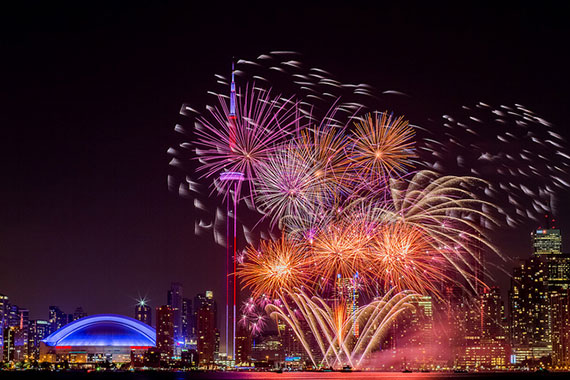
photographing fireworks

Photo by Brett Kiger; ISO 100, f/11.0, 15-second exposure.

I’ll answer the question for you. It is because a little preparation and planning is needed to increase your chances of getting some really nice shots at a fireworks display.

The following are a few tips that might help when you are photographing fireworks.

Use a Tripod: This fireworks photography tip applies whether you are using a point and shoot Digital Compact Camera or a Digital SLR camera. The reason you will need a tripod is because it is best to photograph fireworks at slow shutter speeds.

Slower shutter speeds allow the camera to gather more light from the fireworks scene against the dark sky. When a camera is hand held and a slow shutter speed is used, the result will be a blurred picture.

If you don’t have a tripod, try placing the camera on a steady surface when taking the pictures. Sometimes, even the roof of your car might help.

Arrive early, claim a good spot: If you have time before the show, this fireworks photography tip can be very useful. As you probably know, fireworks shows are usually pretty crowded and you don’t want to have to reach over someone’s head to take a shot.

Some people might like to be close to the fireworks, but from a photography standpoint, it is better to be a little distance away from the actual scene. It is better to be able to shoot towards the fireworks rather than shooting straight up at them.

Also, if you are not right upon the fireworks, you might be able to include a little more than the fireworks burst in your picture. A building, a monument, or a skyline along with the fireworks bursts might make the images a little more interesting.

It is up to you to decide if you want anything but fireworks in your pictures. However, no matter what you decide, make sure you have a clear line of vision before you begin to photograph the fireworks.

Horizontal or Vertical? It doesn’t make a whole lot of difference if you hold the camera in the vertical or horizontal position when photographing the fireworks. However, since fireworks are shot upward in a vertical plane, it might not be a bad idea to shoot single bursts with the camera in the vertical position. On the other hand if there are several bursts going on at one time, the horizontal position will give you more room to frame the whole scene.

best firework photography tips

Photo by Anthony Quintano; ISO 400, f/9.0, 4-second exposure.

Exposure settings for photographing fireworks: If you are using a compact digital camera, you cannot manually change exposure settings. Try using the fireworks scene mode of your camera. The fireworks mode will automatically set a slow shutter speed to photograph fireworks. (once again that is why you need a tripod or a steady surface for the camera).

If you are a Digital SLR user, use your cameras’ manual mode. It would be great if you use the bulb “B” shutter setting. The “B” setting allows you to keep the shutter as long as you like. That way can open the shutter just before the burst, and close it right after if you choose to do so.

If you don’t use the “B” setting, experiment with shutter speeds from 2-8 seconds. Also, try using a remote shutter release to avoid camera shake from pressing the shutter button.

As for the camera lens aperture settings, use smaller aperture openings between F8 and F16 if possible. Although the sky is dark, the fireworks are bright and overexposure is possible when using large aperture and slow shutter speed.

firework photo tips

Photo by Duncan Rawlinson – Dunca; ISO 100, f/18.0, 17-second exposure.

Use low ISO settings like ISO 100 if possible: Higher ISO setting like ISO 800 or ISO 1600 might produce grainy looking images. (depending on what camera you use.) So try to use an ISO setting of ISO 200 or less.

Timing is everything: Fireworks bursts will appear quickly and disappear just as fast. Pre focus your digital compact camera on an area where the fireworks are being generated from. Hold that focus until you are ready to take your next shot. You will save time by not having to focus once the firework is in the air.

If you are using a Digital SLR camera use your manual focus feature prior to or during the first burst. You won’t have to refocus if you stay in the same location and use the same focal length.

Listen for a thump like sound or a whistling sound in the air. Those sounds indicate that fireworks have just been shot into the air. For best results do not wait until you see the bright explosion. Press the shutter as soon as you know something has been fired into the air. That way your camera will get the full effect of the burst from the beginning.(that is if your camera is already pointed right at the area of the fireworks and set at a slow shutter speed).

Photographing fireworks might be a little tricky at first. However, with a little practice you should come out with some pleasing results.

I hope these tips on photographing fireworks will be useful to you.

About the Author:
Keith Jones writes for http://easybasicphotography.com. A site geared towards beginners through serious amateurs who want to learn a little more about basic digital photography.


Go to full article: Fireworks Photos: Preparation and Planning

What are your thoughts on this article? Join the discussion on Facebook

PictureCorrect subscribers can also learn more today with our #1 bestseller: The Photography Tutorial eBook

The post Fireworks Photos: Preparation and Planning appeared first on PictureCorrect.


from PictureCorrect https://ift.tt/3h6dTvb
via IFTTT

PictureCorrect.com: Interesting Photo of the Day: Tunnel Dog

German Shepherds are fantastic friends. Besides being strong, they are also very intelligent, trainable, obedient and full of energy. If you’ve ever spent time with one, you know how they can drain you out while staying quite active. Pet photographer Daniel Towns has done an excellent job of capturing this boundless energy in this image. Have a look and you’ll know what we’re referring to:

dog in a tunnel

“A German Shepherd Leaping on a Train Track” by Daniel Towns (Via Reddit. Click image to see full size.)

Towns shot this image with a Sony A7RIII camera and 24-70mm f/2.8 GM lens. He shot it at f/2.8, 1/500th of a second and ISO 1000 in Tasmania, just outside of Launceston, Australia.

Looking at how the dog is lit, you may wonder if any artificial light was used. But as Towns clarifies, that is not the case. It’s all natural light and it’s simply gorgeous. And it’s not just the dog—even the lighting on the face of the tunnel is fantastic. The dark background also does a great job of making the dog stand out.

“The natural lighting at this spot is always brilliant.”

Besides the dramatic lighting and all the action going on in the image, even the composition is lovely. While the arch of the tunnel does a great job of framing our canine friend, the abandoned train track powerfully draws us right into the action. Reminder: never take photos on active train tracks, it is very dangerous.


Go to full article: Interesting Photo of the Day: Tunnel Dog

What are your thoughts on this article? Join the discussion on Facebook

PictureCorrect subscribers can also learn more today with our #1 bestseller: The Photography Tutorial eBook

The post Interesting Photo of the Day: Tunnel Dog appeared first on PictureCorrect.


from PictureCorrect https://ift.tt/3AiYnUn
via IFTTT

PictureCorrect.com: Tutorial: Color Spaces in Photography

Have you ever come across a situation where the colors in your images look different once you upload them to the web? This issue arises because of something called color space. A basic understanding of how color space works can save you serious time and headaches. Aaron Nace discusses the differences between various color spaces and offers some tips on choosing the correct color space when exporting your images:

Background Information on Color Spaces

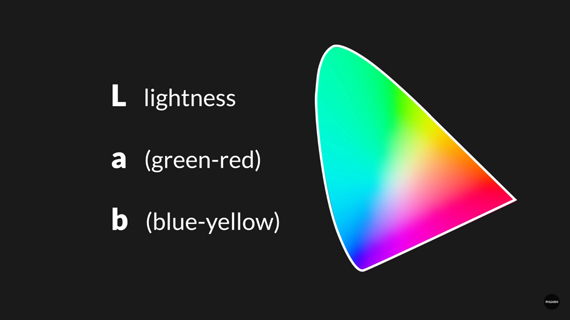
The human eye has the ability to see a ton of colors. According to modern estimates, we can see from 2 million to 8 million colors. There is a mathematical equation to represent the possible colors that we can see known as the Lab model.

lab color model

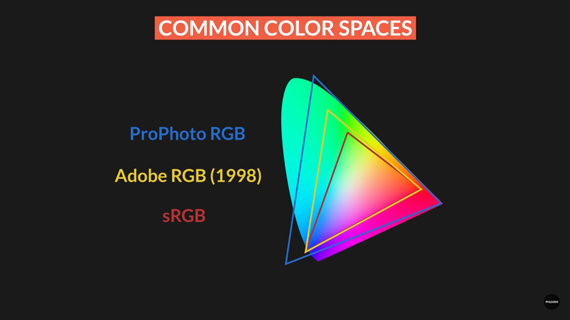
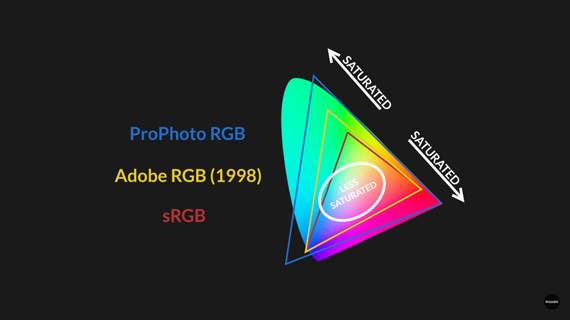
Consider the Lab model as the universe. From this model, we can derive smaller color profiles suitable for different devices. The most common color profiles used by photographers are sRGB, Adobe RGB (1998), and ProPhoto RGB. Have a look at the illustration below to understand how they cover the spectrum of the Lab model.

color spaces in photography

The sRGB color profile contains the least amount of colors and is used by most applications, web browsers, and devices. Now you must be wondering why the smallest spectrum is the most widely used one. Here’s why:

“The whole reason is because there are limitations within different devices. Your phone versus a tablet that was made 10 years ago versus a computer screen, they all can display different amounts of color. So, if you want them to able able to display colors consistently, you have to choose a color profile that’s smaller, using less colors so that all those different devices can properly display all of those different colors.”

And this is the reason why sRGB is in use as a standard color profile for exporting images. So if you plan to upload your images to the web, use the sRGB color profile because that’s the one the web uses.

Color Space Uses

Now you know that there are a few different color profiles and that sRGB is the one that is widely supported. So, what about the other color profiles? Should you only use sRGB? The answer is a bit complicated.

The choice of color profiles is most important when you’re editing your images. You want to edit your images using the color profile that has more color information. This is especially true if the photo you’re working with has a lot of saturated colors. If you compare the sRGB, Adobe RGB (1998), and ProPhoto RGB color profiles, you will notice that they have the greatest amount of difference when it comes to saturated colors.

difference in color spaces

“If you’re working on a very saturated image or if you plan on doing a lot of editing, I highly recommend starting in ProPhoto RGB.”

But as we discussed earlier, the web only supports sRGB. So, what if you want to export the image that you edited using ProPhoto RGB color profile to the web? To overcome the issue, simply export the image using the sRGB profile once you’re done editing with the ProPhoto RGB color profile. More on this below.

Color Settings in Photoshop

In this section, Nace demonstrates how you can set up your color preferences, and he also dispels some myths when it comes to setting up your colors in Photoshop.

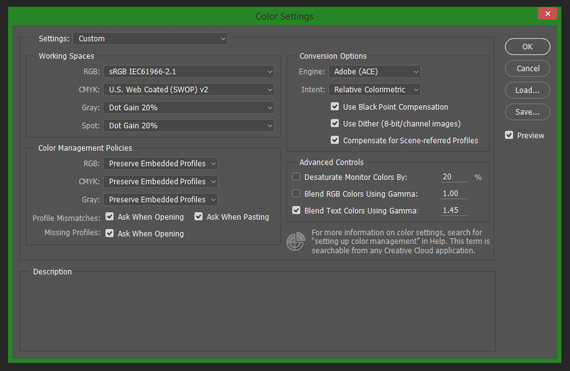
Start by clicking on Edit > Color Settings in Photoshop and it will open your Color Settings dialog box. Here’s what Nace recommends you use for your color settings:

  • For your working space RGB, set it to sRGB.
  • Set the color management policy to “Preserve Embedded Profiles”. This will allow you to edit the image in whatever color profile it is assigned to. If the image is assigned to ProPhoto RGB, Photoshop will edit the image in the ProPhoto RGB color profile.
  • Check the two boxes corresponding to “Profile mismatches” and Photoshop will ask you what to do when there is a profile mismatch. For instance, it will ask you which profile to use if you import or paste an image with the sRGB color profile within an image with an Adobe RGB profile.
  • Check the box corresponding to “Missing profiles” and Photoshop will ask you which color profile you’d like to use when you open an image with no color profile assigned.
  • Use Adobe (ACE) for the conversion engine and set the intent to “Relative colorimetric”.
  • Leave the rest of the settings untouched.

Here’s Nace’s recommended settings for convenience:

photoshop color settings

Photoshop Color Settings

Assigning Color Profiles to RAW

If you’ve fiddled around with your camera settings, you might have come across the color profile setting for your images. Cameras allow you to save images using either the sRGB or Adobe RGB 1998 color profile. However, you should keep in mind that this setting affects only JPEG images. If you shoot RAW (which you should), you can select the color profile later. Nace demonstrates how you can do that using Adobe Camera RAW:

  • Open the RAW image using Photoshop and it will automatically load up in Camera RAW.
  • Click on the settings at the very bottom of the Camera RAW window to launch the “Workflow options” window.
  • In the “Space” drop-down menu, you can select the color profile of your liking and assign it to the image. For demonstration, Nace assigns the ProPhoto RGB color profile to the RAW image.
  • For depth, choose 16 bits/channel.
  • In the Photoshop section, check the box that says “Open in Photoshop as smart objects”.
  • Click on “OK” and then “Open Image”. Photoshop will now prompt you that the image you are trying to open has a different color profile embedded (ProPhoto RGB) than the default working profile (sRGB). You want to use the embedded color profile in this case.

If you want to check your color space, simply go to Edit > Convert to Profile. In the source space, you can see the current profile that your image is assigned to.

Exporting Images for the Web

As we discussed earlier, the web only supports sRGB color profile. So what can you do if you edit your images using some other color profile? Simply go to File > Export > Save for web. In this dialog, make sure that the “Convert to sRGB” box is checked, and click on “Save”. Once the file is saved, you’re good to go.

Lightroom to Photoshop Color Settings

If you like to jump from Lightroom to Photoshop for editing, you can easily make sure that you are using the proper color space.

  • Go to the Lightroom menu and down to “Preferences”.
  • In the “External editing” tab, choose the color profile that you want to use in Photoshop.
  • Set the bit depth to 16 bits/component.

Now if you jump from Lightroom to Photoshop, you can choose to keep the embedded color profile from Lightroom in Photoshop.

Color Settings for Export from Lightroom

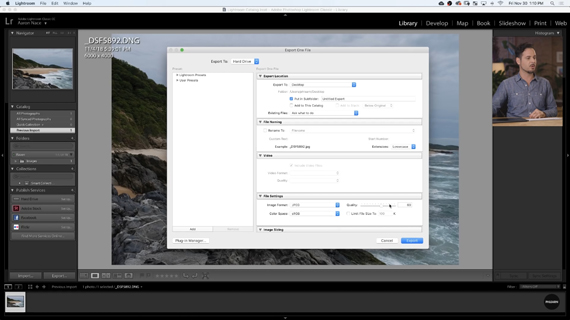
When exporting images directly from Lightroom, choose the color profile in the export dialog as follows:

  • Right click on the image or set of images to export and select Export.
  • In “File settings” choose your “Image settings” as JPEG and your color source as sRGB (for web or to display in most of the devices).
  • Click on export.

saving for web in lightroom

To conclude, think of the Lab color model as the universe of colors and the other color profiles as its subsets. Different devices can handle different color profiles but most of them support sRGB. When editing images, it is highly recommended that you use the ProPhoto RGB color space. But when exporting them, be sure to use the sRGB color space for maximum compatibility.


Go to full article: Tutorial: Color Spaces in Photography

What are your thoughts on this article? Join the discussion on Facebook

PictureCorrect subscribers can also learn more today with our #1 bestseller: The Photography Tutorial eBook

The post Tutorial: Color Spaces in Photography appeared first on PictureCorrect.


from PictureCorrect https://ift.tt/2EDSsxj
via IFTTT

tiistai 29. kesäkuuta 2021

PictureCorrect.com: 10 Photography Mistakes to Avoid

Here are ten common photography mistakes to avoid to take your photos to the next level.

Mistake #1: Combining Light & Shadow

A good example of the mistake of combining light and shadow into photographs can be seen when family photos are taken outdoors. They might be in a really nice location, but the one orchestrating the photograph fails to appreciate how the light from the sun, as it filters its way through tree branches and foliage, is going to impact the resulting image.

light shadow

Photo by Elisey Vavulin; ISO 200, f/13.0, 1/200s.

An example of bad lighting is where you’ve got your subject in some shade and it just ends up being a really, really bad place to take a photograph of someone. And this is what happens with typical family orchestrated portraits taken outdoors.

The ideal to aim for is something more neutral, such as placing your subject in shade and then adding light with a reflector or even an external flash. The key is to start with the right location (such as in the shade), so that you don’t have any shadows falling on your subject and creating a really strong and visually off-putting combination of bits of shadow and bits of light.

Mistake #2: Wrong Location

This tends to happen when the elected photographer is too shy to get their subjects to move to a location that will help result in a more appealing photograph. They’ll tend to make-do with any old location, if their subjects are suddenly all together. What then happens is they’ll end up with something in the background that totally ruins what could be a really nice photograph, such as random cars that aren’t out of focus enough to truly stop them from being a visual distraction. Or, there are rubbish bins or just something that detracts from the overall appeal of the resulting photograph. And, most of the time, all the photographer had to do was move their subjects to a spot only a few meters away, or turn them to a slightly different angle, and they would have had either a clutter-free background, or at least one that would have blended nicely behind the main subjects without being an eyesore or unwanted distraction.

Mistake #3: Focus in the Wrong Place

Many a time, people have managed to compose a really nice photograph, but the elements you’d want to see clearly just aren’t in focus. You have to be aware that the eyes of those viewing the photos are going to go to whatever happens to be sharp and bright.

Examples are flowers, where the head of the flower is blurred and out of focus, but the leaves (nice as they are, but which most likely aren’t the main feature to show off) are the parts that are in focus. So, the focus was good on the leaves, but as it was the head of the flower that was meant to be the main subject, the focus was clearly in the wrong place.

sharp focus in images

photo by Benson Kua

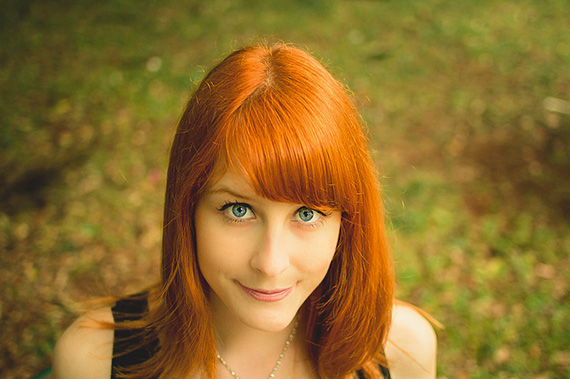
When it comes to taking portraits, it’s not uncommon to see that the photographer has managed to get something either in the foreground or the background in sharp focus, but then they’ve made a total hash of the face and eyes of the subject, which is frustratingly blurred. When viewing the photos, you want to see the detail of the person and don’t want to be impeded by the facial details being blurred and out of focus; this is often what ruins an otherwise nice portrait photo.

When taking a portrait, always make sure you have tack-sharp focus on the person’s eyes. If you’ve positioned the person at a slight angle to you, using center-point focus, lock it in on the closest eye to you. The key to good portrait photos is to get the eyes in crystal clear focus—unless you’re aiming for something creative and artistic, that is!

Mistake #4: Wrong Aperture

Using a wide aperture (low f-number), to create a shallower depth of field, enables you to use selective focus to determine what is in focus and what will be blurred and out of focus. This approach helps you to dictate what those viewing your photos will look at.

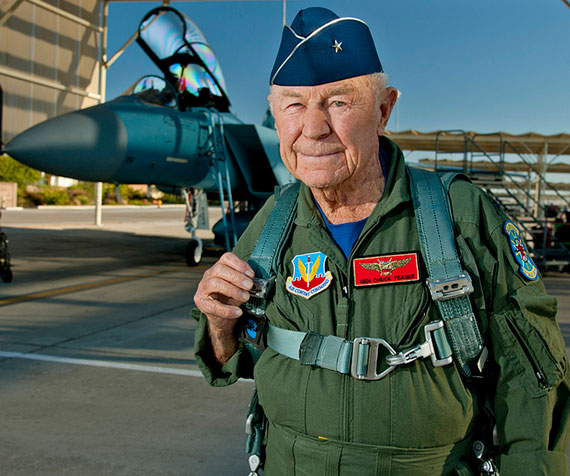
For example, if you’re photographing a pilot standing in front of his or her plane, you want the pilot in focus and not the plane, because you want to draw the viewer’s attention to the pilot—the one who flies the plane—and, in this case, not so much the plane. If it were the plane you were wanting to draw the eye to, you probably wouldn’t have the pilot in foreground of the shot… he/she may be in the plane, but it’s going to be more obvious that the plane is the main subject of the photo, as you photograph the plane in its environment (such as about to taxi onto the runway); the background would be secondary to the plane, so you’d allow the background to become out of focus.

pilot and plane

photo by DVIDSHUB

Of course, if you purposefully wanted to capture both the pilot and the plane in clear focus, with the pilot standing in front of the plane, then you’d shoot with a narrower aperture, such as f/11 or all the way down to f/22, depending on how far the pilot was standing in front of the plane.

Learn to use your DSLR in Aperture Priority mode to learn how to take photos with a low aperture number (f-numbers such as f/4, f/2.8, f/2, f/1.4, etc.), as these will allow you to explore selective focus, to get away from the “point-and-shoot look”, where everything is in clear focus.

Mistake #5: Bad Composition

Landscape photography is a good example where the average photographer tends to come away with poorly composed photographs. The problem usually stems from them not knowing what their subject actually is. If you were out at Niagara Falls, it’d be fairly obvious that your subject would be the stunning waterfall, and so that is what you would want as the star attraction in your frame. However, problems can arise when there are multiple candidates for being the main subject. Is it the autumnal colors of the leaves? Is it the flowing stream as winds its way down into the valley beyond? Is it the valley? If you know what your subject is, it will help you to craft a better photo.

You can sometimes get interesting photos by angling your camera. This is using a technique known as “Dutch angle,” “Dutch tilt,” “canted angle,” “oblique angle,” or “German angle” photography to produce a point of view that’s pretty much like what you see when you tilt your head to one side. It is a technique that can be used to add a dramatic effect to an otherwise ordinary subject matter.

Another cause of bad composition is not getting down to the level of your subject to take the photo. Photographers can get a bit lazy and shoot everything from the height that they stand, regardless of the height of the subject they’re photographing. If photographing, say, kids or animals, you’ll often be rewarded with better images if you make an effort to get down to their level—even going as far to lay on the ground, if you have to—in order to get the shot so you can portray in the photo what it’s like to be at their level. If you can get low, below your subject and shoot upwards, it has the effect of making your subject look much bigger and/or more powerful.

eye level composition

photo by PhotoAtelier

Another composition mistake is trying to shoot every subject from head-to-toe. This is typical of portrait photos. Images can be more interesting if you get in close, either physically closer or with a zoom lens, to photograph your subject(s), say, from the waist, upwards.

Always centering subjects in photos is a habit that can create routinely poor photos. If you don’t center subjects in the frame, you get to take your viewer on a journey through your photograph, which can help make your images a little more compelling. For instance, you photograph a monument and instead of placing that monument in the center of the frame, step back enough so that it can be positioned to either side (where you think it looks better), and then use leading lines (such as the shape of the land, or a fence, or a road, or path), to lead your viewer’s eye from the far side of the image up to the monument (or whatever your subject is), where they may spend a little while taking in the details of that subject before their eyes naturally travel back along the leading line to where they started—at which point they’ll either be done looking, or they may take another visual walk through your photo if it’s compelling enough to them.

Mistake #6: Don’t Shoot Tight Enough

If you take a photo of someone, for example, and you show the person from head-to-toe, plus a lot of what’s in the background and surrounding that person, then the photograph tends to be about the environment that your subject is in – it could be the person is wearing a football kit and is on the pitch, with the goal posts in the background. If, instead, you focused in really tight, so that you fill the frame with your footballer, as much as possible (from the waste up, for instance), then the resulting photograph will now be more about the person, than where they are.

It’s not that you shouldn’t shoot in one way versus the other (head-to-toe versus up tight), but consider shooting both types, in order to give you more options – once you get the photos printed or onto your computer, with a bit of reflection, you might find you prefer one style over the other. But, if you only shot one way, such as always trying to get everything in the frame, from head-to-toe, then you’re missing out on achieving a totally different feel or look to your images.

It doesn’t matter what the subject is; if it’s a car, for example, take one photograph showing the entire car, which will include some of the surrounding environment, and then get in really close and tight, and photograph an appealing section of the car in isolation. It could be just one side or a diagonal shot either taken from the front nose section looking toward the back or from the interesting back end of the car looking forward.

Mistake #7: The Wrong Use of Flash

First of all, a flash unit at full power can be really harsh, which can result in the loss of interesting features and details of your subjects. So, if using flash, turn down the power, such as to -1 stop. You’ll know when you’ve used too much flash, because people will be commenting on the fact you used flash to take the picture. It should be used to enhance the subject(s) in the photo, not to become the main feature or talking point of the image.

You should also take time to learn how to use your camera during the day, as much as at night. If you’re taking photographs outside on a bright sunny day, flash can help to get rid of some of the harsh shadows that may be present in the background or shining onto your subject(s).

If photographing someone outside, in the sun, and you find a small pocket of shade, you might end up with the sun shining down on them and, while you may get the sun adding a nice portion of hair light to the top of their head, the rest of your subject may be lost in a silhouette. By adding a subtle amount of flash, you can capitalize on the hair light coming from the sun, and kiss just enough light with your flash, to illuminate your subject from the front, to take them out of the dark silhouette. The result will be a nicer portrait, overall.

It can be very effective, when outside on a sunny day, to position your subject so the sun is coming from behind, and then you use your flash to help illuminate them from the front. With the sun shining down from the side, it can tend to add really dark shadows, particularly around the eyes, giving your subject a kind of “raccoon look”. This is something you can avoid, with the use of a flash, and simply positioning them so that they are between you and the sun, with the sun directly behind them.

Another problem with photographing people looking into the sun, is they all invariably end up squinting into the camera, which is never a flattering look to have in a photo.

Mistake #8: Not Aware of the Shutter Speed

Photographs that have captured, say, a sportsman in midair as they’re about to touch down and score a try in rugby; where they’re frozen, with no image blurring, will have been shot with a fast shutter speed. Conversely, when you see a bit of motion blur in the photo, such as the movement of the arms and legs of a marathon runner, then these will typically have been taken with a slower shutter speed. The shutter stays open fractionally longer, giving enough time for the camera’s sensor to record the movement of the limbs at various different points as the athlete moves along.
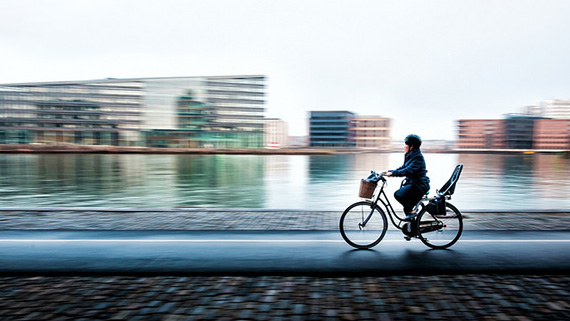
shutter speed panning

1/30 of a second, photo by Dragan

It all depends on the speed of the subject, as to how fast or slow your shutter speed needs to be, in order to capture either some movement in your photo, or to ensure that there’s no motion blur and the subject is completely frozen in that moment. A person jogging along might allow you to capture motion blur at 1/40 or 1/50 of a second, as you pan with them. But, a motorbike or race car may require 1/100 of a second or so, in order to get a similar result.

Mistake #9: Trying to Shoot at Night Without a Tripod

If you know you’re going to be photographing at night, take a tripod along, as you will most likely be needing to use slower shutter speeds. You don’t want to discover a fantastic photographic opportunity, only to be prevented from capturing that moment because you didn’t have a tripod—and because you couldn’t hand-hold the camera, as the outcome would have been photo-ruining blurring, due to having to hold the camera during the slow shutter speeds.

There are some places you go where they don’t allow tripods, in which case you will need to make the best use of whatever stable platform is available. This could be a ledge or a wall, or, if you’re forward thinking, you might be able to arrange a mini tripod in a backpack, which pokes out just enough to let the camera appear like it’s just sitting very well behaved atop your bag. But, in general, if you can use a tripod, it’s often the best choice. Camera bean bags are another option; you just have to scrunch your camera down into them to get it level, but that can solve a problem of not being allowed to take a tripod somewhere and yet still manage to get your camera onto a level base to take your shot.

Mistake #10: Standing By Walls & Bushes

If people know they’re going to have their photos taken, they inevitably find a wall or a bush and reverse themselves right up to it and then wait there until you take their picture.

If you’re using flash or you’re outdoors in bright sunlight and you let them remain in front of the bush or wall, this will most likely result in them having a harsh shadow around them. The bush or wall can also merge with your subjects and you may not get sufficient separation between subject and these background objects, resulting in a rather cluttered portrait.

subject close to brick wall

photo by Anna Davidson

What tends to happen when people have their photo taken up against a wall or a bush is that people viewing the photos will get somewhat distracted, as they may find their minds are caught between looking at the people and looking at that bush or wall. By all means, if the bush is attractive, you can have it in the background, but just bring them far enough away from it so that you can use a wide aperture (small f-stop number), combined with a longer focal length, to have the bush nicely defocused in the background, while letting your subjects take the starring role, as should be the case.

About the Author:
Graham Wadden created and maintains the Creative Commons photography website, WaddenCCPhotography, specializing in creating stock photography primarily for home educators and those in education.


Go to full article: 10 Photography Mistakes to Avoid

What are your thoughts on this article? Join the discussion on Facebook

PictureCorrect subscribers can also learn more today with our #1 bestseller: The Photography Tutorial eBook

The post 10 Photography Mistakes to Avoid appeared first on PictureCorrect.


from PictureCorrect https://ift.tt/3y5wE7H
via IFTTT
PictureCorrect.com: Interesting Photo of the Day: Moeraki Boulders

Sunsets are always magnificent if captured properly. But when you capture one with something that you don’t see every day, like these Moeraki Boulders in New Zealand, it takes it to another level:

sunset with unique rock formations

“Alien Forms” by Chris Smith (Via 500px. Click image to see full size.)

Besides the unique rock formations and the magnificent sunset, good post processing and a camera with decent dynamic range were required to pull off this image. Using a Canon 5D, photographer Chris Smith managed to combine technique with natural phenomena perfectly.


Go to full article: Interesting Photo of the Day: Moeraki Boulders

What are your thoughts on this article? Join the discussion on Facebook

PictureCorrect subscribers can also learn more today with our #1 bestseller: The Photography Tutorial eBook

The post Interesting Photo of the Day: Moeraki Boulders appeared first on PictureCorrect.


from PictureCorrect https://ift.tt/2GFjF6o
via IFTTT
PictureCorrect.com: Choosing Lenses for Landscape Photography Outings

Deciding on what lens to get can be tough. It can be even more difficult than deciding on what camera to buy. On the one hand, there are measurable variables like focal length, aperture, weight, and size. On the other, there’s sharpness and image quality. The latter two are something that normal eyes can’t differentiate easily which makes the task of choosing a lens difficult. In today’s video, professional landscape photographer Nigel Danson explains the factors he considers when choosing a lens:

A common advantage that most expensive lenses have over the cheaper variants is that they are sharper, especially on the edges of the frame. However, expensive lenses also tend to be bulkier. And while maintaining a wide aperture wide doesn’t matter much in daytime landscape photography, the ability to produce a sharp and detailed image is what you should be concerned about.

Similar to Danson’s photography, you too can produce fantastic results that are comparable to those from expensive lenses. You just need to pay attention to a few things. The key is to have an understanding of your lens’s behavior. Typically, lenses exhibit greater distortions and produce softer results when set to their widest aperture. However, every lens has its sweet spot, which can be a combination of a focal length and a particular aperture where it performs the best. The best way you can find it is by spending time with your lens, taking photos at various settings, and by carefully inspecting the results. You will be surprised by how well your cheaper lens can perform.

Knowing your lens not only saves you a good amount of money, but also enables you to have a lighter backpack while providing greater versatility. Make sure that you spend a good amount of time getting to know your lens.


Go to full article: Choosing Lenses for Landscape Photography Outings

What are your thoughts on this article? Join the discussion on Facebook

PictureCorrect subscribers can also learn more today with our #1 bestseller: The Photography Tutorial eBook

The post Choosing Lenses for Landscape Photography Outings appeared first on PictureCorrect.


from PictureCorrect https://ift.tt/360N9pN
via IFTTT
maanantai 28. kesäkuuta 2021

PictureCorrect.com: Fireworks Photography Guide on Sale Until July 4

With 4th of July Independence Day celebrations quickly approaching, we have been receiving requests for more training on how to photograph fireworks. Fireworks photography is indeed one of the most daunting types of photography. This in-depth tutorial eBook explains the process from start to finish, everything from gear and camera settings to composition and post-processing to achieve great results with fireworks of any kind. Currently 55% off to help photographers prepare for the July 4th! Deal ending soon: How to Photograph Fireworks Guide at 55% Off

fireworks photography

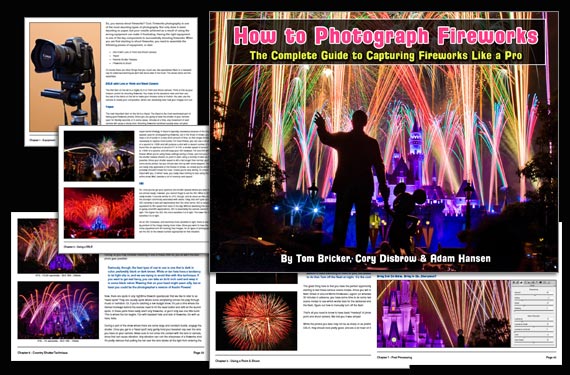
The How to Photograph Fireworks eBook

A common result of photographers new to fireworks photography is capturing nothing but bright white spots instead of colorful bursts. But with the guidance of this eBook in hand, you should be fully prepared to photograph brilliant fireworks displays. While the exposure fundamentals of aperture, shutter speed, and ISO are essential to great fireworks, it’s important to also be aware of the right accessories and set up for your shots correctly.

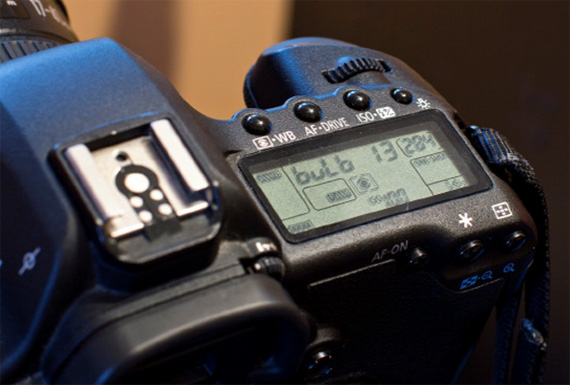
using bulb mode

How to use bulb mode for long shutter speeds

Some of the Many Topics Covered (50 Pages):

  • Equipment & Accessories Needed
  • Using a DSLR for Fireworks
  • Using a Point & Shoot for Fireworks
  • Composition
  • Using a Neutral Density Filter
  • Country Shutter Technique
  • Post Processing
  • Conclusion
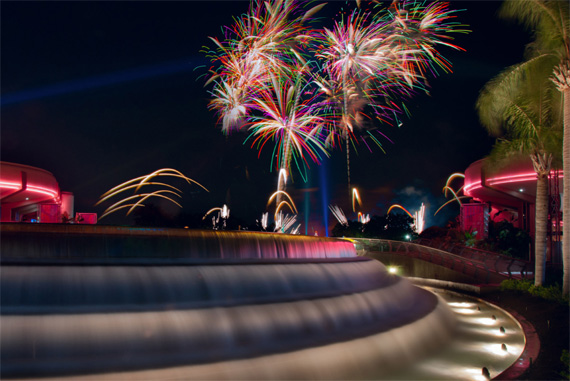
fireworks fountain photo

In-depth tutorials on how to photograph fireworks in challenging conditions

Like post processing in general, there are a myriad of ways to approach the post processing of fireworks shots. To start, they describe general tips and explain how they are universally applicable, and then they apply the techniques to example photos, explaining how they change the overall result.

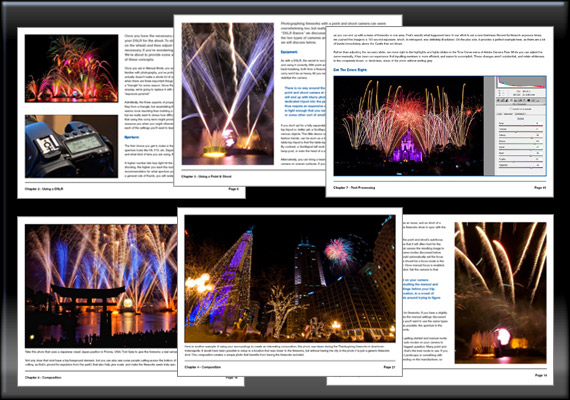
fireworks photography

Pages from How to Photograph Fireworks

How to Photograph Fireworks is a downloadable eBook PDF file, which can be viewed on a number of devices – laptop and desktop computers, iPhone or Android devices, iPads, and other tablets.

How to Get a Discounted Copy Before July 4:

It is currently 55% off until the 4th of July to help photographers prepare for fireworks shows! It also carries a 90 day guarantee, if you do not find the eBook useful just let us know to receive a full refund. So there is nothing to lose in trying it.

Deal found here: The How to Photograph Fireworks eBook at 55% Off


Go to full article: Fireworks Photography Guide on Sale Until July 4

What are your thoughts on this article? Join the discussion on Facebook

PictureCorrect subscribers can also learn more today with our #1 bestseller: The Photography Tutorial eBook

The post Fireworks Photography Guide on Sale Until July 4 appeared first on PictureCorrect.


from PictureCorrect https://ift.tt/2SCJjQG
via IFTTT
PictureCorrect.com: Interesting Photo of the Day: Lightning Surrounds Ostankino Tower

Moscow based photographer Denis Murin was fortunate enough to have had his camera in tow when he witnessed this striking scene. This image features Russia’s Ostankino Tower, a 540 meter telecommunication center that dwarfs the city’s high rise apartments. Brightly lit, it serves as a sturdy neon beacon in the face of an ominous thunderstorm:

Storm in Moscow. (Via Reddit. Click image to see full size.)

Storm in Moscow. (Via Reddit. Click image to see full size.)

Murin was able to capture the glowing multicolored lights of Moscow from his perch as well as the bolts of lightning materializing out of the dark purple clouds. Mimicking the streaks of electricity making contact with the earth’s surface, the tall, skinny tower is framed by dim spotlights pointing towards the heavens.

Built to commemorate the 50th anniversary of the October Revolution, the structure is open to guests well into the evening hours. You can only imagine the awe inspiring sight unwitting visitors gazing from the building’s observation deck were subjected to once the sky began to erupt!


Go to full article: Interesting Photo of the Day: Lightning Surrounds Ostankino Tower

What are your thoughts on this article? Join the discussion on Facebook

PictureCorrect subscribers can also learn more today with our #1 bestseller: The Photography Tutorial eBook

The post Interesting Photo of the Day: Lightning Surrounds Ostankino Tower appeared first on PictureCorrect.


from PictureCorrect https://ift.tt/3qvEzZF
via IFTTT
PictureCorrect.com: Photographing Metal: Finding Ideas and Compositions

To a bystander, photography seems like a simple task. They may feel it’s only a matter of pointing the camera to the subject and pressing a button. But ask anyone with some photography experience and you’ll know how far this perception is from reality. You need to make a lot of technical and artistic decisions before you point the camera or press the button. And those decisions determine how compelling your photographs come out. But again, knowing what you want to photograph and how you want to compose takes practice. If you’ve been struggling with finding ideas and compositions in photography, today we’ll have a look at how a pro does it. We have photographer Roger Lowe who shares his entire thought process when composing and taking a photograph:

A very interesting thing about Lowe is that he doesn’t simply show up at a location and then think about what to shoot. In fact, his thought process begins even before leaving home. Looking up the weather beforehand he gets an idea about what the lighting conditions will be and how he could potentially shoot creating stories with the subjects. This helps in narrowing down his subject choice and allows him to be clear about what he’ll be shooting. He also uses these variables to decide on the film, camera, and other gear to take along. Sounds like a great approach!

“I’m not just pointing and shooting. I’m actually looking through the viewfinder and seeing what I want in the shot.”

Again, once on the field, it’s not just about photographing your subject as soon as you come across one. As a photographer, it’s up to you to study the interaction of light with your subject, and the interaction of your subject with its surroundings. As you can see in the video, Lowe looks at the contrast, the shapes, patterns, and many other factors. You can also see him deciding on his aperture based on where he wants to draw attention. Lastly, he doesn’t just shoot at eye level; he’s not afraid to go down low.

Besides these, there are a lot of other valuable insights that Lowe shares in the video. Be sure to watch the complete video and you’ll definitely learn a lot from his work process.


Go to full article: Photographing Metal: Finding Ideas and Compositions

What are your thoughts on this article? Join the discussion on Facebook

PictureCorrect subscribers can also learn more today with our #1 bestseller: The Photography Tutorial eBook

The post Photographing Metal: Finding Ideas and Compositions appeared first on PictureCorrect.


from PictureCorrect https://ift.tt/3dnZI2F
via IFTTT
sunnuntai 27. kesäkuuta 2021

PictureCorrect.com: Sky Replacement Tutorial in Photoshop

The Sky Replacement feature in Adobe Photoshop will help you to make skies in your images dramatic and surreal. In this step-by-step guide, you will learn how to use the Sky Replacement tool. You will also learn various settings in the Sky Replacement interface to make your skies beautiful.

Are you looking for beautiful skies in your images?

Or do you want to add stunning skies to your architecture, portrait, wildlife or landscape images?

If so, you are in the right place.

In this article, we will discuss Photoshop’s unique feature, Sky Replacement. This tool helps you to transform ordinary skies into beautiful ones. Whenever a photo of mine has an unfortunate flat sky, I use this technique.

Best of all, the Sky Replacement tool is easy to use and produces great results.

Let’s dive right in.

What you’ll learn

  1. Sky replacement tool box
  2. Sky adjustments
  3. Foreground adjustments
  4. Sky replacement for sample image

Step-by-step guide to Sky Replacement in Adobe Photoshop

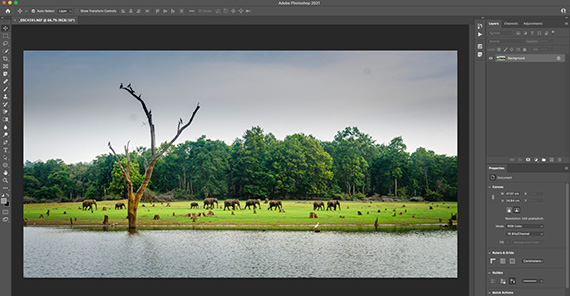
Open the image in Adobe Photoshop. I’m using the latest version from 2021, but the general rules should apply regardless of which version you have.

Image opened in Photoshop 2021

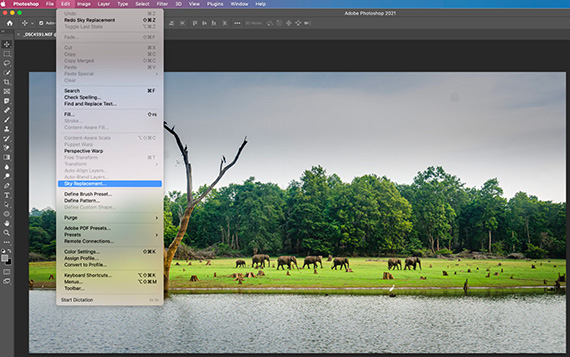
Go to Edit > Sky Replacement.

Edit dropdown menu

The Sky Replacement window will pop up.

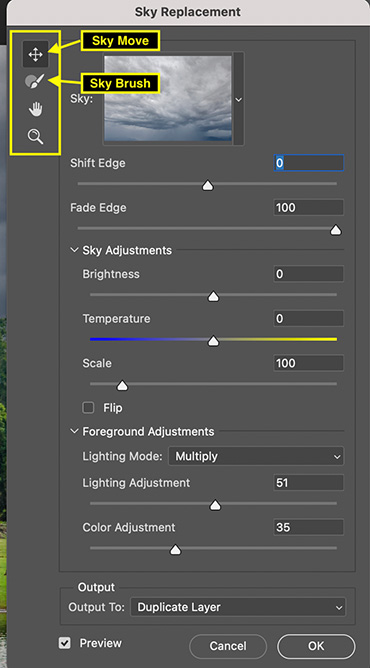
Sky Replacement Toolbox

There are several options in the top-left window. We will mainly use the top two, Sky Move and Sky Brush.

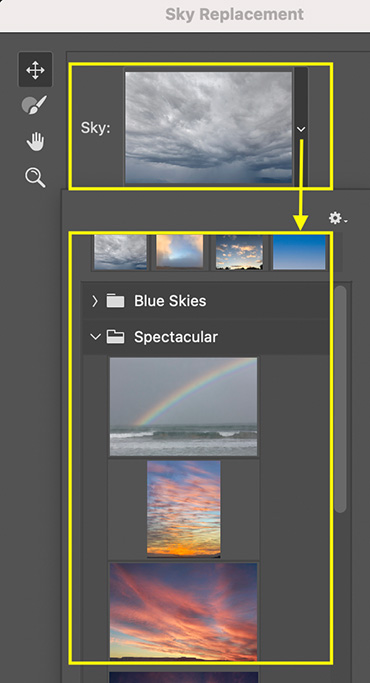
Click on the drop-down menu beside the image preview. Photoshop offers multiple default options, and you can add your own sky images to this bank.

Default sky options available

Once you have selected which sky you want, you can see a preview of that sky in your image.

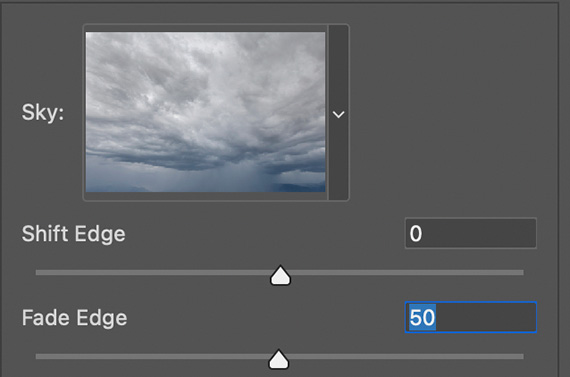
Shift Edge will help you define the boundary between sky and foreground. If you drag the Shift Edge slider toward the left (a negative number), the boundary, or sky, will shift away from the foreground.

Sky edge adjustments

Similarly, if you drag the Shift Edge slider rightward (toward a positive number), the boundary or sky will shift toward the foreground. The Fade Edge slider will help you to make a smooth transition between sky and foreground.

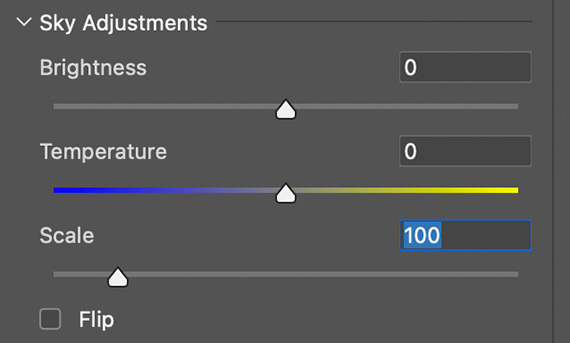
Next up are Sky Adjustments, Brightness and Temperature. Brightness is self-explanatory: it controls how bright your sky looks. Generally, I will keep it to its default zero value or slightly reduce the brightness.

Brightness and temperature adjustment for sky

Use the Temperature slider to warm up or cool down the sky temperature, and use the Scale slider to scale up or down the sky part of your image. Next to the Scale slider, the Flip option will be helpful to flip the sky horizontally.

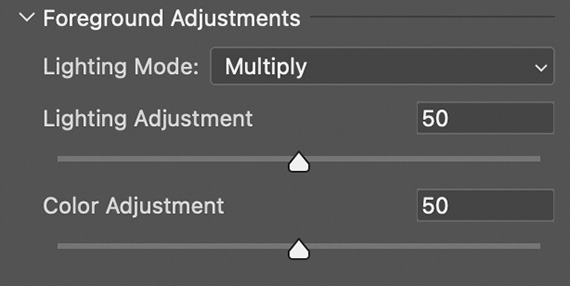
Once you make finish with Sky Adjustments, the next option is Foreground Adjustments. Foreground Adjustments help adjust Lighting Mode, Lighting Adjustment and Color Adjustment. You can make foreground adjustments using these three options, and they will help you to blend the foreground along with the newly replaced sky effectively.

Light levels and color adjustment for the foreground

Here’s a rundown of the Lighting Modes: Multiply darkens the image, whereas Screen Blending brightens it. Below that, the lighting and color adjustments control the intensity of foreground adjustments for overall light and color. Increasing these sliders will increase the opacity.

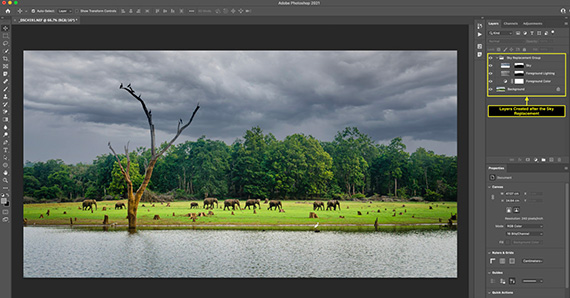
The last option is Output. You can either select Output to New Layers or Duplicate Layers.

Output Option

I recommend you select New Layers. With New Layers, you can see all the layers that Photoshop has applied during this sky replacement process. You can also make some finer adjustments if necessary.

Multiple layers are created after applying Sky Replacement.

Duplicate Layers will create one single image. Similar to Flatten Image in Photoshop, all the layers get merged to create one single image.

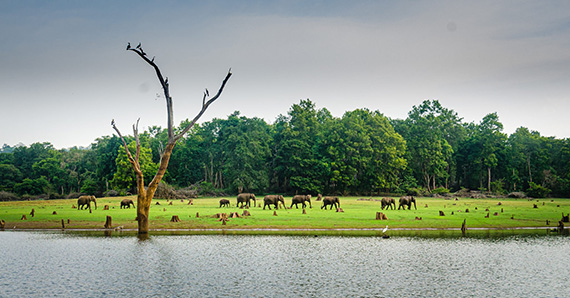
Compare the before and after:

Before

Above is the image with a flat and dull sky.

After

Here is a final image with an overcast sky, replaced using Sky Replacement.

A few things to consider when using Sky Replacement

  • Select a photo that is suitable for Sky replacement, because not every photo will work well.
  • When you replace the sky, keep an eye on the overall colors and temperatures of the image subject. Choose a sky that matches in terms of light levels, color temperatures and reflections.
  • As with any other feature, moderation is key. Use Sky Replacement feature when necessary, and do not try to rely too heavily on it.

Now it’s your turn!

I hope you enjoyed these tips on how to use the Sky Replacement tool in Photoshop.

Want to share your thoughts or responses? Let me know by leaving the comment below.

About the Author:
Shreyas S. Yadav is an engineer and photographer of wildlife and nature. He is also a writer and lifelong adventure explorer. Through his writings, he teaches about digital post-processing and nature photography. Shreyas shares field techniques about nature photography, post-processing and wildlife photo stories on his website.


Go to full article: Sky Replacement Tutorial in Photoshop

What are your thoughts on this article? Join the discussion on Facebook

PictureCorrect subscribers can also learn more today with our #1 bestseller: The Photography Tutorial eBook

The post Sky Replacement Tutorial in Photoshop appeared first on PictureCorrect.


from PictureCorrect https://ift.tt/3jhrwcv
via IFTTT
PictureCorrect.com: Interesting Photo of the Day: Majestic White Lion

Lions are known as “the King of the Jungle” for a reason. Between their bodies, strength and behavior—everything about them is majestic. But even these majestic beasts have to surrender to the whims of their biology. White lions are the result of an extremely rare color mutation specific to South African lions. Regarded to be divine species by some African tribes, white lions are peculiarly astounding. Consider the following image taken by photographer Harry Vincent in South Africa:

a white lion

“Majestic White Lion” by Harry Vincent (Via Reddit. Click image to see full size.)

Vincent took this image with his Canon 5D Mark II while standing pretty close to the lion in a reserve. He was just about 30 meters away when he took this image. As he explains, the experience totally surprised him, as he had severely underestimated how big these cats could get. Vincent says he’s 6’4″, and the lion’s head was in line with his chest.

When Vincent was capturing this image, the food truck in the sanctuary was close by with the lion’s food. This allowed him to photograph the big cat while it was looking toward the truck in anticipation of a proper meal.

“I was volunteering at a sanctuary and we were about to feed them so he was pretty fixated on the food truck.”

The sunlight hitting the lion from the side has created a beautiful outline, separating the beast from the background. The expression on the lion’s face is almost heroic. It is similar to that of a cat who just heard a packet of food being opened. It’s all in the genes, after all.


Go to full article: Interesting Photo of the Day: Majestic White Lion

What are your thoughts on this article? Join the discussion on Facebook

PictureCorrect subscribers can also learn more today with our #1 bestseller: The Photography Tutorial eBook

The post Interesting Photo of the Day: Majestic White Lion appeared first on PictureCorrect.


from PictureCorrect https://ift.tt/3A4OU32
via IFTTT
PictureCorrect.com: How to Get Sharp Photos While Using Aperture Priority

Professionals value time, and manual mode is sometimes a lot of work. So to keep things simple, they often choose to work in aperture priority mode. This way, the photographer has control over the depth of field while the camera does the rest. But in low light conditions, the camera can opt for slow shutter speed, causing images to turn out blurry. Andrew Boey explains how you can tackle the problem:

Cameras are programmed to expose for the mid-tone. They don’t care whether or not the shutter speed is fast enough when in aperture priority mode. They just want to get the mid-tone exposure correct. Unless you’re using a tripod and your subject is still, such slow shutter speeds are useless. You’ll end up getting blurry shots.

blurry portrait

How convenient would it be if you could instruct your camera to not to drop its shutter speed beyond a certain threshold when in aperture priority mode? Well, it is indeed possible. Here’s how you can do it:

Locking Minimum Shutter Speed on Nikon Cameras

In order to program your camera not to slow down its shutter speed below a certain threshold, follow these steps:

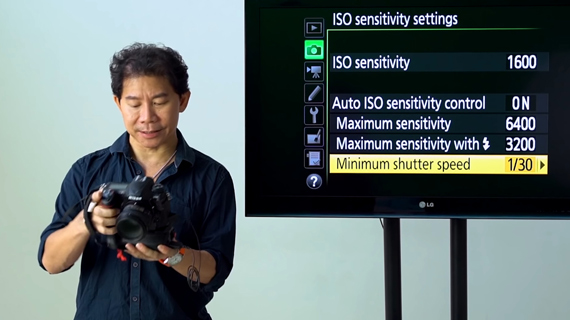
  • Go to the menu and look for ISO sensitivity settings.
  • Set the ISO sensitivity to a lower value like 100 or 200.
  • Turn the Auto ISO sensitivity control on. This will tell the camera to raise the ISO instead of slowing down the shutter speed if the light is insufficient.
  • Choose Maximum sensitivity. How high you want to go depends on your camera and your taste. If noise is not an issue for you, choose higher values. Otherwise, stick with values like 6400.
  • Set the Maximum sensitivity with flash value to something lower than the Maximum sensitivity value.
  • And finally, choose your Minimum shutter speed. The value you set in this option will be the lower limit for your shutter speed. Go for values like 1/30 or 1/60 second.

ISO sensitivity settings in Nikon

With these settings, if the lighting gets poor, the camera will now raise the ISO and not drop the shutter speed below the minimum shutter speed to gather as much light as possible.

Exposure Compensation Hack

Typically, you’d press the exposure compensation button and turn the back command dial to compensate the exposure in tricky lighting situations. To make the work a bit easier, here’s what you can do:

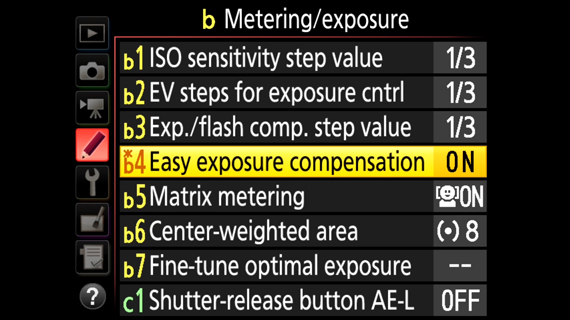
  • Go to the camera menu and choose Metering/exposure.
  • Turn Easy exposure compensation on.

easy exposure compensation setting

This will allow you to change the exposure compensation conveniently just by rotating the back command dial, without pressing the exposure compensation button.

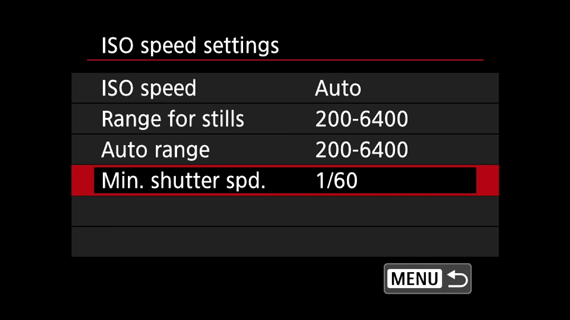
Locking Minimum Shutter Speed on Canon Cameras

To lock down the shutter speed in aperture priority mode using Canon cameras, follow these steps:

  • Go to the camera menu.
  • Go to ISO speed settings.
  • Set the ISO speed to Auto.
  • Next, go to Range for stills and set the minimum and maximum ISO.
  • Finally, set the Min. shutter speed to about 1/30 or 1/60 second.

minimum shutter speed settings in Canon camera

With these simple settings, you can improve the efficiency of the already convenient aperture priority mode. Be sure to try this out if you’ve been getting blurry images when using aperture priority mode.


Go to full article: How to Get Sharp Photos While Using Aperture Priority

What are your thoughts on this article? Join the discussion on Facebook

PictureCorrect subscribers can also learn more today with our #1 bestseller: The Photography Tutorial eBook

The post How to Get Sharp Photos While Using Aperture Priority appeared first on PictureCorrect.


from PictureCorrect https://ift.tt/2H27el0
via IFTTT

lauantai 26. kesäkuuta 2021

PictureCorrect.com: Water Surface and Waterfall Photography Tips

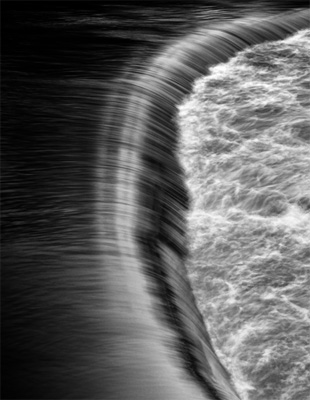
Waterfalls and streams are popular photography subjects because they can easily be made into a soothing digital desktop wallpaper. A common element in many waterfall pictures is the silky smooth appearance of the water.

water surface photography tips

Photo captured by PictureSocial member Tomas Eriksson

This is not difficult to capture, with the right tools and techniques.

Tripod

Without a tripod, pictures of silky smooth moving water would not be possible. This is because we typically use shutter speeds of 2 seconds or more, which is not possible to hand-hold without getting camera shake. The general rule of thumb for a steady shot without a tripod is the one-over-focal-length rule. If you are using a 24mm lens, the slowest shutter speed you should use is 1/24. This actually means 1/30 which is an actual shutter speed setting. Similarly if you are using a 200mm lens, you should not use any shutter speed lower than 1/200. Of course, if your lens has VR (vibration reduction) or IS (image stabilizer) you can bend this rule by a few stops. Or you have hands as steady as a rock.

Polarizing Filter or ND Filter

Circular polarizing filters are designed to reduce reflections and increase saturation. As a side effect, they also cut down about 1.5 stops of light coming through the lens.

ND filters are neutral density filters, available in different strengths. They act like sunglasses for your lens by cutting down the light coming into the lens.

Both these filters enable the shutter speed to drop to the levels that are needed to create the motion blur in the water. The circular polarizing filter has an added benefit in that it minimizes the reflective wet surfaces on the rocks, and prevents hot spots, giving you a clearer shot.

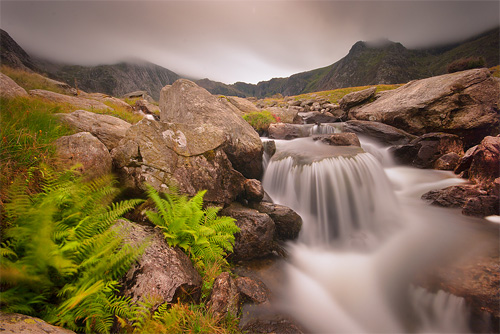
photography tips for waterfalls

“Ferns and Falls” captured by PictureSocial member Mark Broughton

Remote Release

You can use a remote release to trip the shutter, or take advantage of the self timer. Both methods can be used to enable hands-free operation of the camera when the shutter opens. This is crucial for sharp, shake-free shots. If your DSLR has a mirror lock-up function, use it as it adds another layer of stability by locking up the mirror before the shutter opens, further minimizing vibrations.

Timing and Location

Finally it’s time to use these tools to get the shot. Shooting a time when the sun is not too strong will give you the best chance of slowing down the shutter speed. This is because even at ISO100 and F22, your shutter speed may not reach the required levels if there is too much light. A shutter speed range of 2 seconds to 5 seconds is your target. Shooting in forest cover will also increase the possibility of lower light levels.

Vary your shutter speeds for different moods. There are many other variables to fine-tune, like composition, color balance and foreground interest. So keep on experimenting to get the perfect waterfall shot.

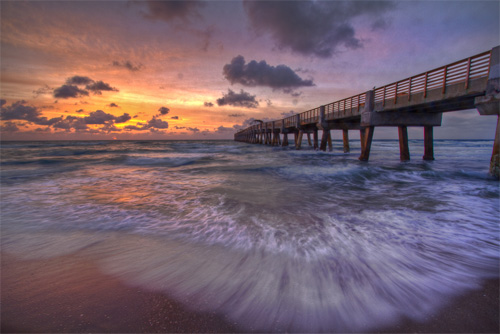
water motion photography

“Tidal Lace” captured by PictureSocial member Debra Vanderlaan

Smoothing Ripples

You can also apply this technique on other water surfaces, like lakes and dams. Ripples on a lake can be smoothed out by using a long exposure. The result is a mirror-like calmness. Reflections on this surface are sometimes rendered as wavy surreal reflections.

About the Author:
Andy Lim (www.simpleslr.info) runs a profitable photography business that spans wedding photography, commercial photography and conducting photography workshops.


Go to full article: Water Surface and Waterfall Photography Tips

What are your thoughts on this article? Join the discussion on Facebook

PictureCorrect subscribers can also learn more today with our #1 bestseller: The Photography Tutorial eBook

The post Water Surface and Waterfall Photography Tips appeared first on PictureCorrect.


from PictureCorrect https://ift.tt/3jeNZqM
via IFTTT
PictureCorrect.com: Daily Interesting Photo: Vibrant Milky Way over Waterfall

Humankind has not yet been able to land on any deep-sky celestial bodies, but we are fortunate to at least be able to see, and even photograph, their appearance. And what appearances they have: the stunning beauty of the Milky Way has inspired eager astrophotographers for many years. Photographer Paul Wilson has done an excellent job capturing the best of both worlds in a single frame:

Milky Way from the South Island in New Zealdnd

“Milky Way from the South Island, New Zealand” by Paul Wilson (Via Reddit. Click image to see full size.)

The foreground is a three-shot panorama Wilson took with his Canon EOS R camera and a 40mm Sigma Art lens, with each exposure lasting two seconds. The sky, on the other hand, is a 20-shot panorama taken with a Canon R5, a 40mm Sigma Art lens and a robotic panoramic head. Each exposure for the sky was one-minute long.

It’s quite spectacular how he was able to capture such dynamic details of the night sky. The Milky Way, with its brilliant stars, star clusters and nebulae, appears no less than a godly piece of art. Similarly, the waterfall in the foreground is no less magnificent. Thanks to the long exposure, the silky look of the water gives the scene a surreal appearance. And looking at how the arm of the Milky Way is aligned with the waterfall, one can imagine that it’s the Milky Way itself where the fall originates.

The beauty of this image is beyond words. What do you think?


Go to full article: Daily Interesting Photo: Vibrant Milky Way over Waterfall

What are your thoughts on this article? Join the discussion on Facebook

PictureCorrect subscribers can also learn more today with our #1 bestseller: The Photography Tutorial eBook

The post Daily Interesting Photo: Vibrant Milky Way over Waterfall appeared first on PictureCorrect.


from PictureCorrect https://ift.tt/3xWAYGy
via IFTTT
PictureCorrect.com: Sparkler Photography in a Home Studio Tutorial

Don’t you just hate it when you find yourself trapped inside because of the weather? A good day for photography wasted. But you can still use your creative ideas indoors and get some interesting shots. In this video, Gavin Hoey from Adorama shares his tips for creating simple, beautiful sparkler shots using a light bulb in front of the sparkler:

Here’s what you’ll need for the setup:

  • a small sparkler
  • a light bulb
  • Blu-tack adhesive
  • glossy, black floor tile (optional)
  • black background

Hoey uses the Blu-tack to hold the sparkler and the light bulb upright on a glossy floor tile. The floor tile provides some protection from the sparks and also creates a fantastic reflection. He also uses a black background at some distance from the setup so that all the attention is directed to the sparkler.

Camera Setup for Sparkler Shoot

  • Shutter speed: Since this is going to be a long exposure shot of 1 second, be sure to have a tripod handy.
  • Aperture: The sparks will cover a good distance, so aim for a greater depth of field. Hoey has his aperture set at f/11.
  • ISO: With practice, Hoey has determined that you can use an ISO of 400 to balance the exposure.

To set all these parameters, use manual mode. Also, set your focus on the middle of the light bulb by focusing manually. As the shoot will take place will all the lights turned off, auto focus will not be of help. When composing your shot, be sure to align the sparkler exactly behind the light bulb. This way, it will appear as if the sparkles are coming from the bulb.

Here is what Hoey’s image looks like. Note that it was taken with all the lights turned out.

sparkler image with bulb

Notice the underexposed metal bulb holder.

The image looks fantastic, doesn’t it? But if you look closely, you can see one small issue. While the glass portion of the light is beautifully lit, the holder at the bottom is still dark, because the sparkler cannot light it up from the back. Hoey uses a simple trick to solve the issue. He lights up his lighter and places it in front of the bulb, making sure that the metal portion is illuminated. In the process, he makes sure that the composition hasn’t changed at all. The idea is to mask in the illuminated holder during post-processing.

illuminating metal holder with a lighter

Editing a Sparkler Image in Photoshop

While most of the image looks great as is, only the metal holder parts needs to be retouched. This can be easily done by using the final image taken with the lighter. Here is how you can do it:

  1. Open both the images in the same document in Photoshop.
  2. Make sure that the image with the lighter is the top layer and the one without is the background layer.
  3. Check that the two images are in perfect alignment by changing the blending mode to Screen.
  4. Once you make sure that the two images are perfectly aligned, go to Layer > Layer Mask… > Hide All. This will hide the layer with the lighter.
  5. Next, grab a brush tool, and choose white as your foreground color. Then paint on the metal portion of the light bulb. Don’t forget to paint over the reflection.
  6. If the Blu-tack is visible, use the clone tool to remove it.

sparkler photography indoors

And there you have it, an amazing looking sparkler photo. So the next time you find yourself trapped indoors, give this technique a try and share your images with us.


Go to full article: Sparkler Photography in a Home Studio Tutorial

What are your thoughts on this article? Join the discussion on Facebook

PictureCorrect subscribers can also learn more today with our #1 bestseller: The Photography Tutorial eBook

The post Sparkler Photography in a Home Studio Tutorial appeared first on PictureCorrect.


from PictureCorrect https://ift.tt/2DtOA2U
via IFTTT

perjantai 25. kesäkuuta 2021

PictureCorrect.com: Developing Your Confidence in Photography

Some photographers are born oozing with confidence and self-belief, while others hide their pictures away from friends and family and spend hours with editing software tweaking and adapting their shots. The more they tweak, the less happy they are with the results they get. If you are one of those photographers, don’t give up and put the camera up for sale; there are ways to build up your confidence and self esteem.

photographer confidence

Photo by Diego PH; ISO 100, f/4.0, 1/4000s.

The first thing to remember is that you are learning, and we learn best by making mistakes.

Then, you must never forget that mastering any art is a lifetime’s work. I doubt that even the most highly regarded photographers working today think that they have all the answers. Part of the pleasure of photography is the fact that you are on a long path of learning and creativity and that you will develop your skills as you move along that path.

Finally, remember that photography is an art in which tastes and opinions vary, and so there will always be a subjective element when any photograph is being assessed. Some people will be rapturous over a picture that others merely find competent.

Constructive Criticism

To develop your confidence, develop the ability to be constructively critical of your own work and that of others. Look for what has worked well, as well as things that could be done differently and perhaps better. Most people find it easier to identify their mistakes than their achievements, so look at the photograph as though someone else has taken it.

photo feedback

Photo by David Marcu.

Technical Skills

Learn about your camera’s features. Find out what it can do in each of its settings, rather than relying on automatic to sort everything out for you. You’ll need to learn by practicing, by reading, and by learning from others, through looking at photographs in the media and in exhibitions, and through either through joining a club or taking a course.

Photography Clubs

Many people find that joining a club is ideal. It provides the opportunity to pick up tips and hints from club members who may have years of experience, to see the work produced by other photographers (some of whom will also be new to photography and therefore less confident than you), and the incentive to learn and develop by entering competitions. There is nothing like having a photograph commended in a competition to boost your self-belief!

photography club

Photo by Ben Collins; ISO 400, f/1.8, 1/400s.

The precise mix of the above will depend on your preferred way of learning and the opportunities available near you, but you can rest assured that something suitable will be near at hand. Choose wisely and you will have an hobby for life.

About the Author:
Margaret Cranford is a photographer based in Clevedon, North Somerset in the UK (redbubble.com/people/magsart). She creates and sources watercolour paintings, photographs and prints.


Go to full article: Developing Your Confidence in Photography

What are your thoughts on this article? Join the discussion on Facebook

PictureCorrect subscribers can also learn more today with our #1 bestseller: The Photography Tutorial eBook

The post Developing Your Confidence in Photography appeared first on PictureCorrect.


from PictureCorrect https://ift.tt/3gWpEo3
via IFTTT