lauantai 30. kesäkuuta 2018

PictureCorrect.com: How to Take Fireworks Photos

Fireworks are the visual rulers of the nighttime universe. No matter how many times we see and experience their bombastic splendor, we always return to see what new designs will be exploded into the darkened sky.
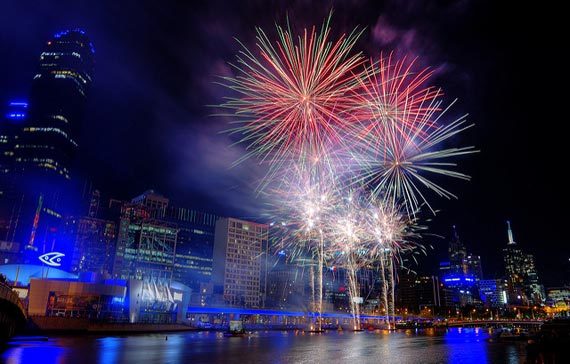
how to take fireworks photos

Photo by Chris Phutully; ISO 100, f/6.3, 4-second exposure.

Watching fireworks is easy. Taking fantastic fireworks photos is not. Although photographing these light shows is more challenging than capturing a daylight portrait of Uncle Ben, it is not impossible. By following these four fireworks guidelines, you will take years off your learning curve and come away with fantastic fireworks photos.

There are four main categories of guidelines to understand in order to take fireworks photos that aren’t all black or out of focus:

1. Equipment

In addition to the standard equipment list, including batteries, memory cards, camera bag, etc., here is a shortened list of critical fireworks-specific equipment to bring along:

  • Tripod — Realize that unless you use a tripod, you will most likely NOT like your fireworks photos.
  • External shutter release (a.k.a. a “cable release”)
  • Tiny flashlight so you won’t be fumbling around in the dark trying to move camera controls
  • Chair that is easy to get in and out of

For best results, your camera should be able to focus manually, and you should be able to set desired shutter speeds of up to 15 seconds, or bulb. If you have never taken a picture with your camera other than in the automatic setting, it’s time to review your owner’s manual and determine your camera’s maximum shutter speed.

2. Location

Choosing the optimal location is a little bit harder than deciding how you can squeeze into a piece of 2 foot x 3-foot real estate on the lawn.
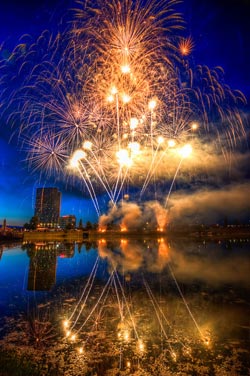
how to take fireworks photos

Photo by Miroslav Petrasko.

  • Look for the optimum vantage point. Avoid sitting in an area with obstructions, such as streetlights, overhead wires, or trees.
  • Decide if you want to capture additional elements (such as reflections off bodies of water or landmarks), and if so, position yourself accordingly.
  • Allow enough scouting time. If you are going to be taking fireworks photos, it is worth your time to spend 30 minutes before the show begins to pick out the best location.

3. Camera Controls and Settings

Unlike taking pictures in the daytime, there is a little bit more setup involved with nighttime photography. For starters, change the ISO setting to 200 or 400. You want your camera to be more sensitive to light but not so sensitive that it will create digital noise.

Change the focusing mode on your camera to manual and focus your camera to infinity.

  • Set up and level the tripod.
  • Attach the remote shutter release to the camera and use that to fire the shutter.
  • Adjust the shutter speed. If you have a bulb setting, this is the time to use it.
  • If you don’t have a bulb setting, use a mid-range aperture such as f/5.6, and set the shutter speed to at least 1 to 2 seconds.

4. Photographing Fireworks

Obviously, this is what it all comes down to. It doesn’t matter that you’re perfectly prepared with the perfect equipment if you don’t take any pictures. Your camera is on its tripod and the shutter release cable is attached. What’s next?
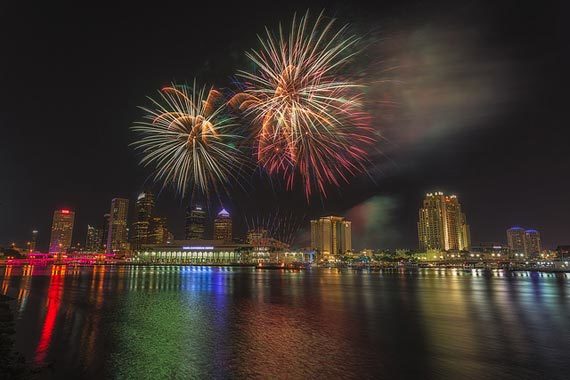
how to take fireworks photos

Photo by Matthew Paulson; ISO 200, f/8, 8-second exposure.

  • Verify that the manual focus is set to infinity.
  • Point your camera toward the area of sky where you believe the fireworks will be exploding. (Don’t be too disappointed if you need to reposition the target area; most do at first.)
  • Your shutter speed is on bulb or set for AT LEAST 1 to 2 seconds. When do you fire the shutter? Unlike daylight photography, firing the shutter BEFORE the fireworks go off is a good idea.
  • Nobody can tell you when to fire the shutter because it is based on what type of fireworks photograph you want to capture. With that said, here are four possible indicators of when you might want to trip the shutter:
  • When you hear the next rocket being launched
  • When the launch trail becomes visible
  • Just BEFORE the rocket explodes, or
  • Just AFTER the rocket explodes

About the Author:
Robert Bezman is a professional photographer and owner of Custom Photographic Expressions. Robert has created best-family-photography-tips.com to help the digital photography users create better photographs.


Go to full article: How to Take Fireworks Photos

What are your thoughts on this article? Join the discussion on Facebook

PictureCorrect subscribers can also learn more today with our #1 bestseller: The Photography Tutorial eBook

The post How to Take Fireworks Photos appeared first on PictureCorrect.


from PictureCorrect https://ift.tt/2IGIKu1
via IFTTT

PictureCorrect.com: Interesting Photo of the Day: Windmill in Netherlands During Sunrise

Morning hours can really be  fruitful for a photographer—if you’re able to leave your bed early, that is. Albert Dros’s image truly supports this statement:

windmill rising from fog in netherlands

Windmill Rising from Fog in Netherlands by Albert Dros (Via Reddit. Click image to see full size.)

Dros actually loves to shoot in these kind of conditions: early morning with a pink sky, lots of ground fog, and spring flowers. As his photo title suggests, the windmill does look like it’s leaving the ground to rise up from the fog underneath.

As for me, it reminds me of a scene from a pirate movie where a ship is breaking out from dense fog on the horizon and approaching the shore.


Go to full article: Interesting Photo of the Day: Windmill in Netherlands During Sunrise

What are your thoughts on this article? Join the discussion on Facebook

PictureCorrect subscribers can also learn more today with our #1 bestseller: The Photography Tutorial eBook

The post Interesting Photo of the Day: Windmill in Netherlands During Sunrise appeared first on PictureCorrect.


from PictureCorrect https://ift.tt/2KxAs9G
via IFTTT
PictureCorrect.com: Wedding Photography: Tips for Photographing Groomsmen

The bride, groom, and the bridesmaids are usually the ones who steal the spotlight on the wedding day. But this doesn’t mean that the groomsmen are to be left out. Groomsmen tend to get a little less attention, but nevertheless, it’s equally important to get shots of the them. Professional wedding photographer Vanessa Joy from Adorama takes us behind the scenes of how to photograph groomsmen:

Joy says that she tends to keep the flow fast and interesting. To do so, she shares some jokes, which help the groomsmen to get comfortable and get natural smiles. This is also important in the sense that men tend to prefer the “socialization” part of the wedding more and might find the photography session a little less interesting compared to the bridesmaids.

Get a Variety of Shots

Joy likes to mix it up and get every possible combination of shots. She likes to shoot the groomsmen in a group, each of them with the groom, and each of them individually, as well. She also suggests that if time is not sufficient to get all of this done, then skip the individual portraits of the groomsmen.

Pose the Group of Carefully

While posing the groomsmen for group shots, Joy likes to arrange the groomsmen in one row alternating according to height. This allows her to create a triangle pattern with the heads of the groomsmen. To make the photo more dynamic, use some props—chairs, for example.

wedding photography groomsmen

Give Some Extra Attention to the Groom

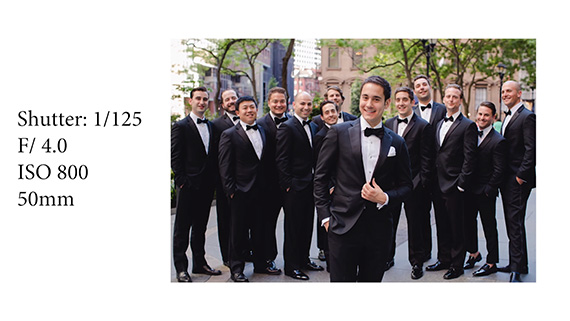
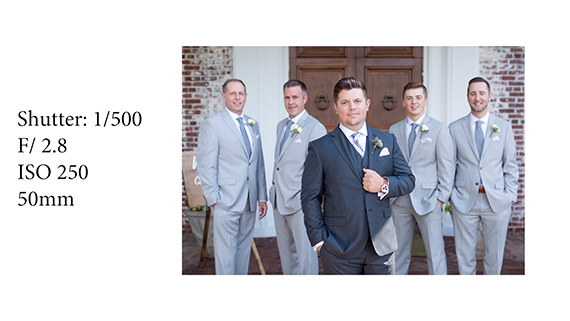
The groom, after all, is the hero of the day, so it makes sense when Joy suggests to pose the group with the groom a few steps in front of the group and closer to the camera with the rest of the group behind him. Then, by shooting at a narrower aperture, you can get a result with all of the groomsmen in focus, and by shooting at a wider aperture, you can keep the groom in focus with the groomsmen being blurred out. Once the photo is taken, individual groomsmen can come up front and join the groom for a quick photo. This tip comes in handy when time is vital.

To make sure that she can fit in all the groomsmen in the frame, Joy likes to shoot with her 50mm lens and while doing individual portrait shots, she opts for her 85mm lens. These focal lengths have minimal distortion and have a flattering compression.

Shoot Upward

To make the men look more powerful and more masculine, Joy suggests shooting slightly from a lower angle in an upward direction while making sure that no double chin is visible.

wedding photography

Get Some Candid Shots

While Joy is busy arranging the groomsmen and taking their photographs, her second shooter is around with a longer lens (something like a 135mm or a 70-200mm) taking candid shots and close up shots of the groomsmen. This adds details and a sense of casualness to the photo album.

Do you have any other tips for photography groomsmen in a wedding?


Go to full article: Wedding Photography: Tips for Photographing Groomsmen

What are your thoughts on this article? Join the discussion on Facebook

PictureCorrect subscribers can also learn more today with our #1 bestseller: The Photography Tutorial eBook

The post Wedding Photography: Tips for Photographing Groomsmen appeared first on PictureCorrect.


from PictureCorrect https://ift.tt/2yWIyqO
via IFTTT
perjantai 29. kesäkuuta 2018

PictureCorrect.com: 7 Keys for Creating Stunning Urban Landscape Photography

When thinking of landscape photography, what often comes to mind are photographs of mountainsides or desolate beaches, but landscape photography is not limited to the wilderness. With a little preparation and forethought, great landscape photographs can also be taken in urban settings. Here’s a quick primer to get you on the right track.

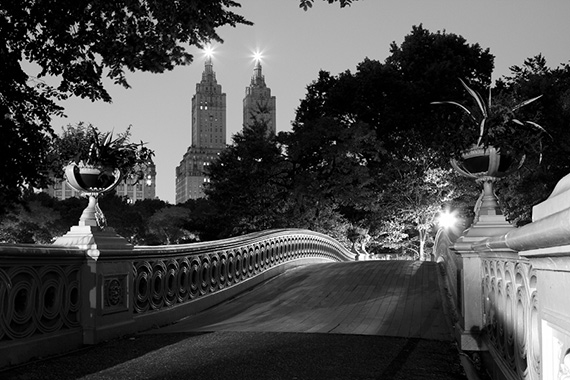
"Bow Bridge at Dusk" captured by James Maher

“Bow Bridge at Dusk” captured by James Maher

1. Foreground, middleground, and background

Treat urban landscape photography just like you would traditional landscape photography. You need to think about how a viewer’s eyes will flow through a scene, and the eyes often flow best when there is a clear foreground, middleground, and background. A landscape photographer will find an incredible background and then survey the area for a complementary foreground. Do this same thing in the city and don’t focus solely on the incredible architecture in the background. In the photo above, notice how the eyes start on the flower urn, are brought into the scene by the middleground of Bow Bridge and then end up in the background of the trees and building.

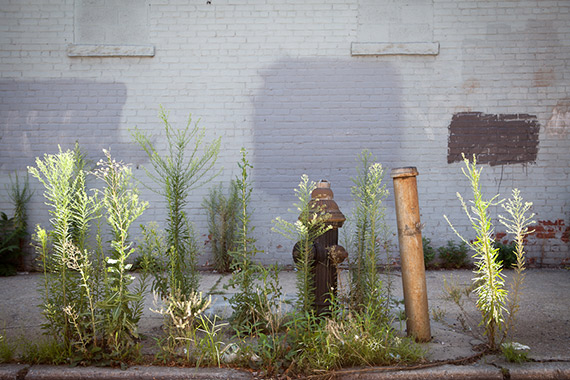
"Fire Hydrant and Weeds, Brooklyn" captured by James Maher.

“Fire Hydrant and Weeds, Brooklyn” captured by James Maher

 2. Make everyday objects beautiful

In traditional landscape photography maybe it’s a flower, a river, a tree, or a mountain that gives a photograph its primary interest. In urban landscape photography, it’s not only about buildings. Figure out ways to make advertisements, textures, graffiti, soda cans, shop windows, cars, and umbrellas beautiful. There are an incredible amount of objects that can be captured in this way, and if you think of them in the same way that you might think about capturing streams or flowers, then you open yourself up to a whole new world of beautiful content to photograph.

 3. Color!

When many people think of urban photography they think of classic black and white, or sepia toned photographs of buildings and street corners from the past. I do too. But ditch that! The world was colorful back then and if photographers had access to color film many would have used it. You can still create black and white photos, but don’t ignore the beautiful colors all around the city.

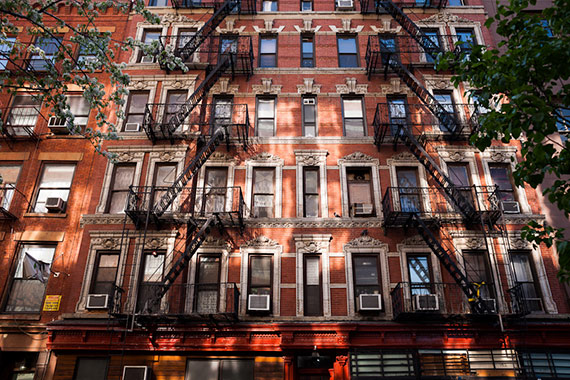
"Fire Escapes, Chinatown" captured by James Maher.

“Fire Escapes, Chinatown” captured by James Maher

 4. Light is key (and always pay attention to the location of the sun)

When you’re walking around a city, the quality of light changes constantly depending on where you are. One second you could be in the bright sun while the next second you could be in the shadows with a small stream of light peeking through. Even reflective buildings and signs can completely change the quality of light surrounding you. It is important to pay attention to where the sun is in the sky and how it is reacting in the environment.

Don’t only notice what’s in the scene, notice the quality of light on it as well.

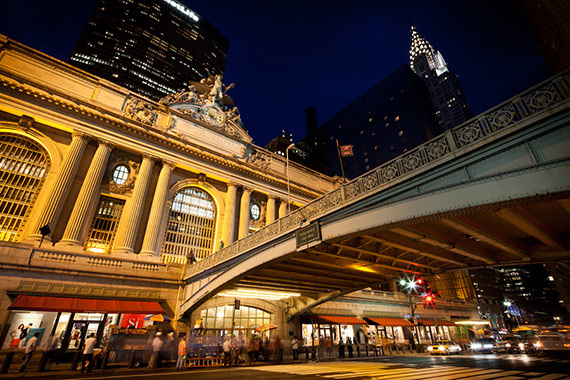
"Grand Central Station and Chrysler Building" captured by James Maher.

“Grand Central Station and Chrysler Building” captured by James Maher

 5. Photograph at night

The quickest and easiest way to improve your urban photography is to go out at night. Don’t just take advantage of the golden hours; continue on into the night as the artificial lights take over. The city takes on a completely new atmosphere, with romantic, classic, or ominous moods. Bring a tripod of course and watch buildings that were boring by day take on a completely new feel.

Also, not as many people photograph at night as during the day, so it is any easy way to make your images stand out.

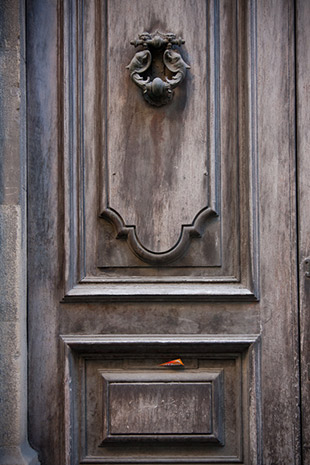
"Old Door and Pizza Menu, Florence" captured by James Maher.

“Old Door and Pizza Menu, Florence” captured by James Maher

 6. Mix the old and the new

Above is a shot of an old door in Florence with a bright orange pizza delivery menu sticking out of it. If you are in a city with a lot of old architecture, don’t only try to capture photos that seem like they were taken hundreds of years ago. That’s been done already and the modern photos are what will be the most unique in the future. In addition to capturing the architecture in classic ways, try to figure out ways to capture the old architecture with a modern twist.

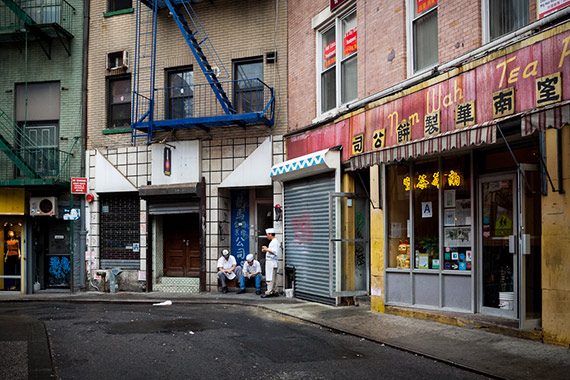
"Three Cooks, Doyer’s Street, Chinatown" captured by James Maher.

“Three Cooks, Doyer’s Street, Chinatown” captured by James Maher

 7. Create a relationship between people and the background

Often photographers shy away from including people in their landscapes. In many cases I can understand why, but often they are missing out. People add interest and help us connect with the scene. They add an element of life that would otherwise be lacking. Frame an interesting background and wait until the right people enter and complete the scene. Don’t just wait until anybody enters the scene; wait until the ideal person enters. Be picky. An incredible background will only be made worse with an uninteresting looking person added to the frame, there has to be a connection between the two.

About the Author:
James Maher is the author of Essentials of Street Photography, which covers everything about the genre even down to specific post processing techniques that can bring the best out of street scenes.


Go to full article: 7 Keys for Creating Stunning Urban Landscape Photography

What are your thoughts on this article? Join the discussion on Facebook

PictureCorrect subscribers can also learn more today with our #1 bestseller: The Photography Tutorial eBook

The post 7 Keys for Creating Stunning Urban Landscape Photography appeared first on PictureCorrect.


from PictureCorrect https://ift.tt/2xYV33A
via IFTTT
PictureCorrect.com: Interesting Photo of the Day: Baby Sea Turtle’s First Swim

South Florida photographer, Ben Hicks, can consider himself fortunate after having been present for the hatching of a nest of Loggerhead sea turtles and subsequent adventure to make it to sea. Without overheating or becoming lost before they find water, just making it offshore is a dangerous chore for the hatchlings. They also risk becoming a meal for a variety of natural predators such as birds and crabs:

Underwater photo of baby sea turtle’s first swim (Via Imgur, click for larger size)

Once the young turtles make it to water they began what is commonly referred to as a swimming frenzy–a rush to swim away from the dangerous coastline where most of it’s natural predators live. Because the turtles are so vulnerable at this age, it is approximated that only 1 in 1000 turtles will actually survive into adulthood. Because so few of the turtles actually make it to the water from the nest, Hicks was able to photograph a relatively rare occasion.


Go to full article: Interesting Photo of the Day: Baby Sea Turtle’s First Swim

What are your thoughts on this article? Join the discussion on Facebook

PictureCorrect subscribers can also learn more today with our #1 bestseller: The Photography Tutorial eBook

The post Interesting Photo of the Day: Baby Sea Turtle’s First Swim appeared first on PictureCorrect.


from PictureCorrect https://ift.tt/2Kib6QQ
via IFTTT
PictureCorrect.com: Photoshop Basics: Levels vs. Curves

As much as it has become a necessity for industry professionals, there’s no arguing against the fact that Adobe Photoshop can prove to be a fickle beast. As any experienced photographer will attest, understanding the ins and outs of the program is no easy undertaking. In particular, it can be difficult to understand the subtleties between seemingly simple tools that may, on the surface, appear to be identical.

Two common, confounding culprits of this sin are the program’s Levels and Curves adjustments. To the untrained eye, there isn’t much of a difference between the two. Indeed, both tools can attain near identical end results. However, as Unmesh Dinda of PIXimperfect explains, there’s a time, a place, and a purpose for the separate (but similar) options:

Dinda uses a brilliant analogy to describe the primary distinction between the two tools. In short, Levels is to Curves what your smart phone’s calculator app is to a scientific calculator. Just as the calculators both compute various mathematical equations, both Levels and Curves alter an image file’s highlights, shadows, midtones, and color.

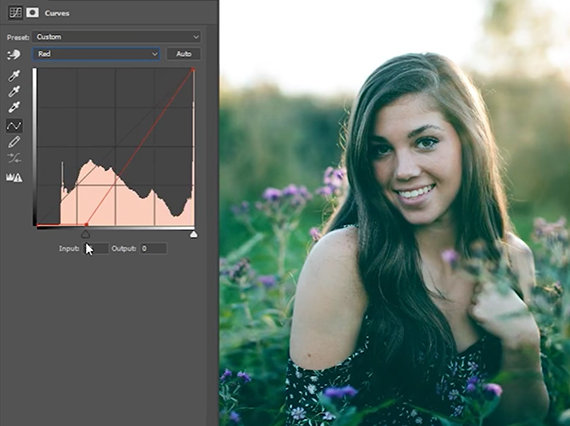
Let’s say, for instance, you’d like to apply a cyan tint to one of your photographs. In the Curves tool, it’s possible to make that happen with a quick tweak to the red channel:

curves adjustment

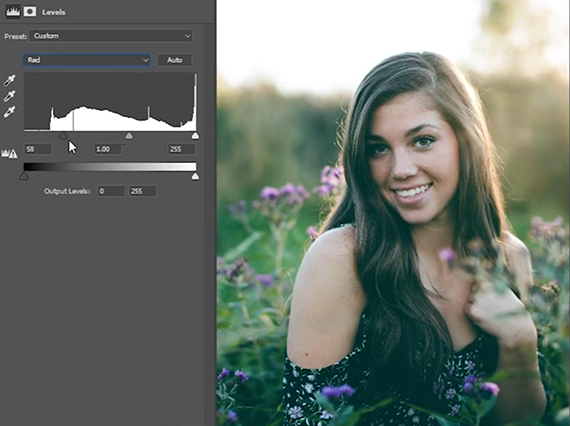
However, should you choose to opt away from using Curves, the same effect can be attained by playing around with the sliders within the Levels tool:

levels adjustment

One difference that is immediately apparent is that the Levels tool has a more straightforward, easy-to-understand design. For those looking to make quick adjustments, its user friendliness is a huge asset.

However, just as a scientific calculator can perform tasks a run-of-the-mill calculator cannot, Curves can perform more nuanced adjustments outside of Levels’s capabilities. For instance, a user may add multiple points to a single curve, making it possible to fine tune tones and apply specific local adjustments.

When push comes to shove, there isn’t an end all, be all tool that beats out another. Rather, making a decision on what works best is dependent on the task at hand combined with personal taste. Both Levels and Curves can significantly speed up your workflow—and understanding the similarities and differences between the two is the first step toward effectively putting both of them to use!


Go to full article: Photoshop Basics: Levels vs. Curves

What are your thoughts on this article? Join the discussion on Facebook

PictureCorrect subscribers can also learn more today with our #1 bestseller: The Photography Tutorial eBook

The post Photoshop Basics: Levels vs. Curves appeared first on PictureCorrect.


from PictureCorrect https://ift.tt/2IBxbEw
via IFTTT
sunnuntai 24. kesäkuuta 2018

PictureCorrect.com: Interesting Photo of the Day: Red Wildflowers at Mount St. Helens

Landscape photographers recognize that a foreground can make or break a landscape image. When they plan a shot, the foreground often has striking detail and colors that draw the viewer in. The attention to detail pushes the viewer’s eyes outward toward the background. In this case, it’s Mount St. Helens in focus as the looming mountain rises from the fog. An early morning sunrise adds warm colors and sunlight to further complement the vibrant red of the wildflowers:

Mount St. Helens wildflowers and mountain fog photograph

“Clearing Fog Reveals Vibrant Wildflowers” by Steve Schwindt (Via Reddit. Click image to see full size.)

Photographer Steve Schwindt photographed these red wildflowers near Mount St. Helens in Washington. His patience paid off as the sun emerged from the clouds. Just then, the fog started clearing to reveal the scene before him and the rest is history. Steve used a Canon 5D Mark II camera with a Canon 17-40mm f/4L lens. In order to have the foreground and background in focus, he focus stacked 8–10 different exposures. His settings were 17mm focal length at ISO 100, f/9.0, and 1/5 second.


Go to full article: Interesting Photo of the Day: Red Wildflowers at Mount St. Helens

What are your thoughts on this article? Join the discussion on Facebook

PictureCorrect subscribers can also learn more today with our #1 bestseller: The Photography Tutorial eBook

The post Interesting Photo of the Day: Red Wildflowers at Mount St. Helens appeared first on PictureCorrect.


from PictureCorrect https://ift.tt/2K5r4Om
via IFTTT
PictureCorrect.com: Color Gels in Studio Photography: 5 Ways to Use Them

When used creatively, color gels can add an extra dimension to portraits. As we tend to associate colors with moods, you can get creative with what mood you want to portray in the photograph and use the appropriate color gels accordingly. In the following video, fashion and portrait photographer Elaine Torres shares with us her favorite techniques for using color gels in studio photo shoots:

In her video, Torres discusses the following techniques of using color gels.

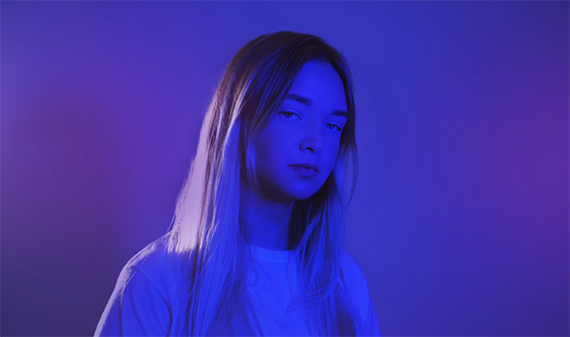
1. Using color gels as a main light

By simply placing a color gel over the main light you can add color to the key light. This way the entire subject and the background will be colored. To add some extra depth, a kicker light can be used behind the subject to separate the subject from the background.

color gel as main light

Color gel placed over main light

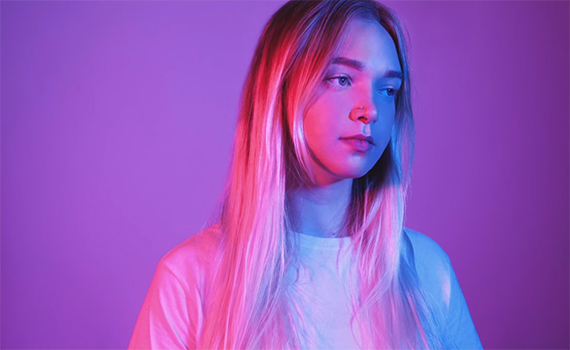
2. Using color gels as mixed main light

As Torres shows in the video, this technique uses multiple key lights, each key light being covered with a different colored gel. This technique can be use to create a colorful and happy, as well as a moody photo with mixed emotions.

using color gels as mixed main light

Two key lights with different color gels used on each of them

3. Using color gels to color a background

This technique can be used to conveniently change the background color instead of spending too much on buying different backgrounds. To color a background using color gels, cover a strobe with the desired gel and place it close to the background. Place the model in front of the background, making sure that the colored light does not spill onto the model. Then, light the model with a key light. Again, make sure that the key light doesn’t spill over to the background. A grid will come in handy to concentrate the light more toward the model.

using color gel to color a background

Background colored using a color gel

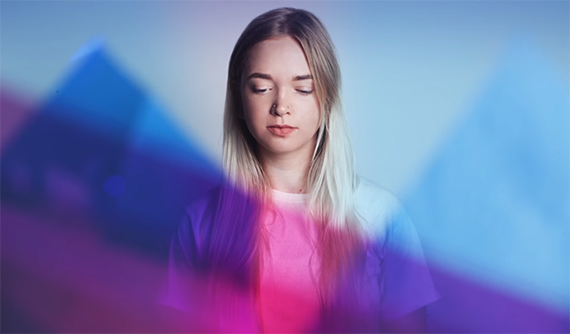
4. Using color gels as props

If you’re not a fan of covering your lighting with gels, then you can even use the color gels as props. Simply place the gels in front of your lens and shoot away. It can add a hazy and dreamy effect to your photograph. You can even overlay different colors and improvise.

using color gels as props

Color gels used off the lights and in front of the lens creatively as props

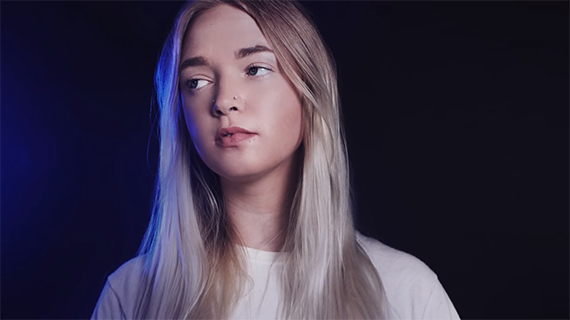
5. Using color gels as kicker light

If you’re familiar with lighting setups used in studio photography, you must know that a kicker light accentuates the edges of a photograph by highlighting it. This helps to differentiate a subject from its background. By adding a color gel on the kicker light, the edges of the subject will be colored and give an interesting look to the photograph. To make the color stand out more, use a darker background.

using color gels as kicker light

Color gel used in kicker light to add an interesting highlight on the edge of the model’s hair

Now that you have an understanding of the techniques to use color gels in your studio photography, go ahead and get creative.

“With color gels, the possibilities are endless to experiment and be creative.”


Go to full article: Color Gels in Studio Photography: 5 Ways to Use Them

What are your thoughts on this article? Join the discussion on Facebook

PictureCorrect subscribers can also learn more today with our #1 bestseller: The Photography Tutorial eBook

The post Color Gels in Studio Photography: 5 Ways to Use Them appeared first on PictureCorrect.


from PictureCorrect https://ift.tt/2Irla4e
via IFTTT
lauantai 16. kesäkuuta 2018

PictureCorrect.com: How to Create a Strip Light Modifier for Speedlights

Light saber style strip lights are not new. There are some good choices available on the market right now. But none of these are quite that effective when it comes to absolute shooting convenience. Joe Edelman decides to build one himself:

The main issue with many strip lights, aside from cost, is that they don’t work with different speedlights and they don’t allow access to the speedlight controls.

Edelman’s design ensures that you’re able to access the speedlight controls without removing the speedlight.

How to Make a Speedlight Strip Light Modifier

To build the light saber, you will need the following:

  • 3″ x 60″ Kraft mailing tube with end caps ($4.81)
  • two 1″ x 12″ hook and loop cable tie down straps ($1.09 each)
  • 24″ x 48″ sheet of white translucent plastic film ($10.36)
  • tripod screw holder adapter ($1.99)
  • flash speedlight umbrella holder ($4.33)
  • 1″ flat washer
  • 1/4″-20 x 1″ screw
  • black gaffer tape
  • gloss white spray paint
  • super glue
  • sharp utility knife

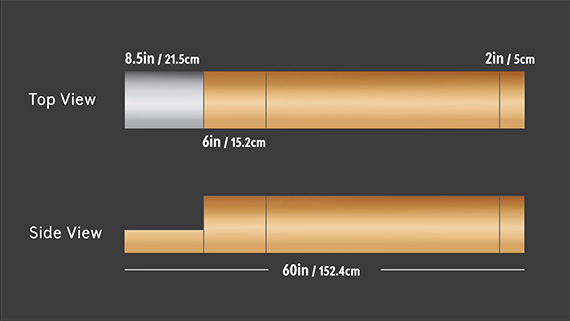
Cut into the mailing tube using the measurements described in the video.

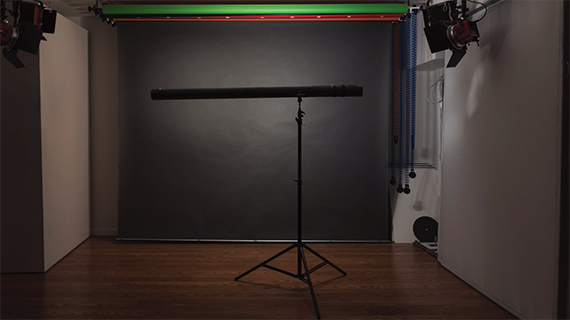
tube diagram

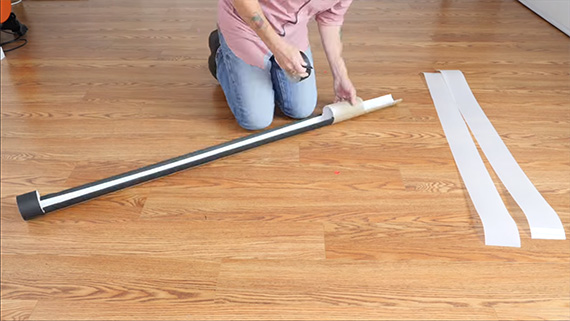
Once the cuts are made, paint the inside of the tube white and use black gaffers tape on the outside.

how to make a light saber light modifier

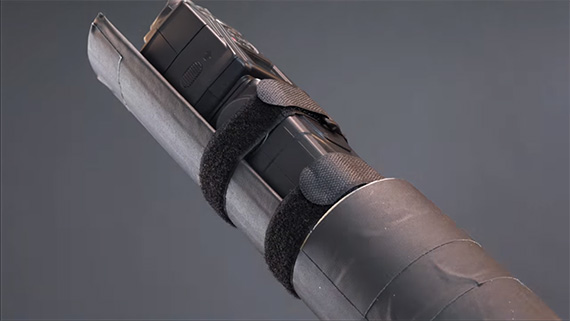
Attach the speedlight using the hook and loop straps.

speedlight modifier

Attach the speedlight.

With the speedlight attached to the tube, find the balancing point using your fingers.

DIY light saber strip light

Find the balancing point.

This is exactly where you will insert the tripod mounting screw adapter, so take your time finding the right spot.

step by step light saber modifier

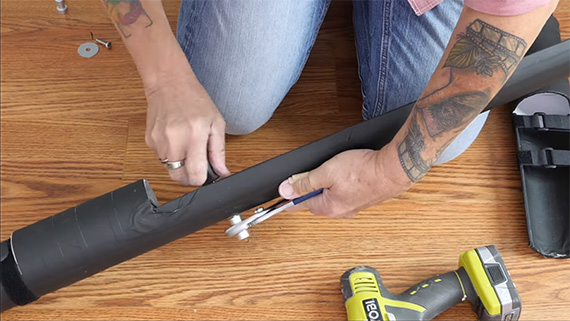
Drill a hole at the balancing point, and insert the tripod mounting screw adapter.

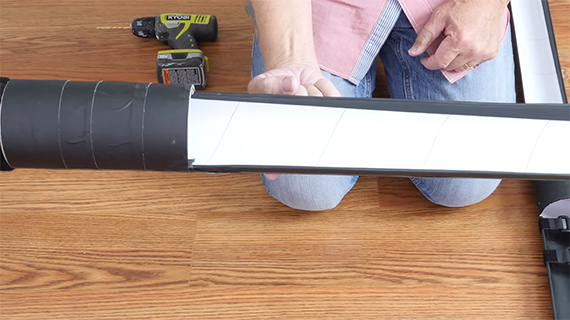
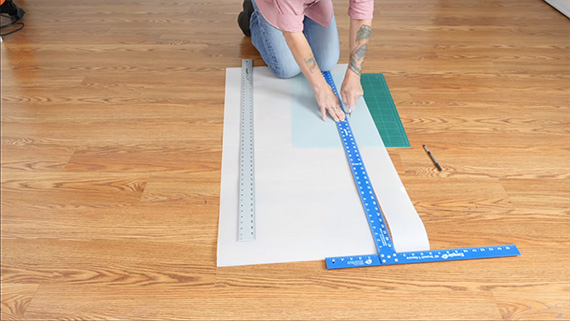
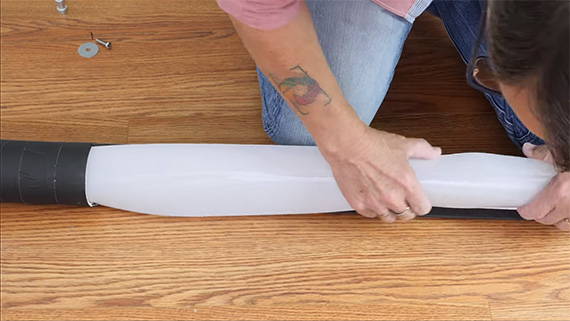
Cut out a piece of plastic film to match the size of the opening in the tube, then roll it and insert it into the opening. Use super glue to secure it in place.

make a light saber for lighting portraits

Cut the plastic film.

light saber tutorial

Insert the film into the opening.

Finally, attach the tube’s end cap.

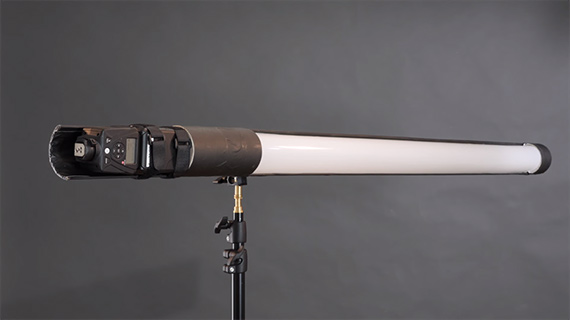
Your light saber speedlight modifier is ready to use!

how to make a light saber strip light

DIY Light Saber Strip Light

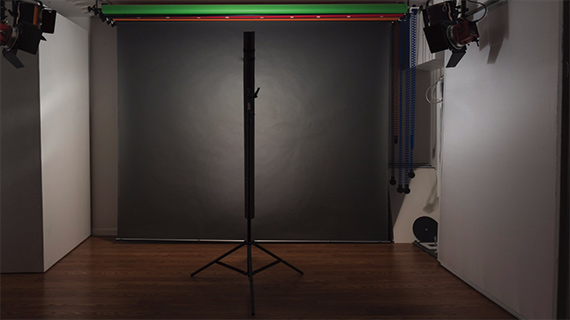
The light fall off varies depending on whether you’re using the strip light in a vertical or horizontal position:

DIY light saber strip light

Vertical

DIY light saber strip light

Horizontal

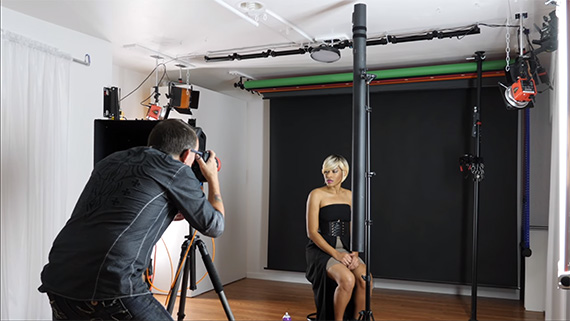
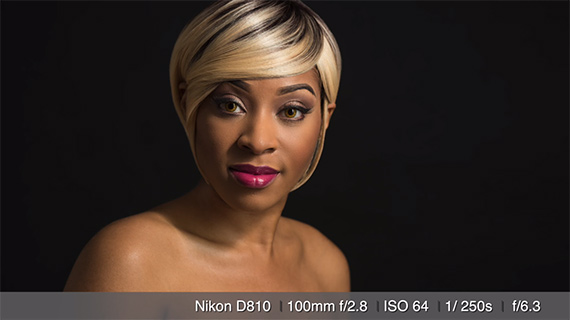
Here’s a quick one-light shot using the strip light.

strip light behind the scenes

DIY light saber light

You can experiment with the position, mix it with a bare speedlight, use another strip light to create different effects, and even gel it to get different results.

Pretty amazing for $20 and about two hours of your time!


Go to full article: How to Create a Strip Light Modifier for Speedlights

What are your thoughts on this article? Join the discussion on Facebook

PictureCorrect subscribers can also learn more today with our #1 bestseller: The Photography Tutorial eBook

The post How to Create a Strip Light Modifier for Speedlights appeared first on PictureCorrect.


from PictureCorrect https://ift.tt/2t1f4mf
via IFTTT