perjantai 30. huhtikuuta 2021

PictureCorrect.com: Star Trail Photography Tips

One of the lessons in the Photography Lab series I teach is a lesson on night photography, specifically shooting the stars. There are two essentials to know before going out to shoot stars your first time.

take beautiful star trail photography

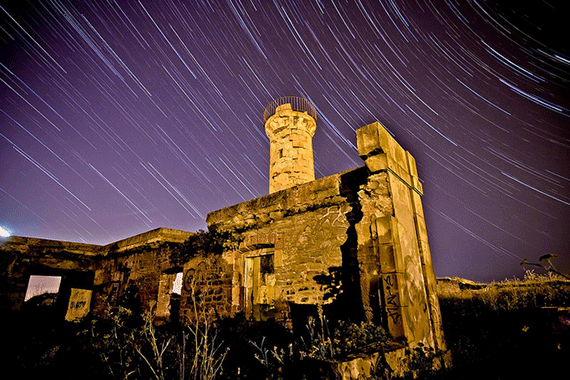
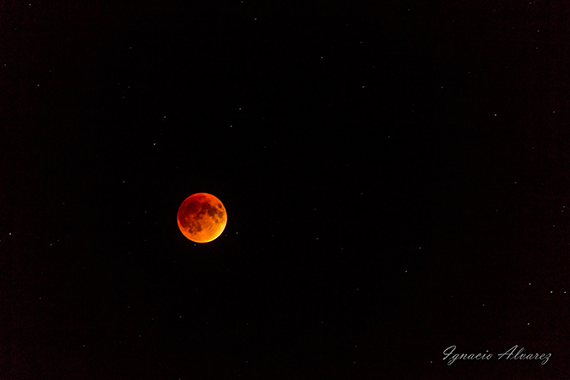
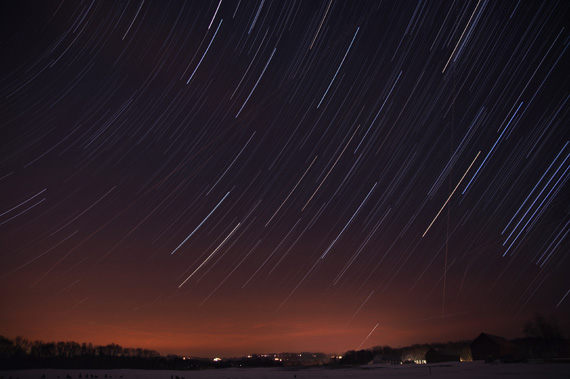
Photo by Aitor Aguirregabiria; ISO 200, f/3.5.

ONE: The Earth is rotating. This means you can photograph star constellations, but after about 15 seconds, you will start to get blurring in your stars because of the movement of the Earth.

TWO: You should know a couple of constellations before you go out: the Big Dipper and Orion are the two I use to orient myself.

Why the Orion and The Big Dipper? First, they are extremely bright and easily found in the night sky. Second, besides being my favorite constellation, Orion is usually high enough in the sky to photograph with other stars around, but it can also sit low so you can get nice foreground elements in your compositions. Finally, use the two stars which make up the pouring end of the Big Dipper to find the North Star. Look at the bottom star in the dipper part of The Big Dipper, the non-handle end. Draw a from the bottom star in the dipper to the top star in the dipper, then continue this line until you see the Little Dipper. This line (and these two stars) point to the last star in the handle of the Little Dipper. Why is this important? The last star in the handle of the Little Dipper is Polaris – the North Star.

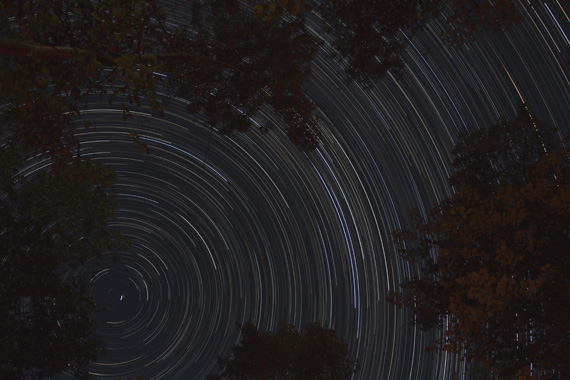
If you know where Polaris (The North Star) is located, you can point your camera in this direction and, using long exposure times, you will get circular star trails instead of blurry constellations.

great star trail photo methods

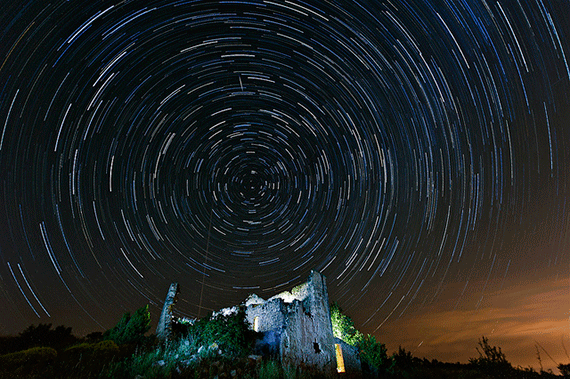
Photo by Miquel González Page; ISO 200, f/2.8.

When I shoot stars, I use two lenses: a Canon 10–22mm and a Tamaron 28–300, which I use in the 28mm–80mm range.

I set my camera to M (manual) and use the following settings:

  • Aperture: widest setting f/2.8 | f/3.5 | f/5.0 depending on focal length
  • ISO: 100 or 200
  • Shutter Speed: BULB setting
  • White Balance: Auto or Tungsten
  • Focusing: Manual / Infinity

Some other items you may want to bring along:

  • Small flashlight. You can see your gear, get things set up, change your camera settings, and change your release cable settings. You can use the flashlight to do a sweep of the ground before you leave to make sure you didn’t leave anything behind. Use the flashlight to paint the foreground with light to give your photographs more compositional drama.
  • Small laser pointer. I haven’t tried this yet, but when I was shooting tonight, I couldn’t see what I was composing through the viewfinder. It’s dark outside when you’re photographing stars! I would take 30 second–45 second photographs to test my compositions. I wondered about using a small laser pointer to hold on top of my lens to see exactly where the lens is pointing.
  • Chair. You’ll be using loooong shutter speeds. You are going to want to sit. Well, I would want one. I want to look up and not get dizzy. A lounge chair is even better! Of course, if you’ve driven to a remote location, you can always sit in your car while waiting for exposures to take.
star trail at dusk

“80/365 Star Trails 2” captured by Mike Poresky

  • Shutter release cable. Some DSLRs have shutter release cables to trigger the shutter. Some you can even set up to take a photo every X minutes with an exposure time of X up to 99h 99m 99s.
  • Stop Watch. Most cameras have a 15min shutter speed max – but do have a bulb setting you can use if you want longer exposure times but don’t have a shutter release cable. In bulb, you shutter will open once you press the shutter button – and will not close until you press the shutter button again. If you use BULB – you may want a stop watch to help keep track of your exposure time.
  • Blanket. It’s winter, and here in New England, it’s COLD in the wee hours of the morning. In addition to a nice coat/jacket, I’ll have a blanket to wrap up in and help stay toasty.
  • Hot Chocolate / Coffee / Tea. Did I mention it’s cold in the middle of the night?! Plus—it’s the middle of the night! And I’m bundled up toasty and warm on a lounge chair, staring at stars. Going to need something to help keep me awake.
  • Tripod. Yes, I know. I said it: tripod. Former students, it’s okay. I know I preach the power of less-is-more, but in this case, you will definitely need a tripod. You’re going to also need a tripod which swivels so you can point you camera in the right direction. Night shots of star trails and meteor showers require LONG exposures. A rock or car roof won’t work here.
  • Friend. Take a friend to share the experience with you. You’ll have someone to talk to (and help keep you from getting bored while you wait for those 1 and 2 hour exposures) and you’ll have great story to tell about taking tons of photographs of stars and meteors and of course – you’ll have the great shots you take too!!
star trail tutorial

“Star Trails at Killbear Provincial Park” captured by Imtiaz Ahmed

  • Camera / Lens. You can’t really take photographs if you don’t have your camera… been there—couldn’t photograph that!!
  • Memory Cards. Make sure you have a large memory card available and have an extra one just in case.
  • Batteries. How many?? Three. Where are they? Charged, set in the camera. Charged, set in your pocket. Set charging in charger. Really, I can’t stress extra batteries for night photography enough. Keeping the shutter open for long periods of time sucks up TONS of battery energy. Where a battery will last you for 6 hours of event photography, you might get 2 or 3 hours of night photography.

Now you know what gear you need, what settings to use, and where to point your camera. It’s time to get out there and try some star photography for yourself!

About the Author:
Professional photographer Loreen Liberty (LiteWriting) has been taking photographs since her early teens, and in the professional industry for the past nine year. After many successful years as a wedding and portrait photographer, Loreen decided to turn her attentions to teaching photography full time. “It gives me more time to practice my craft and be artistic for myself.


Go to full article: Star Trail Photography Tips

What are your thoughts on this article? Join the discussion on Facebook

PictureCorrect subscribers can also learn more today with our #1 bestseller: The Photography Tutorial eBook

The post Star Trail Photography Tips appeared first on PictureCorrect.


from PictureCorrect https://ift.tt/2HyB91C
via IFTTT

PictureCorrect.com: Interesting Photo of the Day: Rocket Arching into the Sky

Companies like SpaceX have created several successful launches in recent years. But while the rockets themselves are feats of science, their aesthetics are equally mesmerizing for their beauty. The following image, taken by photographer Dieter Unrath, is proof of that: it is an exquisite fusion of art and science.

space x launch photograph

“SpaceX Launch” by Coty Spence (Via Imgur. Click image to see full size.)

The image is the result of five different 30-second exposures stitched together. Unrath shot each of the images at 14mm, f/16 and ISO 100.

The most striking feature of this image has to be the arc formed by the burning gases of the spaceship and its reflection on the water beneath. Thanks to the symmetrical look, the arc appears like a semi-circle. One could even confuse it for a half-visible planet in the sky or an eclipse.

It’s also interesting how the flames have granted a warm look to one side of the image, while the other portion appears dark and cool. And the fact that the rocket seems to be storming into the starry portion of the sky beautifully symbolizes how it’s leaving the comfort of its home planet and heading to the infinite cosmos.

How do you feel about the image?


Go to full article: Interesting Photo of the Day: Rocket Arching into the Sky

What are your thoughts on this article? Join the discussion on Facebook

PictureCorrect subscribers can also learn more today with our #1 bestseller: The Photography Tutorial eBook

The post Interesting Photo of the Day: Rocket Arching into the Sky appeared first on PictureCorrect.


from PictureCorrect https://ift.tt/3aVRj50
via IFTTT

PictureCorrect.com: Using Street Photography Techniques Inside a Restaurant Kitchen

Street photography has to be one of the most interesting genres of photography. With little control over your surroundings, it is up to you to make the most interesting photo possible. Based on what kind of location you’re working in, you might either have to wait patiently or move around quickly for the right shot. In today’s video, photographer Pierre T. Lambert tries something a little different. He applies the concepts from street photography to capture scenes of a busy restaurant kitchen:

As you go through the video, you will quickly realize the working environment in the kitchen is comparable to a street scene. The chefs are all busy working on their dishes—there’s no way that Lambert can direct them. Instead, he tries his best to blend in and go with the flow. In the process, you can see that he uses quite a lot of techniques that street photographers use.

To start with, he uses compact gears that are the least intrusive. Throughout the video, Lambert uses the Sony A7C camera with 24mm f/2.8 and 50mm f/2.5 Sony lenses. He even tries to tell a story: this time, of a dish being prepared from scratch. And to portray the sense of rush in the kitchen, he shoots at a slower shutter speed, helping him add motion blur to the image and make it even more dynamic.

Even amidst the fast-paced working environment, Lambert’s creative eyes don’t miss any opportunities. He uses his phone and a black tabletop to add reflections to his shot. He also plays around with perspectives and creatively uses ovens and people as frames for his subject.

It’s really impressive to see Lambert work in the kitchen and come up with beautiful results. Where else do you think we can shoot street photography style?


Go to full article: Using Street Photography Techniques Inside a Restaurant Kitchen

What are your thoughts on this article? Join the discussion on Facebook

PictureCorrect subscribers can also learn more today with our #1 bestseller: The Photography Tutorial eBook

The post Using Street Photography Techniques Inside a Restaurant Kitchen appeared first on PictureCorrect.


from PictureCorrect https://ift.tt/2PCjoaa
via IFTTT

torstai 29. huhtikuuta 2021

PictureCorrect.com: Useful Tips for Spring Photography

Spring is one of the best seasons for capturing the beauty of your natural surroundings. The flowers are in full bloom and the weather is just perfect – not too hot and not too cold. Perfect for practicing landscape photography.

robin and cherry blossoms

photo by m01229

For those who are still learning new skills, you can use certain techniques to ensure you get the best images. As with any type of photography, light is very important. Be particular about the light when you’re shooting outdoors. When it comes to the time of day to capture a dramatic scene, early morning and late afternoon or early evening are the best times. If you’re shooting in the morning, you can focus on the fog or mist. A great location to shoot is the woodland where you can make trees at a distance appear as if they’re fading in the background. This creates a sense of mystery in your photos.

sandy river in may

photo by Luke Detwiler

Make use of the foreground as well and shoot using a wide angle lens. You might be surprised to know that this is one of the oldest techniques. The reason is that a wide angle lens creates a greater depth of field. In this aspect, you can actually use contrast between your subject and background.

Don’t forget to capture the beauty of flowers during this lovely season, after all, what can be more beautiful than photographing a bed of flowers? Keep in mind that it’s during this time when the daisies, bluebells and dandelions are showing their best asset, so find a good location such as a field or woodland. For closeup shots, use a macro lens.

snowdrops

photo by Mark Freeth

Don’t be afraid to experiment with your shots as well. For example you’re in a woodland and you’re wondering what angle to use to capture the tallness of the trees. The answer? Do a vertical shot. To do this, you just need to point your lens 90 degrees upwards to have that so-called converging verticals effect. When you shoot this way, the trees will appear as if they’re close together or converged. And you’re also creating a great mix of colors with the contrast of the green leaves of trees and the blue sky. Now, that is purely nature’s beauty.

Finally, be wary of the white light that may creep in when you’re capturing your subjects. Remember that it can become a distraction so if you can, do get rid of it by cropping right there and then. When you’re taking an image of trees for instance, it’s okay to crop the top portion to eliminate the sky. Or consider taking a few bracketed shots and combining them so both the sky and the trees are well exposed, but that is an advanced topic to discuss another day.

Take advantage of the spring season. It’s great for picture taking.

About the Author:
For information about digital cameras, a resource is 42photo.com, New York’s legendary camera store—in business for over 40 years.


Go to full article: Useful Tips for Spring Photography

What are your thoughts on this article? Join the discussion on Facebook

PictureCorrect subscribers can also learn more today with our #1 bestseller: The Photography Tutorial eBook

The post Useful Tips for Spring Photography appeared first on PictureCorrect.


from PictureCorrect https://ift.tt/2PA1l4q
via IFTTT

PictureCorrect.com: Interesting Photo of the Day: The Two Sides of Istanbul

With its long and rich history where civilizations and empires, as well as various ethnicities and religions, all left their marks, Turkey is a country that never ceases to enchant visitors. Whether it’s an ancient oozing with history or the world’s second-oldest underground railway, Turkey offers a lot to discover. But one of its most fascinating aspects must be its architecture. You can see beautiful structures around the country of historical and religious significance. One prominent example is the Grand Camlica Mosque, the largest mosque in the country. Photographer Tommy took this image of the mosque from the European side of the country and it sure is a sight to cherish:

photo of Çamlıca Mosque taken from Istanbul

“Çamlıca Mosque As Seen From Istanbul” by Tommy (Via Reddit. Click image to see full size.)

The image is a 10-second exposure that Tommy shot with a 250mm lens from Arnavutköy, a part of Istanbul in the European part of the country. If you ever get a chance to visit this place, you will realize that the mosque is in fact not as close as it appears in this image. That’s due to the compression caused by a long focal length the photographer used.

“Basically, I stood really far away and used a telephoto lens to make it look really close.”

While the mosque in the background is surely the highlight of this image, you cannot ignore the brilliant contrast in the foreground. Besides appearing more vibrant, the apartments also feel more contemporary and tell the story of Istanbul’s many ages. The undulating street bears a strong resemblance to the streets of San Francisco, too.

A wonderful metaphorical aspect to the image is what appears to be a blue veil between the Asian and European sides of the Bosphorous Strait. While this is obviously due to the difference in color temperatures between the foreground and background, we can draw a different conclusion from the situation.


Go to full article: Interesting Photo of the Day: The Two Sides of Istanbul

What are your thoughts on this article? Join the discussion on Facebook

PictureCorrect subscribers can also learn more today with our #1 bestseller: The Photography Tutorial eBook

The post Interesting Photo of the Day: The Two Sides of Istanbul appeared first on PictureCorrect.


from PictureCorrect https://ift.tt/3e4YDxq
via IFTTT

PictureCorrect.com: Mistakes to Avoid When Entering Photo Contests

Photography competitions attract many participants. But whether you’re a beginner or a pro, it’s not easy to win one. Just submitting good photos doesn’t cut it. Since the judges need to deal with such a high volume of submissions, yours need to immediately grasp the judges’ attention and keep them engaged. But how do you do that? In today’s video, landscape photographer Nigel Danson answers this exact question and also shares some top tips for entering and winning in photography competitions:

Danson starts by sharing some basic yet overlooked advice that you should take care of when submitting photos to competitions. Having a straight horizon, keeping the subject in focus, ensuring a proper balance among highlights and avoiding distracting elements: while these sound simple, you’d be surprised at how many photographs get disqualified for these reasons.

Later in the video, he also shares some pointers on how to make your images stand out, by focusing on colors, shapes, geometry, textures and lighting. And while these factors help you to take your photos to the higher, they may not be enough to help you win. To increase the probability of you winning the competition, your images must be able to wow the judges.

Danson emphasizes the concept of making an impact with the images and the importance of creativity for winning competitions. Images are impactful if they stand out. This helps grab the judges’ attention immediately and makes them pause. Once you have their attention, you’ve shifted their focus to your creativity. Creative photos tell a story and also invoke emotions.

We highly recommend that you watch the full video. If you’re yet to find success in photography competitions, you’ll find it very much insightful.


Go to full article: Mistakes to Avoid When Entering Photo Contests

What are your thoughts on this article? Join the discussion on Facebook

PictureCorrect subscribers can also learn more today with our #1 bestseller: The Photography Tutorial eBook

The post Mistakes to Avoid When Entering Photo Contests appeared first on PictureCorrect.


from PictureCorrect https://ift.tt/32YByWT
via IFTTT

keskiviikko 28. huhtikuuta 2021

PictureCorrect.com: Better Photos in 6 Simple Steps

The bottom line with any photography learning experience is figuring out how to take great images. That is the result all of us are looking for. If we aren’t actually taking great photos then what’s the point of learning? By putting into practice some simple steps, your photography will improve immediately.

tips for better photos

“Lurking in the Grass” captured by Richard Schneider

I remember searching the Internet looking for keys that would help me to get to the next level with my photography. When I found a key, it was very exciting. I was already a proficient photographer, but it would have been great to find an article with keys to get me to the next level. So based on my experience here are steps that will take you to the next level.

1. Get in Closer

So many amateur photographers think that a telephoto lens is the ultimate accessory for their camera. That’s a total misnomer. The most important accessory to any photographer is their feet. Unless you’re in a game park or zoo where getting closer to the animals may get you eaten, using your feet is essential. You will see more of the subject and the image will probably be of a better quality. As you move in toward the subject you’ll find yourself framing the scene or person with far more attention to the details.

simple ways to improve your photos

Photo by Javcon117*; ISO 800, f/1.4, 1/200-second exposure.

2. Exclude Clutter

By getting in closer you will probably exclude a bunch of clutter that you’d not usually remove from your images. There is a bunch of stuff in any scene that you will not want to see in a few years time when looking at the memories. Coke cans, microwaves, and the kitchen sink—all elements that were not important to you when you shot the image. By carefully looking at the scene you will find things that shouldn’t be there. Remove them or change your viewpoint so that they are no longer in the image.

how to shoot better photos

Photo by Stefan Insam; ISO 100, f/4.0, 1.6-second exposure.

3. Watch the Edges of Your Frame

By giving careful consideration to the whole image—especially the edges—you will see a significant improvement to your photos. Because we are so focused on the child, vehicle, or other chosen subject, which on most occasions is placed in the center of the image (not good), we don’t give attention to the edges. It’s only after the shoot that we ask the question, why did I include the extraneous items that really have no relevance to the image? So watch what encroaches on your scene before pressing the shutter button.

4. Choose a Clear Focal Point or Subject

The most important element of any image is the focal point or subject. This is the reason you are taking the image. If you are photographing your child’s birthday party then make him or her the focal point. Get in closer so the viewer can see what the photo is all about. The subject should always shout out, “I am the center of attention.” You should never be in doubt as to what or who the subject is.

easy ways to improve your photography

Photo by Aikawa Ke; ISO 1600, f/1.4, 1/125-second exposure.

5. Change Your Angle

By simply doing this one step you will see an immediate improvement to your photos. Start by thinking outside the box. Don’t stand in front of the subject. Walk around and look at the possibilities. Get down low and look up at the subject. Move a few steps to your left or right. Climb up higher than the subject and look down. Whatever you do don’t stand in front of the subject. Think differently.

shooting-better-photos

Photo by Brian Kingsley; ISO 3200, f/7.1, 1-second exposure.

6. Practice, Practice, Practice

Huh? You may think, “This isn’t something I can do to improve my photos.” Yup, it sure is! By going out and practicing the first five steps regularly and consistently you are going to become an above average photographer. In any activity or hobby, the more you practice the better you become. So get out and shoot images—lots of them—while thinking about the other five steps.

Here’s a little bonus exercise. Take an object or subject and shoot it in 100 different ways. Sound difficult? It sure is. But when you have exhausted all your ideas and have only taken 71 images, take a look at them and you will find that there are several that are really great that you wouldn’t have shot if you had only taken 5 or 10. Happy shooting!

About the Author:
Wayne Turner has been teaching photography for 25 years and has written three books on photography. He has produced 21 Steps to Perfect Photos; a program of learner-based training using outcomes based education.


Go to full article: Better Photos in 6 Simple Steps

What are your thoughts on this article? Join the discussion on Facebook

PictureCorrect subscribers can also learn more today with our #1 bestseller: The Photography Tutorial eBook

The post Better Photos in 6 Simple Steps appeared first on PictureCorrect.


from PictureCorrect https://ift.tt/2zq8jwQ
via IFTTT

PictureCorrect.com: Interesting Photo of the Day: Mystifying Reflection of the Sky

We sometimes come across certain photographs that seem simple at first, but get more and more confusing the more we look at them. The following image, taken by photographer Jean-Marc Buytaert, is a perfect example. At first, it appears to be the average photograph of the sky’s reflection on a lake—but if you look for more than a few seconds, you’ll find there’s much more to it than that. The perspective will leave heads spinning for sure:

inverted reflection of the sky

“Tripping Reflection of the Sky” by Jean-Marc Buytaert (Via Reddit. Click image to see full size.)

Buytaert didn’t need anything sophisticated to take this photo. He simply took a wide-angle photo with his iPhone, placing the lens close to the surface of the water. In simpler terms, he shot the image with his phone turned upside-down and close to the lake’s surface.

The change in the way he took the image is pretty simple, but the results are quite dramatic. The bottom half of the image appears normal—as if the lake is reflecting the sky above. But the top half is where things start getting trippy. While the scene appears normal close to the horizon, we can’t say the same for the rocks seemingly floating in the sky.

In reality, of course, the rocks are where they are supposed to be—at the bottom of the lake. But the photographer used an effective trick to make viewers raise their eyebrows. It is indeed a great play of perspective by the photographer.

Imagine if rocks actually floated in the sky like that!


Go to full article: Interesting Photo of the Day: Mystifying Reflection of the Sky

What are your thoughts on this article? Join the discussion on Facebook

PictureCorrect subscribers can also learn more today with our #1 bestseller: The Photography Tutorial eBook

The post Interesting Photo of the Day: Mystifying Reflection of the Sky appeared first on PictureCorrect.


from PictureCorrect https://ift.tt/3nsA9RM
via IFTTT

PictureCorrect.com: Real Estate Lead Shot Photo Editing with Luminar AI

In the real estate business, your photos will be the first things that potential customers will see before they visit any property. It is thus vital that your photos look inviting inside and out. While many photographers invest a lot of time and resources in making the inside of the house look great, they often overlook the exterior. The exterior shot, also called the lead shot, can be difficult to take, as a lot of it depends on the weather. If conditions are not right, you can find yourself revisiting the same property multiple times—which is not always feasible. In today’s video, photographer Becki Peckham shows how you can use the power of AI to make your real estate lead shots look mindblowing in a matter of minutes:

Realtors expect a short turnaround time, which means you cannot keep on revisiting the house even if conditions are not right. But in post-production, you can’t alter the landscapes or the house itself—you need the natural lighting to be good and the sky to be appealing. For this purpose, Becki uses the power of artificial intelligence, thanks to an app called Luminar AI.

She demonstrates how you can use the “Sky Replacement” feature in Luminar AI to conveniently replace a boring sky. There are multiple skies available in Luminar AI ready to be used with your photos. Just ensure that the one you choose matches the scene you’ll be using it with. What’s fascinating is how impressive the software automatically masks the sky into your image. The ability to scale, flip and reposition the sky makes customization especially easy.

As you can see in the video, the results are impressive. However, it is up to you, the user, to keep track of what you’re doing. Pay attention to how the lighting is interacting with the building and work accordingly. It’s easy to accidentally go overboard—keep track of your edits and revisit your work frequently to ensure that the images don’t look fake.

See how it works: Luminar AI Photo Editor


Go to full article: Real Estate Lead Shot Photo Editing with Luminar AI

What are your thoughts on this article? Join the discussion on Facebook

PictureCorrect subscribers can also learn more today with our #1 bestseller: The Photography Tutorial eBook

The post Real Estate Lead Shot Photo Editing with Luminar AI appeared first on PictureCorrect.


from PictureCorrect https://ift.tt/32Xyk60
via IFTTT

tiistai 27. huhtikuuta 2021

PictureCorrect.com: Photographing the Moon

Darn, I missed the last eclipse of a full moon. Oh well, now I have to wait for the next one. To be sure I don’t miss it the next time, I am arming myself with this catalog of lunar eclipses from NASA.

lunar eclipse

I’ve photographed the moon many times—and one eclipse. I prepared this article to give you an idea of how to photograph an eclipse, but now it’s not necessary.

I have photographed the moon both on a regular night with a full moon and during an eclipse. Both of them are easy if you know how. In case you want to photograph an eclipse, the following is a list of the things that you’re going to need.

  1. 35mm camera film or digital
  2. 300mm lens or longer
  3. Cloudless night during the event

That’s it! Many people try to photograph the moon using a tripod but they don’t realize that it’s not necessary. Why, you ask? Because of the “sunny 16” rule in photography. Wait! In the middle of the night there is no sun! Well, maybe not illuminating you, but it is illuminating the moon.

The sunny f/16 rule states that you can photograph anything that is illuminated by the sun using a shutter speed one number higher than the film or ISO that you’re using in your camera. For example: if you’re using ISO in your camera, the shutter speed/aperture combination should be 1/125 at f/16. Very simple, right?

half moon

If you’re using an older mechanical film camera and the battery is dead and you cannot read the light meter, using the sunny f/16 rule will allow you to photograph anything that is illuminated by the sun.

What about digital cameras? Digital cameras or film cameras are no different in this situation. For shots of the moon, either camera will capture the moon the same way or anything else illuminated by the sun. Don’t forget that you have a light meter to help you obtain the correct exposure and viewing the images on the screen gives you immediate feedback so you can make changes in the event you need to. Okay, enough of that. Let me tell you what you can do to photograph the moon and why a tripod is not necessary.

If you’re using a digital camera, do the following:

  1. Set your aperture to f/16.
  2. Set the ISO to 100.
  3. Set the white balance to daylight.
  4. Set the color mode to landscape.
  5. Set your shutter speed to 1/125 of a second.

For a film camera, forget steps 3 and 4.

full moon

As you can see, everything is very easy to do and chances are that if you follow this information you’ll get great shots of the moon. But, wait I’m not done yet!

Since the moon is so far away, why use the lens almost fully closed? Since the moon is thousands of miles away from us, we should not worry about depth of field. So, why not use the lens fully open and take advantage of using a very fast shutter speed? This is what I do every time that I photograph the moon.

  • f/16 at 1/125 of a second, right? So that means that you can use reciprocal exposures:
  • f/11 at 1/250
  • f/8 at 1/500
  • f/5.6 at 1/1000
  • f/4 at 1/2000
  • f/2.8 at f/4000

What? Photograph the moon using a 1/4000 of a second? YES! All these are reciprocal exposures and what that means is that each of these settings will give you the same amount of light in your sensor. Of course, some people do not have their cameras set correctly. A couple of my students keep accidentally setting their exposure compensation settings to -4.0 stops on their Nikon cameras, and it’s all because the compensation dial and the aperture dial are one and the same in some Nikon cameras. Why Nikon placed these setting together, I don’t know. So if you have a Nikon camera and, like ALL of my students, you use your camera in manual mode, make sure that you’re in the correct setting when changing the aperture of the lens so you don’t accidentally set a (-) minus exposure on the aperture of the lens.

lunar eclipse

Back to the very fast shutter speed at night. Is it possible to use that in the middle of the night and get the picture? Of course it is. Anything that is illuminated by the sun during the day or at night (the moon) can be photographed using this photography rule. Of course, if you’re going to photograph an eclipse of the moon, the setting will be very different—at least the shutter speed. During an eclipse you will be forced to use slower and slower shutter speeds to compensate for the loss of light. But you’ll get the image!

About the Author:
Ignacio Alvarez is a photography instructor at City Colleges of Chicago.


Go to full article: Photographing the Moon

What are your thoughts on this article? Join the discussion on Facebook

PictureCorrect subscribers can also learn more today with our #1 bestseller: The Photography Tutorial eBook

The post Photographing the Moon appeared first on PictureCorrect.


from PictureCorrect https://ift.tt/2qZ4r1q
via IFTTT

PictureCorrect.com: Interesting Photo of the Day: Cape Kiwanda Long Exposure

Cape Kiwanda in Oregon is well known for experiencing spectacular wave action. This makes it an ideal place to spend some time during the evening hours. The beautiful sunset along with the coastal waves will ensure that you’ll have and amazing time before you call it a day. Photographer Ryan Dyar took the following image from the Oregon Coast:

sunset on Oregon coast

“Sunset and sandstone on the Oregon Coast” by Ryan Dyar (Via Reddit. Click image to see full size.)

The image is a beautiful example of how basic photography composition guides can help you create a staggering photo. A well-thought-out use of foreground, mid-ground, and background has effectively created engaging layers.

This was shot at f22 (to get the sunstar sharp), 2.5 second exposure, and ISO 160 in 2009 with a Canon 1Ds Mk III and a Canon 16-35mm f2.8L at 16mm.

The blurry water stream in the foreground gives a sense that the water is retreating back to the ocean. This has made for a compelling and dynamic foreground. The sandstone on the right with a sun-kissed golden glow is another beautiful aspect. The texture on the sandstone adds “pop” to the image.

Another important element of the image that nobody can miss is the sun. While the sun star effect might appear as fake at first, Dyar clarified that it is actually not photoshopped. By positioning his camera right, he was able to get it when he took the image.

“The old Canon 16-35mm 2.8L II was known for the super clean sun stars it created in the right conditions.”


Go to full article: Interesting Photo of the Day: Cape Kiwanda Long Exposure

What are your thoughts on this article? Join the discussion on Facebook

PictureCorrect subscribers can also learn more today with our #1 bestseller: The Photography Tutorial eBook

The post Interesting Photo of the Day: Cape Kiwanda Long Exposure appeared first on PictureCorrect.


from PictureCorrect https://ift.tt/2OUChlR
via IFTTT