


Relevant reminder: only 1 day left for The 5 Day Photography Deal
Lightroom is an indispensable tool for photographers of all skill levels. Its intuitive design coupled with powerful post-processing capabilities makes it a favorite for editing and enhancing photographs. One of the most flexible tools within Lightroom is the Adjustment Brush. This feature allows for localized adjustments on specific areas of an image, giving photographers fine-tuned control over their edits.
When to Use the Brush Tool
- Selective Exposure Adjustments: The common use of the brush tool is to either brighten or darken specific areas of an image. For instance, if the subject’s face is slightly underexposed in comparison to the background, you can use the brush tool to selectively brighten it without affecting the entire image.
- Enhancing Details: The brush tool is great for enhancing specific details in an image. For example, you can increase sharpness or clarity on a subject’s eyes to make them pop.
- Color Correction: Sometimes, certain areas of a photo might have a different color temperature or tint. With the brush tool, you can adjust the white balance in those specific areas without affecting the whole image.
- Skin Retouching: For portrait photographers, the brush tool can be invaluable for smoothing out skin, reducing blemishes, or enhancing features.
- Vignetting or Dodging and Burning: Create custom vignettes or emulate traditional dodging and burning techniques by using the brush tool to darken or lighten the edges or specific parts of your image.
How to Use Brushes in Lightroom
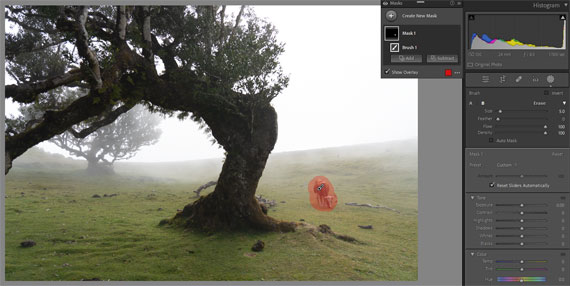
- Select the Brush Tool: In the Develop module, find the Brush tool (represented by a brush icon) or press ‘K’ on your keyboard.
- Adjust Brush Settings: Before painting over your image, adjust the brush size, feather, flow, and density to fit your needs. Size controls the diameter, feather controls the softness of the edge, flow controls the amount of adjustment with each stroke, and density limits the maximum amount of adjustment.
- Choose the Effect: On the right side, select the effect you want to apply (e.g., Exposure, Clarity, Saturation). Adjust the sliders to the desired effect.
- Paint Over Your Image: Click and drag over the areas of the image you want to adjust. You can press ‘O’ on your keyboard to see a red overlay which shows the areas you’ve painted.
- Adjust the Effect After Painting: Once you’ve painted over the areas you want to adjust, you can modify the effect sliders to fine-tune the adjustments.
- Erase or Modify: If you make a mistake, you can choose the “Erase” option in the brush settings or hold down the ‘Alt’ key (or ‘Option’ on Mac) and paint over areas you want to remove the effect from.
- Add New Adjustments: You can add multiple brush adjustments by clicking on ‘New’ and then painting a new adjustment onto the image.
The Adjustment Brush tool in Lightroom is an asset for photographers looking to make localized changes to their images. It offers a level of precision that global adjustments can’t achieve. Whether you’re looking to bring out details, correct color, or enhance specific features, the brush tool has got you covered. With practice, you can master this tool and elevate the quality and impact of your photographs.
For Further Training, Deal Ending Soon:
The 5 Day Photography Deal is back and includes over $2000 worth of the best photography products online from dozens of world-class photographers. Tutorials, eBooks, photo editing presets, software and much more. At 96% off but only until October 17.

The 5 Day Photography Deal (See What’s Inside)
Leading photography educators & brands have been selected to contribute products to the bundle. It’s one of the best photography deals of the year so you may want to check it out.
Only 1 day left: The 5 Day Photography Deal
- - - - - - - - - - - - - - - - - - - - - - - - - - - - - - - - - - - - - - - - - - - - - - - - - - - - - - - - - - - - - - - - - - - - - - - - - -
Did you appreciate this newsletter? Please help us keep it going by Joining Our Patreon Supporters
What are your thoughts on this article? Join the discussion on our Facebook Page
PictureCorrect subscribers can also learn more today with our #1 bestseller: The Photography Tutorial eBook
- - - - - - - - - - - - - - - - - - - - - - - - - - - - - - - - - - - - - - - - - - - - - - - - - - - - - - - - - - - - - - - - - - - - - - - - - -
The post Using Brushes in Lightroom: A Photographer’s Guide appeared first on PictureCorrect.
from PictureCorrect https://ift.tt/U6y51dM
via IFTTT

0 kommenttia:
Lähetä kommentti