


Photoshop is a powerhouse. It has unlocked doors to endless possibilities for photographers. And Photoshop’s shortcuts make using all its features faster and more efficient. Jesus Ramirez shares 15 Photoshop shortcuts to speed up your workflow:
1. Clone Tool Shortcuts
The clone stamp tool allows you to copy pixels from one area of an image to the other. Holding Alt or Option lets you set the sample source, which is then mirrored on the brush. That’s probably already familiar to you. Now here’s where it gets interesting.
- If you hold Alt/Option + Shift and press any of the arrow keys, you will offset the sample source.
- Hold Alt/Option + Shift and press the “<” or “>” buttons to rotate the sample source.
- Hold Alt/Option + Shift and press the “[” or “]” button to scale the sample source. This will let you clone at a different size from the source.

“Keep in mind that these clone tool shortcuts only work with North American keyboards.”
Go to Window > Clone Source and use the panel to use these features.
2. Load Luminosity
This shortcut really comes in handy when you want to target either the highlights or shadows in an image.
- To quickly select the bright pixels, press Ctrl + Alt + 2 on Windows or Command + Option + 2 on a Mac.
- If selecting shadows is your priority, follow the above step and invert the selection by pressing Ctrl (Command in Mac) + Shift + I
With the selection in place, create a color balance adjustment layer and Photoshop will automatically apply a layer mask in the shape of your selection. This will conveniently allow you to make the color adjustments within your range of selection. And again, if you want to invert the contents of the layer mask, simply press Ctrl/Command + I.

3. Lock Transparent Pixels
The lock transparent pixel shortcut is useful when painting or compositing. Press the forward slash key ( / ) to lock the transparent pixels. This will allow you to paint on those pixels that are not transparent. Again, press the forward slash key to unlock the transparent pixels.
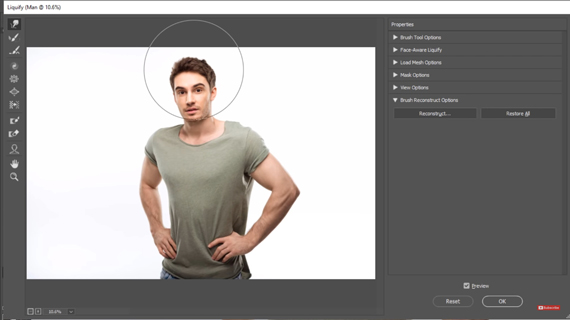
4. Restore Liquify
To undo any of the liquify effects that you’ve applied to an image, use the Forward Warp tool while holding the Alt/Option key. While doing so, paint the areas where you’d like to undo the liquify effect to restore the image in that specific area.
5. Puppet Warp
Puppet warp is yet another powerful distortion tool in Photoshop that you can find in the Edit menu. This tool allows you to place pins on your image that you can then click and drag to distort. But sometimes, you may not get the effect expected. In such cases, hold the Alt/Option key while hovering over a pin. You will then see a circle with a double-sided arrow that you can click and drag to rotate the pin. This will allow you to fine-tune the way the distortion is applied.

6. Cycle Through the Brush List
Cycling through different types of brushes is a necessity when painting, retouching, and compositing. Going back up to the brushes panel time and again can get tedious. You can entirely avoid this step by pressing the “<” or “>” keys to cycle between brushes. Press “<” to move backward on the list and “>” to move forward.
7. Activate Layer Mask
When working with layer masks, you may need to move to and fro between the layer and mask. Press Ctrl/Command + \ to activate the layer mask and press Ctrl/Command + 2 to continue working with the layer again.
8. Fill Only Opaque Pixels
To fill the non-transparent pixels on your layer with the foreground color, press Shift + Alt + Backspace (Shift + Option + Delete on Mac). And if you want to fill the opaque pixels with the background color, press Shift + Control + Backspace (Shift + Command + Delete on Mac).
9. Restore Last Selection
If you need to restore your last selection, you can press Ctrl/Command + Shift + D.
10. Change Brush Size and Hardness
While holding Ctrl + Alt (Command + Option on Mac), right-click and drag left or right to change the size of the brush, and drag up and down to adjust its hardness.

11. Revert File
Sometimes, you may get so much carried out with the edits you make in the images, that you may need to revert the changes. In such cases, pressing the F12 key will revert the file back to the last save point. However remember that if you haven’t saved the document at any point of the edit, Photoshop will restore it back to the original state.
You can also use this function by going to File > Revert.
12. Increase Space Between Characters
When working with text, you may occasionally need to alter the spacing between two characters. Hold Alt/Option and press the left arrow key to decrease the space between two characters. Similarly, if you need to increase the space, press Alt/Option and the right arrow key.
13. Pick Colors Outside of Photoshop
Did you know that you don’t need to have an image open in Photoshop to select a color from it? To do so, open the file alongside Photoshop. Then, using the eyedropper tool, pick any color in an image within Photoshop. Without releasing the mouse button, continue to drag the eyedropper over any image outside of Photoshop to select a color from it. Once you find the color that you like, simply release the mouse button. Photoshop will then set it as the foreground color.
14. Cross-Hair on Painting Tools
When using the painting tools such as the brush tool, pressing the Caps Lock button will change it into a cross-hair. To disable the cross-hair, press Caps Lock again.
15. Banana Tool
“This is a fun Easter Egg that you can use to play a funny prank on a friend or coworker.”
Click on the three dot icon in the Toolbar and click on Edit Toolbar. Then, simply hold Shift and click on Done. This will replace the three dots with a banana icon. The banana icon doesn’t do anything.
“It’s just a funny little icon that surely will freak out your friends.”

You can get rid of it by going back to Edit Toolbar, and clicking on Done while pressing Alt/Option.
How many of these shortcuts and tricks were you familiar with before?
Go to full article: List of Photoshop Shortcuts to Supercharge Your Workflow
What are your thoughts on this article? Join the discussion on Facebook
PictureCorrect subscribers can also learn more today with our #1 bestseller: The Photography Tutorial eBook
The post List of Photoshop Shortcuts to Supercharge Your Workflow appeared first on PictureCorrect.
from PictureCorrect https://www.picturecorrect.com/tips/list-of-photoshop-shortcuts-to-supercharge-your-workflow/
via IFTTT

0 kommenttia:
Lähetä kommentti