


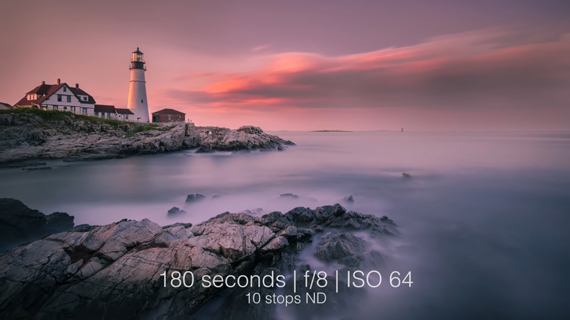
Long exposure photography produces surreal results. By recording the changes in the environment for an extended time, cameras capture images that a human eye cannot replicate. To help you take better long exposure photos, fine art photographer Attilio Ruffo explains how you can master aperture and shutter speed:
Choosing Your Aperture
For landscape photographs, you basically need to have a greater depth of field, and maximum sharpness. Thankfully, you can achieve both of these just by stopping down the aperture. Keep in mind that although small apertures like f/22 can give you maximum depth of field, sharpness will be compromised.
The best thing to do is to observe the results of your lens at various apertures and see for yourself where you get a good balance of sharpness and depth of field. Most lenses perform their best somewhere in the middle of their aperture range, like f/8 or f/11.
Setting Your Shutter Speed
Once your aperture is set, you need to determine a shutter speed that will allow you to capture as much information as possible toward the right of the histogram without clipping. This will ensure that noise will not be introduced in the photos while retrieving shadow details in post.
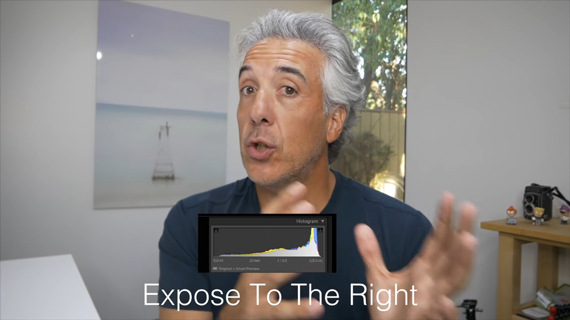
To achieve this, choose the optimum aperture for your lens and take a test shot without putting on any filters. Examine the histogram and slowly increase or decrease the shutter speed until most of the information is toward the right without clipping. If in your initial test shot the histogram has greater weight toward the left, then use a slower shutter speed. And if the histogram shows clipping toward the right, use a slightly faster shutter speed.
Once your aperture and shutter speed are set, adjust your focus, and then put the filter on. But wait! Won’t putting a neutral density (ND) filter cut the light entering the camera and mess with the exposure? Obviously, it will. Depending on the strength of the ND filter you choose, slow down the shutter speed from your current settings to achieve a proper exposure. While trial and error can be a way to learn, Ruffo suggests that you use ND calculator mobile apps. They can help you in determining the shutter speed based on the strength of your ND filter quickly.
However, when using such apps during sunrise and sunset, you need to be careful about the changing light. During sunrise, the surroundings get brighter by the moment. So, if the app suggests using a 5 minutes exposure, you might be better off using just 4 minutes. And during sunset, as it gets darker by the moment, you might want to slightly increase the duration suggested by the app.
So for your next long exposure photography attempts, be sure to use the sweet spot of your aperture range and expose to the right. With the focus locked and the ND filter on the lens, readjust your shutter speed according to the strength of your ND filter, and you’re all set.
I hope these tips will help you step up your long exposure photography to the next level.
Go to full article: Long Exposure Photography: Aperture & Shutter Speed Settings
What are your thoughts on this article? Join the discussion on Facebook
PictureCorrect subscribers can also learn more today with our #1 bestseller: The Photography Tutorial eBook
The post Long Exposure Photography: Aperture & Shutter Speed Settings appeared first on PictureCorrect.
from PictureCorrect http://bit.ly/2HXcVlK
via IFTTT

0 kommenttia:
Lähetä kommentti