


Masking in Lightroom Mobile is a powerful technique that can transform the way you edit photos. Drawing insights from Clifford Pickett’s video tutorial, we delve into the art of isolating and enhancing specific parts of an image using Lightroom Mobile’s masking tools:
Before diving into adjustments, it’s essential to understand the purpose of masking. Masking allows you to apply specific changes to isolated parts of an image, making certain components stand out.
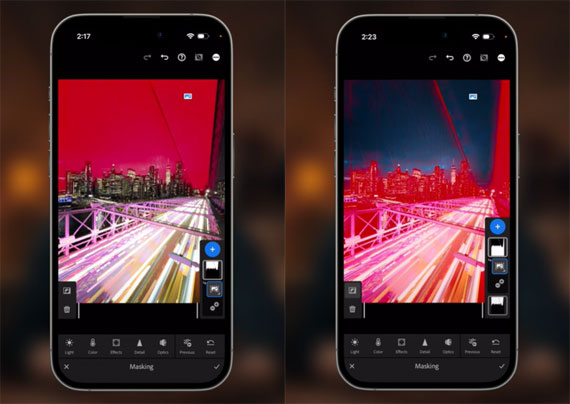
The “Select Sky” Feature:
- Locate the Masking Icon: With your photo open in Lightroom Mobile, look for the masking icon (usually at the bottom left).
- Choose Your Masking Tool: Upon clicking the masking icon, a blue circle with a plus sign will appear. Tapping this will reveal various masking options.
- Opt for ‘Select Sky’: For this guide, we focus on the “Select Sky” option. This feature intelligently detects and isolates the sky portion of your image, allowing for specific adjustments to that area alone.
Enhancing the Sky:
- Color Adjustments: Once you’ve selected the sky, a color option typically found at the bottom grants you access to color temperature adjustment sliders. Dragging the temperature slider left introduces cooler tones, amplifying contrast between the warm foreground and the cool sky.
- Boosting Clarity: To bring out cloud details and texture, head to effects and increase the clarity. Even a small shift, say 10 points, can significantly enhance sky details.
Inverting the Mask for Ground Adjustments:
- Accessing Your Masks: On the right side of the screen, a small vertical line next to your masks can be slid open to reveal detailed information about the masks applied.
- Duplicating and Inverting: To edit everything except the sky, tap the three dots next to the sky mask. From the drop-down menu, choose “Duplicate and Invert.” This creates an inverted mask that isolates everything but the sky.
Editing the Rest of the Image:
- Tackling Highlights: Within the newly inverted mask, head to “Lights.” Here, you can drag down the highlights slider to counteract any overexposed areas.
- Color Cast Correction: To address any unwanted color tones (like the green hue on buildings Clifford mentioned), open the color panel and adjust the tint slider. Move towards magenta to offset green tints.
- Enhancing Details: Navigate to the effects panel to enhance image texture and clarity. By adjusting these sliders, the image’s details, especially on the ground and structures, will pop more.
Masking for Sharpening:
Post-adjustments, you might want to sharpen specific parts of your image. After boosting the sharpening:
Isolate Sharpened Areas: Use the masking slider under the sharpening tools. Dragging to the right while holding down will show which areas are being sharpened. By setting it to around 60, as Clifford suggests, you ensure that only the desired details (like the skyline) are sharpened, excluding softer areas like the sky.
Conclusion:
Masking in Lightroom Mobile offers precise control over image editing. Through selective adjustments, you can craft an image that resonates, balancing foreground and background, and showcasing the photo’s full potential. Whether you’re a seasoned photographer or a hobbyist, mastering masking will significantly elevate your editing prowess.
For Further Training on Lightroom Mobile:
This is where the new iPhone Editing Academy, a course designed by professional photographer and photo editor, Clifford Pickett, steps in to bridge the gap. Pickett, who has edited over 10,000 photos using nothing but his iPhone and sold many to major corporate clients, has crafted this platform as an accessible way to master photo editing.

New: iPhone Photo Editing Academy (see preview videos)
During its launch, the course is on sale at a deeply discounted price. It also includes a full happiness guarantee, if you are not satisfied with the course for any reason simply let them know for a full refund – so there is no risk in trying it.
Launch sale ending soon: iPhone Photo Editing Academy at 80% Off
- - - - - - - - - - - - - - - - - - - - - - - - - - - - - - - - - - - - - - - - - - - - - - - - - - - - - - - - - - - - - - - - - - - - - - - - - -
Did you appreciate this newsletter? Please help us keep it going by Joining Our Patreon Supporters
What are your thoughts on this article? Join the discussion on our Facebook Page
PictureCorrect subscribers can also learn more today with our #1 bestseller: The Photography Tutorial eBook
- - - - - - - - - - - - - - - - - - - - - - - - - - - - - - - - - - - - - - - - - - - - - - - - - - - - - - - - - - - - - - - - - - - - - - - - - -
The post How to Use the Masking Select Sky Tool in Lightroom Mobile appeared first on PictureCorrect.
from PictureCorrect https://ift.tt/q9GRu8N
via IFTTT

0 kommenttia:
Lähetä kommentti