


In this video, renowned French photographer Serge Ramelli shares his secrets to capturing the best possible Northern Lights photos. He starts by emphasizing the importance of finding a cool foreground element and provides an example of a mountain with a unique shape:
Ramelli then explains the process of taking two separate photos – one of the foreground element (the “plate”) and one of the Northern Lights themselves. The plate is taken with a low ISO, and the Northern Lights photo is taken at a high ISO to capture the spikes of the lights.
He emphasizes that the Northern Lights are very fast-moving, so he takes a whole bunch of photos at a high ISO (in this case, 2500) to get all the spikes of the aurora.
Next, Ramelli walks through his workflow in Lightroom, which includes retouching the plate first before synchronizing it with the Aurora photos. He demonstrates how to use the natural drama formula, adjust the white balance, and reduce noise.
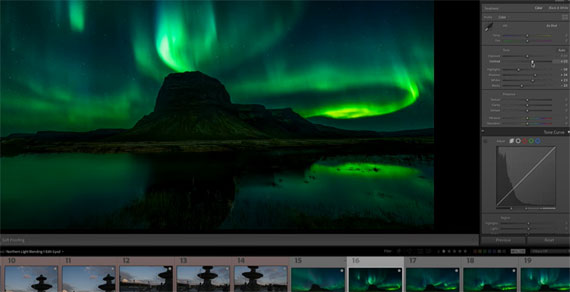
Ramelli then brings the retouched photos into Photoshop to blend them together, using the select tool to separate the sky from the foreground element. He also shows how to invert the mask to conceal the sky and make the foreground element appear.
Here are the steps that Serge Ramelli takes to capture and edit his northern lights photo:
- Find a cool foreground element, such as a mountain, that has a pleasing shape.
- Take a plate photo during the day with a low ISO, long exposure time (e.g. 2-3 minutes), and wide aperture (e.g. f/4).
- Take multiple photos of the northern lights with a high ISO (e.g. 2500) and short exposure time (e.g. 4 seconds) to capture the spikes and movement of the lights.
- Import the photos into Lightroom and edit the plate photo by adjusting exposure, white balance, black point, white point, texture, clarity, and noise reduction.
- Use the select tool to select the sky in the northern lights photo and create a mask that reveals the sky and conceals the foreground.
- Use a brush tool to paint over the areas where the foreground was lost in the mask.
- Save the edited photo in Lightroom and crop it to the desired size.
Capturing the beauty of the northern lights is no easy feat, but with Serge Ramelli’s expert guidance, you too can create a stunning photo that will leave your friends in awe.
For further training: Serge’s Travel Photography Masterclass
- - - - - - - - - - - - - - - - - - - - - - - - - - - - - - - - - - - - - - - - - - - - - - - - - - - - - - - - - - - - - - - - - - - - - - - - - -
Did you appreciate this newsletter? Please help us keep it going by Joining Our Patreon Supporters
What are your thoughts on this article? Join the discussion on our Facebook Page
PictureCorrect subscribers can also learn more today with our #1 bestseller: The Photography Tutorial eBook
- - - - - - - - - - - - - - - - - - - - - - - - - - - - - - - - - - - - - - - - - - - - - - - - - - - - - - - - - - - - - - - - - - - - - - - - - -
The post Aurora Photo Editing Tricks appeared first on PictureCorrect.
from PictureCorrect https://ift.tt/sCbaX1l
via IFTTT

0 kommenttia:
Lähetä kommentti