


Are you a Nikon photographer looking to unlock some quick techniques to use for photo efficiency? Photographer Steve Perry demonstrates some useful tricks for Nikon users:
1. Save Your Settings
Many Nikon cameras allow you to save your settings so that you don’t accidentally adjust or reset them. To do this, first insert an empty memory card, format it, and go to your Setup Menu. Scroll down to “Save/load settings” and click to save your current settings to that memory card!
2. Rename Your Files
Instead of using the default DSC prefix for all of your image files, you can set your own to help organize your files. First, head to your Photo Shooting Menu and select “File naming.” From there, you can choose the three letter prefix for your files.
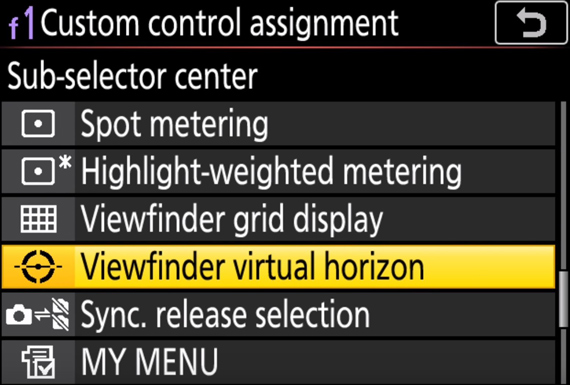
3. Viewfinder Level
Perry demonstrates how he has his joystick programmed to show the virtual horizon line in his viewfinder when he pushes it in. This helps him see if his image angle is tilted one way or the other. When you move your camera left or right, lines will appear in your viewfinder displaying which direction the horizon is tilting.
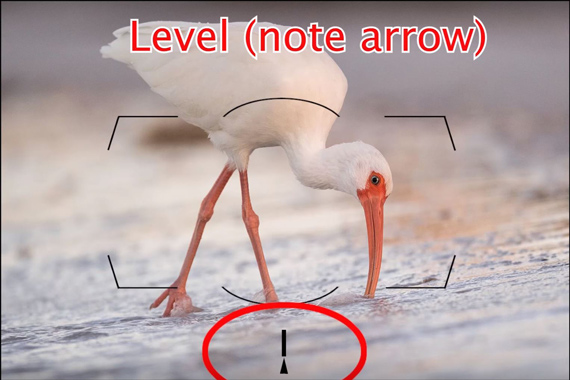
For Nikon cameras before 2016, go to your Custom Setting Menu and select Controls. Both the “Assign Fn button” and “Assign preview button” options support viewfinder virtual horizon. If you select either of them, you can scroll through the different programmable options. “Viewfinder virtual horizon” can be found near the bottom.
Newer Nikons are a bit different. From the Controls menu, select “Custom control assignment.” On the left side, you can change the Preview button (Pv) or Fn1 button to the viewfinder virtual horizon by selecting either and scrolling to that option.
4. High Speed Flash Sync
First, head to the Custom Setting Menu and select Bracketing/flash. In your “Flash sync speed” menu, most Nikons have an option called Auto FP that allows you to use faster shutter speeds than the normal sync speed, as long as you have a supported flash unit. Keep in mind that your flash range will be diminished, so you will need to shoot closer with this setting turned on.
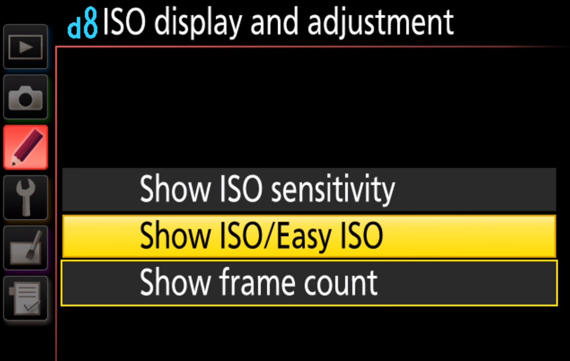
5. Easy ISO and Easy Exposure Comp
Easy ISO is a helpful feature on Nikons but is no longer commonly available on newer models. To see if it works for yours, head to the Custom Setting Menu and select “Shooting/display.” Scroll down to see if you have the “Easy ISO” option and select it to turn it on. Without that option, you can instead select “ISO display and adjustment” and choose “Show ISO/Easy ISO.”
For exposure compensation, select “Metering/exposure” in the Custom Setting Menu. From there, turn on “Easy exposure compensation.” Your main command dial will now easily adjust the ISO or exposure, depending on which option you turned on.
6. Viewfinder Grid
Head to the Custom Setting Menu and select “Shooting/display.” Next, select “Viewfinder grid display” and turn it on to give it a try!
7. Exposure Delay Mode
For longer exposures, you sometimes nudge your camera and cause some image blur. This setting will delay the exposure to prevent that from happening. From the Shooting/display menu, select “Exposure delay mode” and choose how many seconds you want for each delay.
As a Nikon photographer, did these tips help you? These settings are also available on other camera brands, but the instructions won’t be quite the same. Refer to your camera manual and you should be able to find out how to make these adjustments!
Go to full article: 7 Tricks for Nikon Photographers
What are your thoughts on this article? Join the discussion on Facebook
PictureCorrect subscribers can also learn more today with our #1 bestseller: The Photography Tutorial eBook
The post 7 Tricks for Nikon Photographers appeared first on PictureCorrect.
from PictureCorrect https://ift.tt/2I3mgqS
via IFTTT

0 kommenttia:
Lähetä kommentti