The gravel pit was lit up by me .. about 15 minutes with a Led Lenser torch! via 500px https://ift.tt/8RQn1LP


Quick note: only 1 day left for this Flower Photography Guide April Sale
You see them everywhere: flowers in full bloom. They are colorful and so easy to photograph. You can use them as art prints, backgrounds for images, Facebook cover images, or just for the joy of capturing the beauty of a flower. There are some tricks that can elevate your images beyond snapshot level, into images that really express a flower’s magic.

Photo captured by Mourizal Zativa; ISO 100, f/4.5, 1/100s.
If you add only a handful of these approaches to your photography, you will be amazed at the results.

photo by maf04

photo by solarisgirl
That old phrase, “stop and smell the roses” could also have you stopping to photograph the flowers. Blossoms don’t last long, but a well-planned photograph will enrich your life with a flower’s beauty forever.
About the Author:
Mark Laurie is a master photographer, international speaker, author, and studio mentor (InnerSpiritPhoto). He teaches extensively in England and Canada. His Revealing Glamour Photography Workshop is run in Italy. Mark has published seven books. You can find information on his books, photography, and training on his website.
Have you ever wondered how amazing flower photographs are created? I wondered as well… And then, I found this amazing, and gifted, flower photographer- who not only knows HOW to create dynamic flower photography- she also knows how to TEACH those tricks and techniques to other photographers through this in-depth eBook. It is currently 68% off until the end of the month with all the flowers blooming if you want to check it out.
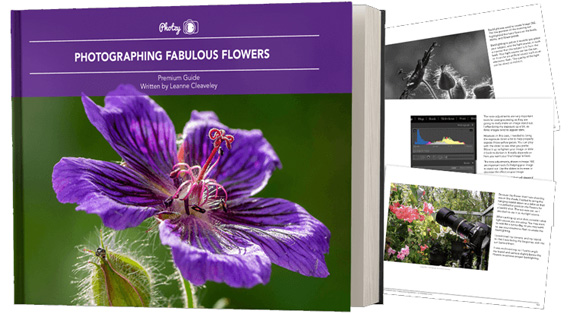
Flower Photography Guide (Take a Peek Inside)
156 page practical guide packed with Assignments, Key Lessons, and Self-Check Quizzes! (15 assignments, 26 key lessons, & 70 self-check questions!) With this guide, you’re getting a complete system for producing beautiful flower photographs. And, it’s at a fraction of the cost of an in-person workshop. Plus you can re-read the material anytime you want, whenever you need a quick refresh.
Only 1 day left: Photographing Fabulous Flowers April Sale
Most photographers assume image quality is determined at the moment of capture. And while getting things right in-camera absolutely matters, a surprising amount of quality is actually lost later — during editing.
Not because editing is harmful, but because small, reasonable adjustments compound quickly. What starts as a clean, detailed file can quietly turn into something softer, noisier, or less natural without it being obvious in the moment.
Related: only a little while left for the Photo Editing Cheat Sheets  April Edits Sale
Modern editing tools are incredibly powerful. With just a few sliders—clarity, sharpening, contrast—you can dramatically change an image in seconds.
The issue is that many of these adjustments work against each other.
For example, increasing clarity and sharpening can make details pop at first. But push them too far and edges become harsh, halos appear, and textures start to look artificial. Then noise reduction is added to compensate—which softens those same details you were trying to enhance.
This back-and-forth is where real image quality starts to disappear.
Noise reduction is one of the biggest culprits in image degradation.
It’s tempting to smooth out grain, especially in high ISO images. But aggressive noise reduction doesn’t just remove noise—it removes texture, fine detail, and micro-contrast.
The result is an image that looks “clean”… but also flat and lifeless.
A better approach is to accept a small amount of noise. Fine grain is far less damaging than smeared detail, and it often preserves the natural feel of the image.
Sharpening should enhance detail—not create it.
When overused, it introduces crunchy textures, jagged edges, and halos around high-contrast areas. This is especially noticeable in skies, foliage, and night photography where subtle detail matters most.
If sharpening is obvious, it’s already too much.
The goal is subtlety. Apply it carefully, and ideally only where it actually improves the image.
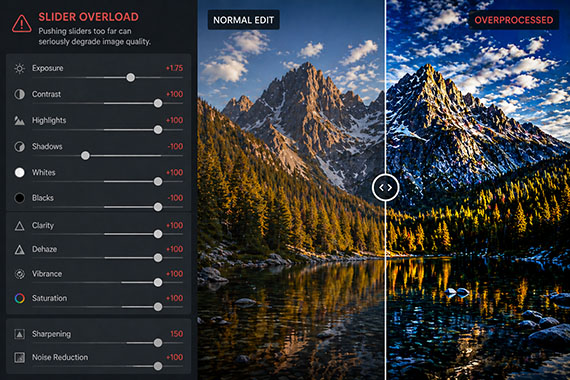
It’s easy to push contrast and saturation too far—especially when editing for impact.
But heavy contrast can crush shadows and clip highlights, permanently removing usable detail. At the same time, oversaturation can clip color channels, leading to unnatural tones and harsh transitions.
Images may look bold at first glance, but they often don’t hold up over time—or under closer inspection.
Even if your edit is solid, your export settings can undo a lot of that work.
Excessive compression, incorrect resolution, or repeated JPEG saves can introduce artifacts, reduce sharpness, and degrade overall clarity.
This is one of the most overlooked areas of image quality. Always export with intention—matching your settings to the final use, whether that’s web, print, or social.
Most image quality loss doesn’t come from one big mistake.
It comes from a series of small, reasonable decisions—slightly too much clarity, a bit too much noise reduction, a touch too much contrast.
Individually, they seem harmless. Together, they significantly degrade the image.
A few simple habits can make a major difference.
Edit with a lighter touch than you think you need. Regularly zoom in and check fine detail. Toggle adjustments on and off to see their true impact. And whenever possible, use selective adjustments instead of applying everything globally.
Most importantly, avoid the urge to “fix everything.” Minor imperfections are often what keep an image looking natural.
The best edits don’t draw attention to themselves.
They preserve what made the photo work in the first place.
If your image still feels natural, detailed, and clean after editing, you haven’t added quality—you’ve successfully protected it.
The April Edits Sale on the Photo Editing Cheat Sheets is wrapping up soon, making this a great time to bring clarity to your editing workflow. If editing often feels scattered or uncertain, these cheat sheets provide a clear, repeatable process for tackling exposure, color, masking, retouching, and finishing touches in the right order.

Paired with time-saving keyboard shortcuts, they help you edit faster, stay consistent, and know when an image is truly finished.
Deal ending soon: The Photo Editing Cheat Sheets April Edits Sale
In photography, capturing the perfect image often revolves around understanding and manipulating light. But when natural light is limited, especially during night or in dimly lit areas, things become challenging. Modern smartphone cameras, despite their compactness, have made significant strides in addressing this challenge. Let’s delve deeper into the technological nuances behind this.
Related: only a little while left for the Smartphone Photography Guide  Spring Sale

Photo captured by Jules PT
The aperture of a camera lens is essentially its “eye.” A larger aperture (denoted by smaller f-numbers like f/1.8) means the camera lens can open wider, allowing more light to enter. While a larger aperture aids in capturing brighter images in darker conditions, it’s only one piece of the puzzle.
The sensor is where light is captured and converted into an image. Generally, larger sensors can gather more light, leading to better image quality and reduced noise. Although smartphone sensors are smaller compared to those in DSLRs or mirrorless cameras, advances in sensor technology have optimized them for better performance in limited light.
In low light, the camera often needs to use slower shutter speeds to let in more light. However, this can introduce motion blur from slight hand movements. OIS combats this by making micro-adjustments to the lens or sensor, providing more stability during longer exposures.
This involves using algorithms to improve or extend the capabilities of digital photography. For example, some smartphones take multiple short-exposure shots and then merge them to produce a brighter and clearer image. This method reduces the noise typically seen in long-exposure shots.
While AI might sound like a trendy term, its application in photography is substantial. AI can assist in analyzing a scene, adjusting settings accordingly, or even identifying and enhancing specific subjects in a frame. This leads to better optimization of available light and improved overall image quality.
Auto-modes are great for convenience, but sometimes full control can yield better results. By manually adjusting parameters like ISO (sensitivity to light), shutter speed, and focus, users can tailor the camera’s behavior to better suit challenging lighting situations.
A RAW image retains all the data from a sensor without compression or processing. This offers more flexibility when editing, especially useful in low light scenarios where you might want to adjust exposure, shadows, or reduce noise without compromising on quality.
While a single lens might be versatile, having multiple lenses (like wide or ultra-wide) allows for more flexibility. Some of these lenses have larger apertures or specific focal lengths, designed to perform better in different lighting conditions.
Photographing in low light with a smartphone isn’t just about having advanced features or the latest tech. It’s about understanding how these technologies work together, how they can be adjusted, and how to use them effectively. While modern smartphones have made it easier to capture quality images in challenging conditions, knowing the underlying principles will always enhance the outcome.
The Spring Sale on the Smartphone Photography Guide is wrapping up soon, and it’s a great chance to finally unlock what your phone camera can really do.

The guide walks through real, usable techniques—manual controls, motion blur, low-light shooting, and creative effects—so you’re not just relying on auto mode and luck. If this post helped, the guide goes much deeper.
Deal ending soon: Smartphone Photography Guide Spring Sale
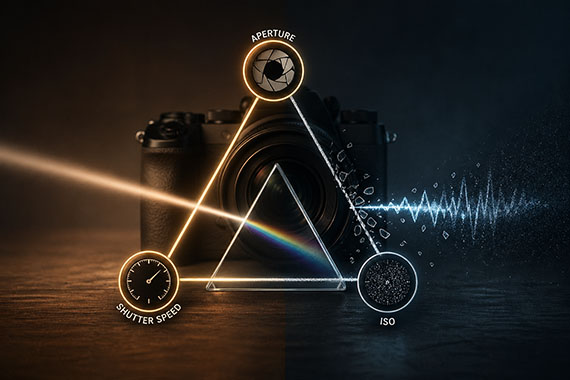
Most photographers are taught the same foundational concept early on: the Exposure Triangle. Aperture, shutter speed, and ISO — three equal parts that work together to create a balanced exposure.
It’s simple. It’s clean. It’s easy to remember.
It’s also… misleading.
Because while aperture and shutter speed directly control light, ISO does something very different. And misunderstanding that difference is one of the fastest ways to end up with inconsistent, unpredictable results.
Related: Want to master manual mode faster? PictureCorrect Premium is designed to be an accelerator with lessons, exercises, and more — and it’s only $1 to try this weekend
The classic explanation suggests all three settings are interchangeable. Need a brighter image? Raise ISO. Too bright? Lower ISO. Just treat it like a third dial.
But that framing quietly implies something untrue:
ISO does not control how much light hits your sensor.
Aperture and shutter speed do. They are physical controls:
ISO, on the other hand, doesn’t gather light. It amplifies the signal after the light has already been captured.
That’s a big distinction.
When you raise ISO, your camera isn’t making the scene brighter in a physical sense. It’s taking the data already captured and boosting it.
That means:
In other words, ISO is closer to a volume knob than a light switch.
Here’s where things start to fall apart for a lot of photographers.
If you treat ISO as an equal partner in exposure, you might use a fast shutter speed and high ISO in one shot, then use a slower shutter speed and lower ISO in another.
Both images might look similarly bright on your screen.
But they are not equal exposures.
The lower ISO image likely captured more actual light and will usually give you:
The higher ISO version may look fine at first glance, but it is often a weaker file underneath.
Instead of thinking of exposure as a triangle, think of it in two steps.
First, set your exposure using aperture and shutter speed. These determine how much light you actually capture. This is your true exposure.
Second, use ISO as a supporting adjustment. ISO helps you reach a usable brightness level, but it should not be your primary tool for exposure decisions.
This shift in thinking changes everything.
Imagine you’re shooting in low light.
You could shoot at:
Both might look similarly bright.
But the second option gathers twice as much light because the shutter stays open twice as long.
That usually means:
The only reason to choose the first option is if you need that faster shutter speed to freeze motion.
Now you’re making a deliberate trade-off — not just spinning the ISO dial to fix brightness.
There are situations where ISO becomes more of a priority:
In those cases, ISO becomes the necessary compromise.
But notice what’s happening: ISO isn’t leading. It’s reacting.
To be fair, the exposure triangle isn’t useless. It’s a helpful starting point, especially for beginners trying to understand why a photo gets brighter or darker.
But it oversimplifies reality.
And that simplification often sticks, leading photographers to rely on ISO in ways that quietly degrade their images.
Aperture and shutter speed determine how much light you capture.
ISO determines how that captured light is interpreted.
Treating them as equals leads to inconsistent results, unnecessary noise, and weaker files.
Once you separate these roles, your decisions become clearer: capture as much light as your scene allows, then use ISO only when needed to support that exposure.
That’s when consistency starts to click — and your images start holding up, not just on the back of your camera, but in editing and final output too.
Every week, more photographers are joining PictureCorrect Premium (only $1 to try this weekend) to level up their craft — and you could be next. Subscribers receive expert-led tutorials, creative challenges, and printable exercises that make each lesson stick.

Whether you’re working to master manual control, or advanced techniques, Premium gives you the structure to make steady progress. The special $1 intro offer is wrapping up this evening, and once it’s gone, so is your chance to lock in early access.
Deal ending soon: Weekend Special Enrollment PictureCorrect Premium
Sky replacement has been a controversial topic in photography for years. What once required advanced Photoshop skills is now something almost anyone can do in seconds, thanks to modern editing tools and AI. As the technology has improved, the debate has only become more relevant.
At its core, the question remains the same: at what point does editing stop being enhancement and start becoming deception?
Related note: only a little while left for the Ultimate Sky Bundle at $250 Off

There’s a simple reason sky replacement became so common: the sky has a huge impact on how a photo feels. A dull, gray sky can flatten an otherwise strong image, while a vibrant sunset can transform it into something much more compelling.
For photographers working in landscapes, travel, and real estate, this made sky replacement an appealing option. And with today’s AI-powered tools, it has become less of a specialized skill and more of a standard feature.
Photographers have always edited their images. Adjusting exposure, contrast, and color has long been part of the process. But sky replacement is different because it introduces something that was never actually there.
That distinction is where opinions tend to split. Some see it as a natural extension of creative expression, while others view it as a step too far—something that misrepresents reality and can create false expectations.
For a long time, this was mostly a philosophical debate. Today, it’s starting to move beyond that.
As of January 1, 2026, California introduced a new layer to this conversation through Assembly Bill 723 (AB 723). The law requires real estate professionals to disclose digitally altered listing photos when those edits change how a property is represented. It also requires access to the original, unedited images.
This includes sky replacement. Swapping in a bright blue sky or dramatic sunset may seem minor, but if it alters the perceived appearance of a property, it falls under disclosure requirements.
The law doesn’t prohibit editing. Basic adjustments like exposure, color correction, or cropping are still allowed without disclosure. However, more significant changes—such as sky replacement, virtual staging, or removing objects—must be clearly communicated.
This shift reflects a broader concern: that highly realistic edits can influence decisions in ways that may not be obvious to viewers.
While this law specifically targets real estate, its implications go beyond that niche. It signals a growing awareness of how powerful modern editing tools have become, especially with AI.
Today, images can be altered so seamlessly that viewers often have no way of knowing what’s real. As a result, trust is becoming more important across all types of photography, from landscapes to travel to social media content.
The easier it becomes to transform an image, the more viewers begin to question what they’re seeing.
There isn’t a single rule that applies to every situation, but context matters more than ever. In artistic or conceptual work, sky replacement can be a perfectly valid creative choice. In situations where accuracy matters—such as commercial or documentary work—it requires more caution.
The key difference is expectation. If viewers assume the image reflects reality, significant alterations can cross a line unless they are disclosed.
The biggest change isn’t the technology itself—it’s how people respond to it. For years, heavy editing was widely accepted as long as the result looked good. That mindset is shifting.
With more awareness, more advanced tools, and even legal requirements in some industries, transparency is becoming part of the conversation. Editing isn’t going away, but the expectation to be honest about it is growing.
Sky replacement isn’t inherently right or wrong. It’s simply a tool. But in today’s environment, how and where it’s used matters more than it once did.
In 2026, the debate is no longer just about artistic choice. It’s about context, trust, and, in some cases, legal responsibility.
With 338 ultra high-quality skies across 10 stunning collections, this bundle gives you the power to transform flat skies into vibrant sunsets, dreamy blue hours, magical northern lights, and more, all in just a few clicks.
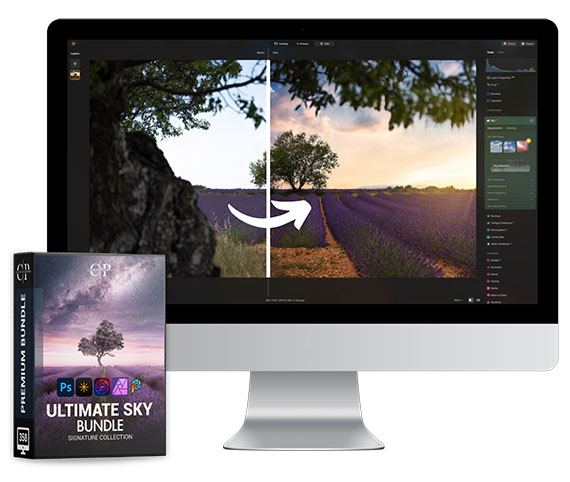
Whether you’re enhancing a landscape, adding drama to a cityscape, or creating artistic composites, you’ll find the perfect sky for every mood.
Deal ending soon: The Ultimate Sky Bundle at $250 Off
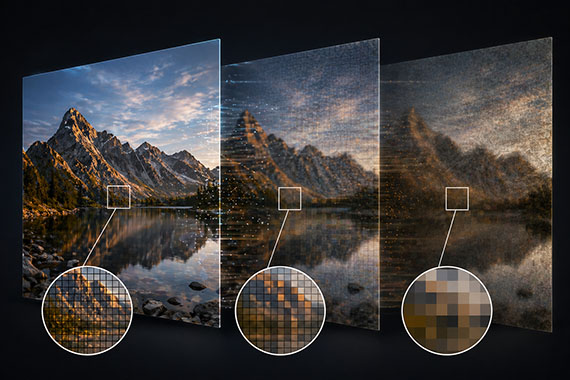
If you’ve ever come back from a shoot only to find your favorite image just a little soft—slightly missed focus, a hint of motion blur, or not quite as crisp as you imagined—you know how frustrating that can be.
Topaz Labs is currently wrapping up their 30-day sale with 30% off Topaz Studio, and it’s one of the more interesting options out there if sharpening—and overall image quality—has been a sticking point in your editing.

What makes Topaz tools stand out is how they approach sharpening. Instead of simply boosting contrast around edges (which can lead to halos and a crunchy look), they’re designed to actually recover detail—helping correct motion blur, missed focus, and general softness in a more natural way.
But sharpening is only part of the story.
Many photographers run into a tradeoff: sharpening can exaggerate noise, while noise reduction can soften detail. Tools like Topaz Photo AI aim to balance both—reducing noise while preserving (and even enhancing) fine detail, which can be especially useful for low-light, wildlife, or night photography.
There’s also the resolution side of things. Upscaling used to mean losing quality, but newer AI-based tools can increase image size while maintaining texture and clarity. That opens up more flexibility for cropping, printing, or revisiting older images that didn’t quite have enough resolution to begin with.
It’s not a magic fix for every image, but in the right situations, it can push a photo further than traditional tools typically allow.
With the current 30% discount on Topaz Studio ending soon, it’s a practical opportunity to experiment—whether that’s improving sharpness, cleaning up noise, or getting more usable resolution out of your files.
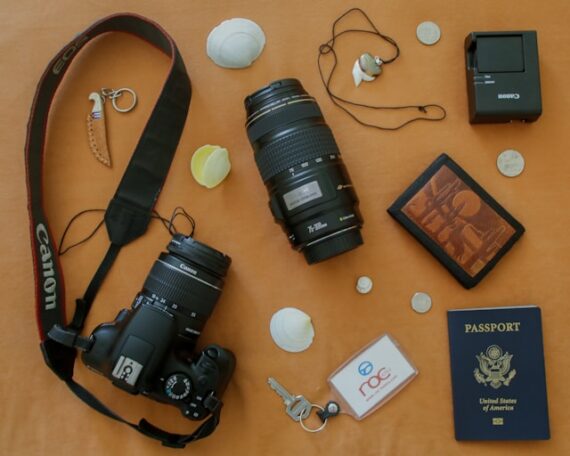
Getting ready for a photography trip usually means packing gear, charging batteries, and clearing memory cards. But one of the most overlooked steps happens inside your camera menu. A few small settings can make a big difference—not just in image quality, but in how smoothly your shooting experience goes when you’re out exploring.
If you want a quick-reference guide for real-world travel scenarios, the April Aperture Sale on the Travel Photography Cheat Sheets (88% off) is worth a look. They’re designed to give you exact settings for common situations you’ll run into on a trip—so you’re not digging through menus when the moment matters.
Before anything else, check your image format.
RAW files capture far more detail than JPEGs, especially in highlights and shadows—something that becomes critical when you’re dealing with harsh sunlight, bright skies, or mixed lighting while traveling.
If you like quick sharing, use RAW + JPEG. Otherwise, RAW-only gives you the most flexibility later.
Auto ISO can be incredibly useful when you’re moving quickly between scenes.
But if your maximum ISO is set too high, your camera may push into noisy territory without you realizing it. Set a reasonable upper limit based on your camera’s performance (for many cameras, something like ISO 1600–3200 is a safe starting point).
This keeps your exposures flexible without sacrificing too much image quality.
This setting alerts you when parts of your image are overexposed.
When traveling, you’ll often encounter bright skies, reflective surfaces, or midday sun. Highlight warnings help you quickly see when you’re losing detail—especially in clouds or bright architecture.
It’s one of the fastest ways to avoid blown highlights in the field.
Auto White Balance works well most of the time, but it can shift unpredictably between shots.
For travel photography, consistency matters—especially if you’re shooting a series of images in the same location. Consider using a preset like Daylight or Cloudy when appropriate.
If you’re shooting RAW, you can always fine-tune later—but starting consistent makes editing much easier.
Turn on grid lines in your viewfinder or LCD.
This helps with:
When you’re shooting quickly in a new environment, this simple overlay can dramatically improve your framing.
Different travel situations call for different autofocus settings.
Make sure your default mode matches what you expect to shoot most often.
Camera beeps and focus confirmation sounds can be distracting—especially in quiet or crowded environments.
Turning these off helps you stay discreet, which is especially useful for street photography or cultural locations where subtlety matters.
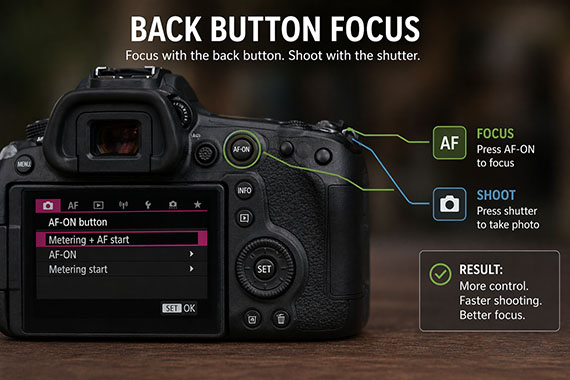
If your camera allows it, consider separating focus from the shutter button.
Back-button focus gives you more control, especially when recomposing or tracking subjects. It takes a little practice, but many photographers never go back once they switch.
Before your trip:
This helps avoid file conflicts and ensures everything runs smoothly from day one.
Go into your menu and review:
Travel days can be long, and you don’t want your camera shutting off too aggressively—or draining faster than expected.
Many cameras let you save your preferred setup to a custom mode (C1, C2, etc.).
This is incredibly useful for travel. You can build a “default travel setup” and instantly return to it if you change settings mid-shoot.
Travel photography is often fast, unpredictable, and full of once-in-a-lifetime moments. The more your camera is set up ahead of time, the more you can focus on composition, light, and timing instead of digging through menus.
If you want a shortcut to getting the right settings in real-world travel situations, the April Aperture Sale on the Travel Photography Cheat Sheets (88% off) is a practical companion. They’re designed to help you quickly dial in the right setup—whether you’re shooting city streets, landscapes, or low-light scenes—so you can spend less time guessing and more time capturing.

Showing you step by step how to dial in settings, avoid common mistakes, and get the shot — even when you’re tired, rushed, or shooting in unfamiliar conditions. Travel-ready, no Wi-Fi required, and designed to be quick to reference so you can spend less time guessing and more time shooting.
Deal ending soon: Travel Cheat Sheets  April Aperture Event
Have you ever captured a great photo on your phone but thought, “I’ll fix it later”… and then never did? What if editing didn’t have to wait? What if your creative flow could start anywhere and continue seamlessly wherever you go?
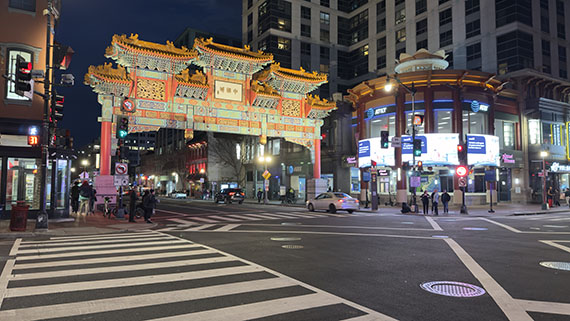
That’s exactly what happened during a call I had with Jim Nix. He was standing in Washington, D.C.’s Chinatown at night, surrounded by glowing color, energy, and beautiful light. The kind of scene photographers dream about. There was just one problem. No camera in hand.
Related reminder: only a little while left for the Luminar Neo Spring Sale
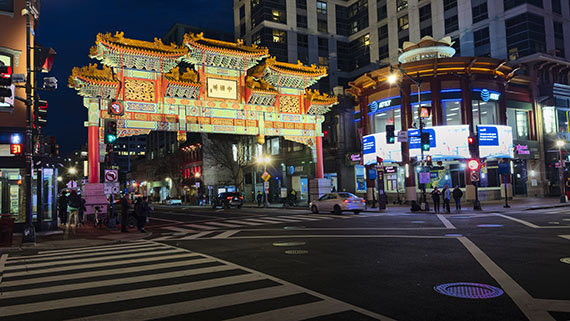
As we talked, Jim described what he was seeing. A richly detailed Chinese gate stretched across the street, lit with vibrant reds and golds. The deep blue evening sky created the perfect backdrop, while headlights, street lamps, and storefronts added layers of light and life to the scene. Cars rolled through the intersection, and people gathered along the sidewalks.
It was all happening in real time.
Instead of overthinking it, Jim did what experienced photographers learn to do. He adapted. He pulled out his phone and captured the moment.
When he reviewed the image, it looked exactly like many quick mobile shots do. The composition was solid, with strong leading lines from the crosswalk guiding your eye into the frame and the gate anchoring the scene. But the image itself felt flat. The colors were muted, the contrast was lacking, and the overall impact just wasn’t there.
It was a reference photo. Useful, but not inspiring.
And that’s where most people stop.
As we were still on the phone, Jim sent the image over. I could immediately see what it could become. The bones were there. Strong composition, great subject, and beautiful light, just waiting to be shaped.
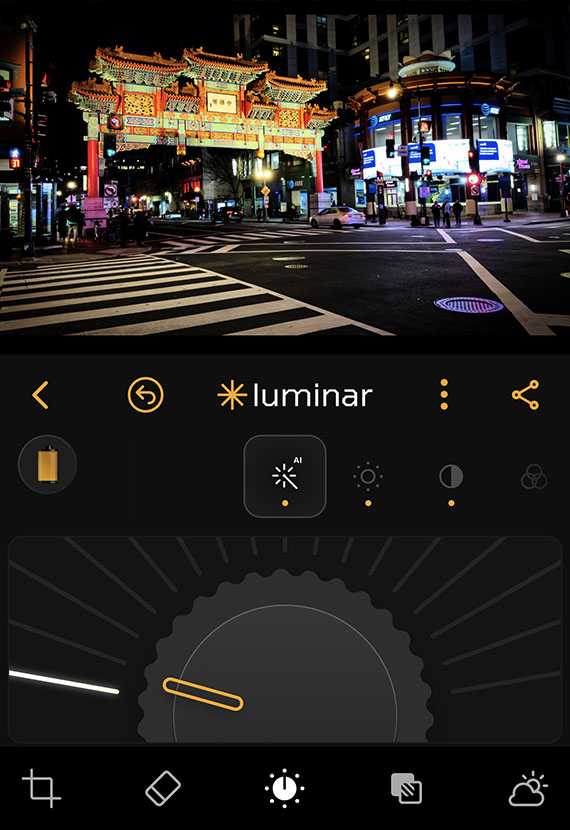
So I opened Luminar Mobile and got to work.
I deepened the sky to bring out that rich nighttime atmosphere. The colors in the gate started to glow, revealing details that were easy to miss in the original capture. I balanced the highlights from the bright signage and streetlights, then added contrast to give the image depth and dimension.
Within minutes, the transformation was clear. What started as a simple reference photo now felt alive. It reflected the energy, color, and mood Jim had been describing just moments before.
That’s the moment it clicked again. Editing isn’t just about fixing a photo. It’s about finishing the story.
What makes this even more powerful is what happened next.
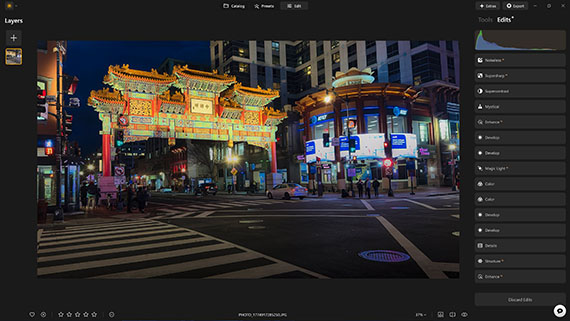
Later, when that same image was opened on the desktop version of Luminar, the work was already there. No starting over. No extra steps. Just a seamless continuation of the edit.
That’s the real strength of cross-device editing. It removes the gap between capturing and creating.
You can start shaping an image the moment it’s captured, even if it’s not your photo, even if you’re mid-conversation, and continue refining it later on a larger screen with full control. The process becomes fluid, natural, and uninterrupted.
It also changes how we think about our images. That quick shot Jim took, knowing he would edit it later, became something more. Not because of the device, but because of the follow-through.
And let’s not overlook what made it all possible. Jim still composed the shot with intention. The crosswalk lines guide the viewer into the frame. The gate anchors the entire scene. The surrounding buildings and street elements create context and balance.
The edit elevated the image, but the vision started the moment he tapped the shutter.
Jim took that photo knowing it wasn’t finished. He knew the real potential would come out in the edit. And in this case, that edit started immediately and continued seamlessly across devices.
That’s the shift. Photography is no longer tied to one place or one moment in time. You can capture on your phone, begin the edit right away, and refine it later on your desktop without ever losing momentum.
So the next time you take a photo that feels a little flat, don’t dismiss it. Look at it as a starting point. Open it up, shape it, and let it evolve.
Because sometimes the best images aren’t made when you press the shutter. They’re made in what you do next.
If you’ve been waiting for a better time to try Luminar Neo, a recent update plus the limited-time Spring Sale pricing makes this one of the better windows to jump in before the deal disappears.

About the Author:
Vanelli is an accomplished photographer, educator, and author based in Florida. He is the Director of Education at Skylum and has transitioned from being a Triple Crown Karate champion to teaching visual arts. With a diverse skill set, Vanelli develops educational content and courses for photo editing, teaching industry leaders along the way. He is a sought-after speaker at major conferences, delivering engaging speeches on photography. Vanelli’s contributions include his articles, educational videos, and hosting the widely acclaimed Luminar Coffee Break show.
Backlit photography, where the light source is positioned behind the subject, offers a unique way to capture the ethereal beauty of flowers. This technique can illuminate the delicate details of petals, create a luminous halo around the subject, and infuse your photos with a sense of depth and drama. Here are some invaluable tips to master backlit flower photography, transforming ordinary floral scenes into breathtaking works of art.
Relevant reminder: only a little while left for the Flower Photography Guide at 68% Off

Photo captured by Eliecer Gallegos
The golden hours—shortly after sunrise or before sunset—are ideal for backlit photography. The soft, warm light during these times can add a magical glow to your flower subjects, enhancing their colors and textures. Midday sun, though not typically recommended due to its harshness, can be harnessed creatively for high-contrast, vibrant effects.
The placement of the flower in relation to the light source is crucial. Ensure the light is directly behind the flower to achieve a glowing effect. Experiment with different angles and distances to capture varying degrees of backlighting and shadow, adding depth and dimension to your images.
Manual mode or aperture priority is your best friend in backlit situations, as it allows full control over exposure, aperture, and shutter speed. A larger aperture (smaller f-number) helps create a narrow depth of field, focusing attention on the flower while blurring the background. Adjust the exposure to highlight the luminous edges of petals without washing out the details.

Photo captured by Dominik Scythe
Lens flare and sunstars can add an artistic touch to your backlit flower photos. To achieve lens flare, allow a bit of direct light into the lens. For sunstars, narrow the aperture to a high f-number, like f/16 or f/22, which can create a starburst effect from the sun. Both effects can add a layer of creativity and mood to your images.
Reflectors can bounce light back onto the darker side of the flower, reducing contrast and revealing more detail. A diffuser can soften harsh sunlight, especially useful during brighter parts of the day, ensuring your flower isn’t lost in shadow.
Post-processing plays a key role in enhancing backlit images. Adjusting highlights, shadows, and colors can help recover details and enhance the glow effect. Tools like the dehaze slider can also be particularly useful in refining the contrast and clarity of backlit elements.

Photo captured by Yair Mejía
Don’t be afraid to experiment with different compositions, backgrounds, and lighting intensities. Sometimes, the most captivating images come from unexpected angles or lighting conditions. Play with silhouettes, close-ups, and varying degrees of backlighting to discover your unique style.
Summary:
Backlit flower photography can transform an ordinary bloom into a stunning, radiant subject. By understanding the interplay of light and shadow, mastering your camera settings, and employing post-processing techniques, you can create luminous, striking images that capture the ephemeral beauty of flowers in a new light. So, grab your camera and venture out into the golden hours, or even the midday sun, and start exploring the luminous world of backlit floral photography!
Have you ever wondered how amazing flower photographs are created? I wondered as well… And then, I found this amazing, and gifted, flower photographer- who not only knows HOW to create dynamic flower photography- she also knows how to TEACH those tricks and techniques to other photographers through this in-depth eBook. It is currently 68% off for a limited time with all the flowers blooming if you want to check it out.
Flower Photography Guide (Take a Peek Inside)
156 page practical guide packed with Assignments, Key Lessons, and Self-Check Quizzes! (15 assignments, 26 key lessons, & 70 self-check questions!) With this guide, you’re getting a complete system for producing beautiful flower photographs. And, it’s at a fraction of the cost of an in-person workshop. Plus you can re-read the material anytime you want, whenever you need a quick refresh.
Deal ending soon: Photographing Fabulous Flowers at 68% Off
Most photographers notice it at some point…You take a shot, review it on the back of your camera—and suddenly parts of the image start flashing or “blinking.”
It looks like something is wrong. So most people ignore it.
That’s a mistake.
Quick note: Our Camera Cheat Sheets are currently part of the April Aperture Sale today—a great time to grab them if you want quick, in-the-field settings and exposure guidance.

That blinking effect is called the highlight warning (often nicknamed “blinkies”).
When it’s turned on in your camera settings, any area that’s overexposed (pure white with no detail) will flash during playback.
In other words:
Your camera is telling you: “This part of your photo is gone.”
No texture.
No detail.
No recovery.
At first, it feels overly sensitive.
So it’s easy to assume:
“That’s normal… I’ll fix it later.”
But here’s the problem:
You can’t fix blown highlights in editing.
Once detail is clipped, it’s permanently lost—even if everything else in your image looks fine.
What makes this tricky is that your photo might look perfectly fine on the LCD.
That’s because:
So while the image looks good…
the blinking highlights are quietly warning you that you’re losing detail.

Instead of ignoring the blinkies, use them as a guide.
Here’s the simple approach:
Review it immediately.
Focus on important parts of the image:
Not all blinking is bad.
If important areas are blinking, reduce exposure:
Then shoot again.
This is where the highlight warning becomes incredibly powerful.
In high-contrast scenes (like sunsets, backlighting, or harsh midday sun), your camera struggles to capture everything.
So you have to prioritize.
And highlights should almost always come first.
Why?
Because shadows can often be recovered.
Highlights can’t.
Expose for the highlights, then lift the shadows later.
This one shift in thinking will dramatically improve your photos.
Instead of aiming for a “bright” image in-camera:
Your images will instantly look more professional—especially in difficult lighting.
There are times when blinking highlights don’t matter:
The key is being intentional—not accidental.
Most photographers focus on gear upgrades.
But this is a settings and awareness issue.
Once you start using the highlight warning properly:
It’s one of those small features that quietly levels up your photography.
Final note: If you want quick-reference settings for handling tricky lighting like this, the Camera Cheat Sheets are part of the April Aperture Sale today—designed to help you dial in exposure fast without guessing.

New: Fundamental Photography Cheat Sheets
Whether you’re a seasoned professional or just starting out, photography cheat sheets can be a valuable resource for improving your skills and taking your photography to the next level. The perfect companion for any photographer. Print one out whenever you need it.
Offer ending soon: The Camera Cheat Sheets April Aperture Event